background image

Consumer Support

Tr

oubleshooting T

ips

Care and Cleaning

Operating Instructions

Safety Instructions

Using the oven.

To avoid possible burns, place the shelves in the desired position before you turn the oven on.

Before you begin…

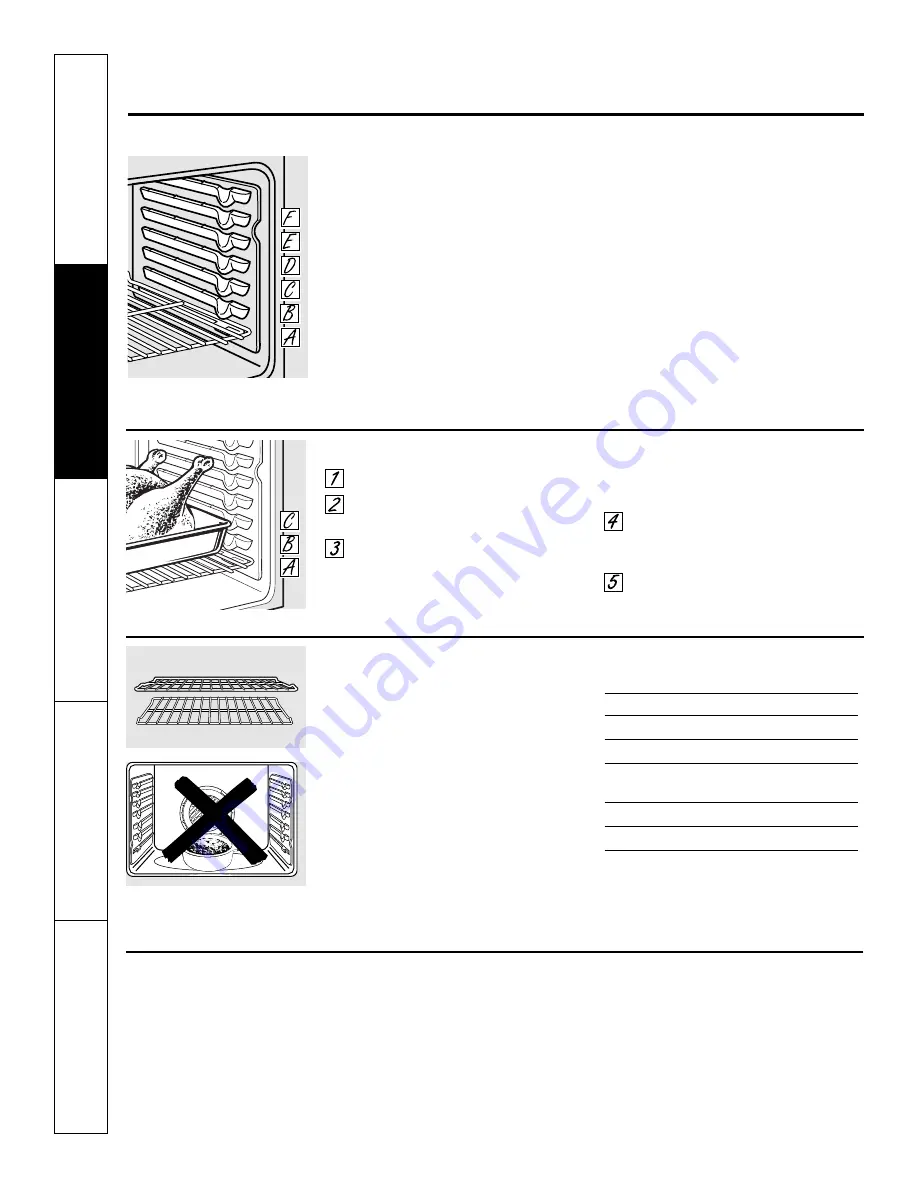
The shelves have stop-locks, so that when
placed correctly on the shelf supports (A
through F), they will stop before coming
completely out, and will not tilt.

When placing and removing cookware, 
pull the shelf out to the bump on the
shelf support.

On some models, the bake heating element
is under the oven floor. Do not place
foods on the oven bottom for cooking.

To remove a shelf,

pull it toward you, 

tilt the front end up and pull it out.

To replace,

place the end of the shelf

(stop-locks) on the support, tilt up the
front and push the shelf in.

CAUTION:

When you are using the shelf in the

lowest position (A), you will need to use caution
when pulling the shelf out. We recommend that
you pull the shelf out several inches and then,
using two pot holders, pull the shelf out by
holding the sides of it. The shelf is low and you
could be burned if you place your hand in the
middle of the shelf and pull all the way out. Be
very careful not to burn your hand on the door
when using the shelf in the lowest position (A).

The oven has 6 shelf positions.

Preheating and Pan Placement

Preheat the oven if the recipe calls for it. 
Preheating is necessary for good results
when baking cakes, cookies, pastry and
breads. 

To preheat, set the oven at the correct
temperature. The control will beep when 
the oven is preheated and the display will 
show your set temperature. This will take
approximately 10–15 minutes.

Baking results will be better if baking
pans are centered in the oven as much 
as possible. If baking with more than one
pan, place the pans so each has at least 
1

″ 

to 1

1

2

″ 

of air space around it.

If baking four cake layers at the same time,
place two layers on shelf B and two layers
on shelf D. Stagger pans on the shelf so one
is not directly above the other.

Type of Food

Shelf Position

Frozen pies (on cookie sheet)

D

Angel food cake

A

Bundt or pound cakes

B or C

Biscuits, muffins, brownies,

C or D

cookies, cupcakes, layer cakes, pies

Casseroles

C or D

Turkey

A

How to Set the Oven for Baking or Roasting

Touch the 

BAKE

pad.

Touch the number pads to set 
the desired temperature.

Touch the 

START

pad.

NOTE:

You will hear the convection fan

while the oven is preheating. The fan will
stop after the oven is preheated and the

display shows your set temperature. 
This is normal.

Check food for doneness at
minimum time on recipe. Cook
longer if necessary.

Touch the 

CLEAR/OFF

pad when

cooking is complete.

Do not place foods directly on the
oven floor.

Oven shelf

Flat shelf

12

Aluminum Foil

Do not use aluminum foil on the bottom 
of the oven.

Never entirely cover a shelf with
aluminum foil. This will disturb the heat
circulation and result in poor baking.

A smaller sheet of foil may be used to
catch a spillover by placing it on a lower
shelf several inches below the food.

Содержание JBP74

Страница 1: ...ting Instructions Broiling Guide 13 Clock and Timer 14 Convection 16 19 Cookware 10 Oven 11 25 Oven Thermostat 23 Sabbath Feature 22 Self Cleaning 26 27 Special Features 20 21 Surface Units 8 9 Timed...

Страница 2: ...not there is a possible risk of the range tipping over and causing injury if you or a child stand sit or lean on an open door Please refer to the Anti Tip device information in this manual Failure to...

Страница 3: ...ets above a range or on the backsplash of a range children climbing on the range to reach items could be seriously injured Never wear loose fitting or hanging garments while using the appliance Be car...

Страница 4: ...t and poultry thoroughly meat to at least an INTERNAL temperature of 160 F and poultry to at least an INTERNAL temperature of 180 F Cooking to these temperatures usually protects against foodborne ill...

Страница 5: ...en Never use the glass cooktop surface as a cutting board Do not place or store items that can melt or catch fire on the glass cooktop even when it is not being used Be careful when placing spoons or...

Страница 6: ...luminum foil to line oven bottoms Improper installation of aluminum foil may result in a risk of electric shock or fire Stand away from the range when opening the oven door Hot air or steam which esca...

Страница 7: ...not touch the heating element or the interior surface of the drawer These surfaces may be hot enough to burn REMEMBER The inside surface of the drawer may be hot when the drawer is opened Use care whe...

Страница 8: ...indicating the control is keeping the power level you set A HOT COOKTOP indicator light will glow when any radiant element is turned on and will remain on until the surface is cooled to approximately...

Страница 9: ...of the surface unit you are cooking on 9 Safety Instructions Operating Instructions Care and Cleaning Troubleshooting Tips Consumer Support ge com Using the Warming Zone The WARMING ZONE located in t...

Страница 10: ...is recommended Caution is recommended for cast iron cookware that is not completely covered with smooth porcelain enamel as it may scratch the glass ceramic cooktop Glass ceramic usable but not recomm...

Страница 11: ...and then touch the number pads to set the amount of time you want your food to cook The oven will shut off when the cooking time has run out DELAY START Pad Use along with COOKING TIME or SELF CLEAN p...

Страница 12: ...ing cakes cookies pastry and breads To preheat set the oven at the correct temperature The control will beep when the oven is preheated and the display will show your set temperature This will take ap...

Страница 13: ...7 10 Space evenly 1 25 to 1 9 cm 1 2 to 3 4 thick 1 8 kg 4 lbs 16 patties C 15 11 Beef Steaks Rare 1 9 to 2 5 cm 3 4 to 1 thick E 6 4 Steaks less than 1 9 cm Medium 454 to 680 g 1 to 11 2 lbs D 8 6 3...

Страница 14: ...again Touch the START pad When the timer reaches 00 the control will beep 3 times followed by one beep every 6 seconds until the KITCHEN TIMER ON OFF pad is touched The 6 second tone can be canceled b...

Страница 15: ...How to Set a Delayed Start and Automatic Stop You can set the oven control to delay start the oven cook for a specific length of time and then turn off automatically Make sure the clock shows the corr...

Страница 16: ...ltiple shelves Good for large quantities of baked foods Good results with cookies biscuits brownies cupcakes cream puffs sweet rolls angel food cake and bread Heat comes from the heating element in th...

Страница 17: ...e Touch the START pad NOTE If the auto recipe conversion feature is on it will automatically reduce the set regular baking temperature by 25 F to the appropriate conversion temperature See Using Conve...

Страница 18: ...5 F 160 F Well 20 24 325 F 170 F Seafood Fish Whole 3 to 5 lbs 30 40 total 400 F Lobster Tails 6 to 8 oz each 20 25 total 350 F Poultry Whole Chicken 21 2 to 31 2 lbs 24 26 350 F 180 185 F Cornish Hen...

Страница 19: ...s that are left in the oven continue cooking after the controls are off START CLEAR OFF 0 9 8 7 6 5 4 3 2 1 0 9 8 7 6 5 4 3 2 1 COOKING TIME CONVECTION ROAST CONVECTION BAKE OR How to Set a Delayed St...

Страница 20: ...ature selections but you may change this to use the Celsius selections Touch the BAKE and BROIL HI LO pads at the same time until the display shows SF Touch the BROIL HI LO and COOKING TIME pads The d...

Страница 21: ...TART BROIL HI LO BAKE CLOCK Safety Instructions Operating Instructions Care and Cleaning Troubleshooting Tips Consumer Support Auto Recipe Conversion When using convection bake the Auto Recipe Convers...

Страница 22: ...display shows SF Tap the DELAY START pad until SAb bAtH appears in the display Touch the START pad and will appear in the display Touch the COOKING TIME pad Touch the number pads to set the desired l...

Страница 23: ...em For example to change the oven temperature 15 F touch 1 and 5 When you have made the adjustment touch the START pad to go back to the time of day display Use your oven as you would normally START 0...

Страница 24: ...Using the Warming Drawer The warming drawer will keep hot cooked foods warm Always start with hot food Do not use to heat cold food other than crisping crackers chips or dry cereal Do not line the wa...

Страница 25: ...pe Control Setting Bacon 3 Breads 1 Casserole 2 Chicken fried 3 Ham 3 Muffins 1 Pies 1 Pizza 3 Potatoes baked 3 Tortilla chips 1 To Crisp Stale Items Place food in low sided dishes or pans Preheat on...

Страница 26: ...oven light bulb cover is in place and the oven light is off IMPORTANT The health of some birds is extremely sensitive to the fumes given off during the self cleaning cycle of any range Move birds to...

Страница 27: ...DELAY START 0 9 8 7 6 5 4 3 2 1 SELF CLEAN After a Clean Cycle You may notice some white ash in the oven Wipe it up with a damp cloth after the oven cools If white spots remain remove them with a soa...

Страница 28: ...become hot during oven use It is normal for steam to come out of the vent and moisture may collect underneath it when the oven is in use The vent is important for proper air circulation Never block t...

Страница 29: ...low resistance to abrasion If you notice the gasket becoming worn frayed or damaged in any way or if it has become displaced on the door you should have it replaced Cleaning the Oven Door To clean th...

Страница 30: ...or dish towel Dry with a clean cloth Replace the pan in the lower oven drawer NOTE For models with a warming drawer before performing any adjustments cleaning or service disconnect the range electric...

Страница 31: ...k the wire cover holder Lift off the cover Do not remove any screws to remove the cover Replace bulb with a 40 watt appliance bulb To replace the cover Place it into groove of the light receptacle Pul...

Страница 32: ...the oven This will help maintain the ease of sliding the shelves in and out of the oven Oven shelf Stainless Steel Surfaces Do not use a steel wool pad it will scratch the surface To clean the stainle...

Страница 33: ...ion after all residue has been removed polish the entire surface with CERAMA BRYTE Ceramic Cooktop Cleaner and a paper towel The CERAMA BRYTE Ceramic Cooktop Scraper and all recommended supplies are a...

Страница 34: ...face These marks are removable using the CERAMA BRYTE Ceramic Cooktop Cleaner with the CERAMA BRYTE Cleaning Pad for Ceramic Cooktops If pots with a thin overlay of aluminum or copper are allowed to b...

Страница 35: ...n before use and use cookware with smooth bottoms the cookware and the surface of the cooktop Cookware has been slid across the cooktop surface Areas of discoloration Food spillovers not cleaned See t...

Страница 36: ...n designed for broiling for broiling In some areas the power Preheat the broil element for 10 minutes voltage may be low Broil for the longest period of time recommended in the Broiling Guide Oven tem...

Страница 37: ...e temperature to cook inside the oven has not dropped below the locking temperature F and a number You have a function error code Touch the CLEAR OFF pad Put the oven back into or letter flash operati...

Страница 38: ...to cool Oven shelves are The shelves were cleaned Apply a small amount of vegetable oil to a paper difficult to slide in a self clean cycle towel and wipe the edges of the oven shelves with the paper...

Страница 39: ...protection or you may request your money back on the remaining value of your contract No questions asked It s that simple Protect your refrigerator dishwasher washer and dryer range TV VCR and much mo...

Страница 40: ...ere Complete and mail your Consumer Product Ownership Registration today Have the peace of mind of knowing we can contact you in the unlikely event of a safety modification After mailing the registrat...

Страница 41: ...41 Notes Safety Instructions Operating Instructions Care and Cleaning Troubleshooting Tips Consumer Support...

Страница 42: ...ing normal business hours Have your model number ready Tired of discolored racks Wishing you had extra heavy duty oven racks NOW AVAILABLE for your range GE s innovative self cleanable porcelain coate...

Страница 43: ...ct is located in an area where service by a GE Authorized Servicer is not available you may be responsible for a trip charge or you may be required to bring the product to an Authorized GE Service loc...

Страница 44: ...that are available while your warranty is still in effect You can purchase it on line anytime or call 800 626 2224 during normal business hours GE Consumer Home Services will still be there after you...

Отзывы: