background image

Содержание GFSF6KEXABB and

Страница 1: ...umer Support Back Cover Performance Data Sheet 39 Product Registration for Canadian Customers 55 56 Product Registration for U S Customers 33 34 State of California Water Treatment Device Certificate 40 Warrantg for Canadian Customers 38 Warrantg for U S Customers 37 GE Model 26 Cong_lateur inf_rieur R frig rateurs La section frangaise commence _ la page 41 Congelador inferior Refrigeradores fiiii...

Страница 2: ... the refrigerator is plugged in i _Unplug the refrigerator before cleaning and making repairs NOTE We strongly recommend that anb servicing beperformed b_la qualified individual _ _ Do not refreezefrozen foods which have thawed completelu DANGER RISK OF CHILD ENTRAPMENT PROPER DISPOSAL OF THE REFRIGERATOR Child entrapment and suffocation are not problems of the past Junked or abandoned refrigerato...

Страница 3: ...have it replaced with a properlg grounded 3 prong wall outlet The refrigerator should alwags be plugged into its own individual electrical outlet which has a voltage rating that matches the rating plate Thisprovides the best performance and also prevents overloading house wiring circuits which could cause a fire hazard from overheated wires Never unplug gour refrigerator bg pulling on the power co...

Страница 4: ...ent FAd justS reezerJ rigerat_ Changing the Temperature Dispenser models To change the temperature press and release the Adjust Freezeror Adjust Refrigerator pad The displag will show the actual temperature Tap either the Adjust Freezeror Adjust Refrigerator pad until the desired temperature is displaged Once the desired temperature has been set the temperature display will return to the actual re...

Страница 5: ... If ice is blocking the chute poke it through with a wooden spoon i_ Beveragesand foods should not bequick chilled in the ice storage drawee Cans bottles or food packages in the storage drawer mag cause the icemaker or auger to jam _ _ To keep dispensedice from missing the glass put the glass closeto but not touching the dispenser opening i _Some crushed ice mag be dispensed even though gou select...

Страница 6: ... holder place the top of the new cartridge up inside the holdec Do not push it up into the holdec Slowlg rotate the cartridge clockwise until it stops As gou turn the cartridge it will automaticallg raise itself into position Cartridge will rotate about 1 4 turn Do not overtighten Run water from the dispenserfor 3 minutes about 1V2gallons to clear the sgstem and prevent sputtering SeeTo Usethe Dis...

Страница 7: ...lting the shelf up insert the top hook at the back of the shelf in a slot on the track Lower the front of the shelf until the bottom of the shelf locks into place i 0 Spillproof Shelves Spillproof shelves have special edges to help prevent spillsfrom dripping to lower shelves Floating snack pan The location of the snack pan is adjustable and can be changed like the other shelves To remove Pullthe ...

Страница 8: ...rom refrigerator to work area To remove Lift bin straight up then pullout To replace or relocate Slidein the binjust above the molded door supports and push down The bin will lock in place NOTE On models without a full width pantrg the location of the bottom door bin is not adjustable Non AdJustable Bins on the Door onsomemodels Toremove Lift the bin straight up then pull out Toreplace Engagethe b...

Страница 9: ...sh for a long time When Dell Drawer is selected the temperature of the drawer can be kept around 34 F 1 C Thisfeature also helps keep meat or fish fresh for a longer time NOTE Fruits and vegetables may be damaged using the Deli Drawer setting Do not store lettuce or other leafy produce in this drawer CAUTION not store gloss bottles in this drawer If they are frozen they can break and cause persona...

Страница 10: ...ll the drawer out to the stop position Remove both side knobs with a flat head screwdriver as shown at left Tilt up the rear of the drawer and lift drawer up and out To replace Pullboth rails out to the stop position Placethe drawer onto the rails and hook the support into the slots located on the side of the drawer Replace the side knobs and push the drawer back into place WARNING not lose the si...

Страница 11: ...press and releasethe Ice Off Lock or Ice Off pad on the control panel to engage the icemaker A newly installed refrigerator may take 12 to 24 hours to begin making ice cubes Youwill hear a buzzing sound each time the icemaker fillswith water Throw away the first few batches of ice to allow the water line to clear Besure nothing interferes with the sweep of the feeler arm When the bin fills to the ...

Страница 12: ...er towel Do not scrub with steel wool pads or other abrasive cleaners Cleaning the Inside To help prevent odors leave an open box of baking soda in the refrigerator and freezer compartments Unplug the refrigerator before cleaning If this is not practical wring excessmoisture out of sponge or cloth when cleaning around switches lights or controls Usean appliance wax polish on the inside surface bet...

Страница 13: ...acket is engaged if equipped Ice Off _ Lock J Preparing for Vacation For long vacations or absences remove food and unplug the refrigeratoEClean the interior with a baking soda solution of one tablespoon 15ml of baking soda to one quart 11liter of wateE Leave the doors open Pressand release the Ice Off Lock or Ice Off pad on the control panel to disengage the icemake_ If the temperature can drop b...

Страница 14: ...gerotor bock in NOTE Reveal appliance bulbs may be ordered from GE Ports and Accessories 800 626 2002 Freezer Light ik CAUTION Light bulbs be hot Unplug the power cord from the outlet Pull drower out to the stop position Rotete the shield down while pushing it backwards to remove it Turn the bulb counterclockwise 0 Replacewith an appliance bulb of the same or lower wattage Replacethe shield Plugth...

Страница 15: ...HE REFRIGERATOR INDOORS If the refrigerator will not fit through a doorwag the refrigerator doors and freezer drawer can be removed To remove the refrigerator door see the Installing the Refrigeratorsection To remove the freezerdrawer see the Removing the FreezerDrawer section WATER SUPPLY TO THE ICEMAKER AND DISPENSER If the refrigerator has an icemaker it will have to be connected to a cold wate...

Страница 16: ...DOORS IMPORTANT NOTE This refrigerator is 35 6 deep Doors and passagewags leading to the installation location must be at least 36 wide in order to leave the doors and handles attached to the refrigerator while transporting it into the installation location If passagewags are less than 36 the refrigerator doors and handles can easilg be scratched and damaged The top cap and doors can be removed to...

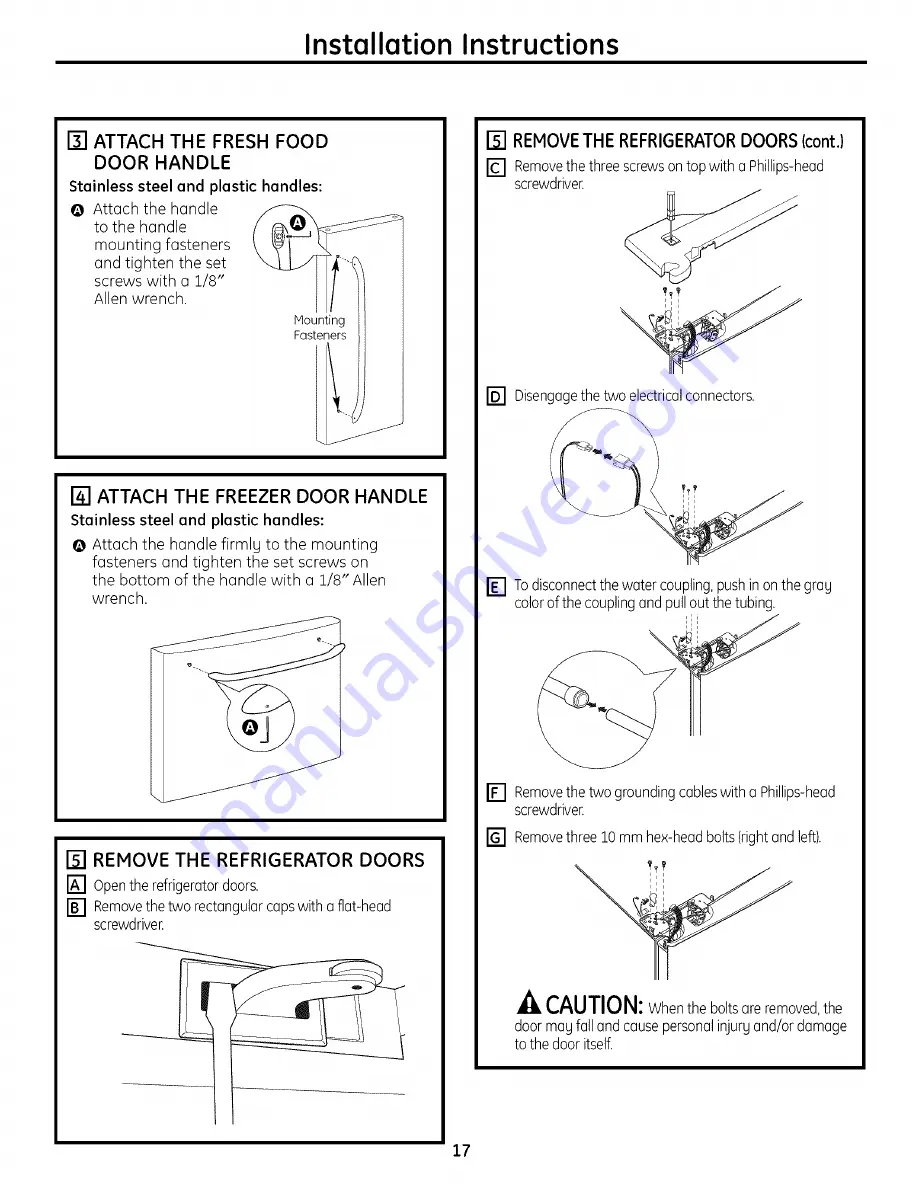
Страница 17: ...1 8 Allen wrench REMOVE THE REFRIGERATOR DOORS Open the refrigerator doors Removethe two rectangular caps with a flat head screwdriver REMOVE THE REFRIGERATOR DOORS cont Removethe three screwson top with a Phillips head screwdriver Disengagethe two electrical connectors _Tt To disconnect the water coupling push in on the grag color of the coupling and pull out the tubing Removethe two grounding ca...

Страница 18: ...GERATOR DOORS cont Insert the top hingepin into the hinge holeon top of the refrigerator door Hake sure the door is aligned with the cabinet and opposite door Attach the hingeto the top of the cabinet Do not tighten bolts completelU Onleft hand doors passthe wires and water line through the top hinge pin Then connect the water line and two connectors Attach the ground wire with a Phillips headscre...

Страница 19: ...OOR lcont Usethe tip of a screwdriver to separate the railfrom the rail cover Tiltthe front end up and lift the entire door Set the door front on a nonscratching surface Pushthe rail assembliesback into the cabinet CAUTION Pushboth sidesof the rail assembliesback at the same time REPLACING THE FREEZER DOOR Two people mag be requiredto complete this procedure ATTACH AND SECURE THE DRAWER FRONT TO T...

Страница 20: ...ntil they lock into place Seepage 10 CONNECTING THE REFRIGERATOR TO THE HOUSE WATER LINE A cold water supply is requiredfor automatic icemaker operation If there is not a cold water supply you will need to provide one SeeInstalling the Water Line section NOTE Before making the connection to the refrigerator be sure the refrigerator power cord is not plugged into the wall outlet If gou are using co...

Страница 21: ...the refrigerator connection at the back of the refrigerator and tighten the compression nut until it is hand tight Then tighten one additional turn with a wrench Overtightening mag cause leaks Fasten the tubing into the clamp provided to hold it in position You mag need to prg open the clamp Ferrule 1 4 sleeve Compression Refrigerator Connection SmartConnedY Tubing PLUG IN THE REFRIGERATOR See the...

Страница 22: ...level refrigerator is necessarg for getting the doors perfectlg even If you need help review the previous section on leveling the refrigerator When the left door is lower than the right doo_ Adjustment point Adjustment point If you open the freezer door you can see the center hinge Insert the supplied 4 mm Allen wrench into the shaft of the center hinge When the left door is higher than the right ...

Страница 23: ...djust the level I_l LEVEL THE FREEZER DOOR cont Find the best position to align the door slope Example The slope is about 2 mm as shown below Slope t__ Reference Plane m Rotate the height adjuster to 2 0 to reduce the door slope After adjustment tighten all the screws I_l SET THE CONTROLS Set the controls to the recommended setting RECOMMENDED CONTROL SETT NGS I REMOVE PACKAGING A Remove oll tape ...

Страница 24: ...fied plumber to correct water hammer before installing the water supplg line to the refrigerator To prevent burns and product damage do not hook up the water line to the hot water line If gou use gour refrigerator before connecting the water line disable the icemaker bg turning the Ice Off feature ON See About the Automatic Icemaker for more information Do not install the icemaker tubing in areas ...

Страница 25: ...frigerator OR gou can cut off the flared fitting with a tube cutter and then use a compression fitting Do not cut formed end from GE SmartConnect T Refrigerator tubing Shutoff valve to connect to the cold water line The shutoff valve should have a water inlet with a minimum inside diameter of 5 32 at the point of connection to the COLD WATER LINE Saddle tgpe shutoff valves are included in mang wat...

Страница 26: ...eve for copper tubing onto the end of the tubing and connect it to the shutoff valve Hake sure the tubing is fully inserted into the valve Tighten the compression nut securely For plastic tubing from a GE SmartConnect T Refrigerator Tubing kit insert the molded end of the tubing into the shutoff valve and tighten compression nut until it is hand tight then tighten one additional turn with a wrench...

Страница 27: ...hecompressor _ Expansion andcontractionof coolingcoilsduring andafterdefrostcancausea crackingor poppingsound _ Onmodelswithanicemaker afteran icemaking cycle you may hearthe icecubesdroppingintothe icebucket _ Onmodelswitha dispenser duringwaterdispense you may hearthe waterlinesmoveat initialdispense andafter dispenser buttonis released _i Theflowof refrigerantthroughthe freezercoolingcoilsmay m...

Страница 28: ...ing door open Frost or ice crgstals Door left open Check to see if package is holding door open on frozen food frost within package Door openings too frequent is normal or too long Frequent buzzing Ice Off feature is turned Press and release the Ice Off Lock pad on the control sound off but the water supplg panel to turn on the Ice Off feature and then the to the refrigerator has not _ icon will b...

Страница 29: ...ds of high humiditg one setting coldeE Turn off Energg Saver mode Moisture collects inside Too frequent or too fin humid weather air long door openings carries moisture into refrigerator when doors are opened Refrigerator or freezer No power at outlet Replace fuse or reset the breakeE compartment light does not work Light bulb burned out or loose See Replacing the light bulbs Door drawer does not ...

Страница 30: ... filter clogged Replace filter cartridge or remove filter and install plug dispenser or icemaker is slow Water spurting from Newlg installed filter cartridge Run water from the dispenser for 3 minutes dispenser about i_ 2 gallons No wateror ice cube Supplg line or shutoff valve Call a plumber production is clogged Water filter clogged o Replace filter cartridge or remove filter and install plug Fi...

Страница 31: ...Notes ge com 31 n 0 o Q n 0 vJ r_ 5 o n 0 0 Q 0 o 0 ...

Страница 32: ...Notes o i a J Q m 0 0 m 0 E 0 32 ...

Страница 33: ...air bills Service coverage for most major brands Unlimited service calls for the length of your contract or credit toward a replacement product Service coverage for covered operating parts and labor on appliances and home electronics that fail during normal single family household use Your satisfaction is our goal We strive to provide you with excellent service in a professional and timely manner ...

Страница 34: ...he form below to ensure that gour product is registered or register online at ge com _ Cut here Consumer Product Ownership Registration Model Number Serial Number I I I Mc Ms Mrs Miss First I I Lastl Name I I I I I I I I I Name I I I I I I I I I I I I I Street I I Address I I I I I I I I I I I I I I I I I I I I I I I I Apt I I I I I I I I I E mail Address zipI cityl i _ _ i _ i I i i i _ i i I Sta...

Страница 35: ...Please placein envelope andmailto Veuillez mettredansuneenveloppe et envoyez OWNERSHIP REGiSTRATiON P O BOX1780 MISSISSAUGA ONTARIO L4Y 4G1 FORCANADIANCONSUMERS ONLY 35 ...

Страница 36: ...U A ENREGISTREMENTSUR NTERNETA www e ectromenag_e_rsq_e ca POSTERA ONTAR O L4Y461 MR M El MRS MME IIF RSTNAME RENOM IIkASTNAME NOM MiSS MLLE MS I I L L I r S fflEET NO N RUE IISTREET NAME RUE IiAN NO APR RP_ I I C FC ViLLE PROVINCE POSTAL I I I J r AREACODE iND REG ITELEPHONE iE IVlA L I I I I L DiDYOU PURCHASEASERViCECONTF_CTFORTHiSAPPLiANCE fl_S OU FYES SIOUkEXP P_ _ON Y A M D J AVE VOUS ACNk_ U...

Страница 37: ...it is abused misused or used for other than the intended purpose or used commerciallg i_ Lossof food due to spoilage i_ _Replacement of house fuses or resetting of circuit breakers i Damage caused after deliverg _i Replacement of the water filter cartridge if included due to water pressure that is outside the specified operating range or due to excessive sediment in the water supplg i _ _Replaceme...

Страница 38: ...or productspurchased for homeusewithin Canada Inhomewarrants servicewill be providedinareas whereit is availableanddeemedreasonable bg labe to provide Owneris responsible to paufor servicecallsrelated to productinstallationand or teachinghowto use the product Damageto finish mustbe reportedwithin48 hours followingthe deliversof the appliance Damageto finishafter delivers Improperinstallation prope...

Страница 39: ... 0 010 mg L 0 010 mg L 0 002 mg L 0 002 mg L 0 002 mg L 0 0002 mg L 0 070 mg L 0 003 mg L 0 005 mg L 0 04 rng L 0 075 mg L 0 003 mg L Tested using a flow rate of 0 50 gpm pressure of 60 psig pH of 7 5 _0 5 temp of 68 _ 5 F 20 _ 3 C Measurement in Particles ml Particles used were 0 5 1 microns NTU Nephelometric Turbidity units Operating Specifications Capacitg certified for up to 300 gallons 1135I ...

Страница 40: ...any Cysts Turbidity Organic Contaminants Alachlor Atmzine Benzene Carbofuran Lindane Mercury Toxaphene 1 4 dichlorobenzene 2 4 D Rated Service Capacity 300 gal Rated ser_ ice Flow 0 5 gpm Conditions of Certification Do not use where water is microbiologically unsafe or with _ _ater ofunknowla quality except that systems certified for cyst reduction may be used on disinfected waters that may contai...

Страница 41: ...allation du r frig rateur 56 63 Pr aration 55 Conseils de d_pannage 67 70 Bruits normaux de fonctionnement 67 Soutien au consommateur Feuillet de donn_es relatives h la performance de la cartouche 73 Garantie pour la clientele au Canada 72 Soutien au consommateur 74 Transcrivez les num_ros de modgle et de s_rie ici de modgle de s_rie IIsfigurent sur I _tiquettequi se trouve h I interieur du compar...

Страница 42: ...nce des enfants _ D branchez votre r frig rateur avant de le nettoger ou de le r paren REMARQUE Nous vousrecommondons vivement de confier toute rdparation _ un technicien quolifid ri Ne recongelezpas les aliments surgel s qui ant compl tementd gel DANGER RISQUES POUR LES ENFANTS COMMENT VOUS Dd BARRASSERCONVENABLEMENT DE VOTREANCIEN Rd FRIGd RATEUR Lesenfants pris au pi ge ou marts d asphy ie sont...

Страница 43: ...olescorrectement mise la terre Ler6frig6rateur doit toujours 6tre branch6 dans sa propre prisede courant dont la tensionnominale est identique celleindiqu6esur la plaquesignal6tique Cette precaution est recommand_e pour garantir un rendement optimum et _viter une surcharge des circuits _lectriques de la r_sidence ce qui pourrait crier un risque d incendie par surchauffe des fils Ne d_branchezjamai...

Страница 44: ... rigerot_ Changement de la temperature ModUles du distributeur Pour modifier la temperature oppugez et relOchez le bouton Adjust Freezer r_gl_gecong_loteur ou Adjust Refrigerator r_gbge rdriger_teur L dfich_ge indiquer_ Iotemperature _ctuelle Appugez bri_vement sur I_touche Adjust Freezer r_gbge cong_loteur ou Adjust Refrigerator r_gl_gerdrigemteur jusqu a ce que I_temp_roture desiree _pp_roisse M...

Страница 45: ...lotte en position ferrule Side laglace bloque la goulotte faites la passer avec une cuill een bois _ _ Boissonset aliments ne doivent pas _tre rafra_chis rapidement dans lebac de stockage 5 glace Descanettes des bouteilles ou des paquets d aliments dans le tiroir de stockage peuvent provoquer le bourrage de la machine glaqons ou de la vrille _ Pour viter que la glace distribu e ne tombe hors du ve...

Страница 46: ...u support Ne I ins rez pos de force dons lesupport Tournez doucement la cortouche dons le sensdes oiguilles d une montrejusqu _ ce qu elle s orr te Pendant so rotation la cartouche atteindra elle m meso position Locortouche tournero d environ 1 4 de tout Ne serrezpustrap fort Foites couler de I eau du distributeur pendant 3 minutes environ5 litres pour purger le sgst me et emp cher les pulv risoti...

Страница 47: ...p6rieur 6 I arri_re de la clagette dans une fente du rail Abaissez le devant de la clagette jusqu 6 ce que le bas de la clagette se fixe en place Clayettes anti d_versement Les clagettes anti d6versement ant des bards sp6ciau pour emp_cher tout d6versement aux clagettes inf6rieures Bac _ casse crogte _ positionnement variable La position de ce bac 6 casse croOte est r6glable et peut _tre modifi6e ...

Страница 48: ...e travail Enl_vement Soulevez I avant du bac droit vers le haut puis enlevez en soulevant Remise en place ou changement de place Faites glisser le bac juste au dessus des soutiens moul_s de la porte et poussez vers le bas Le bac se verrouillera en place NOTE Sur les modules sans garde mange complet la location du bac de porte inf_rieur est non r_glable Bacs non r_glables de porte lsurcertains modu...

Страница 49: ...picerie fine est s_lectionn_ la temp ature du tiroir peut _tre maintenue 5 34 F 1 C environ Cefonctionnalit_ permet de conserver de la viande fra_cheou du poisson frais pendant Iongtemps NOTE Losfruits et los 16gumes peuvent _tre endommagds par l utilisation du rdgloge Oeli Drower tiroir dpiceriefine Ne stockezpas de laitue ou d autresproduits 6 feuillesdons ce tiroi_ 4LMISE EN GARDE Ne stockezpas...

Страница 50: ...iroir hors de sa position d arr Enlevezles deux ergots lat aux avec un tournevis 6 t teplate comme montr 6 gauche Inclinez vers le haut derri redu tiroir et sortez le en le soulevant Remise en place Sortezles railsjusqu 6 leur position d arr Placezletiroir sur les rails et ins ez le support dans les fentes situ es sur le c6t du tiroir Replacezles ergots lat aux et poussez le tiroir en place AVERTI...

Страница 51: ...ace d6sactiv6e verrouillage ou la touche Ice Off glaced6sactiv6e du panneau de commande pour connecter la machine h glagons Un rdrig ateur nouvellement install6 prend de 12 h 24 heures pour commencer h produire des glagons Vous entendrez un bourdonnement chaque fois que la machine h glagons se remplit d eau Jetez les premiers lots de glagons pour permettre h la conduite d eau de se purger Assurez ...

Страница 52: ...aine d acier ou d autres nettogants abrasifs Nettoyage de I int_rieur Pour aider 6 emp_cher lesodeurs laissez une bo_teouverte de bicarbonate de soude darts les compartiments r6frig6ration et cong61ation D_branchez votre r_frig_ruteur avunt de le nettoyer Sice n est pas pratique enlevez toute humidit6 au mogen d une 6ponge ou d un chiffon pour nettoger autour des commutateurs des lumi_res ou des r...

Страница 53: ... onti basculement soit engag_ si votre r_frig_rateur est ainsi _quip_ Ice Off q Lock J _ce Off_ Dgpart en vacances Lorsque vous vous absentez pendant une p_riode prolong_e videz et d_branchez le r_frig_rateu_ Nettoyez I int_rieur avec une solution d eau et de bicarbonate de soude _ raison 15 ml d unecuill_re soupe de bicarbonate par litre 1pinte d eau Laissezles portes ouvertes Appuyez et relSchez...

Страница 54: ... ReveoP peuvent _tre commandoes ou service opr_s vente GE ou 800 626 2002 Lumi_re du compartiment cong_lation MISE EN GARDE Lesompoules dlectriquespeuvent _tre brOluntes D branchez le cordon d alimentation de la prise Sortez le tiroirjusqu 6 sa position d arr t Faitestourner le caput tout en le poussant vers I arri re pour I enleveE Tournez I ampoule dans le sens contraire des aiguilles d une mont...

Страница 55: ...rte vous pouvez enlever les portes du compartiment r_frig_mtion et le tiroir du compartiment cong_lation Pour enlever la porte du compartiment r_frig ation consultez la section Installation du r_frig_mteur Pour enlever le tiroir du compartiment cong_lation consultez la section Enl6vement du tiroir du comportiment cong lotion PREPARATION suite ALIMENTATION D EAU DE LA MACHINE _ GLA _ONS ET DU DISTR...

Страница 56: ...o Dessus 25mm 1po Arri_re 25mm11po DleMONTAGE DES PORTES DU RleFRIGleRATEUR NOTEIMPORTANTE Cer_frig_rateur a uneprofondeurde35 6po Lesporteset lespassages qui m_nent6 I endroito6vousd_sirez I installezdoivent avoir unelargeurdu moinsde36po pour permettredetransporter ler_frig_rateurjusqu 6 cet endroitsans_tre oblig_d enleverlesporteset lespoign_es Silepassagea moinsque 36po delargeur vousrisquezvr...

Страница 57: ...u6es en bas de la poign6e 0 I aided une cl6 Allende 1 8 po DI_MONTAGEDESPORTES DURI FRIGI RATEUR Ouvrezles portes du rdrig_rateur Enlevezles deux capuchons rectangulaires avec un tournevis _ t teplate DI_MONTAGE DES PORTES DU RI_FRIGI_RATEUR suite Enlevezles trois vis en hout avec un tournevis cruciforme D6branchez les deux connecteurs 61ectriques Pourd6branchezI alimentationd eau poussezsur lacou...

Страница 58: ...a porte 58 REMONTAGE DES PORTES DU RI_FRIGI_RATEUR suite Ins_rezla brochede la charni_resup_rieuredans letrou de charni_reenhaut de laporte du rdrig_rateur Assurez vous que la porte estalign_eavec lecaissonet laporte oppos_e Fixezlacharni_reen haut du caisson Neserrezpascompletement lesboulons TTT Surla porte de gauche passezlesills et laconduite d eau6 travers la brochede lacharni_resup_rieure Pu...

Страница 59: ...nte d un tournevis pour s arer le rail du couvercle Inclinez I avant vers le haut et soulevez la porte enti e Placez la faqade de la porte sur une surface non abrasive Repoussez les assemblages de rail dans le caisson MISE EN GARDE poussez lesdeux c6t_s des assemblages de rail en m_me temps REMONTAGE DE LA PORTE DU CONGI_LATEUR Deux personnes peuvent tren cessaires pour achever cette proc dure FIX...

Страница 60: ...supports et poussez levers lebasjusqu _ ce qu il se verrouilleen place Voirpage 50 BRANCHEMENTDU RI_FRIGI_RATEUR _ LACONDUITED EAU DE LA MAISON Une alimentation d eau froide est requise pour faire fonctionner la machine 6 gla_ons Vous devrez en fournir une si elle n existe pas Voir la section Installation de la conduite d eau NOTE Avant de brancher la conduite au r6frig6rateur assurez vous que le ...

Страница 61: ...u _ compression _ Io main Serrez ensuite un outre tour _ I oide d une cl_ Un serroge e cessif pourroit occosionner des fuites Fixez le tuyou dons le collet fourni pour le muintenir en position II est possible que vous deviez _curter le collet Ferrule Ecrou 0 sleeve compression Raccord du r_frig Tug_ SmartConnectT I_l BRANCHEZ LE CORDON DU RI_FRIGI_RATEUR DANS LA PRISE Lisez I _tiquette concernont ...

Страница 62: ...cessoire pour que les portes soient porfoitement plones Sivous ovez besoin d oide reportez vous _ Io section pr_c_dente sur le nivellement du r_frig_roteur Lorsque Io porte gouche est plus bosse que Io porte droite Lorsque la porte gauche est plus haute que la porte droite Point d ajustement Point d ajustement NIVELLEMENT DES PORTES DU REFRIGERATEUR Isuite Si vous ouvrez la porte du cong_loteur vo...

Страница 63: ...R suite Trouvez la meilleure position pour aligner I inclinaison de la porte Exemple L inclinaison est d environ 2 mm comme illustr6 ci dessous Inclinaison _ _ _ _ Plan de Tournez Iajusteur de hauteur vers 2 0 pour r6f6rence r_duire I inclinuison de la porte Apr_s le r_glage resserrez toutes les vis I_l RI_GLEZ LES COMMANDES R_glez les commandes selon les recommandations REGLAGES DE COMMANDE RECOM...

Страница 64: ... section Machine6 GfaqonsAutomatique pour de plus amples informations N installezjamais les tuyaux de la machine 6 glad on dans des endroits o_ la temp ature risque de descendre en dessousdu point de cong_lation Sivous utilisezun outil _lectrique comme une perceuse _lectrique pendant I installation assurez vousque I isolement ou le cSblage de cet outil emp_che tout danger de secousse _lectrique Vo...

Страница 65: ...tugau d eau froide Le robinet d arr6t doit avoir une entr6e d eau avec un diam_tre int6rieur minimal de 5 B2 po au point dejonction avec le TUYAU D EAU FROIDE Des robinets d arr6t 6 6trier sont souvent indus dans les trousses d alimentation d eau Avant d acheter assurez vous que le robinet 6 6trier se conforme 6 vos codes de plomberie Iocaux Installez le robinet d arr t sur la canalisation d eau p...

Страница 66: ...n 6crou de compression et une bague manchon 6 I extr_mit_ du tugau et branchez les au robinet d arr_t Assurez vous que le tugau soit bien ins_r_ dans le robinet Serrez fort I _crou de compression Pour le tugau en mati re plastique d une trousse GE SmartConnect TM Refrigerator Tubing ins_rez I extr_mit_ moul_e du tugau dans le robinet d arr_t et serrez I _crou de compression 6 la main puis serrez u...

Страница 67: ...es vitesses Cela seproduit Iorsque lerdrig6rateur vient d etre branche Iorsque lesportes sontouvertes fr uemment ouIors deI ajout d une grande quantite d aliments danslescompartiments congelateur ourdrigerateur Les ventilateurs permettent demaintenir lesbonnes temperatures i_ Les ventilateurs changent devitesses pour assurer deseconomies d _nergie etunrefroidissement optimaux BRUITS D EAU 6 _ Lepa...

Страница 68: ...n paquetquiemp_chela portedefermen surgel s ilestnormal Lesouverturesde porte sont quedu givrese forme trap fr6quentesoutrap Iongues I int rieurdupequet Vibrationfr quente Lafonctionnalit6IceOff glace Appugez et rel6chez latoucheIceOff Lock glacedesactiv_e d_sactiv6e estd_sactiv6e mais verrouillage du panneaudecontr61e pouractiver lafonctionnalit_ I approvisionnement en eeudu IceOff glacedesactiv_...

Страница 69: ...emode d 6conomied 6nergie DeI humiditgseforme I int_rieur_quand ii fair humide I air transporte deI humiditg I int_rieurdu rgfriggrateurquanci vousouvrezlesportesJ Vous ouvrez les portes trap souvent ou trap Iongtemps Lalumi_redecompartiment Pasd _lectricit_6 laprise Remplacez lefusibleou remettezenmarche r_frig_ration oucong_lation ledisjoncteu_ nes al ume pas L ampoulea brOl_ou elle Consultez Re...

Страница 70: ...bouchon du filtre de la machine _ glagons est lent L eaujaillit Lu curtouche du filtre vient Faitescouler I eau du distributeur pendant minutes du distributeur d etre instull_e environ6 litres La machine _ glagons Lu conduite d euu ou Appelez un plombieE ne distribue ni eau le robinet d urr_t est bouch nigla_ons Lefiltre 6 euu est bouch Remplacezla cartouche du filtre avec une nouvelle cartouche o...

Страница 71: ...Notes Q 0 e_e 0 C3 0 _o Q 0 XA v 0 v 71 ...

Страница 72: ...tu de la garantie sera fourni dans les r gionsoOil est disponible etoO Habe estime raisonnable de le fournir Cette garantie est en sus de toute garantie statutaire EXCLUSIONS DE LA GARANTIE Le propri_taire est responsable de payer les r_parations occasionn es par I installation de ce produit et ou les visites n cessairespour lui apprendre 6 utiliser ee produit Tout dommage au fini de I appareil do...

Страница 73: ...070 mg L 0 003 mg L 0 005 mg L 0 04 mg L 0 075 mg L 0 003 mg L Test_ utilisont un d_bit de 0 50 gpm une pression de 60 psig un pH de 7 5 _0 5 et une temp de 20 C_ 5 C 68 F _5 F Plesures en porticules mL Les porticules utilis_s _toient de 0 5 1 micron NTU unit s de turbidit_ n ph_lom trique Sp cificetions d op_retion Capacit certifi ejusqu 6 maximum de 300 gallons 1135 I jusqu 6 maximum de six mois...

Страница 74: ...om_nagers peuvent recevoir pi_ces et accessoires directement _ la maison cartes VISA MasterCard et Discover accept_es Les directives stipul_es dans le pr sent manuel peuvent _tre effectu_es par n importe quel utilisateur Les autres r_parations doivent g_n_ralement _tre effectu_es par un technicien qualifi Soyez prudent car une r_paration inadequate peut affecter le fonctionnement s_curitaire de I ...

Страница 75: ...ria del agua 98 100 Instalaci6ndel refrigerador 90 97 Preparaci6npara instalar el refrigerador 89 Solucionar problemas lo1 1o4 8onidos normales de laoperaci6n 101 Servicio al consumidor Garantia para consumidores en los EstadosUnJdos 106 Hojade datos de funcionamiento 107 Servicioal consumidor 111 Anote aqui los n5meros de modelo g de serie No de modelo No de serie Usted los ver6 en una etiqueta e...

Страница 76: ...el mecanismo autom6tico para hacer hielo mientras el refrigerador est conectado i Desconecte el refrigerador antes de limpiarlo o efectuar reparaciones NOTA Recomendamosenfdticamente encargar cualquier servicio a un personal calificado i No vuelva a congelar los alimentos congelados una vezque se hagan descongelado iPELIGRO RIESGO DE QUE UN NINO PUEDA QUEDAR ATRAPADO DESHACERSEDEBIDAMENTE DE SU RE...

Страница 77: ...ci6n reemplazarlopor un contacto adecuado para tres puntascon conexi6na tierra Elrefrigerador deber conectarse siempre en su propio contacto el ctricoindividual que tenga un voltaje que vaga de acuerdo con la tabla de clasificaci6n Estogarantiza la mejor ejecuci6n g evita la sobrecarga del circuito el6ctrico de la casa g los da_os a causa del sobrecalentamiento de los cables Nunca desconecte el re...

Страница 78: ...iar la temperatura Modelos de dispensador Para cambiar la temperatura presione g libere el bot6n Adjust Freezer ajustedel congelador oAdjust Refrigerator ajustedel refrigerador La pantalla mostrarci la temperatura real Pulse el bot6n Adjust Freezer ajustedel congelador o Adjust Refrigerator ajustedel refrigerador hasta que aparezca la temperatura deseada Modelos de controles internos Para cambiar ...

Страница 79: ...avi6selo con una cuchara de madera _ Las bebidas g los alimentos no deben enfriarse rdpidamente en el caj6n de almacenamiento de hielo Las latas botellas o paquetes de alimentos del caj6n de almacenamiento pueden hacer que la m quinade hielo o la barrena se traben i_ Paraevitar que el hielo caiga fuera de los vasos coloque el vaso cerca pero sin tocar la abertura del dispensado_ f Puededispensarse...

Страница 80: ...cho de filtro de reemplazamiento nose puede encontra_ Eldispensador y el dispositivo para hacer hielo no pueden funcionar sin el filtro o sin eltap6n de derivaci6n del filtro Filtros de recambio Para pedir cartuchos adicionales en los Estados Unidos visite nuestro s rio Web ge com o Ilame a GEpara partes g accesorios a1800 626 2002 Modelo MWF Alinee laflecha del cartucho y el soporte del cartucho ...

Страница 81: ...iba inserte el gancho superior en la parte posterior del estante en la ranura de la corredera Bajeel frente del estante hasta que la parte inferior del estante se ajuste en su lugar i 0 Estantes a prueba de salpicaduras Los estantes a prueba de salpicaduras tienen hordes especialespara evitar que las salpicaduras se rieguen a los estantes inferiores Bandeja de snacks desmontable La ubicaci6n de la...

Страница 82: ...rador al _rea de trabajo Para retirar Levante el estante recto g luego h61elo Para reemplazar o cambiar de lugar Desliceel compartimiento justo encima de los soportes de la puerta g presione hacia abajo Elcompartimiento se trabar_ en su luga_ NOTA Enmodelos sin despensa de ancho completo la ubicaci6n del recipiente inferior de la puerta no es ajustable Compartimientos no ajustables en la puerta le...

Страница 83: ...iona Dell Drawer caj6n para Deli la temperatura del caj6n puede mantenerse alrededor de los 34 F 1 C Estacaracteristica tambi6n aguda a mantener carnes g pescados frescos durante un periodo m6s prolongado NOTA Los frutas y vegetalespueden daharse con la configuraci6n Deli Drawer cajbnpara Deli No guarde lechuga u otto vegetal de halos en esteca 6n PRECAUCl N Noguarde botellas de vidrio en estecajb...

Страница 84: ...a gaveta Para retirar Tire del caj6n hacia afuera hasta que se detenga Quite ambas perillas laterales con un destornillador de cabeza plana Inclinehacia arriba la parte trasera del caj6n lev6ntelo g quitelo Para reemplazan Tire ambos rieles hacia afuera hasta que se detenga Coloque el caj6n sobre los deles g enganche el soporte dentro de las ranuras ubicadas en el lado del caj6n Vuelva a colocar l...

Страница 85: ...uministro de agua presione y libere los botones Ice Off Lock o Ice Offdel panel de control para conectar la m quinade hielo Un refrigerador reci6n instalado se puede tomar entre 12 y 24 horas para empezar a hacer cubos de hielo Escuchar i un zumbido cada vez que la mciquina de hielos se Ilene de agua Desechelos primeros cubos de hielo para permitir que la linea del agua se limpie AsegOresede que n...

Страница 86: ...o raspe con esponjillasde metal u otros limpiadores abrasivos Limpiar el interior Paro evitor olores deje una caja abierta de bicarbonato de sodio en los compartimientos del refrigerador g del congeladon Desconecte el refrigerador antes de limpiarlo Sino fuera posible exprima el exceso de humedad de la esponja o del patio cuando se limpie alrededor de botones bombillas o controles Usecera para ele...

Страница 87: ...nodo si corresponde Preparaci6n para vacaciones Enel caso de vacaciones o ausencias prolongadas quite los alimentos y desenchufe el refrigeradoc Limpie el interior con soluci6n de bicarbonato de una cucharada 15 ml de bicarbonato par un cuarto 1litro de agua Dejeabiertas las puertas Presioney libere el bot6n Ice Off Lock apagado hielo bloqueado o el bot6n Ice Off apagado hielo del panel de control...

Страница 88: ...aro electrodomdsticos Reveal pueden solicitarse en Piezos g Accesorios de GE 800 626 2002 Luz del congelador A PRECAUCION Los bombillas podfion estar calientes Desenchufe el cable de energia del tomacorriente Tire el caj6n hacia afuera hasta que se detenga Girela cubierta hacia abajo mientras la empuja hacia atr spara quitarla Girela bombilla en sentido contrario de las agujas del reloj Coloque un...

Страница 89: ...ra retirar la puerta del refrigerador consulte la secci6n Instalacion c el refrigeration Para retirar la gaveta del congelador consulte la secci6n Cdmo retirar la gaveta del congeladon SUMINISTRO DE AGUA HACIA LA MAQUINA DE HIELOS Y EL DISPENSADOR EN ALGUNOS MODELOS Si el refrigerador tiene una m6quina de hielos se tendr6 que conectar a una tuberia de agua potable fria Un kit de suministro de agua...

Страница 90: ...ijas del refrigerador se pueden rayar y dahar con facilidad Se pueden retirar la tapa superior y las puertas para permitir el traslado seguro del refrigerador al interior Empiece con el Paso 1 Pase hasta el paso 9 si no se necesita retirar las puertas Deje la cinta y todo el embalaje en las puertas hasta que el refrigerador se encuentre en su destino final NOTA Utilice una carretilla de mano almoh...

Страница 91: ...llen de 1 8 C6MO QUITAR LAS PUERTAS DEL REFRIGERADOR Abra los puertas del refrigerador Quite las dos tapas rectangulares con un destornillador de cabeza plana C6MO gUITAR LAS PUERTAS DEL REFRIGERADOR cont Quite lostrestornillos de la porte superior con un destornillador Phillips Descanecte losdos canectares el_ctricos I Para desconectar la conexidn de agua presione sabre el color gris de la conexi...

Страница 92: ...ERTAS DEL REFRIGERADOR cont Introduzca el perno de la bisagra superior dentro delorificio de la bisagra de la porte superior de la puerto del refrigerador Verifique que la puerto est alineada con el gabinete y la puerto opuesta Conecte la bisagra a la porte superior del gabinete No ajuste los pernos par completo Enlos puertasdela izquierda poselos cablesy linea de aguaa tray s delperno dela bisagr...

Страница 93: ... destornillador para separar el riel de la tapa del riel Incline el extremo frontal hacia arriba g levante toda la puerta Coloqueel frente de la puerta sobre una superficie que no rage Empujelos montajes de rielesdentro del gabinete PRECAUCION Empujeambos lados de los montajes de rielesal mismo tiempo C6MO VOWER A COLOCAR LA PUERTA DEL CONGELADOR Se requieren dos personas para completar este proce...

Страница 94: ...or dentro de ambos soportes Upresione hacia abajo hasta que setraben en su lugan Verp6gina 84 C6MO CONECTAR EL REFRIGERADOR A LA LJNEA DE AGUA DE LA CASA Se requiere un suministro de agua frfa para la operaci6n de la m6quina de hielos Si no existe un suministro de agua fria usted necesitar6 hacer uno Ver la secci6n Instaloci6n de Io tuberio de aguo NOTAS Antes de hacer la conexi6n cerci6rese de qu...

Страница 95: ...ior del refrigerador Uapriete la tuerca de compresi6n hasta que est_ apretada a mano Entonces apriete una vuelta adicional con una Ilave Sila aprieta demasiado causar6 fugas Apriete latuberia en la abrazadera proporcionada pora sostenerla en su posici6n Es posibleque usted necesite levantar la abrazadera haciendo palanca Conexi6n del F_rula Tuerca de manga compresi6n 1 4 Tuberia de SmartConnect I_...

Страница 96: ...ehacefalta unrefrigerador niveladoparaque laspuertasest n bienequilibradas Sinecesita aguda vuelva aver lasecci6nanteriorsobrelanivelaci6n delreffigerador Cuando lapuerto izquierda est6mas baja que la derecha Cuando lapuerta izquierda est6mas alta quela derecha de ajuste Punto de ajuste C6MO NIVELAR LAS PUERTAS DEL REFRIGERADOR lcont Si abre la puerta del congelador usted podr6 ver la bisagra cent...

Страница 97: ...O NIVELAR LA PUERTA DEL CONGELADOR Icont Encuentre la mejor posici6n para alinear Ia inclinaci6n de la puerta Ejemplo La indinaci6n es de 2 mm como puede verse abajo I Pianode referencia Gireel ajuste de altura a 2 0 para reducir la inclinaci6n de la puerta Despu s del ajuste apriete todos los tornillos I_1AJUSTE LOS CONTROLES Ajuste los controles donde se recomienda I AJUSTES DE CONTROLE RECOMEND...

Страница 98: ...abre to mdquina de hielo automdtica No instale la tuberia de la m6quina de hielos en lugares donde la temperatura caiga par debajo del nivel de congelamiento AI usar cualquier aparato elOctrico coma un taladro elOctrico durante la instalaci6n aseg0rese de que el aparato est6 aislado o conectado de manera que evite el peligro de una descarga elOctrica o se opere par baterias Todas las instalaciones...

Страница 99: ... apagado tipo silla vienen incluidas en muchos kits de suministro de agua Antes de comprar asegOrese de que una v61vulatipo silla cumple con los c6digos de plomeria en su Iocalidad Instale la v61vula de apagado en la tuberia del agua de consumo m6s frecuentemente utilizada CIERRE EL SUMINISTRO PRINCIPAL DE AGUA Abra el grifo m6s cercano por suficiente tiempo para limpiar la tuberia del agua SELECC...

Страница 100: ...BERiA A LA V _LVULA Coloque la tuerca de compresi6n gf ula para latuberia de cobre manga en el extremo de latuberia Ucon ctelaa la v61vulade apagado Aseg0rese de que la tuberfa est6 complemente insertada en la v61vula Apriete la tuerca de compresi6n firmemente Para tuberfa de pl6stico de un kit de tuberia para el refrigerador SmartConnect T de GE inserte el extremo moldeado de la tuberia en la v61...

Страница 101: ...distribuci6n inicial y despu sla Iiberaci6ndel bot6n deldispensadon iWHIR _Puedeescucharlos ventiladoresmovi_ndosea gran velocidad Estopasa cuando el refrigeradorse conecta por primera vez cuando las puertasse abren frecuentemente o cuando se guarda gran cantidadde alimentos en el refrigeradoro en los compartimientosdel congelador Losventiladoresest6nayudando a mantener las temperaturascorrectas _...

Страница 102: ...ntes de la puerto Vea Loscontroles Se dej6 abierta la puerta Revisesi hay un paquete qua mantiene la puerta abierta Escarcha o cristales Se dej6 abierta la puerto Revisesi hug un paquete que mantiene la puerto abierta de hielo en alimentos congelados escarcha Apertura de puertas mug en paquete es normal frecuente o mug prolongada Formaci6n lenta del hielo Sedej6 abierta la puerto Revisesi hag un p...

Страница 103: ...edad No es extrafio durante Sequela superficie con un patio suave g ajuste en la superficie del periodos de alta humedad el control del refrigerador una marca mrs hacia Io frio refrigerador Apague el modo EnerggSaver ahorro de energia Humedad se forma al Abrir la puerta con mucha interior lenclima h_medo frecuencia o por mucho tiempo el aire Ileva la humedad al refrigerador cuando las puertas se a...

Страница 104: ...emueve el filtro el dispensadoro m_quina g instale el tap6n de hielo eslento Elague chorrea Cartucho del filtro reci_n Dejecorrer el agua desde el dispensador por 3 minutos del dispensador instalado aprox 1V2gal6ns Nosa eaguay Est6 tapaclala linea de agua Llame a un plomero el dispositivo para hacer o la Ilave de paso hielo no funciona Filtro de ague tapado Reemplaceel cartucho del filtro o remuev...

Страница 105: ...Notas ge com 105 0 Q _ O O _ 0 Q 0 _ 0 ...

Страница 106: ...roducto si hag abuso mal usa o usa para otros prop6sitos que los propuestos o usa para fines comerciales i_ P_rdida de alimentos par aver as ij_Caesar dahos despots de la entrega i _Reemplazo de fusibles de su hogar o reajuste de interruptores de circe to _ Reemplazo del cartucho del filtro para agua si incluidos debido a presi6n de agua afuera de las limites de operaci6n especificados o sedimento...

Страница 107: ... 0 070 mg L 0 003 mg L 0 005 mg L 0 04 mg L 0 075 mg L 0 003 mg L Probado utilizando una tasa de flu o de 0 5 gpm 1 8927 I min presi6n de 60 psig 4 218 Kg cm2 pH de 7 5 _0 5 temp de 20 _ 5 C Medici6n en part culas mL Los particulas usadas eran de 0 5 1 micrdn Unidades de turbidez Nefelom6trica IVTU Especificaciones de Operaci6n Capacidad certificado para hasta 300 galones 1135 litros hasta seis me...

Страница 108: ...m Notas 0 2 m 0 u l ul E 2 o ul 0 t_ 0 _ 108 ...

Страница 109: ...Notas ge com 109 m 0 Q O _ 0 Q 0 _ 0 ...

Страница 110: ...Notas 0 2 m 0 u l ul E 2 o ul 0 t_ 0 _ ii0 ...

Страница 111: ...er momenta o Ilamar al 800 626 2224 durante horas normales de oficina GEConsumer Home Servicesestar _a0n ahi cuando su garantia termine Piezasg accesorios Aquellos individuos con la calificaci6n necesaria para reparar sus propios electrodom sticospueden pedir que se les manden las piezas o accesorios directamente a sus hogares aceptamos las tarjetas VISA MasterCardy Discover Haga su pedido en line...

Страница 112: ...nytime or call 800 626 2224during normal business hours GEConsumer Home Serviceswill still be there after your warranty expires In Canada call 1 888 261 2133 Parts and Accessories n the U S ge com Individuals qualified to service their own appliances can have parts or accessoriessent directly to their homes VISA HasterCard and Discovercards are accepted Orderon line today 24 hours every day or by ...

Отзывы: