Chapter 2: Installation
16
GE-DS-242-PoE Managed Ethernet Switch User Manual
Step 3:
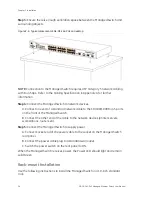
Ensure there is enough ventilation space between the Managed Switch and
surrounding objects.
Figure 2-4: Typical placement of GE-DS-242-PoE on desktop
NOTE:
Connection to the Managed Switch requires UTP Category 5 network cabling
with RJ-45 tips. Refer to the Cabling Specification in Appendix A for further
information.
Step 4:
Connect the Managed Switch to network devices.
A. Connect one end of a standard network cable to the 10/100/1000 RJ-45 ports
on the front of the Managed Switch.
B. Connect the other end of the cable to the network devices (printer servers,
workstations, routers etc).
Step 5:
Connect the Managed Switch to supply power.
A. Connect socket end of the power cable to the socket on the Managed Switch
rear panel.
B. Connect the power cable plug to a standard wall outlet.
C. Switch the power switch on the rear panel to ON.
When the Managed Switch receives power, the Power LED should light and remain
solid Green.
Rack-mount Installation
Use the following instructions to install the Managed Switch in a 19-inch standard
rack.
Содержание GE-DS-242-POE
Страница 1: ...GE Security P N 1069174 REV 1 0 ISS 22FEB10 GE DS 242 PoE Managed Ethernet Switch User Manual ...
Страница 14: ...Chapter 1 Introduction 10 GE DS 242 PoE Managed Ethernet Switch User Manual ...
Страница 124: ...Chapter 4 Web Based Management 120 GE DS 242 PoE Managed Ethernet Switch User Manual ...
Страница 130: ...Chapter 5 Console Management 126 GE DS 242 PoE Managed Ethernet Switch User Manual ...
Страница 204: ...Chapter 8 Power Over Ethernet Overview 200 GE DS 242 PoE Managed Ethernet Switch User Manual ...
Страница 210: ......


