Chapter 2: Installation
GE-DS-242-PoE Managed Ethernet Switch User Manual
15
Switch Rear Panel
The rear panel of the Managed Switch includes an AC inlet power socket, which
accepts input power from 100 to 240VAC, 50-60 Hz. Figure 2-3 shows the rear panel
of the Managed Switch.
Figure 2-3: GE-DS-242-PoE Rear panel
2
3
POWER NOTICE:
1. The Managed Switch is a power-required device: it will not work unless it is
receiving power. If your networks must be active at all times, it is recommended
that the Switch be connected to a UPS (Uninterruptable Power Supply) to prevent
data loss or downtime.
2. In some areas, installing a surge suppression device may also help protect your
Managed Switch from being damaged by unregulated power surges or current to
either the Switch or the power adapter.
Switch Installation
This text describes how to install the Managed Switch and connect it as necessary.
Please read the following instructions, and perform the procedures in the listed order.
Desktop/Shelf Installation
NOTE:
Refer to the environmental restrictions listed in the Product Specifications
when selecting a location for the Managed Switch.
Step 1:
Attach the rubber feet to the recessed areas on the bottom of the Managed
Switch.
Step 2:
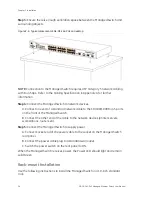
Place the Managed Switch on a desktop or shelf near an AC power source, as
shown in Figure 2-4.
Содержание GE-DS-242-POE
Страница 1: ...GE Security P N 1069174 REV 1 0 ISS 22FEB10 GE DS 242 PoE Managed Ethernet Switch User Manual ...
Страница 14: ...Chapter 1 Introduction 10 GE DS 242 PoE Managed Ethernet Switch User Manual ...
Страница 124: ...Chapter 4 Web Based Management 120 GE DS 242 PoE Managed Ethernet Switch User Manual ...
Страница 130: ...Chapter 5 Console Management 126 GE DS 242 PoE Managed Ethernet Switch User Manual ...
Страница 204: ...Chapter 8 Power Over Ethernet Overview 200 GE DS 242 PoE Managed Ethernet Switch User Manual ...
Страница 210: ......


