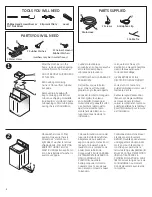
GE GCWP1805DCC Скачать руководство пользователя страница 2

PARTS SUPPLIED

Drain Hose

Antisiphon clip

2 Screws

1 Cable Tie

2

Phillips Head Screwdriver or 

1/4" Nut Driver

Slip Joint Pliers

Level

TOOLS YOU WILL NEED

2

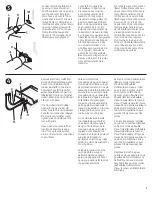
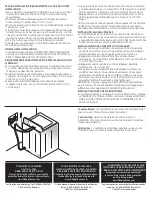
Move washer close to final  

position. Make sure there is 

at least a 24" clearance on 

right side of washer to remove 

shipping bar 

F

. PULL SHIPPING 

BAR 

F

 OUT USING YELLOW 

PLASTIC HANDLE 

G

. Keep bar so 

it can be reinstalled if washer is 

ever moved again.

Positionnez la machine à laver 

près de son emplacement 

définitif. N’oubliez pas de laisser 

un dégagement d’au moins 61 

cm (24 po) du côté droit de la  

machine pour permettre le 

retrait de la tige d’expédition (

F

). 

ENLEVEZ LA TIGE D’EXPÉDITION 

(

F

) EN LA TIRANT PAR SA 

POIGNÉE EN PLASTIQUE JAUNE 

(

G

). Conservez la tige en vue de 

sa réinstallation au moment 

d’un déplacement éventuel de 

la machine.

Coloque la lavadora cerca del 

lugar de instalación definitivo. 

Asegúrese de que exista un  

espacio de por lo menos 61 cm 

(24 pulg.) a la derecha de la  

lavadora, con el propósito de 

poder sacar la barra de  

transporte 

F

. SAQUE LA BARRA 

DE TRANSPORTE 

F

 USANDO LA 

MANIJA AMARILLA DE  

PLÁSTICO 

G

. Guarde la 

barra para poder colocarla 

nuevamente en caso de que 

sea necesario mover de nuevo 

la lavadora.

After the machine is in the 

home, remove outside packing 

material/carton from washer.

DO NOT REMOVE SHIPPING ROD 

AT THIS TIME.

Remove bag containing 

Owner’s Manual from tub and 

put aside.

Remove drain hose 

A

 with 

bag containing parts 

from 

tub. Leave shipping material 

E


(cardboard or styrofoam) inside 

tub opening to hold tub in place 

during the rest of installation.

Cuando la lavadora se 

encuentre en su hogar, deseche 

el material de empaque 

sobrante de la lavadora.

NO REMUEVA AÚN LA BARRA DE 

TRANSPORTE.

Del tambor, saque la bolsa 

que contiene el Manual del 

propietario y colóquela aparte.

Saque del tambor la manguera 

de drenaje 

A

 y las piezas 

en la bolsa 

D

. Mantenga el 

material de empaque 

E

 (cartón 

o poliestireno) dentro del la 

apertura del tambor para 

mantener éste último en su 

lugar durante el resto de la 

instalación.

Lorsque la machine est à  

destination, enlevez l’ensemble 

des matériaux extérieur et 

cartons d’emballage.

NE PAS RETIRER LA TIGE

D’EXPÉDITION EN CE MOMENT.

Sortez le sac contenant le 

guide d’utilisation du remous et 

mettez-le de côté.

Retirez le tuyau d’évacuation 

(

A

) avec sac de pieces

 (D) 

qui 

se trouve dans le tambour

.


Laisser le matériel en carton ou 

polystyrène (

E

) dans le tambour 

pour l’immobiliser pour la suite 

de l’installation.

1

2 Rubber Washers

2 Strainer Screens/

Rubber Washers

2 Water Hoses

(washers may be in water hoses)

PARTS YOU WILL NEED

Содержание GCWP1805DCC

Страница 1: ...rounded branch circuit protected by a 15 or 20 amp circuit breaker or time delay fuse If the electric supply provided does not meet the above requirements call a licensed electrician Installation de votre nouvelle machine à laver Avant de commencer familiarisez vous avec les instructions suivantes AVIS IMPORTANT RESPECTEZ L ENSEMBLE DES CODES ET DES NORMES APPLICABLES Avis à l installateur N oubli...

Страница 2: ...vadora After the machine is in the home remove outside packing material carton from washer DO NOT REMOVE SHIPPING ROD AT THIS TIME Remove bag containing Owner s Manual from tub and put aside Remove drain hose A with bag containing parts D from tub Leave shipping material E cardboard or styrofoam inside tub opening to hold tub in place during the rest of installation Cuando la lavadora se encuentre...

Страница 3: ...old water hose S Thread cold water hose S onto connection labeled C at top rear of washer Hand tighten plus an additional 1 8 turn with pliers Move washer as close to final location as possible leaving room for you to make water drain and electrical connections to your home Antes de instalar las mangueras de agua saque el cordón eléctrico N de su lugar de almacenamiento Si no esta presente instale ...

Страница 4: ... a standpipe fasten drain hose A to standpipe with cable tie T provided NOTE If drain hose facility does not meet 30 minimum height requirement thread drain hose through supplied antisiphon clip U and mount to cabinet back as shown 5 Determine which is HOT water line before attaching water hoses to faucets Traditionally HOT faucet is on left If screen washers are not installed With protruding part...

Страница 5: ...unded in accordance with all local codes and ordinances WARNING Improper connection of equipment grounding conductor can result in a risk of electric shock Check with a qualified electrician or serviceman if you are in doubt as to whether the appliance is properly grounded Do not modify the plug provided with the appliance if it will not fit the outlet have a proper outlet installed by a qualified...

Страница 6: ...ción bajo los términos de la garantía www GEAppliances com Si tiene alguna pregunta en cuanto a la instalación llame al 1 800 626 2003 en los EE UU 1 800 561 3344 en Canadá POUR ENREGISTRER VOTRE MACHINE À LAVER COMPOSEZ LE NUMÉRO SANS FRAIS SUIVANT 1 888 269 1192 ÉTATS UNIS UNIQUEMENT Enregistrez votre machine sans tarder pour confirmer vos droits de protection au titre de la garantie www GEAppli...

Отзывы: