background image

Installation 

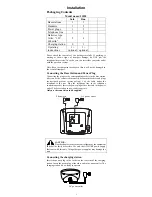
Packaging Contents


Model name: 21828 

 Solo 

Duo 


Base stations 


Handsets 1 


Power plugs 


Telephone line 


Batteries, type 
AAA, “1.2V 
600mAh” 

2 4 


Charging station


Operating 
instructions 

1 + 

optional

1 + 

optional


Please check the contents of the package carefully. If anything is 
missing or shows signs of transport damage, do NOT put the 
telephone into service! In such a case, contact either your sales outlet 
with the purchase receipt. 
 
Note: Keep the equipment package so that it will not be damaged in 
the event of transport. 

Connecting the Base Station and Power Plug 

Connecting the plugs to the corresponding sockets in the base station 
(they can not be connected incorrectly because the sockets and plugs 
are designed prevent reverse poling). Lay the cable under the 
telephone to the rear. Plug the telephone line in the telephone 
connection socket. Insert the power plug at the other end in the power 
outlet. The base station in now ready to operate. 

Only use the connection cable supplied. 


CAUTION: 

Plug the adaptor to the socket outlet that near the equipment 

and shall be easily accessible. Use only the ATLINKS power supply 
that came with this unit. Using other power supplies may damage the 
unit.


Connecting the charging station 

Insert the power plug in the socket on the rear side of the charging 
station. Insert the power plug at the other end in the power outlet. The 
charging station is now ready to operate. 


AC power outlet 

AC power outlet 

Phone jack 

Содержание FS21828

Страница 1: ...ting devices fluorescent lighting burglar alarms microwave ovens computers etc To clean the 21828 use a lightly moistened antistatic cloth Information for DECT product The 21828 telephone is compliant...

Страница 2: ...NO USER SERVICEABLE PARTS INSIDE REFER SERVICING TO QUALIFIED SERVICE PERSONNEL THE EXCLAMATION WITHIN THE TRIANGLE IS WARNING SIGN ALERTING YOU OF IMPORTANT INSTRUCTIONS ACCOMPANYING THE PRODUCT SEE...

Страница 3: ...in the base station they can not be connected incorrectly because the sockets and plugs are designed prevent reverse poling Lay the cable under the telephone to the rear Plug the telephone line in the...

Страница 4: ...rding Internal free communication between handsets Prefix dialing Automatic call answering on off Call log function with caller list for 20 numbers or names from phone book network dependent Alphanume...

Страница 5: ...KEY TONE ON OFF 5 AUTO ANS ON OFF 6 CALL TIMER ON OFF 7 DEFAULT CONFIRM 8 REGISTER SEARCHING 4 BASE 1 BARRING ENTER PIN HANDSET1 DISABLE 2 EMERGENCY ENTER PIN 1 EXTERNAL 2 NUMBER ENTER NO 3 RINGER ME...

Страница 6: ...down key CID key Asterisk key INT OK INT OK key C Cancel Mute key P Redial Pause key Up key External call key Phone book key R Flash key Hash key lock key Paging In use CID LED Steady Flash OFF hook V...

Страница 7: ...ting the Language Ten different languages are available for selection for each handset In standby mode press button and 5 key Current language is displayed Press or as often as necessary to select the...

Страница 8: ...nd the call Handset is not in the base station Press key Carry out the conversation Press key to end the call Redialing The phone stores the last five numbers dialled in the redial memory Press key th...

Страница 9: ...is possible to include a second handset in the conversation three way conference Press INT OK key and enter the number of the corresponding handset e g 2 which will join the teleconference The externa...

Страница 10: ...dotted line the ringing volume will be switched to OFF Changing the Ringer Melody external internal Press key until the HANDSET menu appears and Press INT OK key twice Use or key to select the requir...

Страница 11: ...s are retained Press key until the HANDSET menu appears and press INT OK key Press or key to select the submenu and press INT OK key to confirm Note The display will switch back to standby mode Key as...

Страница 12: ...mber 123 All numbers which begin with 123 are dialed even if the unit is only programmed for internal calls Press key until the BASE menu appears and press INT OK key Press or key to select the requir...

Страница 13: ...nd press INT OK key Press or key to select the required submenu and press INT OK key Enter the PIN factory setting 0000 and press INT OK key If necessary Use or key to select the handset and press INT...

Страница 14: ...istration Unplug and then plug in the power adaptor No display The battery has not been charged Charge the battery or replace them see Battery Charging No reactions to keystroke The keypad is locked P...

Отзывы: