GE H
EALTHCARE
D
IRECTION
2307224-100, R
EVISION
6
D
ISCOVERY
LS S
YSTEM
S
ERVICE
M
ANUAL
Page 182
Chapter 6 - Table
6.2.6.38 Adjust the Table Latch
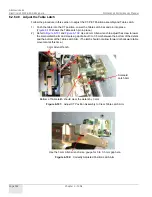
Follow the procedure in this section to adjust the CT-PET Position assembly and Table Latch.
1.) Push the table into the CT position. Lower the Table Latch bar and pin into place.
shows the Table Latch pin in place.)
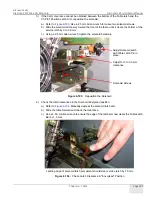
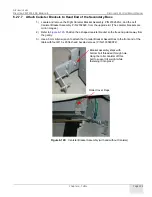
2.) Refer to
and
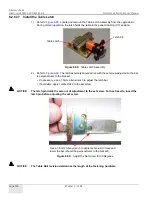
. Use a 3 mm Allen wrench to adjust the screw to lower
the solenoid latch arm and create a gap of about 3 to 3.5 mm between the bottom of the detent
and the bottom of the Table Latch Arm. (The latch should not allow forward or backward table
movement at this time.)
Figure 6-101:
Adjust CT Position Assembly to Clear Table Latch Arm
Figure 6-102:
Correctly Adjusted Position Latch Arm
3 mm Allen Wrench
Solenoid
Latch Arm
Bottom of Table latch should clear the detent by 3 mm.
Use the 3 mm Allen wrench as a gauge for 3 to 3.5 mm gap here.
Содержание Discovery LS
Страница 1: ...GE Healthcare OPERATING DOCUMENTATION 2307224 100 Rev 6 Discovery LS System Service Manual ...
Страница 2: ...GE HEALTHCARE DIRECTION 2307224 100 REVISION 6 DISCOVERY LS SYSTEM SERVICE MANUAL Page 2 ...
Страница 24: ...GE HEALTHCARE DIRECTION 2307224 100 REVISION 6 DISCOVERY LS SYSTEM SERVICE MANUAL Page 24 Table of Contents ...
Страница 32: ...GE HEALTHCARE DIRECTION 2307224 100 REVISION 6 DISCOVERY LS SYSTEM SERVICE MANUAL Page 32 List of Figures ...
Страница 110: ...GE HEALTHCARE DIRECTION 2307224 100 REVISION 6 DISCOVERY LS SYSTEM SERVICE MANUAL Page 110 Chapter 5 Console ...
Страница 222: ...GE HEALTHCARE DIRECTION 2307224 100 REVISION 6 DISCOVERY LS SYSTEM SERVICE MANUAL Page 222 Chapter 6 Table ...
Страница 242: ...GE HEALTHCARE DIRECTION 2307224 100 REVISION 6 DISCOVERY LS SYSTEM SERVICE MANUAL Page 242 Chapter 7 Gantry ...
Страница 357: ......


