


DigitalFlow™ XGM868i Service Manual
31
Chapter 4. Parts Replacement
4.7.1 Assembling the Circuit Board Assembly (cont.)
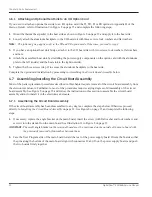
Note:
If the thermal gap filler pad of the power supply board has been damaged, you must remove and replace it
before reinserting the power supply board. First, remove and discard the damaged pad. Then remove the blue
protective liner from the new pad and apply it with the white face against the power supply board.
3.
Secure the power supply board and heat sink to the main board by reinstalling the screws, flat washers and lock
washer previously removed from the corners of the power supply board. See Illustration 11 in Figure 8 on page 35.
4.
Refer back to Illustration 7 in Figure 7 on page 34. Carefully align the terminal board onto the main board/power
supply assembly and the two option boards (Slot 1 and Slot 2, where applicable), so that the connectors listed in
Table 5 are facing each other.
Firmly press the terminal board and the interconnect board toward each other until all of the connectors are
completely seated.
IMPORTANT:
With two option cards installed, it may require some patience to get all of the connectors properly aligned.
Do not force the assembly together, or some of the pins may not enter the sockets properly.
5.
Secure the assembly together by installing the three mounting screws, flat washers and lock washers previously
removed from the terminal board. Be sure to install one end of the green grounding jumper wire under the screw
indicated in Illustration 7 in Figure 7 on page 34. The smaller screw should be used at the angle bracket location,
and secured with a nut, lock washer and flat washer.
Proceed to the next section for instructions on installing the reassembled circuit board assembly in the electronics
enclosure.
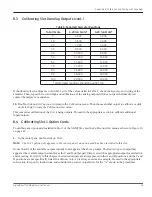
Table 5: Matings for Terminal Board
Terminal Board
Mating Board
1
J7 Connector (Large Three-Pin Connector Plug)
Power Tab on AC Power Supply Board
2
J6 Connector (Large Three-Pin Connector Plug)
Power Tab on DC Power Supply Board
3
P7 Connector
J7 Connector on Main Board
4
P10 Connector
J9 Connector on Main Board
5
P9 Connector
J10 Connector on Main Board
6
P8 Connector
J8 Connector on Main Board
7
P21 Connector
J1/J3 Connector on I/O Board, Slot 2 Option
8
P22 Connector
P2 Connector on I/O Board, Slot 1
Содержание DigitalFlo XGM868i
Страница 2: ......
Страница 4: ...ii no content intended for this page ...
Страница 44: ...Chapter 4 Parts Replacement DigitalFlow XGM868i Service Manual 36 ...
Страница 48: ...40 DigitalFlow XGM868i Service Manual no content intended for this page ...
Страница 70: ...62 DigitalFlow XGM868i Service Manual no content intended for this page ...
Страница 78: ...Warranty 70 DigitalFlow XGM868i Service Manual no content intended for this page ...
Страница 79: ......


