


DigitalFlow™ XGM868i Service Manual
5
Chapter 1. Calibration
1.4.1 Preparing for Calibration
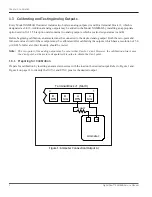
Prepare for the calibration procedure by connecting a
Slot 0
analog output (or an independent calibrated current source)
to the desired input on the option card. See Figure 4 on page 12 to identify the
IN
(
+)
and
RTN(-)
pins for the desired
input on terminal block J2.
Note:
The zero point of the analog input may be set for either 0 mA or 4 mA. However, the calibration always uses the
4 mA point, as the meter extrapolates this value to obtain the 0 mA point.
1.4.2 Accessing the Calibration/Test Menu
1.
From the
Keypad Program
, press the right arrow key to scroll to the
CALIB
menu. Press
[Enter].
2.
In the
Cal
window, scroll to
Slot 1
. Press
[Enter].
3.
Scroll to the desired
Input
to open the
ANALOG INPUT
menu. (
Input A
will be used as an example in this manual.)
Press
[Enter].
IMPORTANT:
Calibrating
Input B, C
or
D
is identical to calibrating
Input A
. However, be sure to reconnect the current
source on terminal block
J2
. Refer to Figure 4 on page 12 for the correct pin numbers.
4.
Scroll to the appropriate option to select the reference point to be calibrated. Press
[Enter].
IMPORTANT:
The procedure for calibrating all the inputs is the same. However, when calibrating a different input, be
sure to reconnect the current source at terminal block
J2
. See Figure 4 on page 12 for the correct pin
numbers.
5.
Do one of the following:
•
Proceed to<Title Font> 4 mA Option on page 5.
•
Proceed to<Title Font> 20 mA Option on page 5.
1.4.2a 4 mA Option
Set the calibrated current source to 4 mA.
•
If you selected the
4 mA
option in the
ANALOG INPUT
menu, scroll to
STORE
to accept the current 4 mA value or
on
ABORT
to cancel the entry. Press
[Enter].
In either case, the XGM868i returns to the
Analog Input
window.
1.4.2b 20 mA Option
Set the calibrated current source to 20 mA.
•
If you selected the
20 mA
option in the
ANALOG INPUT
option, scroll
STORE
to accept the current 20 mA value
or to
ABORT
to cancel the entry. Press
[Enter].
In either case, the XGM868i returns to the
ANALOG INPUT
window.
•
Press
[Escape]
to return to the
Slot 1
window and calibrate additional inputs/outputs, or press
[Escape]
again to
close the
CALIB
menu.
Содержание DigitalFlo XGM868i
Страница 2: ......
Страница 4: ...ii no content intended for this page ...
Страница 44: ...Chapter 4 Parts Replacement DigitalFlow XGM868i Service Manual 36 ...
Страница 48: ...40 DigitalFlow XGM868i Service Manual no content intended for this page ...
Страница 70: ...62 DigitalFlow XGM868i Service Manual no content intended for this page ...
Страница 78: ...Warranty 70 DigitalFlow XGM868i Service Manual no content intended for this page ...
Страница 79: ......


