background image

The purpose of the warm setting of the lower
oven drawer is to hold hot cooked foods at
serving temperature. Always start with hot
food; cold food cannot be heated or cooked
using the warm setting of the lower oven
drawer.

Do not use the lower oven drawer to dry
newspapers. If overheated, they can catch
on fire.

Do not leave paper products, plastics, canned
food or combustible materials in the drawer.

Never leave jars or cans of fat drippings
in or near your lower oven drawer.

Do not warm food in the lower oven drawer
for more than two hours.

Do not touch the heating element or the
interior surface of the lower oven drawer.

These surfaces may be hot enough to burn.

REMEMBER:

The inside surface of the lower

oven drawer may be hot when the drawer
is opened.

Use care when opening the lower oven
drawer. Open the drawer a crack and let
hot air or steam escape before removing
or replacing food. Hot air or steam which
escapes can cause burns to hands, face
and/or eyes.

Do not use aluminum foil to line the lower
oven drawer. Foil is an excellent heat insulator
and will trap heat beneath it. This will upset
the performance of the drawer and it could
damage the interior finish.

Never place, use or self-clean the lower oven
drawer pan in the upper oven.

WARNING!

LOWER OVEN DRAWER

IMPORTANT SAFETY INFORMATION.
READ ALL INSTRUCTIONS BEFORE USING.

6

O

p

e

ra

ti

n

g

In

st

ru

c

ti

o

n

s

S

a

fe

ty

In

st

ru

c

ti

o

n

s

C

a

re

a

n

d

C

le

a

n

in

g

In

st

a

ll

a

ti

o

n

In

st

ru

c

ti

o

n

s

T

ro

u

b

le

sh

o

o

ti

n

g

T

ip

s

C

o

n

su

m

e

r

S

u

p

p

o

rt

Содержание CS980SNSS

Страница 1: ...ht Replacement 37 Oven Racks 37 Self Cleaning 31 32 Stainless Steel Surfaces 33 Installation Instructions 40 47 Anti Tip Device 40 46 Dimensions and Clearances 41 Electrical Connections 42 45 Level th...

Страница 2: ...ren alone children should not be left alone or unattended in an area where an appliance is in use They should never be allowed to sit or stand on any part of the appliance Do not allow anyone to climb...

Страница 3: ...e high floor temperatures may result and many floor coverings will not withstand this kind of use Never install the range over vinyl tile or linoleum that cannot withstand such type of use Never insta...

Страница 4: ...u do flame foods under the hood turn the fan on Keep an eye on foods being fried at high or medium high heat settings Foods for frying should be as dry as possible Frost on frozen foods or moisture on...

Страница 5: ...the glass cooktop surface when it is in use They may become hot and could cause burns Clean the cooktop with caution If a wet sponge or cloth is used to wipe spills on a hot surface unit be careful t...

Страница 6: ...surfaces may be hot enough to burn REMEMBER The inside surface of the lower oven drawer may be hot when the drawer is opened Use care when opening the lower oven drawer Open the drawer a crack and let...

Страница 7: ...ol If racks must be handled when hot do not let pot holder contact the heating elements Pulling out the rack to the stop lock is a convenience in lifting heavy foods It is also a precaution against bu...

Страница 8: ...units for the entire griddle turn the knob clockwise To turn on the surface unit for the back half of the griddle turn the knob counterclockwise CAUTION The entire griddle will still become hot IMPORT...

Страница 9: ...e your Lodge cast iron griddle on the designated area of the cooktop and then preheat the griddle on the Hi setting for 5 minutes 5 Sear steak on each side for 3 minutes NOTE There will be smoke ensur...

Страница 10: ...d or cold food on the COOK WARM ZONE could result in food borne illness Push and turn the control knob to any desired setting For best results all foods on the COOK WARM ZONEshould be covered with a l...

Страница 11: ...time required to bring the water to a boil Use only flat bottomed woks Wok Cooking We recommend that you use only a flat bottomed wok They are available at your local retail store Do not use woks tha...

Страница 12: ...n the glass surface even when the cooktop is cool Even after the surface units are turned off the glass cooktop retains enough heat to continue cooking To avoid overcooking remove pans from the surfac...

Страница 13: ...lain Enamel Covered Cast Iron recommended As long as the cookware is covered completely with porcelain enamel this cookware is recommended Caution is recommended for cast iron cookware that is not com...

Страница 14: ...all programmed functions must be reset The time of day will flash in the display when there has been a power outage OVEN LIGHT Pad Touch to turn the oven light on or off DELAY START Pad Use along wit...

Страница 15: ...e uninterrupted Avoid touching the vent openings or nearby surfaces during oven or broiler operation they may become hot Handles of pots and pans on the cooktop may become hot if left too close to the...

Страница 16: ...ven heats up the temperature change of the air in the oven may cause water droplets to form on the door glass These droplets are harmless and will evaporate as the oven continues to heat up Preheating...

Страница 17: ...1 lb 4 patties C 13 8 Space evenly 1 2 to 3 4 thick 4 lbs 16 patties C 15 11 Beef Steaks Rare 3 4 to 1 thick E 6 4 Steaks less than 3 4 thick Medium 1 to 11 2 lbs D 8 6 are difficult to cook rare Well...

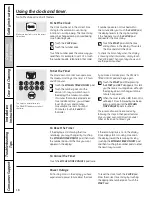
Страница 18: ...utes Touch the KITCHEN TIMER ON OFF pad Touch the number pads until the amount of time you want shows in the display The maximum number of minutes that can be entered is 60 To set additional time you...

Страница 19: ...r oven control to delay start the oven cook for a specific length of time and then turn off automatically Make sure the clock shows the correct time of day Touch the BAKE pad Using the number pads ent...

Страница 20: ...sseroles Insert the probe into the meatiest part of the inner thigh from below and parallel to the leg of a whole turkey Using the probe How to Set the Upper Oven For Roasting When Using the Probe Ins...

Страница 21: ...t grease spatters Place the rack in rack position A In a convection oven a fan circulates hot air over under and around the food This circulating hot air is evenly distributed throughout the oven cavi...

Страница 22: ...rack convection baking This mode is used for cooking food items on only one rack in convection bake Touch the CONVECTION ROAST pad for convection roasting Touch the number pads to set the desired ove...

Страница 23: ...100 F the changing internal temperature will be shown in the display When the internal temperature of the food reaches the number you have set the probe and the oven turn off and the oven control sign...

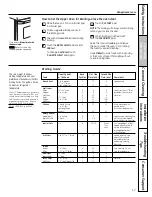
Страница 24: ...160 F Well 20 24 325 F 170 F Seafood Fish whole 3 to 5 lbs 30 40 total 400 F Lobster Tails 6 to 8 oz each 20 25 total 350 F Poultry Whole Chicken 21 2 to 31 2 lbs 24 26 350 F 180 185 F Cornish Hens Un...

Страница 25: ...cooking after the controls are off How to Set a Delayed Start and Automatic Stop You can set the upper oven control to delay start the oven cook for a specific length of time and then turn off automa...

Страница 26: ...hut off and leave the control set in this special features mode Fahrenheit or Celsius Temperature Selection Your oven control is set to use the Fahrenheit temperature selections but you may change thi...

Страница 27: ...feature is activated The adjustment will be retained in memory after a power failure Range Lockout Auto Recipe Conversion You can use your favorite recipes in the convection oven When using CONVECTION...

Страница 28: ...ute until only is in the display Press and hold both the BAKE and BROIL HI LO pads at the same time until the display shows SF Tap the DELAY START pad until 12 shdn or no shdn appears in the display 1...

Страница 29: ...djustment touch the START pad to go back to the time of day display Use your oven as you would normally NOTE The thermostat adjustment for Baking will also affect Convection Baking or Convection Roast...

Страница 30: ...n Temperature Time WARM 10 minutes 350 F 20 minutes 425 F 30 minutes Back of Lower Oven Knob Appearance may vary You may find that your new oven cooks differently than the one it replaced Use your new...

Страница 31: ...ipe up heavy soil on the oven bottom How to Set the Upper Oven for Cleaning Turn off all surface burners NOTE The surface burners will not function during the self clean cycle Touch the SELF CLEAN pad...

Страница 32: ...y Touch the RANGE LOCKOUT pad and then the START pad to turn it off See the Range Lockout section NOTE The surface units must be turned off prior to the self clean start time Touch the SELF CLEAN pad...

Страница 33: ...omething as simple as leaving fingerprint smudges on the stainless steel surface overnight For stainless steel appliances where blemishes are prone to show on the surface we recommend APPLYINGACOATOFC...

Страница 34: ...to clean this by hand Any soap left on the liner causes additional stains when the oven is heated The area outside the gasket can be cleaned with a soap filled plastic scouring pad Do not allow food s...

Страница 35: ...ake sure the drawer heating element is cool Removable Lower Oven Drawer Pan NOTE Allow lower oven drawer to cool before removing pan NOTE Wipe spills promptly after each use Never place use or self cl...

Страница 36: ...panel they will damage the finish A 50 50 solution of vinegar and hot water works well The control knobs may be removed for easier cleaning Make sure the knobs are in the OFF positions and pull them s...

Страница 37: ...old appliance bulb To replace cover Place it into the groove of the light receptacle Pull the wire forward to the center of the cover until it snaps into place When in place the wire holds the cover f...

Страница 38: ...l recommended supplies are available through our Parts Center See instructions under To Order Parts section on next page N NO OT TE E Do not use a dull or nicked blade Heavy Burned On Residue Use a CE...

Страница 39: ...s s su uc ch h a as s j je el ll ly y o or r f fu ud dg ge e a an nd d h ha av ve e a a s sp pi il ll lo ov ve er r i it t c ca an n c ca au us se e p pe er rm ma an ne en nt t d da am ma ag ge e t to...

Страница 40: ...ctions with the Consumer Note to Consumer Keep these instructions for future reference Skill level Installation of this appliance requires basic mechanical skills Completion time 1 to 3 hours Proper i...

Страница 41: ...the cooktop shall conform to the installation instructions packed with that appliance If cabinet storage is installed reduce the risk by installing a range hood that projects horizontally a min of 5 b...

Страница 42: ...branch circuit protected by a circuit breaker or fuse having amperage as specified on the rating plate The rating plate is located behind the oven drawer on the oven frame We recommend you have the el...

Страница 43: ...d strain relief they can be removed for better fit NOTE Do not install the power cord without a strain relief The strain relief bracket should be installed before reinstalling the rear range wiring co...

Страница 44: ...ected to the center lower position of the terminal block Tighten screws securely into the terminal block Skip to Step 8 and proceed with the installation D E C B A 5 3 WIRE POWER CORD INSTALLATION WAR...

Страница 45: ...Skip to Step 8 and proceed with the installation A B 6 4 WIRE CONDUIT INSTALLATION Loosen the three lower terminal screws from the terminal block Remove the ground screw and ground plate and retain t...

Страница 46: ...cover on the range back by sliding its right edge under the retaining tab and replacing the two screws removed earlier Make sure that no wires are pinched between the cover and the range back 8 LEVEL...

Страница 47: ...t the rear leveling leg is fully inserted into the Anti Tip bracket and that the bracket is securely installed 11 OPERATION CHECKLIST Turn on one of the surface units to observe that the element glows...

Страница 48: ...t colored glass when it is hot This is temporary and will disappear cooktop as the glass cools Plastic melted to Hot cooktop came into See the Glass surface potential for permanent damage the surface...

Страница 49: ...let properly grounded outlet Upper oven will not The oven temperature is too Allow the range to cool to room temperature and self clean high to set a self clean operation reset the controls Oven contr...

Страница 50: ...d the inside of the oven is normal for the first few times the oven is used LOC appears in The Range Lockout feature Be sure the surface unit controls are turned OFF the display is activated Turn this...

Страница 51: ...51 OWNERSHIP REGISTRATION P O BOX 1780 MISSISSAUGA ONTARIO L4Y 4G1 FOR CANADIAN CONSUMERS ONLY Please place in envelope and mail to Veuillez mettre dans une enveloppe et envoyez...

Страница 52: ...52...
Страница 53: ...cks Wishing you had extra heavy duty oven racks NOW AVAILABLE for your range GE s innovative self cleanable porcelain coated oven racks Heavy Duty Durable Able to be cleaned in a self cleaning oven Vi...

Страница 54: ...ult your local or state consumer affairs office or your state s Attorney General Warrantor General Electric Company Louisville KY 40225 For The Period Of GE Will Replace One Year Any part of the range...

Страница 55: ...ktop if it should crack due to thermal shock discolor crack at the From the date of the rubber seal between the glass cooktop and the porcelain edge or if the pattern wears off original purchase A rep...

Страница 56: ...anytime or call 800 626 2224 during normal business hours GE Consumer Home Services will still be there after your warranty expires In Canada call 1 888 261 2133 Parts and Accessories In the U S GEApp...

Отзывы: