


49-88068
19
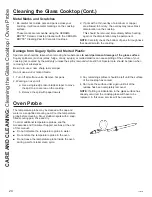
Oven Probe
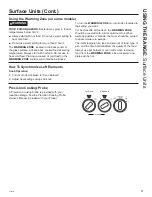
USING THE RANGE:
Oven Probe
Internal food temperature is frequently used as an
indicator of doneness, especially for roasts and poultry.
The Probe mode monitors the internal food temperature
and turns the oven off when the internal food
temperature reaches the programmed temperature.
Always check the temperature at multiple locations in
the food with a food thermometer after cooking to ensure
that all portions of the food have reached the minimum
safe internal temperature for that food.
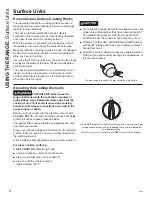
Proper Probe Placement
After preparing the meat and placing it on the cooking
pan follow these instructions for proper probe placement.
Ŷ ,QVHUWWKHSUREHLQWRWKHIRRGVRWKDWWKHWLSRIWKH
probe will rest in the center of the thickest part of
the food. For best performance the probe should
be fully inserted into the food. If the probe is not
located properly, it may not accurately measure the
temperature of the coolest portion of the food. Some
foods, particularly small items, are not well suited for
cooking with the probe due to their shape or size.
Ŷ 7KHSUREHVKRXOGQRWWRXFKERQHIDWRUJULVWOH
Ŷ )RUZKROHSRXOWU\LQVHUWWKHSUREHLQWRWKHWKLFNHVW
part of the breast.
Ŷ )RUERQHOHVVURDVWVLQVHUWWKHSUREHLQWRWKHFHQWHU
of the roast.
Ŷ )RUERQHLQKDPRUODPELQVHUWWKHSUREHLQWRWKH
center of the lowest large muscle or joint.
Ŷ )RUFDVVHUROHVRUGLVKHVVXFKDVPHDWORDILQVHUWWKH
probe into the center of the dish.
Ŷ )RUILVKLQVHUWWKHSUREHIURPMXVWDERYHWKHJLOOLQWR
the meatiest area, parallel to the backbone.
Probe Usage
The temperature probe can only be used with Bake,
Convection Bake, and Convection Roast.
To use the probe with preheating:
1. Select the desired cook mode (
Bake
,
Convection
Bake
, or
Convection Roast
) pad and enter the
desired cooking temperature with the number pads.
2. Insert the probe into the food (see Proper Probe
Placement).
3. Once the oven is preheated, place the food in the
oven and connect the probe to the probe outlet,
PDNLQJVXUHLWLVIXOO\LQVHUWHG8VHFDXWLRQWKHRYHQ
walls and probe outlet are hot.
4. When the probe is connected, the display will prompt
you to enter the desired food temperature. The
maximum internal food temperature that you can set
is 200° F.
To use the probe without preheating:
1. Insert the probe into the food (see Proper Probe
Placement).
2. Place the food in the oven and connect the probe into
the probe outlet in the oven.
3. Press the
Cook Mode
pad (
Traditional Bake
,
Convection Bake
, or
Convection Roast
) and
enter the desired cooking temperature with the
number pads. Press
Options
and select
Probe
then
follow the display prompts to enter the desired food
temperature.
Probe Care Guidelines
Ŷ 8VHRISUREHVRWKHUWKDQWKHRQHSURYLGHGZLWKWKLV
product may result in damage to the probe outlet.
Ŷ 8VHWKHKDQGOHVRIWKHSUREHDQGSOXJZKHQLQVHUWLQJ
and removing them from the meat and outlet
Ŷ 7RDYRLGGDPDJLQJ\RXUSUREHGRQRWXVHWRQJVWR
pull on the cable when removing it.
Ŷ 7RDYRLGEUHDNLQJWKHSUREHPDNHVXUHIRRGLV
completely defrosted before inserting the probe.
Ŷ 7RSUHYHQWSRVVLEOHEXUQVGRQRWXQSOXJWKHSUREH
from the outlet until the oven has cooled.
Ŷ 1HYHUOHDYHWKHSUREHLQVLGHWKHRYHQGXULQJDVHOIRU
steam clean cycle.
Ŷ 'RQRWVWRUHWKHSUREHLQWKHRYHQ
WARNING
Consuming undercooked food can result in foodborne illness. Use probe according to
the following instructions to ensure all portions of the food reach minimum safe cooking temperatures.
Recommendations for minimum safe food temperatures can be found at
www.foodsafety.gov or www.IsItDoneYet.gov.


