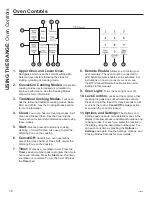
GE CHS995 Скачать руководство пользователя страница 18

18

49-88068

USING 

THE 

RANGE:

 Cooking 

Modes

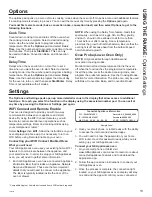
Cooking Modes (Cont.)

Frozen Snacks

The Frozen Snacks modes are designed to cook frozen 
foods such as potato nuggets, French fries, and similar 
frozen snacks and appetizers. Most foods will cook 
within package recommended time. Adjust cooking time 
according to individual preferences. 

8VH)UR]HQ6QDFNV6LQJOHZKHQFRRNLQJIUR]HQVQDFNV

on a single rack. This mode does not require preheating 
the oven. Food should be placed in the oven before or 
immediately upon starting this mode. 

8VH)UR]HQ6QDFNV0XOWLZKHQFRRNLQJIUR]HQVQDFNV

on two racks simultaneously. This mode includes a 
preheating cycle to prepare the oven for multi-rack 
baking. Press 

Options

 and select 

Frozen

 then follow any 

display prompts to access this mode.

Frozen Pizza

The Frozen Pizza modes are designed to cook 
frozen pizzas. Most pizzas will cook within package 
recommended times. Adjust cooking time according to 
individual preferences. 

8VH)UR]HQ3L]]D6LQJOHZKHQFRRNLQJRQDVLQJOHUDFN

This mode does not require preheating the oven. Food 
should be placed in the oven before or immediately upon 
starting this mode. 

8VH)UR]HQ3L]]D0XOWLZKHQFRRNLQJRQWZRUDFNV

simultaneously. This mode includes a preheating cycle 
to prepare the oven for multi-rack baking. Press 

Options


and select 

Frozen 

then follow any display prompts to 

access this mode.

Baked Goods

The Baked Goods mode is designed for cooking cakes, 
breads, cookies, and similar foods on a single rack. This 
mode is designed to provide lighter top browning and 
better volume. Some foods may require slightly longer 
cook times relative to when cooked in the traditional bake 
mode. Press 

Options

 and select 

Baked


Goods

 than 

follow any display prompts to access this mode.

Convection Bake Multi Rack

The Convection Bake mode is intended for baking 
on multiple racks at the same time. This mode uses 
air movement from the convection fan to enhance 
cooking evenness. Your oven is equipped with Auto 
Recipe Conversion, so it is not necessary to adjust the 
temperature when using this mode. Always preheat 
when using this mode. Baking times may be slightly 
longer for multiple racks than what would be expected 
for a single rack. To use this mode press the 

Conv Bake 

pad, enter a temperature with number pads, and then 
press 

Start/Enter

Convection Roast

The Convection Roast mode is intended for roasting 
whole cuts of meat on a single rack. This mode uses air 
movement from the convection fan to improve browning 
and reduce cooking time. Check food earlier than the 
recipe suggested time when using this mode, or use the 
probe (see the Probe section for more information). It is 
not necessary to preheat when using this mode. To use 
this mode press the 

Conv Roast 

pad, enter a temperature 

with the number pads, and then press 

Start/Enter

.

Proof

Proof mode maintains a warm  environment for rising 
yeast-leavened dough. If the oven is too warm, Proof 
mode will not operate and the display will show "Oven 
too hot for Proof". For best results, cover the dough 
while proofing and check early to avoid over-proofing.

CAUTION


'RQRWXVHWKH3URRIPRGHIRUZDUPLQJ

food or keeping food hot. The proofing oven temperature 
is not hot enough to hold foods at safe temperatures.

Содержание CHS995

Страница 1: ...FETY INFORMATION 3 USING THE RANGE Surface Units 8 Cookware for Induction Cooktop 10 Oven Controls 12 Options 13 Settings 13 Sabbath Mode 15 Oven Racks 16 Aluminum Foil and Oven Liners 17 Cookware 17...

Страница 2: ...to every GE Appliances product and we think you will too Among other things registration of your appliance ensures that we can deliver important product information and warranty details when you need...

Страница 3: ...n panel by removing the fuse or switching off the circuit breaker R QRW OHDYH FKLOGUHQ DORQH FKLOGUHQ VKRXOG QRW be left alone or unattended in an area where an appliance is in use They should never b...

Страница 4: ...or by using a multi purpose dry chemical or foam type fire extinguisher I WKHUH LV D ILUH LQ WKH RYHQ GXULQJ VHOI FOHDQ WXUQ the oven off and wait for the fire to go out R QRW force the door open Intr...

Страница 5: ...is inadvertently turned on they may ignite Heat from the cooktop or oven vent after it is turned off may cause them to ignite also R QRW SODFH PHWDOOLF REMHFWV VXFK DV NQLYHV IRUNV spoons and lids on...

Страница 6: ...eration R QRW WRXFK RYHQ VXUIDFHV GXULQJ VHOI FOHDQ RSHUDWLRQ HHS FKLOGUHQ DZD IURP WKH RYHQ GXULQJ self cleaning Failure to follow these instructions may cause burns HIRUH RSHUDWLQJ WKH VHOI FOHDQ F...

Страница 7: ...visable to consult your doctor or the pacemaker manufacturer about your particular situation 8VH WKLV DSSOLDQFH RQO IRU LWV LQWHQGHG SXUSRVH DV described in this Owner s Manual H VXUH RXU DSSOLDQFH LV...

Страница 8: ...LUHFWO with hands Always use mitts or pot holders to protect hands from burns 2 127 6 FRRNZDUH DFURVV WKH FRRNWRS VXUIDFH RLQJ VR PD SHUPDQHQWO GDPDJH WKH DSSHDUDQFH RI the ceramic cooktop The pan mat...

Страница 9: ...back center of the glass surface will keep hot cooked food at serving WHPSHUDWXUH OZD V VWDUW ZLWK KRW IRRG R QRW XVH WR heat cold food Placing uncooked or cold food on the WARMING ZONE could result...

Страница 10: ...rim For best performance match the pan size to the element VL H 8VLQJ D VPDOOHU SRW RQ D ODUJHU EXUQHU ZLOO JHQHUDWH less power at any given setting Cookware Noise Slight sounds may be produced by dif...

Страница 11: ...ded minimum size for the cooking element used INCORRECT CORRECT Pan bottom rests on cooktop trim or does not rest completely on the cooktop surface Heavy handle tilts pan Pan is partially magnetic on...

Страница 12: ...tdown timer Press the Timer pad and number pads to program the time in hours and minutes Press the Start pad The timer countdown is complete To turn the timer off press the Timer pad 8 Remote Enable A...

Страница 13: ...Bake and Convection Roast Settings The Options and Settings pads open up more detailed menus in the display that allow access to additional functions For each you select the function in the display u...

Страница 14: ...corresponding instructions included with the mating Chef Connect enabled product The range will cancel pairing mode after two minutes if no mating device is detected Select Remove to confirm product i...

Страница 15: ...pads to select a different preset cooking temperature and press Start Enter 2 Since no feedback is given during temperature change an oven thermometer can be used to confirm temperature changes Start...

Страница 16: ...VXSSRUWV NOTE Remove unused racks when using the oven for faster preheat improved efficiency and optimal cooking performance Extension Racks on some models Extension racks have a frame that locks int...

Страница 17: ...position and other recommendations for specific modes and foods Bake The bake mode is for baking and roasting When preparing baked goods such as cakes cookies and pastries always preheat the oven fir...

Страница 18: ...hter top browning and better volume Some foods may require slightly longer cook times relative to when cooked in the traditional bake mode Press Options and select Baked Goods than follow any display...

Страница 19: ...ct the desired cook mode Bake Convection Bake or Convection Roast pad and enter the desired cooking temperature with the number pads 2 Insert the probe into the food see Proper Probe Placement 3 Once...

Страница 20: ...skin side down first Watch food closely when broiling For best performance when broiling center food below the broil heater or burner Boneless chicken breasts Broil Low Bake 8SSHU Lower 1 2 0RYH IRRG...

Страница 21: ...r or vinegar and water solution Rinse with clean water and dry with a soft cloth When cleaning surfaces make sure that they are at room temperature and not in direct sunlight If stain on the door vent...

Страница 22: ...rack may become difficult to slide See the Oven Racks section for instructions on how to improve IMPORTANT The health of some birds is extremely sensitive to the fumes given off during the self clean...

Страница 23: ...cool 2 Spread a few drops of CERAMA BRYTE Ceramic Cooktop Cleaner on the entire burned residue area 8VLQJ WKH LQFOXGHG 5 0 5 7 Cleaning Pad for Ceramic Cooktops rub the residue area applying pressure...

Страница 24: ...stances Be sure to use a new sharp razor scraper R QRW XVH D GXOO RU QLFNHG EODGH 1 Turn off all surface units Remove hot pans 2 Wearing an oven mitt D 8VH D VLQJOH HGJH UD RU EODGH VFUDSHU WR PRYH th...

Страница 25: ...r circuit breaker panel Let the bulb cool completely before removing it For your safety do not touch a hot bulb with a damp cloth If you do the bulb may break To remove 7XUQ WKH JODVV FRYHU FRXQWHUFOR...

Страница 26: ...and down to the locked position 5 Close the oven door Removal position Pull hinge locks up to unlock Push hinge locks down to lock Rest notch on bottom edge of hinge slot Notch Bottom edge of slot Hi...

Страница 27: ...ormal The surface may appear discolored when it is hot This is temporary and will disappear as the glass cools Plastic melted to the surface Hot cooktop came into contact with plastic placed on the ho...

Страница 28: ...n The probe is plugged into the outlet in the oven Remove the probe from the oven Oven will not steam clean LVSOD IODVKHV 27 Allow the oven to cool to room temperature and reset the controls Oven cont...

Страница 29: ...eat Remove items to reduce preheat time Number of racks in oven Adding more racks to the oven will cause the oven to take longer to preheat Remove some racks LIIHUHQW FRRNLQJ PRGHV The different cooki...

Страница 30: ...FHSW IRU ODPSV EXCLUSION OF IMPLIED WARRANTIES Your sole and exclusive remedy is product repair as provided in this Limited Warranty Any implied warranties including the implied warranties of merchan...

Страница 31: ...ssories Small Broiler Pan 8 x 1 x 13 Large Broiler Pan 12 x 1 x 16 URLOHU 3DQ Parts Oven racks Oven elements Light bulbs Cleaning Supplies CitruShine Stainless Steel Wipes CERAMA BRYTE Stainless Steel...

Страница 32: ...le while your warranty is still in effect You can purchase it on line anytime GE Appliances Services will still be there after your ZDUUDQW H SLUHV Q WKH 86 GEAppliances com ge service and support sho...

Страница 33: ...ons Opciones 13 Settings Configuraciones 13 Modo Sab tico 15 Estantes del Horno 16 Papel de Aluminio y Cobertores del Horno 17 Utensilios 17 Modos de Cocci n 17 Sonda del Horno 19 Gu a de Cocci n 20 C...

Страница 34: ...reemos que usted tambi n Entre otras cosas el registro de su electrodom stico asegura que podamos entregarle informaci n importante del producto y detalles de la garant a cuando los necesite Registre...

Страница 35: ...H D ORV QLxRV VRORV pVWRV QR GHEHQ TXHGDU VRORV o sin atenci n en un rea donde un aparato est en uso Nunca debe permitirse que se suban sienten o paren en cualquier parte de este aparato PRECAUCI N No...

Страница 36: ...KRUQHDGR ap guelo cerrando la puerta del horno y apagando el control o usando un qu mico seco multiuso o un extintor de incendios de espuma 6L KD XQ LQFHQGLR HQ HO KRUQR GXUDQWH OD DXWR OLPSLH D apag...

Страница 37: ...cocci n o de la ventilaci n del horno luego de que este fue apagado podr hacer que dichos productos se incendien tambi n 1R FRORTXH REMHWRV PHWiOLFRV WDOHV FRPR FXFKLOORV tenedores cucharas y tapas so...

Страница 38: ...H XWLOL DU HO FLFOR GH OLPSLH D DXWRPiWLFD OLPSLH la grasa y restos de comida que haya en el horno Una cantidad excesiva de grasa se puede incendiar lo cual puede producir da os con humo en su hogar 6...

Страница 39: ...H XQ FLUFXLWR GLIHUHQWH del tomacorriente al que se encuentra conectado el receptor 3DUD VROLFLWDU D XGD FRQVXOWH FRQ HO SURYHHGRU PLQRULVWD R D XQ WpFQLFR H SHULPHQWDGR GH UDGLR 79 b tolerar cualquie...

Страница 40: ...agarraderas para proteger las manos de quemaduras 12 6 UHFLSLHQWHV GH FRFFLyQ D WUDYpV GH la superficie de la estufa Hacerlo puede da ar permanentemente la apariencia de la estufa de cer mica El mater...

Страница 41: ...uraci n deseada Para obtener mejores resultados todas las comidas en el WARMING ZONE rea para Calentar deber an estar cubiertas por una tapa o papel de aluminio Al calentar pasteles o panes la tapa se...

Страница 42: ...iente al tama o del elemento Usar una olla m s peque a sobre un quemador m s grande genera menos energ a en cualquier configuraci n Ruidos de los recipientes de cocci n Diferentes tipos de recipientes...

Страница 43: ...completo sobre la superficie de la estufa Una manija pesada inclina el recipiente La base del recipiente se apoya completamente sobre la superficie de la estufa El recipiente est bien equilibrado La...

Страница 44: ...a programar el tiempo en horas y minutos Presione la tecla Start Iniciar La cuenta regresiva del temporizador se complet Para apagar el temporizador presione la tecla Timer Temporizador 8 Remote Enabl...

Страница 45: ...de Cocci n La sonda s lo puede ser usada con las funciones Bake Hornear Convection Bake Hornear por Convecci n y Convection Roast Dorar por Convecci n Settings Configuraciones Las teclas Options Opcio...

Страница 46: ...e emparejamiento luego de dos minutos si no es detectado ning n dispositivo para emparejar Seleccione Remove Retirar para confirmar que el producto est emparejado o para desemparejar el mismo de su co...

Страница 47: ...s teclas num ricas de 1 a 5 para seleccionar una temperatura de cocci n actual diferente y presione Start Enter Iniciar Ingresar 2 Debido a que no hay ninguna indicaci n durante el cambio de temperatu...

Страница 48: ...los estantes en desuso al usar el horno para un precalentamiento m s r pido mayor eficiencia y un rendimiento ptimo de la cocci n Estantes Extensibles en algunos modelos Los estantes extensibles cuent...

Страница 49: ...erde que es posible que su nuevo horno funcione de manera diferente que aquel que est reemplazando Bake Hornear El modo de horneado es utilizado para hornear y dorar Al preparar comidas horneadas tale...

Страница 50: ...rior m s leve y un mejor volumen Algunas comidas podr n requerir tiempos de cocci n m s prolongados en relaci n a cuando se cocina en el modo de horneado tradicional Presione la tecla Options Opciones...

Страница 51: ...OD VRQGD MXVWR DUULED GH OD agalla en la zona m s carnosa paralela a columna Uso de la Sonda La sonda de temperatura s lo puede ser usada con las funciones Bake Hornear Convection Bake Hornear por Co...

Страница 52: ...asarla Para un mejor rendimiento centre la comida debajo del elemento que emite calor para asar o del quemador Hornear Dorado por Convecci n Bake Convection Roast Inferior 2 Use una olla chata tal co...

Страница 53: ...n agua limpia y seque con una tela seca Al limpiar supeficies aseg rese de que est n a temperatura ambiente y fuera del contacto con la luz solar Si las manchas en el borde de la ventana de la puerta...

Страница 54: ...limpieza de cualquier horno afectan la salud de algunas aves de manera notoria Procure llevar sus aves a otra habitaci n bien ventilada Para usar la funci n Self Clean Limpieza Autom tica 1 Comience c...

Страница 55: ...ropajos que no sean los recomendados 1 Deje enfriar la estufa 2 Coloque unas gotas del limpiador de estufas cer micas CERAMA BRYTE sobre toda el rea de residuos pegados 3 Utilizando el pa o de limpiez...

Страница 56: ...tancias calientes Aseg rese de utilizar un raspador nuevo y afilado No utilice hojas desafiladas o da adas SDJXH WRGDV ODV XQLGDGHV GH VXSHUILFLH 4XLWH ODV ROODV calientes 2 Utilizando un guante de co...

Страница 57: ...ranuras de la ficha D a la tapa de vidrio un cuarto de giro en direcci n de las agujas del reloj NOTA DV OiPSDUDV SDUD electrodom stico de 40 watts son m s peque as que las l mparas hogare as de 40 wa...

Страница 58: ...e la puerta del horno Posici n de retiro Empuje los bloqueos de las bisagras hacia arriba para desbloquearlos Empuje trabas de la bisagra hacia abajo para bloquear Apoye la abertura en el extremo infe...

Страница 59: ...bases lisas reas de decoloraci n en la estufa No se limpiaron los derrames de alimentos antes del uso siguiente Ver la secci n C mo limpiar la estufa de vidrio Superficie caliente en un modelo con una...

Страница 60: ...HOT Caliente Espere a que la cocina se enfr e a temperatura ambiente y reinicie los controles Controles del horno configurados de forma incorrecta Consulte la secci n Uso de Limpieza al Vapor La puer...

Страница 61: ...cir el tiempo de precalentamiento N mero de estantes en el horno Agregar m s estantes al horno har que ste tarde m s en precalentarse Retire algunos estantes Diferentes modos de cocci n Los diferentes...

Страница 62: ...oducto DxR FDXVDGR GHVSXpV GH OD HQWUHJD 3URGXFWR QR DFFHVLEOH SDUD EULQGDU HO VHUYLFLR UHTXHULGR 6ROLFLWH HO VHUYLFLR WpFQLFR SDUD UHSDUDU R UHHPSOD DU ODV l mparas excepto las l mparas LED GARANT A...

Страница 63: ...la para Asar Extra Grande 17 x 1 x 19 Piezas Estantes del horno Elementos del horno L mparas de luz Sonda Suministros de Limpieza Limpiadores de Acero Inoxidable CitriShine Limpiador de Electrodom sti...

Страница 64: ...dquirir en cualquier momento a trav s de Internet Los servicios de GE Appliances a n estar n all cuando su garant a caduque En EE UU GEAppliances com ge service and support shop for extended service p...

Отзывы: