GE Appliances JDC27GP Скачать руководство пользователя страница 13

Features of Your Oven Control

?

?

1. 

PROGRAM STATUS. Words

light up in the display   show the
selected oven mode.

 information 

 be

displayed at 

 time by pressing


 the operation you 

 see. 

For example, you can

display the current time   day
while the timer is counting down
by pressing the CLOCK pad.

2. TIME DISPLAY. Shows the
time   day, the times set 

 the

timer or automatic oven operation.

 OVEN TEMPERATURE

AND BROIL DISPLAY. Shows
the oven temperature or the broil
setting selected.

4. FUNCTION INDICATORS.

Lights up to show whether oven is
in bake or broil mode.

5. INCREASE. Short taps to this
pad increase time or temperature
by 

 amounts. Press and hold

pad to increase time or temperature
by 

 amounts.

6. DECREASE. Short taps to this
pad decrease time   temperature
by 

 amounts. Press and hold

pad to decrease time or
temperature by larger amounts.

BAKE. Press this pad to select

 function. Then tap or press

INCREASE or DECREASE pad to
display desired temperature.
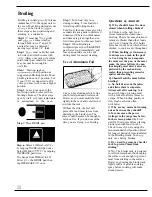
8. BROIL. 

 this pad to select

broil function. Then tap
INCREASE pad once to broil at
LO 

 or twice to broil at 

 Tap DECREASE pad to

change back to LO broil.

9. COOK TIME. Press this pad
and then press the INCREASE 
DECREASE pad to set the amount
of time you want your food to
cook. Press BAKE and the
INCREASE or DECREASE pad to
set the oven temperature. The oven
will shut off after the selected
Cook Time has run out.

10. 

STOP TIME. Use this pad

 with COOK 

TIME 

INCREASE 

or DECREASE pad to

set the oven to start automatically,
cook for a specified time and stop
automatically at a time you select.

11. 

CLOCK. Press this pad before

setting the clock.

To set 

 first press CLOCK

pad. “TIME” will flash in the
display. Tap INCREASE or
DECREASE pad to change the
time of day by small amounts.
Press and hold INCREASE or
DECREASE pad to change the
time of 

 by larger amounts.

12. 

 ON/OFF. Press this

pad to select timer function. The
timer does not control oven
operations. Press pad again to
turn it off.

To set timer, first press 
pad. “TIMER” 


 in the

display. Tap INCREASE or

DECREASE pad to change the
time by 

 amounts. Press and

hold INCREASE or DECREASE
pad to change the time 

 larger

amounts.

Hours and minutes will be
displayed if the time set on the
timer is more than 1 hour. Minutes
and seconds will be displayed if
the 

 set on the timer is less

than   hour.

13. CLEAR/OFF. Press this pad

to cancel all oven operations
except clock and timer.

 “F-” 


on display, this indicates a
function error code. 
Press
CLEAR/OFF pad. 

 oven

to cool for one hour. Place back
into operation. If the problem
repeats. disconnect power to

 the oven and call for service.

Содержание Appliances JDC27GP

Страница 1: ...Services Safety Instructions 3 4 Energ kwing Tips 5 Surface Cooking 8 11 Features 6 7 Control Settings Model and Serial Numbers 2 Cooking Guide lo 11 Oven 12 Cookware Tim 10 11 Baking Baking Guide 15...

Страница 2: ...contact the dealer or builder that sold you the range Save time and money Before you request service Check the Problem Solver in the back of this book It lists causes of minor operating problems that...

Страница 3: ...other bulky cloth For your safety never use your appliance for warming or heating the room Do not leave paper products cooking utensils or food in the oven when not in use Do not store flammable mater...

Страница 4: ...sy spillovers that may catch on fire Q Be sure drip pans and vent ducts are not covered and are in place Their absence during cooking could damage range parts and wiring Don t use aluminum foil to lin...

Страница 5: ...ways turn surface unit off before removing cookware Oven Cooking Preheat oven only when necessary Most foods will cook satisfactorily without preheating If you find preheating is necessary watch the i...

Страница 6: ...Features of Your Range I Model JDS26Gp JDC27GP JDS27GP I 6...

Страница 7: ...ed under right rear surface unit 11 Oven Controls Automatic Oven Timer turns your oven on and off for you automatically Oven Control and Thermostat Clock Timer lets you time any kitchen function even...

Страница 8: ...t only from OFF position When control is in any position other than OFF it may be rotated without pushing in Be sure you turn control to OFF when you finish cooking An indicator light will glow when A...

Страница 9: ...aking sure they are cool check to make sure that yoLu plug in units are securely fastened into the surface connection Q Why does my cookware tilt when I place it on the surface unit A Because the surf...

Страница 10: ...not combined with other metals Directions and Settings to Complete Cooking MEDIUM LO or LO Lhen add cereal Finish iming according to package directions MED to cook I or 2 minutes to completely blend i...

Страница 11: ...is heard HI Bring just to boil HI Measure I 2 to 1 inch water in saucepan Add salt and prepared vegetable In covered saucepan bring to boil HI Measure water and salt as above Add frozen block of veget...

Страница 12: ...when voLI are removing food from them Or placing food on them When placing cookware on a shelf pLli the shelf IU IO he stop position Place he ccmkwam on the shelf then slide the shelf back into the t...

Страница 13: ...amount of time you want your food to cook Press BAKE and the INCREASE or DECREASE pad to set the oven temperature The oven will shut off after the selected Cook Time has run out 10 STOP TIME Use this...

Страница 14: ...REASE or DECREASE pad to set the amount of time on the timer The timer will start automatically within a few seconds of releasing the pad The timer as you arc setting it will display seconds until 60...

Страница 15: ...baking is finished and then remove food from oven How to Time Bake The oven control allows you to turn the oven on or off automatically at specific times that you set NOTE Before beginning make sure t...

Страница 16: ...OP TIME pad 151m 5 00 tippears on the display and STOP TIME flashes The control automatically sets Stop Time by adding the Cook Time to the time of day In this example the time of day is 2 00 and the...

Страница 17: ...s Loat Pans Metal or Glass Loat Pins Shiny Obkmg or Muffin Pans Shiny Ohiong 01 Mutfin pans Pldin rolls SWCLX 1 0115 Cakes wi houl shot tcning Angel I ood lcll roll Aiuminum Tube pun Mwd telly Roll Pi...

Страница 18: ...erature during Bake cycle press BAKE pad and then INCREASE or DECREASE pad to get new temperature Remove fat and drippings as necessary Baste as desired Step 5 Press CLEAR OFF when baking is finished...

Страница 19: ...3500 325 Doneness Rare Medium Well Done Rare Medium Well Done Well Done Well Done To Warm Well Done Well Done Well Done Well Done Approximate Roasting Time in Minutes per Pound 3 to 5 lbs 6 to 8 lbs...

Страница 20: ...the foil tightly to the rack and cut slits in it just like the rack Without the slits the foil will prevent fat and meat juices from draining to the broiler pan The juices could become hot enough to...

Страница 21: ...10 7 5 6 Ii 7 8 14 16 20 25 Beet Steaks Rare Medium Well Done Ral e Mdi Llnl en Done HI 6 12 10 15 15 LO 35 HI I F 2 3 4 HI 13 16 HI 5 1 in thick I to 17 Ibs c c c c c c A Steks less than I in thick c...

Страница 22: ...ing a small amount of water and a stiff bristle nylon brush Use water sparingly and change it frequently keeping it as clean as possible and be sure to blot it up with paper towels cloth or sponges Do...

Страница 23: ...bulb when replacing it To remove Unscrew and 1 ift off the glass cover Remove the bulb To replace Put in a new 40 watt appliance bulb NOTE A 40 watt appliance bulb is smaller than a standard 40 watt h...

Страница 24: ...years may drift from the factory setting and differences in timing between an old and a new oven of 5 to 10 minutes are not unusual You may be inclined to think that the new oven is not performing cor...

Страница 25: ...steel Ii wIcI clc m sul t dccs wi sh rinse LUUJ then polish wool abrasives with tI dt y cloth ammonia acids or commercial oven cleaners Wush all glass with cloth Lkunperwd in s Mp w iter Rinse tlnd po...

Страница 26: ...ked on hot pan Cookware is not suitable for broiling Aluminum foil used on the broil pan rack has not been fitted properly and slit as recommended Oven controls not properly set Check Roasting or Baki...

Страница 27: ...chase a IX contract while your war ranty is still in effect and you ll receive a substantial discount With a multiple year contract you re assured of future service at today s prices Telecommunication...

Страница 28: ...use fuses or teach you how to use the product resetting of circuit breakers Read your Use and Care material Failure of the product if it is used If you then have any questions for other than its inten...

Отзывы: