background image

No function (reserved 

for future use)

8

Co

ns

um

er

 S

up

po

rt

Tr

ou

bl

es

ho

ot

in

Ti

ps

In

st

al

la

tio

In

st

ru

ct

io

ns

Ca

re

 a

nd

 C

le

an

in

g

O

pe

ra

tin

In

st

ru

ct

io

ns

Sa

fe

ty

 In

st

ru

ct

io

ns

About the controls on the air conditioner

Auxiliary Controls – Dip Switches (location varies by model)

Vent Control

The vent control is located behind the front grille on the 

right side of the air discharge area. When 

CLOSED

, only 

the air inside the room will be circulated and conditioned. 

When 

OPEN

, the vent allows outdoor fresh air exchange.

To open or close the vent:

1. Remove the front grille.

2. Remove the vent card screw.

3. Remove vent card, turn it over and replace it by 

locating rear hole in card over locating pin inside air 

discharge and reattaching screw at front. 

Horizontal louvers  

on the front grille 

let you control the 

air direction up and 

down. 

Remove the front grille 

to adjust the vertical 

louvers side-to-side  

to direct the air left  

or right.

Air Direction

Locating hole

Screw hole

OPEN position  

(Mesh end toward back)

CLOSE position  

(Mesh end toward front)

Locating hole

Screw hole

The unit leaves the factory set at the CLOSE position.

The auxiliary dip switch controls are located 

behind the room cabinet—as shown in this figure.
The owner is responsible for checking switches 

and ensuring they are in the desired position.

Fan Cycle/Continuous - Cool     

Fan Cycle/Continuous - Heat (on some models)

Class 2 (on some models)

Fan Cycle/Continuous - Cool

When this switch is enabled 

(UP)

, it allows the indoor 

fan to cycle on/off with the compressor. When this 

switch is disabled

 (DOWN)

,  it allows the indoor fan to run 

continuously. The default setting is down (continuous).

Fan Cycle/Continuous - Heat (on some models)

When this switch is enabled 

(UP)

, it allows the indoor 

fan to cycle on/off with the heater operation. When this 

switch is disabled

 (DOWN)

,  it allows the indoor fan to run 

continuously. The default setting is 

UP

 (cyclic).

Class 2 - Remote Thermostat (on some models)

When this switch is enabled 

(UP)

, it allows the unit 

to operate with a Class 2 Remote Control Wall 

Thermostat. The unit controls are disabled.  

The default setting is down (disabled).

Fan Cycle/Continuous - Cool     

Fan Cycle/Continuous - Heat (on some models)

Class 2 (on some models)

Содержание AJCM08ACD

Страница 1: ...ling a J Model in an Existing Wall Case 14 Through the Wall Installation 15 Window Installation Optional 16 21 Troubleshooting Tips 22 Normal Operating Sounds 22 Consumer Support Consumer Support Back...

Страница 2: ...with refrigerants check with the company handling disposal about what to do SAFETY PRECAUTIONS WARNING Risk of electric shock Can cause injury or death This appliance must be properly grounded Do not...

Страница 3: ...properly grounded 2 prong wall outlet by use of a UL listed adapter available at most local hardware stores n The larger slot in the adapter must be aligned with the larger slot in the wall outlet to...

Страница 4: ...cally turn off in half an hour to 24 hours Each touch will set the time in half hours up to 10 and then in hours up to 24 To cancel the Off Timer press the OFF pad until the display time disappears SL...

Страница 5: ...umber and the indoor air will become warmer NOTE If the air conditioner is off and is then turned on while set to COOL it will take approximately 3 minutes for the compressor to start and cooling to b...

Страница 6: ...the On Timer press the ON pad until the display time disappears OFF When the air conditioner is on it can be set to automatically turn off in half an hour to 24 hours Each touch will set the time in...

Страница 7: ...circulation and filtering without cooling or heating Since fan only settings do not provide cooling or heating a temperature setting will not be displayed Remote Control Press FAN pad Press LOW or HIG...

Страница 8: ...CLOSE position Mesh end toward front Locating hole Screw hole The unit leaves the factory set at the CLOSE position The auxiliary dip switch controls are located behind the room cabinet as shown in t...

Страница 9: ...sult from improper connections Special care must be used in connecting the wires No line voltage connections should be made to any circuit Isolate all wires in building from line voltage Terminal Conn...

Страница 10: ...Hook the tabs on the front grille even with the tabs on the case and snap into place Replace the screws and filter Front Grille Outdoor Coils The coils on the outdoor side of the air conditioner shou...

Страница 11: ...onditioner is to clean the filter at least every 30 days A clogged filter reduces cooling heating and air flow Keeping the air filter clean will n Decrease cost of operation n Save energy n Prevent cl...

Страница 12: ...pliances com Installation Air Conditioner Instructions 12 ELECTRICAL REQUIREMENTS cont Some models require 230 208 volt a c protected with a time delay fuse or circuit breaker These models should be i...

Страница 13: ...apts Whirlpool wall case to a J model chassis Wall Case Fits Whirlpool wall cases 257 8 W x 161 2 H x 231 8 D RAK1102 GE RAB30 Adapts GE wall case to a J model chassis F models Fits the RAB 30 wall ca...

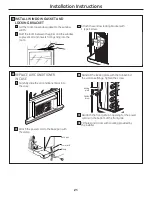
Страница 14: ...STALLING A J MODEL IN AN EXISTING WALL CASE Read these instructions completely and carefully Remove shipping pads if present CAREFULLY SLIDE AIR CONDITIONER BACK INTO CASE Make sure that the tubing on...

Страница 15: ...the opening should be structural wall members Lintel Use a lintel in brick veneer and brick and block types of wall to support the bricks or blocks above the opening Do not allow the wall case to be u...

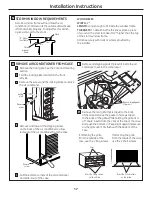
Страница 16: ...d right hand Case side gasket 2 Vinyl window gasket Bottom window gasket Case top gasket Foam top window gasket B Right side A Left side holes are on the left holes are on the right WINDOW REQUIREMENT...

Страница 17: ...pressure on the grille until it fits flush with the bottom of the case 17 STORM WINDOW REQUIREMENTS A storm window frame will not allow the air conditioner to tilt towards the outside and will keep it...

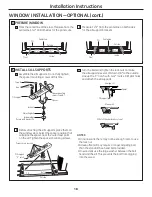
Страница 18: ...require a longer adjusting bolt than the standard hex head bolt provided On wood sills use the large washer between the bolt head and the sill This prevents the bolt from digging into the wood PREPAR...

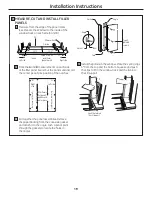
Страница 19: ...and attach it to the angle Push a pencil point through the gaskets to locate the holes in the angles Install the panels in the window Place the spring clips 3 from the top and the bottom Squeeze and...

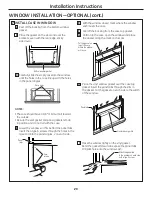
Страница 20: ...With the window closed mark where the window sash meets the case Peel off the backing from the case top gasket Hold on to the case open the window and place the gasket along the mark on the case Place...

Страница 21: ...e front grille An opening for the power cord is on the bottom of the front grille Fill holes and cracks with caulking provided by the installer INSTALL WINDOW GASKET AND LOCKING BRACKET Cut the foam t...

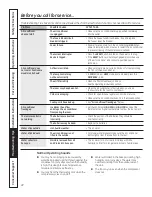
Страница 22: ...of the air conditioner and contact a qualified service technician Air conditioner does Airflow is restricted Make sure there are no curtains blinds or furniture blocking not cool or heat some the fro...

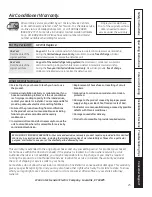
Страница 23: ...Replacement of house fuses or resetting of circuit breakers n Failure due to corrosion on models not corrosion protected n Damage to the product caused by improper power supply voltage accident fire f...

Страница 24: ...while your warranty is still in effect You can purchase it on line anytime or call 800 626 2224 during normal business hours GE Consumer Home Services will still be there after your warranty expires...

Отзывы: