


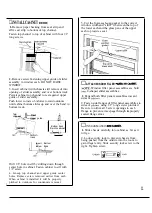


THE CABINET MAY BE
THE WALL IN
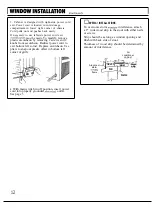
●
Any
side louvers must project on the
outdoor side of the wall.
●
The room side of the
must project into
the room at least 1“ from the finished wall.
The
must be installed level from side to
side and with a 3/8” tilt from front to rear.
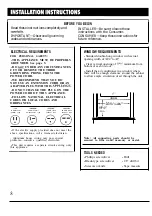
TOOLS REQUIRED
●
Phillips head screwdriver
Blade-type screwdriver
●
Magnetic stud finder (optional)
●
Tin snips
. Handsaw
●
Hammer
●
Level
●
Caulking gun
●
Chisel
●
Tape measure
●
Concrete saw (if installing through a masonry wall)
NEEDED
(obtain locally)
.12 #10 wood screws, 1“ long
●
1 tube high grade caulking compound
●
Wooden framing studs
●
Lintel, if required, to support bricks or blocks
above opening.
Flashing, aluminum or galvanized steel
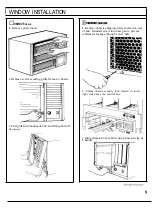
❑
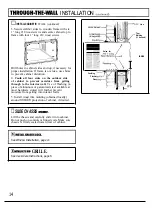
pREpAREwALLOPENING.
1.
Determine size of opening.
Measure
width and height of cabinet and add 1/8” to each
dimension.
HEIGHT
2.
Choose
the wall opening
Be sure
a power receptacle is (or will be) installed nearby.
3.
Make the opening.
Frame it to support the
weight of the air conditioner. Add metal flashing
over bottom of frame opening and 1“ upon sides to
reduce the possibility of moisture entering the area
between the inner and outer wall.
The flashing lip should be 1“ wide and bent down
See illustration, page 14.
❑
PREPARE YHEcABINEI.
1. Remove chassis from
Installation, page 9.
2.
With
or
tape, seal
all holes provided in the
for
installation hardware not used in this installation.
❑
lNSTAllcABINETIN wA1l.
1. Place
in wall opening.
2. Secure cabinet bottom rail to wooden frame
with two 1“ long #10 wood screws.
:
.
(continued


