background image

Introduction

Important installation guidelines ........1

Getting started

Parts checklist ..............................................2

Telephone base layout .............................3

Back and side views ..................................4

Installing backup batteries ....................5

Installing on a desk or table ..................6

Installing on a wall .....................................7

Settings

Display language ........................................8

Contrast ..........................................................8

Local area code ...........................................8

Telephone operation

Speakerphone ..............................................9

Placing a call .................................................9

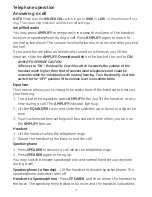
Answering a call .......................................10

Amplified audio

.........................................10

Equalizer  .....................................................10

Volume..........................................................11

Neckloop Jack ...........................................11

Mute ...............................................................11

Vibrating alerter .......................................11

Flash ..............................................................11

Redial .............................................................11

Memory

To store a number in memory ...........12

To add a pause to a memory  

location ......................................................12

To change a stored number ...............12

To dial a number from memory ........12

To dial from the Programmable 

Emergency Call Buttons ....................13

Chain dialing from memory ................13

Caller ID

Call Waiting with Caller ID ...................14

Caller ID record .........................................14

Review caller ID records .......................15

Dial from caller ID records ...................15

Caller ID display messages .................16

Store caller ID record into  

memory .....................................................16

To replace a stored caller ID record  

in memory ................................................16

Delete a caller ID record in caller ID 

record .........................................................17

Delete all caller ID records in caller  

ID record ...................................................17

Appendix

Troubleshooting guide ..........................18

General Product Care ............................20

Equipment Approval Information ....21

Important Safety Instructions ...........24

Limited Warranty .....................................27

Index ..............................................................29

Table of contents

Содержание 30234

Страница 1: ...Model number 30234 AMPLIFIED SPEAKERPHONE WITH VIBRATING ALERT ...

Страница 2: ...special offers or discounts on future purchases It will not diminish your warranty rights if you choose not to register Assistance and more information Retain your sales receipt as proof of purchase in the event warranty service is necessary For product assistance or for more information about accessories visit our website at www gephones com or call our customer service center at 1 877 394 9775 A...

Страница 3: ...add a pause to a memory location 12 To change a stored number 12 To dial a number from memory 12 To dial from the Programmable Emergency Call Buttons 13 Chain dialing from memory 13 Caller ID Call Waiting with Caller ID 14 Caller ID record 14 Review caller ID records 15 Dial from caller ID records 15 Caller ID display messages 16 Store caller ID record into memory 16 To replace a stored caller ID ...

Страница 4: ... 18 for help Or you may visit our website at www gephones com for additional information Important installation guidelines Avoid sources of noise and heat such as motors fluorescent lighting microwave ovens heating appliances and direct sunlight Avoid areas of excessive dust moisture and low temperature Never install telephone wiring during a lightning storm Never install telephones or jacks in wet...

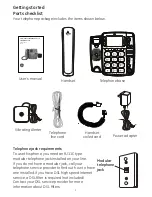
Страница 5: ...ar jack call your telephone service provider to find out how to have one installed If you have DSL high speed Internet service a DSL filter is required not included Contact your DSL service provider for more information about DSL filters Telephone base User s manual Vibrating Alerter Telephone line cord Handset coiled cord Power adapter Handset Modular telephone jack Model number 30234 AMPLIFIED SP...

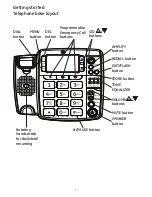
Страница 6: ...g handset tab for desk wall mounting DEL button MENU button DIAL button CID buttons AMPLIFY button REDIAL button EXIT FLASH button STORE button TONE EQUALIZER MUTE button SPEAKER button PAUSE button VOLUME buttons Programmable Emergency Call buttons ...

Страница 7: ...kloop not included see page 11 for more information VIBRATING ALERT jack See Important Safety Instructions on page 24 AMPLIFY OVERRIDE CAUTION When set to ON the Amplify Override switch increases the volume of the handset much higher than that of conventional telephones and could be uncomfortable for individuals with normal hearing Turn the Amplify Override switch to the OFF position if the volume...

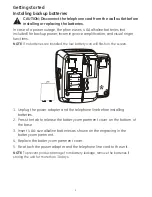
Страница 8: ...stalled the low battery icon will flash on the screen 1 Unplug the power adapter and the telephone line before installing batteries 2 Press the tab to release the battery compartment cover on the bottom of the base 3 Insert 4 AA size alkaline batteries as shown on the engraving in the battery compartment 4 Replace the battery compartment cover 5 Re attach the power adapter and the telephone line c...

Страница 9: ...ther device e g an additional telephone or data modem that needs to be connected to the telephone line please connect it to the DATA jack at the top of the base CAUTION To reduce risk of personal injury fire or damage use only the power adapter provided with this product This power adapter is intended to be correctly oriented in a vertical or floor mount position 5 Plug the power adapter into an ele...

Страница 10: ... into the recessed area at the bottom of the telephone base 5 Slip the mounting holes on the bottom of the base over the wall plate posts on the modular jack and slide the unit down firmly into place 6 Plug the power adapter into the jack engraved 9V DC at the top of the base then plug the other end into an electrical outlet not controlled by a wall switch 7 Plug one end of the handset coiled cord...

Страница 11: ...return to the idle mode Local area code This telephone can use programmed area codes to determine the number format to display when a valid Caller ID signal is received Numbers that match the local area code are displayed as seven digits and are used for dialing back previous numbers Entering your local area code will also help you immediately know if the call is local or long distance when viewin...

Страница 12: ...owing guidelines when using the speakerphone The speakerphone works similarly to a two way radio also called FRS or Walkie Talkies in that you can only listen or talk at one time Stay within 2 to 3 feet of the phone so that you can be clearly heard by the caller You can adjust the speaker volume by adjusting the VOLUME buttons while the speakerphone is in use The speakerphone indicator lights when...

Страница 13: ...Override switch to the OFF position if the volume level is uncomfortable Equalizer This feature allows you to change the audio tone of the handset to best suit your hearing 1 To activate the equalizer press AMPLIFY after you lift the handset or any time during a call The AMPLIFY indicator lights up 2 Lift the EQUALIZER cover and slide the switches up or down to adjust the tone 3 Your customized to...

Страница 14: ...can be muted while using the speakerphone handset or neckloop NOTE This feature will be canceled when you switch between speakerphone neckloop and handset Vibrating alerter To use the vibrating alert feature simply plug the included vibrating alerter into the VIBRATING ALERT jack on the right side of the base Place the alerter in a clean dry location where you can feel it vibrate such as on a chai...

Страница 15: ...number using the dial key pad 4 Press STORE and then enter the name using the dial key pad 5 Press STORE again to save the record The screen shows OK when the entry is successfully stored To add a pause to a memory location You can insert a dialing pause in the dialing sequence when storing a number requiring a pause 1 Follow the steps as To store a number in memory above 2 Press and hold PAUSE un...

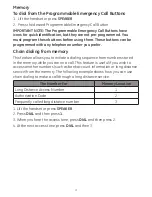
Страница 16: ...allows you to initiate a dialing sequence from numbers stored in the memory while you are on a call This feature is useful if you wish to access another numbers such as bank account information or long distance service from the memory The following example shows how you can use chain dialing to make a call through a long distance service The Number For Memory Location Long Distance Access Number 1...

Страница 17: ...of calls Date Time Call Waiting with Caller ID If you subscribe to call waiting with caller ID service from your telephone service provider a call waiting alert sounds when you receive a second incoming call while you are already on a call Call Waiting with Caller ID information will only be displayed on the handset that is in use when the second incoming call comes When you hear the call waiting ...

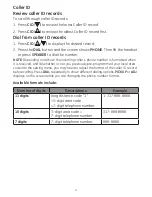
Страница 18: ...e number is formatted when it is received and b whether or not you previously pre programmed your local area code into the setting menu you may need to adjust the format of the caller ID record before calling Press DIAL repeatedly to show different dialing options PICKUP or ADJ displays on the screen while you are changing the phone number format Available formats include Number of digits Descript...

Страница 19: ...number was not available Store caller ID record into memory NOTE Be sure to format the CID entries correctly before storing them Stored entries can be replaced but not edited 1 Press CID to scroll to the desired caller ID record when the telephone is not in use 2 Press STORE and the screen shows LOCATION 3 Use the dial key pad to enter a memory location 0 9 or press one of the Programmable Emergen...

Страница 20: ...L to delete the caller ID record NOTE Press EXIT FLASH to return to the idle mode Delete all caller ID records in caller ID record 1 Press CID to display any caller ID record 2 Press and hold DEL until DELETE ALL shows on the display 3 Press DEL again to delete all records The screen shows NO CALLS NOTE Press EXIT FLASH to return to the idle mode ...

Страница 21: ...ted No dial tone Check installation make sure the telephone line cord is connected to the base unit and a modular phone jack RJ 11 Try disconnecting and reconnecting the handset cord into the handset and base to ensure proper connection Check the switch hook Make sure it fully extends when the handset is lifted from the base You must have touch tone service on your line to use this phone If you do...

Страница 22: ...ER VOL switch is set to LOW or HI You may have too many extension phones on your line Unplug some extension phones Check for a dial tone If there is no dial tone see solutions for No dial tone Cannot dial from memory locations Make sure you stored the memory buttons correctly Try restoring the memory location Be sure to include any dialing prefixes like 1 and or an area code just as you would if d...

Страница 23: ... electrical noise for example motors or fluorescent lamps Avoid dropping the phone and other rough treatment Clean the phone with a soft cloth Never use strong cleaning agents paint thinner abrasive powder alcohol or other chemical products to clean the unit Doing so may damage the finish Retain the original packaging in case you need to ship the phone at a later date DO NOT expose to direct sunlig...

Страница 24: ...phone company A plug and jack used to connect this equipment to the premises wiring and telephone network must comply with the applicable FCC Part 68 rules and requirements adopted by the ACTA A compliant telephone cord and modular plug is provided with this product It is designed to be connected to a compatible modular jack that is also compliant See installation instructions for details Equipmen...

Страница 25: ...to allow you to maintain uninterrupted service Interference Information This device complies with Part 15 of the FCC Rules Operation is subject to the following two conditions 1 This device may not cause harmful interference and 2 This device must accept any interference received including interference that may cause undesired operation This equipment has been tested and found to comply with the l...

Страница 26: ...ing antenna is connected If these measures do not eliminate the interference please consult your dealer or an experienced radio television technician for additional suggestions Notice The changes or modifications not expressly approved by the party responsible for compliance could void the user s authority to operate the equipment Hearing Aid Compatibility HAC This telephone system meets FCC standa...

Страница 27: ...duct in a built in installation unless proper ventilation is provided 6 Only operate this product from the type of power source indicated on the marking label If you are not sure of the type of power supply to your home consult your dealer or local power company 7 Plug the adaptor into an easily accessible electrical outlet near the equipment 8 Do not allow anything to rest on the power cord Do no...

Страница 28: ...exposed to rain or water C The product does not operate normally by following the operating instructions D The product s cabinet has been damaged E The product exhibits a distinct change in performance 20 Avoid using a telephone during an electrical storm There may be a remote risk of electric shock from lightning 21 Do not use the telephone to report a gas leak in the vicinity of the leak 22 Do n...

Страница 29: ...ies to products employing more than one separately replaceable primary battery 10 When inserting battery ies into this product the proper polarity or direction must be observed Reverse insertion of battery ies may result in leakage or explosion 11 When inserting battery ies into this product do not twist or pinch the wires or allow wires to become pinched in battery door 12 If storing over 30 days...

Страница 30: ...of this product at CCT s option is your exclusive remedy This limited warranty only applies to products purchased used and serviced in the United States and its territories or Puerto Rico If you purchased this product outside of the United States its territories or Puerto Rico contact your dealer for service information This is the only warranty applicable to this product ALL OTHER WARRANTIES EXPR...

Страница 31: ...mbers have been removed altered or rendered illegible Products purchased shipped from used or serviced outside the United States Batteries Products used for business commercial or institutional purposes Damage caused by acts of nature such as but not limited to lightening damage Products returned without valid proof of purchase How To Obtain Warranty Service Call our customer service center at 1 8...

Страница 32: ...val Information 21 F Flash 11 G General Product Care 20 I Important Safety Instructions 24 Installing on a desk or table 6 Installing on a wall 7 Introduction 1 L Limited Warranty 27 Local area code 8 M Memory change a stored record 12 dial from the programmable emergency call buttons 13 dial from the record 12 Mute 11 N Neckloop 11 P Parts Checklist 2 Placing a call 9 R Redial 11 S Speakerphone 9...

Страница 33: ...m 2011 CCT Tech USA Inc Distributed in the U S A by CCT Tech USA Inc Model 30234 P N 905 0234004 00 Version 1 03 2011 Printed in China is a trademark of General Electric Company and is under license by CCT Tech USA Inc Irving TX 75039 ...

Отзывы: