background image

26

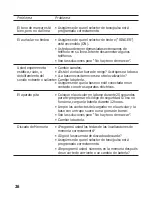
El tono de marcar está

• Asegúrese de que el selector de tono/pulso está

bien, pero no da línea

programado correctamente.

El auricular no timbra

• Asegúrese de que el selector de timbre (“RINGER”)

está encendido (ON).

• Usted puede tener demasiadas extensiones de

teléfono en su línea. Intente desconectar algunos
teléfonos.

• Vea las soluciones para “No hay tono de marcar”.

Usted experimenta

• Cambie canales.

estática, ruido, o

• ¿Está el auricular fuera de rango? Acérquese a la base.

debilitamiento del

• ¿La base necesita moverse a otra localización?

sonido entrante o saliente • Cambie la batería.

• Asegúrese de que la base no esté conectada en un

contacto con otros aparatos eléctricos.

El aparato pita

• Coloque el auricular en la base durante 20 segundos

para re-programar el código de seguridad. Si eso no
funciona, cargue la batería durante 12 horas.

• Limpie los contactos del cargador en el auricular y la

base con un trapo suave o una goma de borrar.

• Vea las soluciones para “No hay tono de marcar”.
• Cambie la batería.

Discado de Memoria

• ¿Programó usted las teclas de las localizaciones de

memoria correctamente?

• ¿Siguió la secuencia de discado adecuada?
• Asegúrese de que el selector de tono/pulso está

programado correctamente.

• ¿Reprogramó usted  números en la memoria después

de un corte de corriente o un cambio de batería?

Problema

Problema

Содержание 26730

Страница 1: ...We bring good things to life 26730 25 Channel Caller ID with Call Waiting Cordless Telephone User s Guide ...

Страница 2: ...ith FCC Rules and Regulations If these changes are expected to affect the use or performance of your telephone equipment the telephone company must give you adequate notice in writing to allow you to maintain uninterrupted service INTERFERENCE INFORMATION This device complies with Part 15 of the FCC Rules Operation is subject to the following two conditions 1 This device may not cause harmful inte...

Страница 3: ...S 5 DIGITAL SECURITY SYSTEM 5 DESKTOP INSTALLATION 6 WALL MOUNT INSTALLATION 7 TELEPHONE OPERATION 9 RECEIVING A CALL 9 MAKING A CALL 9 REDIAL 9 FLASH BUTTON 9 CHANNEL BUTTON 9 TEMPORARY TONE 10 FINDING THE HANDSET 10 RINGER SWITCH 11 TONE PULSE DIALING 11 TONE 11 PULSE 11 VOLUME 11 VOICE MESSAGING 12 CALLER ID FEATURES 13 CALLER ID WITH CALL WAITING 13 RECEIVING AND STORING CALLS 13 REVIEWING MES...

Страница 4: ...iew the time and date of each incoming call Record up to 40 Caller ID messages sequentially Know who called while you were away To get the most from your new phone we suggest that you take a few minutes right now to read through this user s guide IMPORTANT Because cordless phones operate on electricity you should have at least one phone in your home that isn t cordless in case the power in your ho...

Страница 5: ...nterference the base of the cordless telephone should not be placed near or on top of a TV or VCR If such interference continues move the cordless telephone farther away from the TV or VCR PAGE FIND CHARGE IN USE wall mount bracket 1 2 3 ABC DEF 5 4 6 JKL GHI MNO 8 7 9 PQRS WXYZ TUV 0 TONE OPER PHONE TALK REDIAL CALL BACK VOLUME DELETE CHANNEL FORMAT MEMORY FLASH OFF ON RINGER DIGITAL SECURITY SYS...

Страница 6: ...battery is charging Allow the phone to charge for 12 hours before using the first time If you don t charge the phone properly for 12 hours when you first set up the phone perfomance of the battery will be compromised 5 After charging connect the telephone cord to the phone and then to the wall jack 1 4 3 5 NOTE For desktop charging only the handset is able to charge facing up or down NOTE The phon...

Страница 7: ...ou don t charge the phone properly for 12 hours when you first set up the phone perfomance of the battery will be compromised The CHARGE IN USE light comes on indicating that the battery is charging 3 Set the RINGER switch on the handset to ON 4 After charging plug the short phone line cord into the phone jack on the back of the unit and then to the wall jack 5 Attach the wall mount bracket by ins...

Страница 8: ...ling To change to pulse rotary dialing see Tone Pulse Dialing If you don t know which type of service you have check with the phone company 6 Slip the mounting holes over the wall plate posts and slide the unit down firmly into place Wall plate not included 6 ...

Страница 9: ...r call transfer which are available through your local phone company TIP Don t use the TALK button to activate custom calling services such as call waiting or you ll hang up the phone CHANNEL BUTTON While talking you might need to manually change the channel in order to get rid of static Press and release the CHANNEL button to advance to the next clear channel 1 2 3 ABC DEF 5 4 6 JKL GHI MNO 8 7 9...

Страница 10: ...r call is answered 3 Follow the voice instructions to complete your transaction 4 Hang up when finished The phone returns to Pulse rotary service FINDING THE HANDSET This feature helps to locate a misplaced handset Press and hold the PAGE FIND button on the base The handset beeps continuously for about 2 minutes or until you press any button on the handset PAGE FIND CHARGE IN USE PAGE FIND button ...

Страница 11: ...ss and hold the CHANNEL button for 2 seconds until the phone beeps 3 Press TONE PULSE 1 Turn the phone off 2 Press and hold the CHANNEL button for 2 seconds until the phone beeps 3 Press VOLUME The VOLUME button controls the volume of the handset s earpiece with four listening levels 1 2 3 ABC DEF 5 4 6 JKL GHI MNO 8 7 9 PQRS WXYZ TUV 0 TONE OPER PHONE TALK REDIAL CALL BACK VOLUME DELETE CHANNEL F...

Страница 12: ...e messaging service and you subscribe to it the CHARGE IN USE light on the base will flash when the phone is not in use to indicate there is a message waiting It will stop flashing after the message has been reviewed PAGE FIND CHARGE IN USE CHARGE IN USE light ...

Страница 13: ...n appears in the display after you hear the tone Press the FLASH button to put the current person on hold so that you can answer the incoming call CALLER ID FEATURES 1 2 3 ABC DEF 5 4 6 JKL GHI MNO 8 7 9 PQRS WXYZ TUV 0 TONE OPER PHONE TALK REDIAL CALL BACK VOLUME DELETE CHANNEL FORMAT MEMORY FLASH OFF ON RINGER CHANNEL button FLASH button TALK button REDIAL button VERY IMPORTANT The Caller ID fea...

Страница 14: ... been received Press the arrow down button to scroll through the call records from the most recent to the oldest Press the arrow up button to scroll through the call records from the oldest to the newest When the memory is full a new call automatically replaces the oldest call in memory NEW appears in the display for calls received that have not been reviewed NOTE Check with your local phone compa...

Страница 15: ...s and hold DELETE The display shows ERASE ALL 2 Press DELETE again to erase all records DIALING A CALLER ID NUMBER 1 Make sure the phone is OFF 2 Use the arrow and buttons to display the desired Caller ID record 3 Press the CALL BACK button to dial the number 1 2 3 ABC DEF 5 4 6 JKL GHI MNO 8 7 9 PQRS WXYZ TUV 0 TONE OPER PHONE TALK REDIAL CALL BACK VOLUME DELETE CHANNEL FORMAT MEMORY FLASH OFF ON...

Страница 16: ... digit 7 digit telephone number 10 digit 3 digit area code 7 digit telephone number 11 digit long distance code 1 3 digit area code 7 digit telephone number 1 Use the arrow buttons and to scroll to the number you want to call back 2 If the number will not dial as shown press the FORMAT button Repeat if necessary until the correct number of digits are shown 3 Press CALL BACK TALK button CALL BACK b...

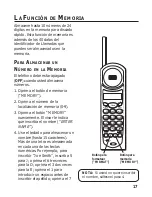
Страница 17: ...ss the memory location number 0 9 3 Press MEMORY again The display shows ENTER NAME 4 Use the keypad to store a name up to 15 characters More than one letter is stored in each of the number keys For example to enter Joe Smith press 5 for J press 6 three times for O press 3 two times for E press 1 to enter a space before you start entering the last name press 7 four times for S press 6 for M press ...

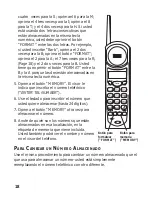
Страница 18: ...8 Record whose number is stored in the location on the memory label provided You will also be able to view the name and number in the phone s display CHANGING A STORED NUMBER Use the same procedure to change a stored number as you do to store a number you re just replacing the phone number with a different one 1 2 3 ABC DEF 5 4 6 JKL GHI MNO 8 7 9 PQRS WXYZ TUV 0 TONE OPER PHONE TALK REDIAL CALL B...

Страница 19: ...phone is OFF 2 Use the arrow and buttons to scroll through the numbers stored in memory until the desired number is shown 3 Press CALL BACK to dial the number 1 2 3 ABC DEF 5 4 6 JKL GHI MNO 8 7 9 PQRS WXYZ TUV 0 TONE OPER PHONE TALK REDIAL CALL BACK VOLUME DELETE CHANNEL FORMAT MEMORY FLASH OFF ON RINGER MEMORY button TALK button CALL BACK button IMPORTANT If you make test calls to emergency numb...

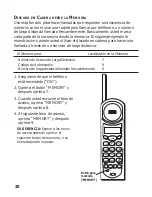
Страница 20: ...xample shows how you can use chain dialing to make a call through a long distance service The Number For Memory Location Long distance access number 7 Authorization code 8 Frequently called long distance number 9 1 Make sure the phone is ON 2 Press MEMORY and then press 7 3 When you hear the access tone press MEMORY and then press 8 4 At the next access tone press MEMORY and then 9 1 2 3 ABC DEF 5...

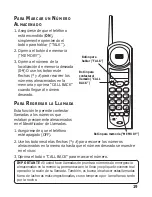
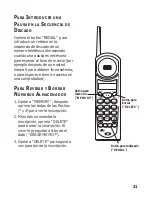
Страница 21: ...SEQUENCE Press the REDIAL button to insert a delay in the dialing sequence of a stored telephone number when a pause is needed to wait for a dial tone for example after you dial 9 for an outside line or to wait for a computer access tone Each pause counts as 1 digit in the dialing sequence 1 2 3 ABC DEF 5 4 6 JKL GHI MNO 8 7 9 PQRS WXYZ TUV 0 TONE OPER PHONE TALK REDIAL CALL BACK VOLUME DELETE CHA...

Страница 22: ...ace battery Battery Holding Strap Plug 1 Slide open the battery compartment door 2 Unhook the strap holding the battery in place 3 Pull out the battery plug 4 Remove the battery pack 5 Replace and plug in the new battery pack use GE BT 12 replacement battery 6 Reconnect the strap to secure the battery 7 Replace the battery compartment door 8 Charge the battery for 12 hours before use PAGE FIND CHA...

Страница 23: ... NOT expose to direct sunlight or moisture Avoid dropping the handset as well as other rough treatment to the phone Clean the phone with a soft cloth Never use a strong cleaning agent or abrasive powder because this will damage the finish Retain the original packaging in case you need to ship the phone at a later date Periodically clean the charge contacts on the handset and base with a clean pen ...

Страница 24: ...stored in the phone s outgoing memory END OF LIST Indicates that there is no additional information in Caller ID memory NEW Indicates call or calls have not been reviewed OUT OF AREA The incoming call is from an area not serviced by Caller ID or the information was not sent PAGING YOU Someone has pressed the PAGE button on the base PRIVATE The person is calling from a number that has been blocked ...

Страница 25: ...he CHARGE IN USE indicator come on The battery may need to be charged TROUBLESHOOTING TIPS CALLER ID Problem Solution No Display Is battery fully charged Try replacing the battery If you are using AC power make sure that the unit is connected to a non switched electrical outlet Disconnect the unit from the plug and plug it in again Did you order Caller ID service from your local telephone company ...

Страница 26: ...ed to be relocated Charge battery Make sure base is not plugged into an outlet with another household appliance Unit beeps Place handset in base for 20 seconds to reset the security code If that doesn t work charge battery for 12 hours Clean charging contacts on handset and base with a soft cloth or an eraser See solutions for No dial tone Replace battery Memory Dialing Did you program the memory ...

Страница 27: ...s You re too close to appliances such as microwaves stoves computers etc Atmospheric conditions such as strong storms Base is installed in the basement or lower floor of the house Base is plugged into an AC outlet with other electronic devices Baby monitor is using the same frequency Handset battery is low You re out of range of the base ...

Страница 28: ...ity to operate this product For instructions on how to obtain service refer to the warranty included in this user s guide or contact Consumer Information at 1 800 448 0329 Attach your sales receipt to the booklet for future reference or jot down the date this product was purchased or received as a gift This information will be valuable if service should be required during the warranty period Purch...

Страница 29: ...model Shipping Handling and Insurance _______________ Total Amount Enclosed _______________ Mail order form and money order or check in U S currency made payable to Thomson Consumer Electronics Inc to TCE Mail Order Department P O Box 8419 Ronks PA 17573 8419 Name_______________________________________________________ Address_____________________________________ Apt ____________ City _____________...

Страница 30: ...30 ...

Страница 31: ... signals 24 Hearing aid compatibility 2 I Installation and setup 5 Interference information 2 Introduction 4 M Making a call 9 Memory 17 Message indicators 24 Modular jack requirements 5 P Pause Inserting in dialing sequence 21 R Receiving a call 9 Receiving and storing calls 13 Reviewing and deleting stored numbers 21 Reviewing messages 14 Ringer switch 11 S Security 5 Service 28 Stored numbers 1...

Страница 32: ...ocorro Texas 79927 Pay any charges billed to you by the Exchange Center for service not covered by the warranty Insure your shipment for loss or damage Thomson accepts no liability in case of damage or loss en route to Thomson A new or refurbished unit will be shipped to you freight prepaid What your warranty does not cover Customer instruction Your Owner s Manual provides information regarding op...

Страница 33: ...Creamos cosas buenas para la vida Serie 26730 Teléfono Inalámbrico de 25 Canales con Identificador de Llamadas y Llamada en Espera Manual del Usuario ...

Страница 34: ...an alterar el uso o el funcionamiento de su equipo telefónico la compañía telefónica deberá darle aviso adecuado en escrito para que Ud goce de un servico ininterrumpido INFORMACIÓN DE INTERFERENCIAS Este artefacto cumple con la Parte 15 de las Reglas de la FCC Su funcionamiento es sujeto a las dos condiciones siguientes l Este artefacto no puede causar interferencia dañosa y 2 Este artefacto debe...

Страница 35: ...A 9 PARA HACER UNA LLAMADA 9 REDISCADO 9 BOTÓN DE CENTELLEO SERVICIOS ESPECIALES 9 BOTÓN PARA CAMBIAR CANALES CHANNEL 9 TONO TEMPORARIO 10 PARA ENCONTRAR EL AURICULAR 10 SELECTOR DEL TIMBRE RINGER 11 DISCADO DE TONO PULSO 11 TONO 11 PULSO 11 VOLUMEN 11 MENSAJE DE VOZ 12 FUNCIONES DEL IDENTIFICADOR DE LLAMADAS 13 IDENTIFICADOR DE LLAMADAS CON LLAMADA EN ESPERA 13 PARA RECIBIR Y ALMACENAR LLAMADAS 1...

Страница 36: ...léfono Ver la hora y la fecha de cada llamada entrante Grabar hasta 40 mensajes del Identificador de Llamadas en secuencia Saber quién llamó mientras usted no estaba Para obtener el mayor provecho de su nuevo teléfono le sugerimos que tome unos momentos ahora mismo para leer la guía del usuario IMPORTANTE Como los teléfonos inalámbricos funcionan con electricidad usted debe tener por lo menos un t...

Страница 37: ... su teléfono inalámbrico no debería de estar cerca o encima de la televisión o de su aparato de video cassettes Si la interferencia continúa mueva su teléfono inalámbrico lejos de la televisión o video cassettera PAGE FIND CHARGE IN USE Placa para montaje de pared 1 2 3 ABC DEF 5 4 6 JKL GHI MNO 8 7 9 PQRS WXYZ TUV 0 TONE OPER PHONE TALK REDIAL CALL BACK VOLUME DELETE CHANNEL FORMAT MEMORY FLASH O...

Страница 38: ...la batería puede no ser la óptima 5 Después de cargar conecte el cable del teléfono al aparato y después al contacto de pared NOTA El teléfono automaticamente se pasa a modalidad de discado de tono touch tone Para cambiar a modalidad de pulso rotatorio vea Discado de Tono Pulso Si usted no sabe qué tipo de servicio tiene cheque con su compañía telefónica CUIDADO Use unicamente el cable de corrient...

Страница 39: ...e que el teléfono se cargue durante 12 horas antes de usarlo por primera vez Si usted no carga el teléfono adecuadamente durante 12 horas cuando usted instala inicialmente su teléfono la operación de la batería puede no ser la óptima La luz de CHARGE IN USE se iluminará para indicar que la batería está cargando 3 Coloque el selector del timbre RINGER del auricular en la posición de encendido ON CU...

Страница 40: ... y después metiendo la lengüeta en la parte de abajo en su sitio 6 Deslice los agujeros de montaje sobre los postecitos de la placa y resbale el aparato hacia abajo hasta que entre firmemente en su sitio NOTA El teléfono automaticamente se cambia a modalidad de discado de tono touch tone Para cambiar a modalidad de pulso rotatorio vea Discado de Tono Pulso Si usted no sabe qué tipo de servicio tie...

Страница 41: ...rida que son disponibles a través de su compañía telefónica local 1 2 3 ABC DEF 5 4 6 JKL GHI MNO 8 7 9 PQRS WXYZ TUV 0 TONE OPER PHONE TALK REDIAL CALL BACK VOLUME DELETE CHANNEL FORMAT MEMORY FLASH OFF ON RINGER Botón para cambiar canales CHANNEL Botón para servicios especiales FLASH Botón para hablar TALK Botón para rediscado RE DIAL SUGERENCIA No use el botón para hablar TALK para activar los ...

Страница 42: ...espués de que su llamada es contestada 3 Siga las instrucciones del operador para completar su transacción 4 Cuelgue cuando haya terminado PARA ENCONTRAR EL AURICULAR Esta función le ayuda a localizar el auricular extraviado Oprima y sostenga el botón para localizar PAGE FIND en la base El auricular emite tonos continuos durante aproximadamente 2 minutos o hasta que usted oprima cualquier botón de...

Страница 43: ...para cambiar canales CHANNEL durante 2 segundos hasta que el teléfono pite 3 Oprima TONE PULSO 1 Apague el aparato 1 2 3 ABC DEF 5 4 6 JKL GHI MNO 8 7 9 PQRS WXYZ TUV 0 TONE OPER PHONE TALK REDIAL CALL BACK VOLUME DELETE CHANNEL FORMAT MEMORY FLASH OFF ON RINGER Botón para cambiar canales CHANNEL Botón para control de volumen VOLUME Selector de timbre RINGER 2 Oprima y sostenga el botón para cambi...

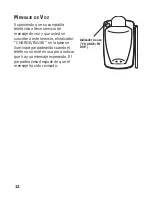
Страница 44: ...y que usted se suscribe a este servicio elindicador CHARGE IN USE en la base se iluminará parpadeando cuando el teléfono no esté en uso para indicar que hay un mensaje esperando El parpadeo cesa después de que el mensaje ha sido revisado PAGE FIND CHARGE IN USE Indicador de uso CHARGE IN USE ...

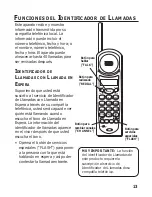
Страница 45: ... Espera La información del identificador de llamadas aparece en el visor después de que usted escucha el tono Oprima el botón de servicios especiales FLASH para poner a la persona con la que está hablando en espera y así poder contestar la llamada entrante FUNCIONES DEL IDENTIFICADOR DE LLAMADAS 1 2 3 ABC DEF 5 4 6 JKL GHI MNO 8 7 9 PQRS WXYZ TUV 0 TONE OPER PHONE TALK REDIAL CALL BACK VOLUME DELE...

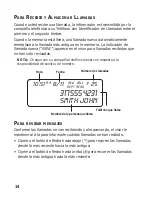
Страница 46: ...evisadas NOTA Cheque con su compañía telefónica local con respecto a la disponibilidad de servicio de nombre PARA REVISAR MENSAJES Conforme las llamadas se van recibiendo y almacenando el visor le mantiene al día para informarle cuántas llamadas se han recibido Oprima el botón de flecha hacia abajo para recorrer las llamadas desde la más reciente hacia la más antigua Oprima el botón de flecha haci...

Страница 47: ...dos los datos ERASE ALL 2 Oprima DELETE nuevamente para borrar todos los datos PARA DISCAR UN NÚMERO DEL IDENTIFICADOR DE LLAMADAS 1 Asegúrese de que el teléfono está apagado OFF 2 Use los botones de la flechas y para mostrar el dato del Identificador de Llamadas deseado 3 Oprima el botón CALL BACK para marcar ese número 1 2 3 ABC DEF 5 4 6 JKL GHI MNO 8 7 9 PQRS WXYZ TUV 0 TONE OPER PHONE TALK RE...

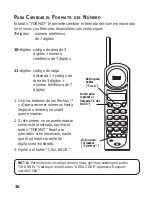
Страница 48: ...co de 7 dígitos 10 dígitos código de área de 3 dígitos número telefónico de 7 dígitos 11 dígitos código de larga distancia 1 código de área de 3 dígitos número telefónico de 7 dígitos 1 Use los botones de las flechas y para recorrer números hasta llegar al número que usted quiere marcar 2 Si el número no se puede marcar como está mostrado oprima el botón FORMAT Repita la operación si es necesario ...

Страница 49: ...e El visor le indica que inscriba el nombre ENTER NAME 4 Use el teclado para almacenar un nombre hasta 15 caracteres Más de una letra es almacenada en cada una de las teclas numéricas Por ejemplo para inscribir Joe Smith inscriba 5 para J oprima el 6 tres veces para la O oprima el 3 dos veces para la E oprima el 1 para introducir un espacio antes de inscribir el apellido oprima el 7 NOTA Si usted ...

Страница 50: ...2 dos veces para la B Usted tiene que oprimir el botón FORMAT entre la B y la A porque las dos están almacenadas en la misma tecla numérica 5 Oprima el botón MEMORY El visor le indica que inscriba el número telefónico ENTER TEL NUMBER 6 Use el teclado para inscribir el número que usted quiere almacenar hasta 24 dígitos 7 Oprima el botón MEMORY otra vez para almacenar el número 8 Anote de quién son...

Страница 51: ...emoria y oprima CALL BACK cuando llegue al número deseado PARA REGRESAR LA LLAMADA Esta función le permite contestar llamadas a los números que estaban previamente almacenados en el Identificador de Llamadas 1 Asegúrese de que el teléfono esté apagado OFF 2 Use los botones de las flechas y para recorrer los números almacenados en la memoria hasta que el número deseado se muestre en el visor 3 Opri...

Страница 52: ...memoria El siguiente ejemplo le muestra cómo puede usted utilizar el discado en cadena para hacer una llamada a través de un servicio de larga distancia El Número para Localización en la Memoria Número de Acceso de Larga Distancia 7 Código de Autorización 8 Número de larga distancia llamado frecuentemente 9 1 Asegúrese de que el teléfono está encendido ON 2 Oprima el botón MEMORY y después oprima ...

Страница 53: ...dora PARA REVISAR Y BORRAR NÚMEROS ALMACENADOS 1 Oprima MEMORY después oprima las teclas de las flechas y para ver la inscripción 2 Mientras se muestra la inscripción oprima DELETE para borrar la inscripción El visor le preguntará si borra el dato ERASE MEMO 3 Oprima DELETE por segunda vez para borrar la inscripción 1 2 3 ABC DEF 5 4 6 JKL GHI MNO 8 7 9 PQRS WXYZ TUV 0 TONE OPER PHONE TALK REDIAL ...

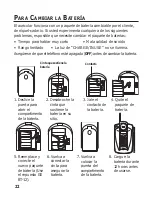
Страница 54: ...r la batería Cinta que sostiene la batería Contacto 1 Deslice la puerta para abrir el compartimento de la batería 2 Desabroche la cinta que sostiene la batería en su sitio 3 Jale el contacto de la batería 4 Quite el paquete de batería 5 Reemplace y conecte el nuevo paquete de batería Use el repuesto GE BT 12 6 Vuelva a conectar la cinta para asegurar la batería 7 Vuelva a colocar la puerta del com...

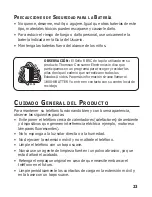
Страница 55: ...mparas fluorescentes No lo exponga a la luz solar directa o a la humedad No deje caer la extensión móvil y no maltrate el teléfono Limpie el teléfono con un trapo suave Nunca use un agente de limpieza fuerte ni un polvo abrasivo ya que esto dañará el acabado Retenga el empaque original en caso de que necesite embarcar el teléfono en el futuro Limpie periódicamente los contactos de carga en la exte...

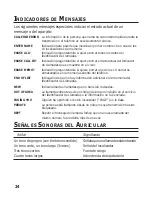
Страница 56: ...nados en la memoria saliente del teléfono END OF LIST Indicación de que no hay información adicional en la memoria del Identificador de Llamadas NEW Indica llamada o llamadas que no han sido revisadas OUT OF AREA La llamada entrante es de un código de área no incluído en el servicio del Identificador de Llamadas o la información no fué enviada PAGING YOU Alguien ha oprimido el botón localizador PA...

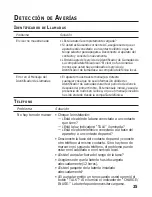
Страница 57: ...ería puede necesitar cargarse DETECCIÓN DE AVERÍAS IDENTIFICADOR DE LLAMADAS Problema Solución El visor no muestra nada Está la batería completamente cargada Si usted está usando corriente AC asegúrese de que el aparato esté conectado a un contacto eléctrico que no tenga selector para apagarse Desconecte el aparato del contacto y conéctelo nuevamente Ordenó usted el servicio de Identificador de Ll...

Страница 58: ... Cambie la batería Asegúrese de que la base no esté conectada en un contacto con otros aparatos eléctricos El aparato pita Coloque el auricular en la base durante 20 segundos para re programar el código de seguridad Si eso no funciona cargue la batería durante 12 horas Limpie los contactos del cargador en el auricular y la base con un trapo suave o una goma de borrar Vea las soluciones para No hay...

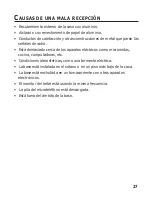
Страница 59: ...io Está demasiado cerca de los aparatos eléctricos como microondas cocina computadoras etc Condiciones atmosféricas como una tormenta eléctrica La base está instalada en el sótano o en un piso más bajo de la casa La base está enchufada en un tomacorriente con otros aparatos electrónicos El monitor del bebé está usando la misma frecuencia La pila del microteléfono está descargada Está fuera del ámb...

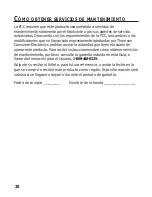
Страница 60: ...ronics podrían anular la autoridad que tiene el usuario de operar este producto Para recibir instrucciones sobre cómo obtener servicios de mantenimiento por favor consulte la garantía incluida en esta Guía o llame a Información para el Usuario 1 800 448 0329 Adjunte su recibo al folleto para futura referencia o anote la fecha en la que se compró o recibió este producto como regalo Esta información...

Страница 61: ...ilidad Cuando se aplique enviaremos un modelo más reciente Envío manejo y seguro _______________ Monto total incluido _______________ Envíe el formulario de pedido y giro postal o cheque en moneda estadounidense a nombre de Thomson Consumer Electronics Inc a TCE Mail Order Department P O Box 8419 Ronks PA 17573 8419 Nombre_______________________________________________________ Dirección___________...

Страница 62: ...30 ...

Страница 63: ...ón 4 L La Función de Memoria 17 M Mensaje de Voz 12 O Operación del Teléfono 9 P Para Almacenar un Número en la Memoria 17 Para Borrar Datos 15 Para Borrar el Dato Actual 15 Para Borrar Todos los Datos 15 Para Cambiar el Formato del Número 16 Para Cambiar la Batería 22 Para Cambiar un Número Almacenado 18 Para Discar un Número del Identificador de Llamada 15 Para Encontrar el Auricular 10 Para Hac...

Страница 64: ...l Centro de Intercambio por servicio que no esté cubierto por garantía Asegure su embarque en contra de pérdida o daño Thomson no acepta ninguna responsabilidad en caso de daño o de pérdida La unidad nueva o reacondicionada le será embarcada con flete prepagado Lo que no cubre la garantía Instrucciones al cliente Su manual de propietario le proporciona la información con respecto a las instruccion...

Отзывы: