background image

3. CONTROL PANEL 

- 78 -  

01 Aug 2018 


User Manual for LPU-1000 LED Player Unit 


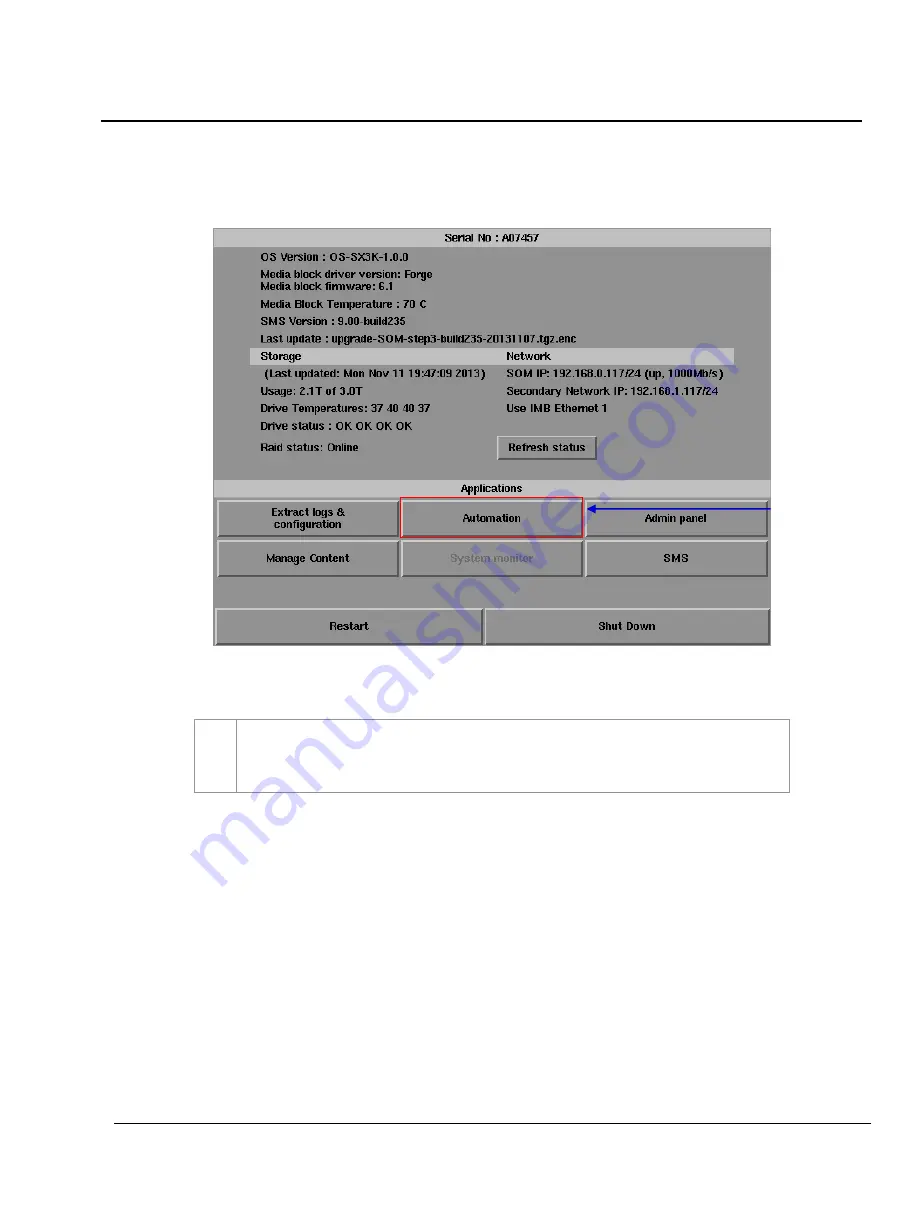
Figure 54: Accessing Automation


3.3 Manual Automation Execution 


1


Automation labels  and  LED Screen  commands can  now  be  executed  from  an  interface  on 

the  Control  Panel.  Press 

Automation 

on  the 

Control  Panel 

to  start  the  manual  automation 

interface as shown  in

 Figure 55.


Содержание LPU-1000

Страница 1: ...1000 LED PLAYER UNIT THIS DOCUMENT IS PROPRIETARY AND CONFIDENTIAL NO PART OF THIS DOCUMENT MAY BE DISCLOSED IN ANY MANNER TO A THIRD PARTY WITHOUT THE PRIOR WRITTEN CONSENT OF GDC TECHNOLOGY SMS vers...

Страница 2: ...3 Scheduler 18 2 3 4 Configuration 19 2 3 4 1 General 19 2 3 4 2 CineCanvas 22 2 3 4 3 Assistance 23 2 3 4 4 Audio Option 24 2 3 4 4 1 Audio Channel Mapping 25 2 3 4 5 Caption 30 2 3 4 6 IMB Network 3...

Страница 3: ...dule a Show 64 2 6 Synchronizing Shows 69 2 7 Subtitle Setting 69 2 7 1 Subtitle Overlay 69 2 7 1 1 Subtitle Overlay Setup 69 2 7 1 2 Subtitle Language Selection 70 2 8 Shutdown Restart Application 75...

Страница 4: ...ce 105 5 ADMIN PANEL 107 5 1 General Introduction 107 5 2 User Interface UI 107 5 2 1 Introduction 107 5 2 2 Access to Admin Panel 108 5 2 2 1 Access via Control Panel 108 5 2 2 2 Login to Admin Panel...

Страница 5: ...reen 142 5 3 4 1 Access to Touchscreen 142 5 3 4 2 Select Touchscreen Type 143 5 3 4 3 Calibrate Touchscreen 144 5 4 User Manager 145 5 4 1 Access to User Manager 145 5 4 2 Add Edit user 145 5 4 3 Del...

Страница 6: ...2 2 1 Setting up the server for MDA playback 159 7 2 2 2 Setting up the MDA configuration file 160 7 2 3 Audio channel routing requirements 162 7 3 Audio Upmix 163 7 3 1 Requirement 163 7 3 2 Setup 16...

Страница 7: ...ontinuous product development and improvements In no other event shall GDC Technology Limited be liable for any loss of profit or any other commercial damages including but not limited to special cons...

Страница 8: ...hen China Tel 86 755 8608 6000 C Esteve Terradas n 27 esc D Despacho 1 08023 Barcelona Spain Tel 34 93 159 51 75 Peru Lima USA Los Angeles Brazil S o Paulo Singapore Calle Manuel Miota 170 Miraflores...

Страница 9: ...11440 Indonesia Tel 62 21 2920 4691 3F Kyobashi Chuo Bldg 1 14 7 Kyobashi Chuo ku Tokyo 104 0031 Japan Tel 81 3 5524 2607 Office No B 207 208 Everest Chamber Andheri Kurla Road Marol Andheri East Mum...

Страница 10: ...tions on how to use and manage the GDC LPU 1000 LED Player Unit LPU 1000 The user interface of the media block in LPU 1000 consists of a few key components described in the diagram below in Figure 1 T...

Страница 11: ...echnology personnel All warnings on the LPU 1000 in the documentation manual should be adhered to All instructions for operating and maintaining LPU 1000 must be followed closely 1 2 2 Electrical Safe...

Страница 12: ...Interface The SMS interface is used for playback control creating and editing playlists scheduling It also provides access to advanced configuration options 2 2 Accessing the SMS Interface 1 Enter the...

Страница 13: ...tton The button is enabled when the system is in playing or pause mode To resume from pause simply hit the Pause button again 3 Stop button The button is enabled when the system is in playing mode and...

Страница 14: ...the serial number and software version of the IMB 9 SCREEN LOCK button The SCREEN LOCK function will prevent any unintentional screen touches or mouse clicks that could disturb playback The screen wil...

Страница 15: ...list Content The contents of the playlist being currently edited are shown here 3 Clip Information Displays information about the selected item in the Content This includes the Name total Duration Sou...

Страница 16: ...will move after the next clip 13 Shows This displays a list of all the playlists saved Selecting a playlist here displays the contents of the playlist for editing A playlist that is currently playing...

Страница 17: ...er Unit 01 Aug 2018 17 Type in the desired name and press Enter to complete the action To cancel the action and return to the previous screen press Cancel 19 Close Exits the Playlist Management and re...

Страница 18: ...ious Next Deletes the currently selected show schedule Navigate show schedules by going forward and backward one at a time 5 Add to Schedule a Select the playlist to be scheduled The contents of the s...

Страница 19: ...2 SMS User Manual for LPU 1000 LED Player Unit 01 Aug 2018 19 Figure 6 Configuration General 2 3 4 Configuration 2 3 4 1 General 10 11 14 17 15 12 7 6 3 2 1 4 5 9 8 13 16 18 20 19...

Страница 20: ...at the extreme left If the Reset TimeCode at end of clip option is not selected the system will retain the timecode at the point in which playback ends or stops The Slider Bar will remain at where the...

Страница 21: ...Configuration Interface Please refer to Section 2 3 5 SNMP Configuration 16 Automation This will bring up the automation configuration user interface used to integrate the IMB with external devices Pl...

Страница 22: ...MPEG Check this to display XYZ video output for MPEG playback 2 Resolution Allows playback of mixed 2K and 4K content at a constant resolution Video output will be scaled up or scaled down to the sele...

Страница 23: ...ance 1 USB Disk Press to perform software upgrades from USB Disk 2 Server Information Displays serial number OS version software version video capabilities of the IMB and warranty expiry date 3 Warn b...

Страница 24: ...put is always enabled on LPU 1000 3 Audio Output Sampling Rate Change audio output sampling rate Output audio sampling rate can be fixed at 48kHz or 96kHz for all content or it can match the content s...

Страница 25: ...rder 2 3 4 4 1 Audio Channel Mapping 1 Audio output based on the number of audio channels in the audio track of the DCP can be configured in this tab 2 The preset for the number of audio channels in t...

Страница 26: ...1 Audio output based on SMPTE audio channel configuration labels can be configured in this tab 2 Check the Use SMPTE audio labels checkbox to route audio output based on SMPTE audio channel configura...

Страница 27: ...Aug 2018 27 Figure 12 Alternative Inputs 1 Audio output for alternative HDMI SDI inputs can be configured in this tab 2 The audio output preset for each alternative input can be changed here 3 Use th...

Страница 28: ...ual for LPU 1000 LED Player Unit Figure 13 Upmix 1 Audio channel upmix can be enabled or disabled in this tab 2 Check the Enable Upmix checkbox to enable audio upmix Please refer to Section 7 3 for mo...

Страница 29: ...nfigured in this tab 2 Select a preset to view or change preset settings 3 Add a new preset or delete the current preset 4 Audio configuration for an audio preset can be changed here 5 Click Save to s...

Страница 30: ...es a Rear Window display for closed captions Note A USB to Serial converter is required for Rear Window display 2 Enable Device Maximum waiting time Enable communication with a closed caption device t...

Страница 31: ...e main IP address of the LPU 1000 The SMS interface can be reached at this IP address using VNC 4 SOM Gateway Specify the network gateway for the LPU 1000 5 Enable IMB Ethernet 1 Specify an IP address...

Страница 32: ...U 1000 LED Player Unit 7 Validate IPs Click to check all IP addresses entered above for correctness A dialog will be displayed showing the source and target IP addresses and any errors found in the ne...

Страница 33: ...hare available to this LPU 1000 system for the use as data storage 2 Configure the LPU 1000 to use an attached single external eSATA hard disk as data storage The external eSATA hard disk must be atta...

Страница 34: ...that enables the use of SNMP to monitor the IMB The SNMP interface contains many useful SNMP traps and is easy to configure 2 3 5 2 Accessing the SNMP Configuration Interface Press Configuration to s...

Страница 35: ...19 SNMP Configuration 1 On the SNMP Configuration there are several tabs along the bottom of the screen The General option shown in the above figure System Info option System Setting option Encrypt op...

Страница 36: ...Trap Sending Interval Indicates the time interval in seconds after which a trap should be resent to the SNMP Manager The trap will continue to be resent only as long as the error condition exists 3 S...

Страница 37: ...set to the server model if the Automatically set System Name to Server model option is checked 3 System Location The location where the LPU 1000 is installed This value will be displayed when SNMP inf...

Страница 38: ...d Frame KDM Invalid When this option is checked an SNMP trap will be generated when a DCP ingest starts When this option is checked an SNMP trap will be generated when a DCP ingest is completed When t...

Страница 39: ...ped in the specified time period in seconds 2 3 5 3 4 Encrypt 1 Enable Authentication Allows user to enable SNMP Authentication by providing Username The default Password can be changed using the Chan...

Страница 40: ...threshold temperature for respective storage device by using the and buttons Activate the Trap by checking the checkbox opposite the corresponding storage device NOTE When the Trap is On a trap will b...

Страница 41: ...screen keyboard Activate the Trap by checking the checkbox NOTE When the Trap is On a trap will be sent to the SNMP Manager if the mount capacity exceeds the threshold value 1 On the SNMP Configurati...

Страница 42: ...e SNMP Configuration select PCI A new window opens as seen in Figure 26 above 2 Activate the Trap by checking the checkbox opposite the corresponding PCI Device NOTE When the Trap is On a trap is sent...

Страница 43: ...e 27 above 2 Set the threshold temperature required for the system sensors by typing in the field or using an on screen keyboard Activate the Trap by checking the checkbox opposite System Temperature...

Страница 44: ...nit Figure 28 SNMP Configuration Ethernet 2 3 5 3 9 Ethernet 1 On the SNMP Configuration select Ethernet A new window opens as seen in Figure 28 above 2 Enables sending an SNMP trap if the system dete...

Страница 45: ...to save the current SNMP configuration a Select OK to save the configuration b Select Cancel to cancel the configuration 2 Press Cancel if you want to cancel the operation A small window pops out to c...

Страница 46: ...2 SMS 46 01 Aug 2018 User Manual for LPU 1000 LED Player Unit 2 3 6 Automation Please refer to Figure 6 to understand how transit from Configuration to Automation Figure 30 GDC Automation workflow...

Страница 47: ...only be executed within a playlist as long as that playlist is playing If playback stops or the Stop button is pushed automation will not run 1 On the Automation press Devices In the Devices the Syste...

Страница 48: ...Type as NETWORK SOCKET 3 After adding the device name assign the type of device you want to use Select from a dropdown list as seen below 4 You can edit or delete the device name on the dropdown list...

Страница 49: ...ce will already have default values b The status of the device can be Enabled or Disabled Select from the dropdown list as seen below c The Linefeed Type can be selected from the dropdown list as seen...

Страница 50: ...pens as seen in Figure 33 On the Inputs press Add to enter the selected device NOTE Only devices capable of sending a signal to the IMB can be added under Inputs a Select a Trigger event from the drop...

Страница 51: ...D Player Unit 01 Aug 2018 51 2 3 6 3 Actions 1 Select Actions on the Automation On the Actions press Add located at the top portion of the screen An on screen keyboard opens Type in your desired label...

Страница 52: ...Event Label Then select a device from the dropdown list as seen below New devices can be added to the list from the Devices a If the selected device is System the Output Type prompt is Primitive The P...

Страница 53: ...y copied label To delete an existing label select the label name from the dropdown list and then press Delete 4 Press Save after completing the settings to return to the Playlist Management 5 By press...

Страница 54: ...never a playback error occurs 3 Interrupt timer delays when player is unpaused When this option is selected and the user clicks Unpause button on the player the next action in the automation cue will...

Страница 55: ...Export automatically saves the configuration file for the selected automation device to your web browser s default download location 2 Import Export Configuration Import allows user to select configur...

Страница 56: ...LED Player Unit Figure 37 Creating a show playlist 2 4 Show Playlist 2 4 1 Create a Show Playlist 2 4 1 1 Access to Playlist Management 1 On the SMS interface press to open a Playlist Management for c...

Страница 57: ...ues 2 Select the composition to add to the playlist and press Repeat the same step to add other compositions e g trailers or advertisements to the playlist 3 Compositions in the playlist are shown in...

Страница 58: ...Figure 39 Playlist Management Editing Cues 2 4 1 3 Editing Cues 1 To edit a cue of a composition on the playlist select the desired composition from the Playlist Management and press Edit Cue A new w...

Страница 59: ...2 SMS User Manual for LPU 1000 LED Player Unit 01 Aug 2018 59 Figure 40 Cue Editor 3 4 2 6 5 7 4 8 4...

Страница 60: ...entry window will open Use the and buttons enter the desired time code Press OK to confirm your selection To specify a frame for the activation of the cue press the Time button once and it will toggle...

Страница 61: ...indicate that there are no markers present 4 To add an automation cue label select the desired automation cue label from the dropdown list as seen below 5 To add a start cue tick the Start Cue option...

Страница 62: ...rt of the composition s playback 6 Press Add Cue to add the cue to the composition The cue s details will then be displayed in the cue window as seen below NOTE You can select a cue from the cue windo...

Страница 63: ...st 2 4 1 4 Saving the Playlist 1 Press Save Show to save the playlist This ensures any changes to playlist will not be lost Note The Save Show button will remain greyed out until any changes are made...

Страница 64: ...01 Aug 2018 User Manual for LPU 1000 LED Player Unit 2 5 Show Schedule 2 5 1 Schedule a Show Figure 42 SMS Interface Scheduler 1 On the SMS Interface press Scheduler A new window opens as seen in Fig...

Страница 65: ...is DD MM YYYY and the time format is HH MM SS To select the day click on DD and adjust to the required day using and Repeat the same for MM YYYY HH MM and SS b At Shows select the playlist for the sho...

Страница 66: ...of time check Loop Until and indicate the date and time to end the loop e Press Add after the schedule date time is fixed and playlist is selected f If the new show schedule does not conflict with oth...

Страница 67: ...At Select Date indicate the date of the schedule You should see a line on the time bar at the slot where the show is scheduled b Click on the line Information about the show such as name time and dura...

Страница 68: ...to return to Scheduler When on the Scheduler press back to return to the SMS Interface c To navigate to the previously scheduled show just before the selected show press Prev d To navigate to the succ...

Страница 69: ...y fields are left blank the default values are assumed Login and password fields only need to be entered if the user has changed these parameters on the cinema LED screen 2 7 1 Subtitle Overlay 2 7 1...

Страница 70: ...SMS 70 01 Aug 2018 User Manual for LPU 1000 LED Player Unit Figure 46 SMS Interface Control Panel 2 7 1 2 Subtitle Language Selection 1 Press the Control Panel Button to navigate to the Control Panel...

Страница 71: ...2 SMS User Manual for LPU 1000 LED Player Unit 01 Aug 2018 71 2 From the Control Panel select Manage Content 2 Figure 47 Manage Content...

Страница 72: ...nguage 4 When subtitle overlay is selected the language for clips with subtitles can be configured in the Content Manager as seen in Figure 48 Setting the correct language for subtitles will ensure th...

Страница 73: ...ions 6 As shown in Figure 49 the following languages can be set for each clip Simplified Chinese Traditional Chinese Korean Japanese English Spanish Italian Russian French The language setting can als...

Страница 74: ...2 SMS 74 01 Aug 2018 User Manual for LPU 1000 LED Player Unit Figure 50 Returning to Control Panel 7 Click the Control Panel button to return to the Control Panel 7...

Страница 75: ...ser to select shutdown or restart application Restarting the application will not reboot the IMB It will only restart the software without affecting the hardware Allow some time for the IMB to restart...

Страница 76: ...52 Accessing the Control Panel 3 CONTROL PANEL 3 1 About Control Panel The Control Panel UI provides access to all the other interfaces used to configure and operate the LPU 1000 To get to the Contro...

Страница 77: ...on System information including the serial number OS version SMS version network and storage information can also be seen on the Control Panel UI NOTE The Refresh status button is used to manually ref...

Страница 78: ...t Figure 54 Accessing Automation 3 3 Manual Automation Execution 1 Automation labels and LED Screen commands can now be executed from an interface on the Control Panel Press Automation on the Control...

Страница 79: ...EL User Manual for LPU 1000 LED Player Unit 01 Aug 2018 79 2 Select an automation label to view the actions associated with the label Press Execute to execute the automation label 2 Figure 55 Executin...

Страница 80: ...l for LPU 1000 LED Player Unit 3 4 Restarting the Control Panel 1 Press Restart to restart the Control Panel The Control Panel will restart and display the SMS interface as seen in Figure 57 1 Figure...

Страница 81: ...3 CONTROL PANEL User Manual for LPU 1000 LED Player Unit 01 Aug 2018 81 Figure 57 SMS interface...

Страница 82: ...ndow appears as seen in Figure 58 Select Shutdown to continue shutdown of IMB or Cancel to cancel shutdown of IMB All current playback will be stopped upon shutdown of the system WARNING If current pl...

Страница 83: ...of the IMB in the following ways 4 1 2 Accessing the Content Manager 1 Download content from a disk or source on the network 2 Download keys KDM s required for playing back content from disk or source...

Страница 84: ...Interface 2 Press Manage Content to go to the Content Manager NOTE The Content Manager can run in the background and does NOT need to be exited 4 2 Content Management 4 2 1 Ingesting Content Figure 60...

Страница 85: ...ress Import to queue downloading of the package or CPL To bypass ingestion for direct playback you can press Live Play instead Refer to Live Play below for more info 7 When done selecting the package...

Страница 86: ...01 Aug 2018 User Manual for LPU 1000 LED Player Unit 4 2 2 Ingesting Content from USB Disk 1 Select USB drive from dropdown list and click Open Continued on next page 1 Figure 61 Opening a USB disk c...

Страница 87: ...Manual for LPU 1000 LED Player Unit 01 Aug 2018 87 2 Select a storage device and its partition from the dropdown lists 3 Press OK to confirm the selection 3 2 3 Figure 62 Selecting the USB storage de...

Страница 88: ...the KDMs present in the selected directory that are valid for this IMB 3 Click under the Transfer column to select the KDM you wish to download A green check indicates the selected KDM 4 Shows the det...

Страница 89: ...Aug 2018 89 4 2 4 Monitor Ingest Progress 1 Select the Status option 2 Shows the download status of the packages or CPLs In this example downloading of some packages or CPLs is incomplete 2 1 1 2 1 F...

Страница 90: ...g paused 2 Use the Move Up and Move Down buttons to move the highlight bar up and down to select the desired package or CPL when multiple packages or CPLs are being downloaded You can only move the hi...

Страница 91: ...osite the package or CPL you want to delete A green check indicates the selection 2 Click View CPL to toggle between the package and CPL lists displayed in the content interface 3 You can select all b...

Страница 92: ...e package s or CPL s 4 2 7 Checking Content Integrity 1 Click View CPL to toggle between the package and CPL lists displayed in the content interface Click under the Select column opposite the package...

Страница 93: ...s are present in the selected package s or CPL s a If Now is selected the package will be verified immediately as seen below b If Schedule is selected you need to assign a name and schedule the time a...

Страница 94: ...LPU 1000 LED Player Unit 4 You can check if there are stray files in the selected package s or CPL s by pressing Check Stray A small window pops out to confirm if there are no stray files 4 4 Figure 6...

Страница 95: ...is modified or corrupted by calculating hash for each file in the selected package s or CPL s 6 You will see OK under the Status column after verifying that no problems are detected If errors are foun...

Страница 96: ...Schedule 7 You can view the list of package s CPL s that you have scheduled for verification by selecting the Schedule option 8 Select the desired package or CPL and press View to see its schedule det...

Страница 97: ...e KDM 1 Select the KDM tab in the Content Manager 2 Show the KDM s present in the selected directory that are valid for this IMB 3 Show the details of the selected KDM including target CPL UUID and da...

Страница 98: ...t 4 4 1 Manage Licenses Figure 72 License Manager 1 Select the License tab in the Content Manager 2 Shows the licenses that are valid for this system 3 Shows the details of the selected license includ...

Страница 99: ...IMB 3 Click under the Transfer column to select the license you wish to download A green check indicates the selected license 4 Shows the details of the selected license including feature and date of...

Страница 100: ...LPU 1000 LED Player Unit 4 4 3 Monitor Ingest Progress Figure 74 Monitor the progress of download of the packages 1 Select the Status option 2 Shows the download status of the packages or CPLs In this...

Страница 101: ...rce Management 4 5 1 Adding a Data Source 1 You can add a new source or edit an existing source by selecting the Source option 2 To add a new source enable the source name entry and source information...

Страница 102: ...new data source name on the Source Name entry NOTE You can type on each entry using an external keyboard or by using the on screen keyboard The on screen keyboard is normally used when an external ke...

Страница 103: ...name and Password are enabled The username and password are optional provided that the data source is not protected by username and password For example some window shares can be accessed without user...

Страница 104: ...r Manual for LPU 1000 LED Player Unit Figure 77 Deleting a previously saved data source 4 5 2 Deleting a Data Source 1 Select the data source you want to delete from the dropdown list 2 Press Delete t...

Страница 105: ...2018 105 Figure 78 Editing a new data source 4 5 3 Editing a Data Source 1 To edit an existing source select the data source you want to edit from the dropdown list 2 Press Edit to edit the selected d...

Страница 106: ...r Unit Figure 79 Editing the parameters of the selected data source 3 You can edit change the source name parameter settings username or password by typing on each entry using an external keyboard or...

Страница 107: ...etwork setup maintenance and configuration and access to software information All actions can be performed by touching the drawn control on the screen of the IMB Access to the Admin panel of the GDC I...

Страница 108: ...LED Player Unit 5 2 2 Access to Admin Panel 5 2 2 1 Access via Control Panel 1 Press Control Panel on the SMS interface 2 Click on the Admin panel button to go to the startup window for Admin Panel a...

Страница 109: ...dow Without focusing on the particular window text will not appear even if you type something Click Focus again only when necessary 2 Click on the password entry on the screen and type in the required...

Страница 110: ...erface 3 Select Quit if you wish to go back to Control Panel A small window pops out to confirm the selection Press Yes to confirm 4 Select Shut Down if you wish to shut down the IMB A small window po...

Страница 111: ...the IMB 3 System Info Shows OS version licensing hardware and hotfix information 4 Touchscreen For selecting touchscreen type and calibrating the touchscreen 5 User Manager For adding editing deleting...

Страница 112: ...User Manual for LPU 1000 LED Player Unit Figure 83 Storage System Management 5 3 Configuration Maintenance 5 3 1 Storage System Management 1 Select Storage System Management A small window for Storag...

Страница 113: ...layer Unit 01 Aug 2018 113 Figure 84 Storage System Management Create new RAID array 5 3 1 1 Create new RAID array 1 Select Create new RAID array A new window appears as seen in Figure 85 Figure 85 Co...

Страница 114: ...then click Return 3 If less than three 3 hard disks are inserted to the PSD a small dialog box will pop up Click Return on the on screen keyboard to exit and return to Storage System Management 4 The...

Страница 115: ...s 5 3 1 2 Monitor RAID Status 1 Select Monitor RAID Status When the RAID is rebuilding it displays the rebuilding progress as normal function to the previous RAID setup A new window appears as seen in...

Страница 116: ...Hard Disk Information 1 Select Hard Disk Information A new window appears as seen in Figure 90 2 Select the disk you want to view the information from and press Select 3 A new window will show the inf...

Страница 117: ...5 ADMIN PANEL User Manual for LPU 1000 LED Player Unit 01 Aug 2018 117 3 Figure 91 List of information for selected hard disk...

Страница 118: ...t Hard Disk Usage 5 3 1 4 Hard Disk Usage 1 Select Hard Disk Usage from Storage System Management 2 A new window showing hard disk usage appears as seen in Figure 93 Click Back to return to the Storag...

Страница 119: ...m Management Storage performance Figure 95 Storage performance Select a Hard Disk 5 3 1 5 Storage Performance 1 Select Storage performance A new window showing a list of hard disks appears as shown in...

Страница 120: ...96 Shows information on storage performance of the selected hard disk 3 A new window showing information on hard disk performance appears as seen in Figure 96 Press Save output to USB to save this in...

Страница 121: ...ld Speed 1 If the RAID array is being rebuilt during playback the rebuild speed will slow down significantly To resume highest rebuild speed after playback is finished go to Admin Panel Login Click St...

Страница 122: ...al for LPU 1000 LED Player Unit Figure 98 Diagnostics Maintenance 5 3 2 Diagnostics Maintenance 5 3 2 1 Access to Diagnostics Maintenance 1 On the Main menu select Diagnostics Maintenance A small wind...

Страница 123: ...logs configuration 5 3 2 2 Extract Logs Configuration 1 Select Extract logs Select the set of logs required on this dialog box A pop up window will be shown indicating that the log extraction is in p...

Страница 124: ...ance Backup configuration Figure 101 Saving IMB configuration 5 3 2 3 Backup Configuration 1 The Backup Configuration saves the IMB configuration to a backup file on a USB disk or thumb drive Attach a...

Страница 125: ...e 2 The backup file is saved in an encrypted format as seen in Figure 101 The following configuration files are included in the backup file Automation configuration SNMP configuration SMS configuratio...

Страница 126: ...When Restore Configuration is pressed a list of backup files present on the USB disk is displayed Select the backup file to restore and then press Select 3 Information on the backup file will be disp...

Страница 127: ...ting the timezone of specific region 5 3 2 5 Configure Timezone 1 Select Configure Timezone A new window will appear as seen in Figure 106 2 Move the highlight bar to your geographical area by clickin...

Страница 128: ...Unit Figure 107 Selecting the timezone of specific country 3 Move the highlight bar to your timezone by clicking the up or down arrow keys on the on screen keyboard and then click the space key Then c...

Страница 129: ...access Figure 109 Entering the IP address of the IMB 1 Select Check network access on the Network 2 A new window appears to enter Network or IP address Enter the Network or IP address and then select...

Страница 130: ...User Manual for LPU 1000 LED Player Unit Figure 110 Information shown after testing the connectivity of the IMB to the network 4 Press Save output to USB to save a screen capture of the information to...

Страница 131: ...etwork Network Time Figure 112 Entering the IP address of the time server 1 Select Network Time on the Network 2 A new window appears for NTP service configuration as shown in Figure 112 Select Enable...

Страница 132: ...3 2 8 Software Upgrade 1 From the Software Upgrade button in the Admin Panel you can run any GDC issued upgrade files once you press the button you will be prompted for the upgrade password as seen i...

Страница 133: ...5 ADMIN PANEL User Manual for LPU 1000 LED Player Unit 01 Aug 2018 133 Figure 115 Diagnostics Maintenance Software Upgrade 3 Select the upgrade file from the dropdown list and press OK 3...

Страница 134: ...it Figure 116 Diagnostics Maintenance Check IP Conflict Figure 117 Network interface Selection 5 3 2 9 Check IP Conflict 2 Select a network interface for checking IP conflict 1 Select Check IP Conflic...

Страница 135: ...ADMIN PANEL User Manual for LPU 1000 LED Player Unit 01 Aug 2018 135 Figure 118 IP Conflict result 3 Select Save output to USB to save a screenshot of the information to a USB disk Click Back to exit...

Страница 136: ...18 5 ADMIN PANEL User Manual for LPU 1000 LED Player Unit Figure 119 System Info 5 3 3 System Information 5 3 3 1 Access to System Info 1 On the Main menu select System Info A small window for System...

Страница 137: ...Info Software OS version 5 3 3 2 Software OS Version 1 Select Software OS version on System Info 2 The OS and Software versions of the IMB are shown in a new window as seen in Figure 121 Press Back t...

Страница 138: ...tion including the Motherboard Video card and JPEG2000 card used in the IMB 5 3 3 3 Hardware Information 1 Select Hardware information on the System Info 2 A new window showing the list of hardware in...

Страница 139: ...4 Licensing Information 1 Select Licensing information on System Info 2 A new window shows the serial number and license capabilities of available options in the server as seen in Figure 124 Press Ba...

Страница 140: ...mation Figure 127 Patches and upgrades installed in the IMB 5 3 3 5 Hotfix Information 1 Select Hotfix information It allows the user to check on the patches and upgrades installed on the IMB 2 A new...

Страница 141: ...ormation Figure 129 Module Version Information 5 3 3 6 Module Information 1 The Module information button provides the user with detailed version information used in troubleshooting 2 A new window sho...

Страница 142: ...ADMIN PANEL User Manual for LPU 1000 LED Player Unit Figure 130 Touchscreen 5 3 4 Touchscreen 5 3 4 1 Access to Touchscreen 1 On the Main menu select Touchscreen Touchscreen appears showing two types...

Страница 143: ...a change is made to the touchscreen type Select Yes to confirm the change in touchscreen type 2 A small menu for selecting the touchscreen type appears a If TK USB is selected the screen will switch...

Страница 144: ...Figure 133 3 Touch the blinking symbol until it stops Continue touching the blinking symbols on each of the four 4 corners of the screen to complete the calibration of the touchscreen c A small windo...

Страница 145: ...r Manager 5 4 1 Access to User Manager 1 On the Main menu select User Manager A small window for User Manager appears 5 4 2 Add Edit user 1 On the Main menu select Add Edit user A new window for usern...

Страница 146: ...nit 2 Type in your desired Username and Password using the on screen keyboard to create a new username password and press OK 3 A small window will appear after creating your username and password Pres...

Страница 147: ...type in your new password A small window pops up asking if you want to change the password Press Yes to confirm A new window appears to confirm the password has changed Press OK to exit and return to...

Страница 148: ...me you want to delete and press Select A small window pops up to confirm if you want to continue to delete the user Select Yes to confirm A small window appears confirming the user has been deleted Pr...

Страница 149: ...rent user password A new window for password entry appears as seen in Figure 139 1 Type in your new password and press OK A small window appears confirming the change in password Press OK to exit and...

Страница 150: ...l for LPU 1000 LED Player Unit 5 ADMIN PANEL Figure 140 DCI compliance 5 5 DCI Compliance 5 5 1 Access to DCI Compliance 1 Press the DCI compliance button to access the RTC time offset or extract the...

Страница 151: ...Unit 01 Aug 2018 151 Figure 141 RTC Offset 5 5 2 Offset RTC Time 1 The allowed offset range is set to plus or minus 360 seconds 2 The Offset can be set or within the allowed offset range seen in fiel...

Страница 152: ...t 5 ADMIN PANEL Figure 142 Set time for SM log 5 5 3 Get SM Log 1 Choose the date and time range for SM log extraction It is possible to alter the name of the output file with the Key Pad button Once...

Страница 153: ...t Shutdown 5 6 Quit Shutdown 1 On Main menu select Quit Shutdown A small window shows the Quit Shutdown a Select Quit to switch to the Control Panel b Select Shut Down to turn off the IMB c Select Log...

Страница 154: ...rvices to restart all automation communications playback and content management services on the IMB Playback will be stopped while services are restarted Select Yes to restart services or No to cancel...

Страница 155: ...nit Important Note Always power on any external storage before powering on the LPU 1000 LED Player Unit The external storage must be powered on first to be correctly identified by the LPU 1000 6 2 Pow...

Страница 156: ...es on the LPU 1000 that require licenses from GDC 7 1 Network Streaming The LPU 1000 is capable of playing live network streams This section provides information on configuring the LPU 1000 for live n...

Страница 157: ...layed for cases where source audio and video are out of sync Both positive and negative audio and video playback Recommended value 0 frames 3 Setting the PTS sync option will force playback to use the...

Страница 158: ...e PID box is checked Choose between MPEG2 and H 264 MPEG4 or Auto Detect Select whether to apply 3D demux to incoming video stream None 2d 2D video output Side by side 3D 3D video output with side by...

Страница 159: ...LPU 1000 LPU 1000 LED Player Unit MDA Playback Internal Decoder LDM for the server s serial number MDA configuration file for the cinema the server is to be installed in 7 2 2 Server configuration fo...

Страница 160: ...0 139 load the webpage http 192 168 0 139 cgi bin mdaConfig The MDA configuration web page will be shown as follows Figure 147 MDA Configuration Manager Use the Upload MDA configuration section to up...

Страница 161: ...7 APPENDIX 161 USER MANUAL FOR LPU 1000 LED PLAYER UNIT 5 Mar 2018 Figure 148 MDA Configuration Manager...

Страница 162: ...h 5 1 channel audio 7 1 channel audio and MDA audio without speaker re configuration audio channel routing configuration needs to be done After selecting Internal for MDA decoding it is possible to se...

Страница 163: ...nse for MDA playback internal rendering 7 3 2 Setup 7 3 2 1 Enable audio upmix 1 Audio upmix is enabled in SMS Configuration Audio tab Audio Channel Mapping Upmix 2 Check the Enable Upmix checkbox to...

Страница 164: ...roperties for each CPL in an SPL 2 This can be done from SMS Playlist Management CPL Properties Audio tab Figure 151 CPL audio track properties setting Audio track properties can be changed for each C...

Страница 165: ...perties setting The audio channel configurations available for each CPL are as follows Audio channel configuration Audio upmix applied Unspecified No audio upmix applied 2 0 stereo No audio upmix appl...

Страница 166: ...24 3607 Tel 86 755 8608 6000 India Mumbai Spain Barcelona Office No B 207 208 Everest Chamber C Esteve Terradas Andheri Kurla Road Marol Andheri East n 27 esc D Despacho 1 Mumbai 400 059 India 08023 B...

Отзывы: