gCreate gMax 2 PRO Скачать руководство пользователя страница 5

Pg 4

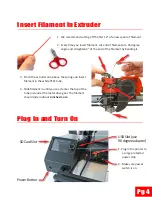
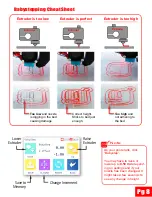
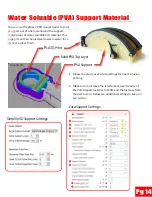
Insert Filament In Extruder
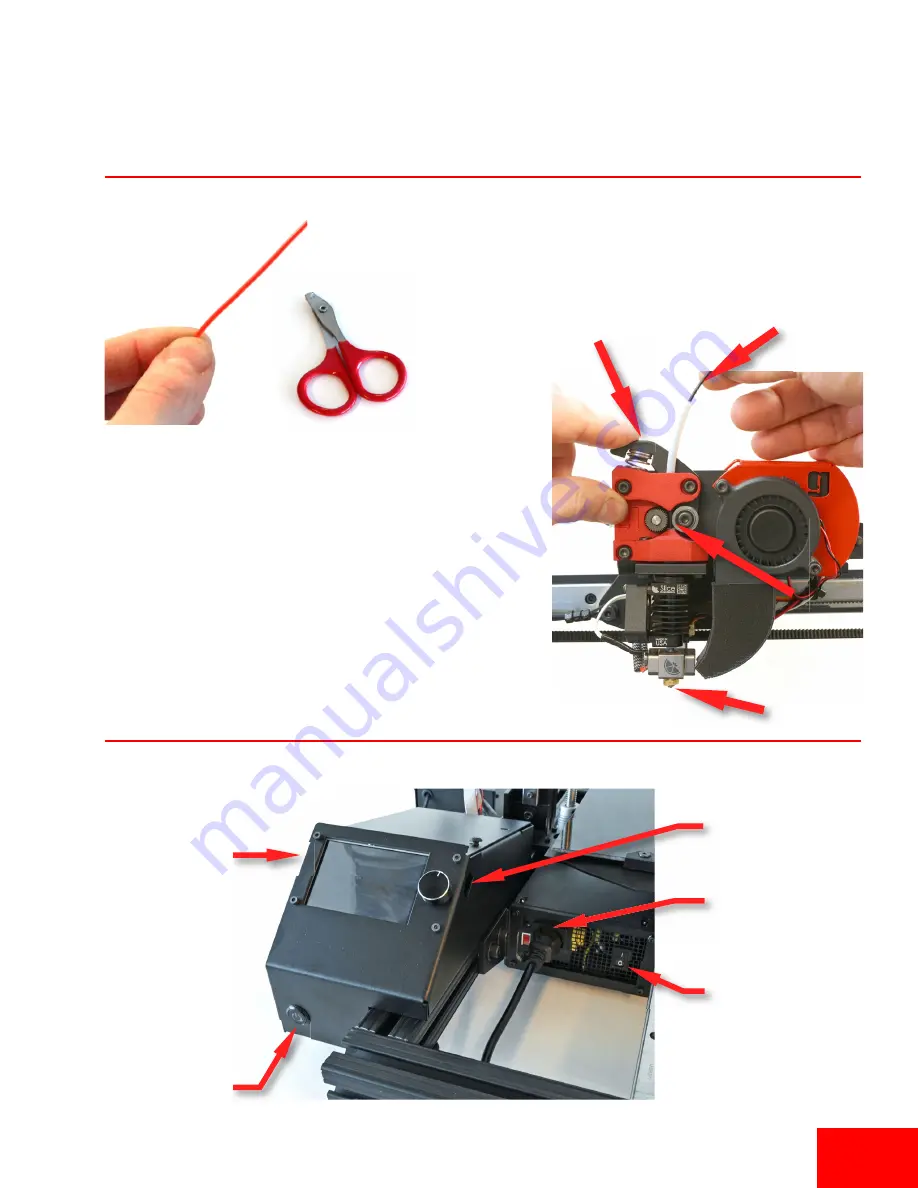
Plug In and Turn On

3.  Pinch the extruder arm above the spring and insert 

fi

lament in the white PTFE tube.

4.  Slide 

fi

lament in un l you see it enter the top of the 

tube just under the metal drive gear. The 

fi

lament 

should slide in about 

4 inches more

.

1. Plug in the printer to 

a surge protected 
power strip.

2.  Make sure power 

switch is on.

SD Card Slot

Power Bu on

1

USB Slot (use
90 degree adapter)

1.  We recommend cu ng o

 the 

fi

rst 12” of a new spool of 

fi

lament.

2.  Every  me you insert 

fi

lament, cut end of 

fi

lament at a 45 degree 

angle and straighten 4” of the end of the 

fi

lament by bending it.

Содержание gMax 2 PRO

Страница 1: ...ng please review this guide to set up and learn about your gMax Printer This guide should be used aŌer you have received the printer and followed the unboxing instrucƟons This manual is for Single and Dual extruder printers Check out youtube com gCreate3d to watch a gMax 2 Geƫng Started Video ...

Страница 2: ... Pg 1 Extruder Drag Chain Extruder Swing Arm Hotend Nozzle BLTouch Bed Sensor Extruder Carriage Extruder Filament Bracket Lead Screw LCD Screen Power Button USB Connection RGB LED Light Bar Lead Screw Pillow Block Lead Screw Coupler Power Supply SD Card Slot Lead Screw Nut Block Print Bed Acrylic or G10 FR4 X Axis Arm Electronics Box ...

Страница 3: ...es before touching it Always keep a working fire extinguisher and have a working smoke alarm near the printer Never place flammable objects near the printer including liquid chemicals that can release flammable vapors Never open the electronics case when the printer is powered on Any modifications or attempted repairs not explicitly directed by gCreate that cause damage are not covered under the W...

Страница 4: ...y Set Power Cord Addi onal Nozzles Brass Nozzle Cleaning Brush Filament Cu ers Open the accessory box and remove all the parts Each printer comes with a scraper for removing parts from the build plate a power cord hex keys nozzle cleaning brush and an extra bag of hardware for future upgrades ...

Страница 5: ...under the metal drive gear The filament should slide in about 4 inches more 1 Plug in the printer to a surge protected power strip 2 Make sure power switch is on SDCardSlot PowerBu on 1 USBSlot use 90degreeadapter 1 We recommend cu ng off the first 12 of a new spool of filament 2 Every me you insert filament cut end of filament at a 45 degree angle and straighten 4 of the end of the filament by ben...

Страница 6: ...si on on the side of the card 3 Select Print TFT SD gMax IniƟal Setup The test file will perform several func ons X Y Z Axis Motor test slow and fast Mul ple Homing Test Extrusion test with heat Fan test then cooldown Heated BedTemp Hotend 1 Temp No fica ons Se ngs Menu Fan Speed Printer Speed Coordinatesof Extruder X Y Z CurrentTemp TargetTemp Print Menu No fica ons P i The gMax Initial Run Test ...

Страница 7: ... To T T T r The gMax 2 PRO x axis arm should be manually leveled prior to bed leveling especially after it has been shipped The easiest method is to turn the lead screws with the printer turned off If the arm is not level the z axis may bind while it tries to lift The gMax 2 Pro uses Bilinear Bed Leveling BBL in marlin to probe the bed and create a 3d mesh for the first layer The mesh is saved to ...

Страница 8: ...s the prin ng begins you will need to adjust the first layer height using the Babystepping feature since it is set inten onally high from the manufacturing facility so as not to damage the bed Refer to the next page for more informa on Pg 7 CurrentTemp TargetTemp Print Progress Fan Speed PrintFlow FeedRate CancelPrint Filename PausePrint BabystepMenu Displaysmodel thumbnailifac vated BedTemp MoreM...

Страница 9: ...and not adhering to the bed Correct height Sticks to bed just enough Extruder Extruder Extruder Extruder is too low Extruder is perfect Extruder is too high As your print starts click Babystep You may have to raise or lower up to 0 50 mm depend ing on settings and if your nozzle has been changed It might take a few seconds to see any change in height Note ...

Страница 10: ...tly you should see no curling at the edges 3 USING CAUTION take the scraper and gently tap at the edges of the print Look for corners of the model and tap them A er several taps the print should pop off the bed If the model has a large surface area on the print bed it may be harder to remove and you may have to slide the scraper below the model Tap Edges or Corners The scraper is very sharp NEVER p...

Страница 11: ...nt quality issues can be fixed by changing slicing seƫngs Print speeds layer height exterior wall thickness or perime ter count infill density support material se ngs hotend temperature and fan cooling are the typical se ngs to modify Refer to the Cura and Simplify3d websites and forum gcreate com for many useful tutorials Always use high quality filament to reduce issues and improve your results ...

Страница 12: ... raise move out of the way and it will retract the filament Insert your new filament and press resume 5 Always plug your printer and heated bed into a UPC power backup or surge protector 6 When the nozzle is hot carefully use needle nose pliers or the metal bristle brush to remove any excess plas c which may have built up 7 Do not use any lubricant on the lead screws instead clean them off periodic...

Страница 13: ...uder 2 filament un l you feel when it hits the first filament and pull back about 5mm 3 Babystep and bed level the printer just like a single extruder The 2in1 dual extruder uses similar settings as the single extruder and does not require independent adjustments of the hotend height Make sure to update your slicing settings Pg 12 s the ThermistorSetScrew HeaterCartridgeSetScrew ...

Страница 14: ...ure In Simplify 3D you can add code to the Scripts Tool Change Scripts tab to cool the inac ve nozzle G1 X 15 Y210 F3500 move to X 15 and wait for temps Dual PLA PLA on the Chimera Switch to T0 or LEFT hotend IF NEWTOOL 0 M104 S170 T1 set T1 RIGHT inac ve extruder to 170 C IF NEWTOOL 0 M109 S190 T0 set T0 LEFT ac ve extruder to 190 and wait IF NEWTOOL 0 M104 S extruder0_temperature T0 set T0 LEFT ...

Страница 15: ...from the part to zero Below are addi onal se ngs to keep an eye out for You can use the gMax 2 PRO dual extruder to print your part out of one material and the support material out of water soluable PLA material This support can then be dissolved away in water for a cleaner surface finish PLA3DPrint PVASupport Simplify3DSupportSe ngs CuraSupportSe ngs P 1 Fo pr 2 Ma th P SolidPVATopLayer S Simplif...

Отзывы: