background image

ZZZ-182.41212MR.1216-21.GP.EN.doc       

              WEB VERSION 

      19 


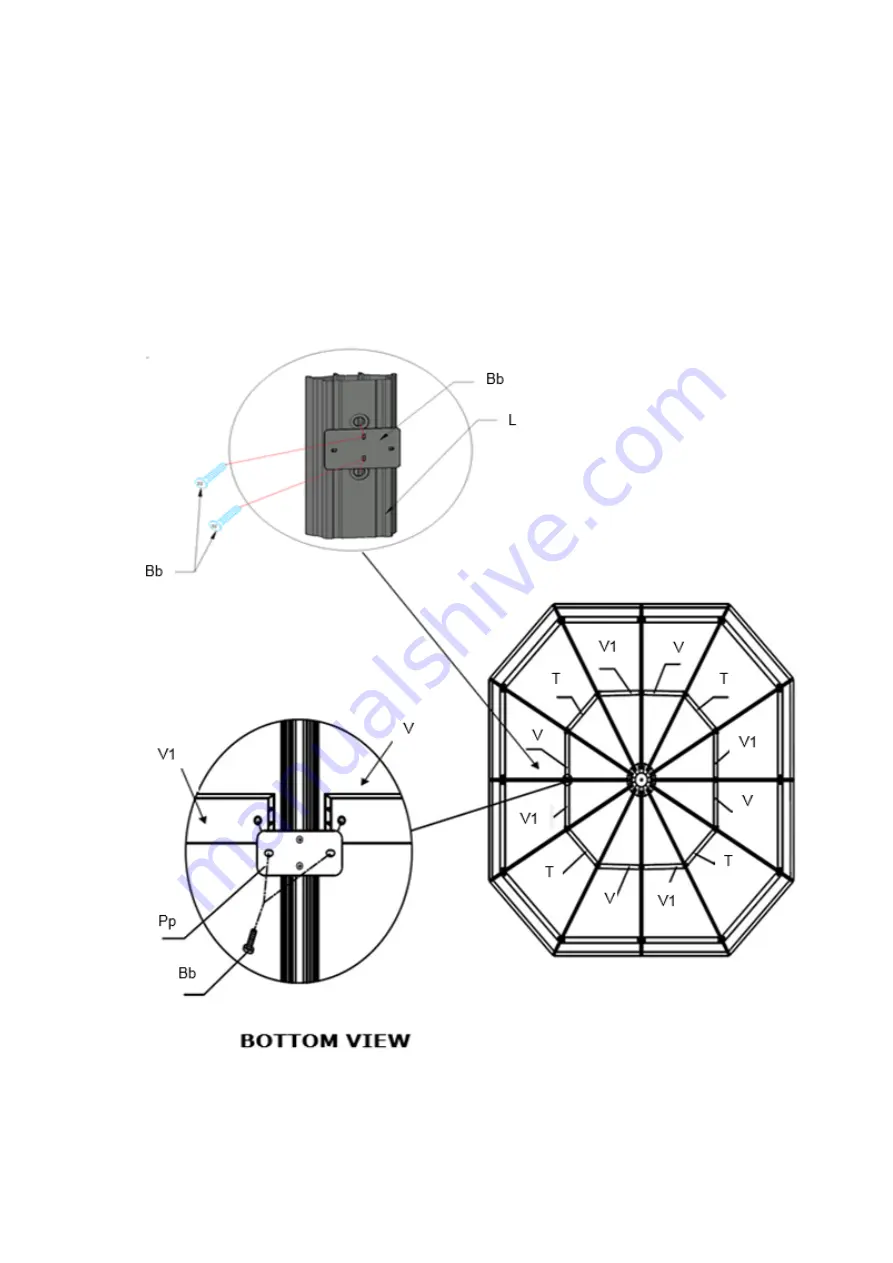
Step 8: 


1.  From the inside of the solarium, install all the Brackets (Pp) using Bolts (Bb) on the Rafters L 

& K. 

2.  From the inside of the solarium, install the Solidifying Bar (T, V, and V1) as illustrated using 

the Bolts (Bb). 


NOTE : Make sure all screws/ bolts are tight. 


Содержание 41212MR-12 SAND

Страница 1: ...TE 12 X 12 SOLARIUM ASSEMBLY INSTRUCTIONS DO NOT DESTROY THE BOXES UNTIL COMPLETELY ASSEMBLED PLEASE VERIFY THE CONTENT OF EACH BOX AGAINST THE LIST OF PARTS Two or more adults required for assembly Base Dimensions 12 x 12 Largest Dimensions 12 10 x12 10 Overall Height 110 APPROX ...

Страница 2: ...tions and check that all parts are present in the boxes If any parts are missing refer to warranty information A 6ft 1 8m stepladder Phillips screwdriver tape measure level mallet and a tarp to place parts on will be required for assembly not included Remove top protective film from roof panels prior to assembly DO NOT remove bottom protective film until ready to insert roof panels so as to identi...

Страница 3: ...chaser with the bill In order to properly exercise your warranty please comply with the following Carefully inspect the contents of the carton for missing or damaged components Should you discover damaged or missing parts do not return the product to the place of purchase but contact Gazebo Penguin Customer Service Department at the numbers listed below Montreal 514 276 3485 Elsewhere 1 800 737 71...

Страница 4: ... SLIDING DOOR FRAME D 2 2 2 2 17 054 ROOF PANEL Aa 6 4 08 165 12 DOOR LATCH Dd R 1 2 08 130 12 FRAME NEXT TO DOORS extra holes B 2 2 08 169 12 DOOR LATCH Dd L 1 2 08 158 12 SCREW M6 16 Bb 1 108 08 133 12 CONNECTING PIECE E 4 8 08 131 12 SLIDING DOOR C 2 2 08 167 12 SCREW M6X63 5 Ee 1 20 08 161 12 SCREW M6X70 Cc 1 12 08 136 12 DOOR RAIL F 4 2 12 037 12 CAPNUT M5X60 Cc 2 1 12 08 137 12 DOOR RAIL G 4...

Страница 5: ...OOR STOPPER H 1 4 17 044 12 RAFTER L 4 4 08 189 12 ACORN NUT Hh 1 1 17 057 ROOF PANEL Ll 6 4 08 139 12 CONNECTING PIECE I 4 8 08 143 12 Top Cap M 1 1 08 193 PLASTIC PLUG Ii 1 20 17 058 ROOF PANEL Mm 5 4 08 140 12 CONNECTING PIECE J 4 8 08 144 12 CENTRAL HUB N 1 1 17 055 ROOF PANEL Jj 5 4 08 134 12 UPPER DOOR RAIL END CAP Nn 1 4 17 043 12 RAFTER K 4 8 17 049 12 COVER FOR RAFTERS O 4 8 ...

Страница 6: ... SOLIDIFYING BAR V 1 4 17 051 12 GAP COVER BAR P 1 12 17 070 12 SOLIDIFYING BAR V1 1 4 18 067 12 SOLIDIFYING BAR BRACKET Pp 1 12 12 047 12 SCREW M5X15 Ww 1 12 17 053 12 END CAP R 1 12 17 060 ROOF PANEL Y 6 4 17 046 12 FINISHING BAR S 1 4 08 156 12 SCREW M4 16 Z 1 28 17 048 12 SOLIDIFYING BAR T 1 4 15 125 12 STEEL ANGLE Z2 assembled to rafter 1 4 15 124 12 STEEL ANGLE Z1 assembled to rafter 1 8 NOT...

Страница 7: ...R FRAME D 2 2 2 2 17 054 ROOF PANEL Aa 6 4 08 165 32 DOOR LATCH Dd R 1 2 08 130 32 FRAME NEXT TO DOORS extra holes B 2 2 08 169 32 DOOR LATCH Dd L 1 2 08 158 32 SCREW M6 16 Bb 1 108 08 133 32 CONNECTING PIECE E 4 8 08 131 32 SLIDING DOOR C 2 2 08 167 32 SCREW M6X63 5 Ee 1 20 08 161 32 SCREW M6X70 Cc 1 12 08 136 32 DOOR RAIL F 4 2 12 037 32 CAPNUT M5X60 Cc 2 1 12 08 137 32 DOOR RAIL G 4 2 ...

Страница 8: ...OR STOPPER H 1 4 17 044 32 RAFTER L 4 4 08 189 32 ACORN NUT Hh 1 1 17 057 ROOF PANEL Ll 6 4 08 139 32 CONNECTING PIECE I 4 8 08 143 32 Top Cap M 1 1 08 193 PLASTIC PLUG Ii 1 20 17 058 ROOF PANEL Mm 5 4 08 140 32 CONNECTING PIECE J 4 8 08 144 32 CENTRAL HUB N 1 1 17 055 ROOF PANEL Jj 5 4 08 134 32 UPPER DOOR RAIL END CAP Nn 1 4 17 043 32 RAFTER K 4 8 17 049 32 COVER FOR RAFTER O 4 8 ...

Страница 9: ...LIDIFYING BAR V 1 4 17 051 32 GAP COVER BAR P 1 12 17 070 32 SOLIDIFYING BAR V1 1 4 18 067 32 SOLIDIFYING BAR BRACKET Pp 1 12 12 047 32 SCREW M5X15 Ww 1 12 17 053 32 END CAP R 1 12 17 060 ROOF PANEL Y 6 4 17 046 32 FINISHING BAR S 1 4 08 156 32 SCREW M4 16 Z 1 28 17 048 32 SOLIDIFYING BAR T 1 4 15 125 32 STEEL ANGLE Z2 assembled to rafter L 1 4 15 124 32 STEEL ANGLE Z1 assembled to rafter K 1 8 NO...

Страница 10: ...Y THE BOXES UNTIL COMPLETELY ASSEMBLED Tools needed Step Ladder 6 8 2 Phillips 2 Robertson Screwdriver not supplied Rubber Mallet Various Files 12 piece of wood Based on the location decide where you would like to position the two 2 doors panels which can slide open to the left or the right your choice ...

Страница 11: ...ERSION 11 Assembly Instructions 12x12 Solarium Pre assembled steel angle Z1 Z2 to roof Rafters K L respectively using Bolts Bb To Be Assembled Before Packing 4 Steel Angles Z1 to be attached to the right hole and remaining 4 to the left hole ...

Страница 12: ...p to bottom to affix the Panel B and Door Frame D 3 When assembling Angled Panels A you should put the two panels at 135 degree angle then use the angled Connecting Pieces I and J slide from top to bottom to affix the panels together 4 Frame screening should be facing the outside of the unit 5 Door frame step down is on the inside of the unit 6 When sliding the part I J and E into the frames shake...

Страница 13: ...ZZZ 182 41212MR 1216 21 GP EN doc WEB VERSION 13 Step 2 1 Affix Gap Cover Bars P by sliding them on top of the exterior groove of the Frames A B D Step 3 ...

Страница 14: ...into wheels of Sliding Door C 2 Slide Lower Door Rail G into the plastic guide of the Sliding Door C 3 Use Bolts Bb to affix the plastic Stoppers H one on each end of Top Door Rail F 4 Using a Screw Oo affix the upper door rail End Caps Nn one on each end of Top Door Rail F ...

Страница 15: ...side of the solarium 1 Place a Bolt Ww and Washer Gg through the Top Door Frame D and Door Top Rail F and place a Female Bolt Cc 2 from the other side Once all are inserted tighten them all securely 2 Secure the Bottom Door Rail G using a Bolt Cc with a Washer Gg 3 Use Bolt Bb to affix the Door Latch Dd R Dd L onto the frame ...

Страница 16: ...ing Bolts Bb 2 Use Screws Z to affix the Rafters K onto the top of panels going through the Metal Piece Z1 attached to the Rafter K Note 1 Rafters must be affixed where panels connect to each other 2 Affix the Rafter K such that the extra hole on the bracket Z1 are facing each other as shown below NOTE 2 ...

Страница 17: ...EN doc WEB VERSION 17 Step 6 1 Follow the same procedure of Rafter K to assemble roof Rafters L onto the remaining panels Note Do not tighten the bolts right away as you may have to adjust the angle when inserting the roof panels ...

Страница 18: ... align the holes in each bar one on top of the other Place End Caps R under the aligned holes and secure with Bolts Bb 3 Repeat the process with the remaining finishing bars as illustrated 4 In order to finish the installation of the last Finishing Bar S U and U1 you have to unscrew the first Bolts Bb at your starting point and place an End Cap R then re install the Bolts Bb NOTE Make sure all scr...

Страница 19: ...Step 8 1 From the inside of the solarium install all the Brackets Pp using Bolts Bb on the Rafters L K 2 From the inside of the solarium install the Solidifying Bar T V and V1 as illustrated using the Bolts Bb NOTE Make sure all screws bolts are tight ...

Страница 20: ... doc WEB VERSION 20 Step 9 1 Install the bottom Roof Panels Jj Kk and Mm by sliding them onto Finishing Bar S U U1 NOTE 1 Please refer to the stickers on how to place the roof panels 2 Make sure all screws bolts are tight TOP VIEW ...

Страница 21: ...ZZZ 182 41212MR 1216 21 GP EN doc WEB VERSION 21 Step 10 1 Install the upper Roof Panel Aa by sliding them on top of roof Rafters K NOTE Please refer to the stickers on how to place the roof panels ...

Страница 22: ...Step 11 1 Once installation of the Roof Panel Aa is complete affix it using the Cover for Rafters 0 using the Screws Oo1 on one side only then place another roof panel and repeat step until last roof panel is installed using all Cover for Rafters 0 01 ...

Страница 23: ...ZZZ 182 41212MR 1216 21 GP EN doc WEB VERSION 23 ...

Страница 24: ...ZZZ 182 41212MR 1216 21 GP EN doc WEB VERSION 24 Step 12 1 Put Top Cap M on top of the Central Hub N ...

Страница 25: ...ZZZ 182 41212MR 1216 21 GP EN doc WEB VERSION 25 Step 13 1 Install the last Roof Panel Aa TOP VIEW ...

Страница 26: ...ZZZ 182 41212MR 1216 21 GP EN doc WEB VERSION 26 Step 14 1 Once the last roof panel is installed screw last Cover for Rafters O to the Rafter K with bolts Oo1 ...

Страница 27: ...ZZZ 182 41212MR 1216 21 GP EN doc WEB VERSION 27 Step 15 1 Use Acorn Nut Hh and Washer Gg to affix the Top Cap M to the Central Hub N ...

Страница 28: ... WEB VERSION 28 Step 16 1 Inside each of the frames panels push two Plastic Plugs Ii into the ground and secure the unit by using two Screws Ee for each panel or use any other type of anchoring suitable for the floor that you are using ...

Страница 29: ...ZZZ 182 41212MR 1216 21 GP EN doc WEB VERSION 29 Suggestions The below mentioned are only suggestions in order to permit drainage these will vary depending on your flooring material flatness and slope ...

Страница 30: ...ZZZ 182 41212MR 1216 21 GP EN doc WEB VERSION 30 ...

Страница 31: ...ZZZ 182 41212MR 1216 21 GP EN doc WEB VERSION 31 NOTE The dimensions are approximate ...

Отзывы: