background image

6

Menu operation

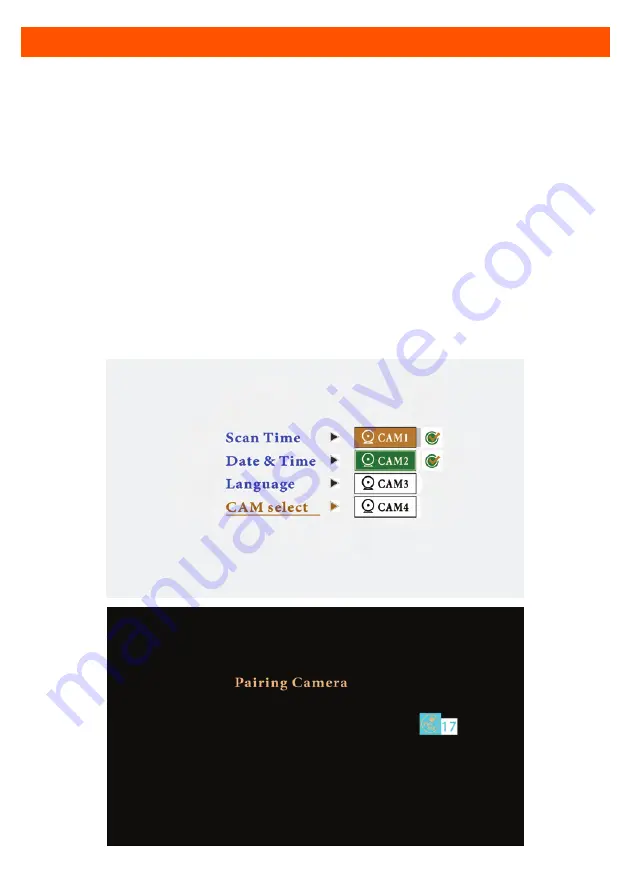
Pairing

NOTE: This monitor can pair up to 4 cameras at once.

The monitor must be told how many cameras are to be used in 

“Settings: , :CAM select: and select CAM1, CAM2, CAM3 or CAM4. 

Select in order from 1 to 4. For connection press the 

“+ / -“ buttons to select camera and the “AV” button to confirm.

Select the Pairing icon on screen. Press the “AV” button and a 

timer will appear on screen until successfully paired. Wait until 

connection is successful. Screen will automatically go back to 

MENU screen.

Содержание GRV7HDW

Страница 1: ...more information on the Gator range go to our website INCLUSIONS 7 Wireless Monitor Mounting Bracket With Adhesive Pad Monitor Sunvisor 1080P HD Wireless Camera 1 7M 10 32V Monitor Power Adaptor 1 5M...

Страница 2: ...tion Main Menu 5 Menu operation Cameras 5 Menu operation Pairing 6 Menu operation Record 7 Menu operation Playback 8 Menu operation View mode 9 Menu operation Setting 10 Monitor specifications 11 Came...

Страница 3: ...stallation diagram 1 5 Metres 10 32V DC car accessory socket 2 5 Metres Power wires 10 32V Accessory Power wires Reversing light 10 32V Option2 Hardwired Option1 Socket wired 1 7 Metres Camera 2 Monit...

Страница 4: ...truction for future reference WARNING The wireless monitor reversing system is designed to be used with not instead of other viewing aids in your vehicle The manufacturer shall not be held liable for...

Страница 5: ...ireless antenna 5 Selection button 6 Menu button Click to enter exit the menu settings 7 Selection button 8 AV button 9 Power button Press for 1 second to turn on or off 10 Power light Blue 11 Adjusta...

Страница 6: ...channel mode Press the AV button to change to single viewing mode If you have more than one camera Cameras Select the Camera icon on screen Press the AV button to enter the camera settings Press the...

Страница 7: ...select and select CAM1 CAM2 CAM3 or CAM4 Select in order from 1 to 4 For connection press the buttons to select camera and the AV button to confirm Select the Pairing icon on screen Press the AV butt...

Страница 8: ...ord icon on screen Press the AV button to enter Select record time and press the AV button to enter Select recording times of 1 3 and 5 minutes Press MENU button to exit and recording will start To st...

Страница 9: ...s Press the AV button to open the file and playback Each recorded file is coloured differently depending on what camera the footage was recorded highlighted at the top of the screen CAM1 CAM2 CAM3 CAM...

Страница 10: ...how many cameras are being used Select the View mode icon on screen Press the AV button to enter then press the buttons to cycle through view options as pictured below Press the AV button to confirm...

Страница 11: ...e scan time is after you enter the Auto Scan mode mostly use for 4 cameras The screen will auto switch the cameras display each for 5 seconds Date Time Edit the date and time Language Select prefered...

Страница 12: ...y hopping technology Chipset Solution Operating Temperature 20 C to 70 C Weight 440g Dimensions L 197 x W 62 3 x H 136mm Monitor specifications Type 1 2 7 HD CMOS Resolution 1080P Voltage 10 32VDC Sen...

Страница 13: ...would like to download a digital copy of this manual or other Gator manuals software please visit the gatordriverassist com website and click on Firmware Manuals or search for the product model number...

Отзывы: