background image

10


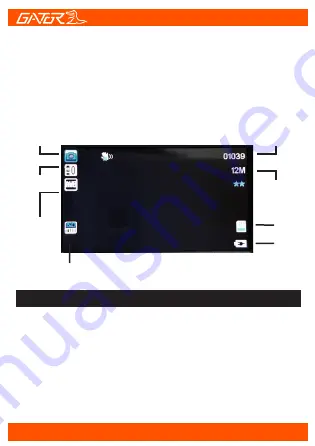
ISO

White

balance

Exposure

Photo mode

Remaining

photo space 

Resolution

Battery/

power

icon

SD Card

Photo Mode:

There is a photo camera icon at the top left corner of the 

LCD to signify you are on photo mode. To take a photo 

press the [OK] button and you will hear a shutter click 

sound. Briefly the photo will display on the screen. 

To switch between video, photo and playback modes, 

press and hold the [Menu/Mode] button. Quick press the 

[Menu/Mode] button again to show Function and Settings 

menu for each mode. Press the [arrow] buttons to choose 

between Function, Settings or X icon to exit. Press the  

[OK] button to activate.  Use [arrow] buttons to move 

through menus,  [OK] button to confirm selections.

DASH CAM modes & settings

Содержание GHDVR360

Страница 1: ...Resolution 1080P HD Full Screen Size 2 5 160 Wide Angle Super Capacitor G Sensor Adhesive Window Mount Manual GHDVR360 FULL HD 1080P DaSH cam...

Страница 2: ...sult in product failure damage or incorrect operation and therefore impact the product performance FULL HD 1920x1080 30FPS 2 5 High resolution LCD screen 160 Degree HD wide angle lens Super Night Visi...

Страница 3: ...Cam modes and settings 10 Instructions for video and photo operation 11 Video features 12 Video Photo settings 13 Photo features 15 Accessing files via your computer 16 Super capacitor battery 17 Form...

Страница 4: ...4 Package components GHDVR360 Mounting Bracket Car Charger 8G Micro SD Card...

Страница 5: ...5 Product structure 1 Recording indicator light 2 Rotating lens 3 Display screen 4 Power ON OFF 5 Mini USB input 6 Micro SD card input 7 Mounting base 8 LED light 1 6 4 3 5 8 2 7...

Страница 6: ...6 8 9 10 11 13 12 8 Menu Mode button 9 Arrow UP button 10 Arrow Down button 11 OK button 12 Mounting base 13 Speaker 14 Mounting base...

Страница 7: ...B interface charging point of the Dash Cam Connect charging end of the cable into 12V power socket of vehicle 7 Adjust the mounting bracket and rotate the camera direction to get the best view Ensure...

Страница 8: ...This can be purchased separately from your retailer to hard wire your Dash Cam to your vehicle Universal hard wiring kit GUNIHWC Sold separately 8 Suggested Fixing the Dash Cam...

Страница 9: ...will start flashing RED A red circle will flash on the screen and a red timer will appear when recording has started To stop the recording simply press the OK button To resume press recording press OK...

Страница 10: ...ll hear a shutter click sound Briefly the photo will display on the screen To switch between video photo and playback modes press and hold the Menu Mode button Quick press the Menu Mode button again t...

Страница 11: ...nd function In playback mode short press the Arrow Up button to fast rewind with 2X 4X 8X speeds available Short press Arrow Up to the next previous video When in pause mode press Arrow Up to stop pla...

Страница 12: ...want to keep any of the files it is best to upload them to your computer We recommend the Dash Cam to be set to 3 minute files WDR Wide Dynamic Range is used to achieve greater exposure to dynamic ra...

Страница 13: ...with locked video files Re format the SD card to create space The device does NOT guarantee video recording of all accidents as built in impact sensor may not be activated due to combination of user s...

Страница 14: ...the power button LED Allows the user to turn the LED light under DASH CAM on or off Plate Number Enter your vehicles number plate to display on recorded video or photos Format This feature allows you...

Страница 15: ...you to take multiple photos with one click Quality Fine Normal Economy Sharpness Strong Normal Soft White Balance Auto Daylight Cloudy Tungsten Fluorescent Color Color Black White or Sepia ISO Auto 10...

Страница 16: ...mages from your Dash Cam remove the SD card and use a card reader to connect to your computer An icon called VOLUME1 for Apple Users will appear Inside will be a folder named CARDV For PC Users storag...

Страница 17: ...ravity Sensing setting turned on or create locked files This will fill up the card causing it to stop recording any footage Press Menu Mode button on the side of the display to activate the lock foota...

Страница 18: ...angle Viewing Angle Super Night Vision G Sensor Loop recording Functions Multiple OSD Language Built in Microphone and speaker Audio Micro SD card 8GB inc 32GB Class 10 Max Storage Mini USB Power Inp...

Страница 19: ...the SD card and 8GB class 10 or above is recommended Make sure that your card is labeled Micro SDHC and not Micro SDXC as SDXC cards will not work with this Dash Cam Fuzzy dirty image Please check if...

Страница 20: ...proof Do not try opening the shell or trying to repair the Dash Cam by yourself If the accessories for the Dash Cam have any problems please take it to an authorised repair agent for repair Do not use...

Страница 21: ...http gatordriverassist com website and search for your model Click on Firmware Manuals at the bottom of the screen to view and download This manual is considered correct at time of printing but is su...

Отзывы: