background image

www.gateway.com

41

Installing a printer, scanner, or other device

Your computer has IEEE 1394 (Firewire

®

) and USB ports. Use 

these ports to connect peripheral devices such as printers, 
scanners, and digital cameras to your computer. For more 
information about port locations, see 

“Checking out your 

computer” on page 6

.

IEEE 1394 and USB ports support plug-and-play and 
hot-swapping
, which means that your computer will usually 
recognize such a device whenever you plug it into the 
appropriate port. When you use an IEEE 1394 or USB device for 
the first time, your computer will prompt you to install any 
software the device needs. After doing this, you can disconnect 
and reconnect the device at any time.

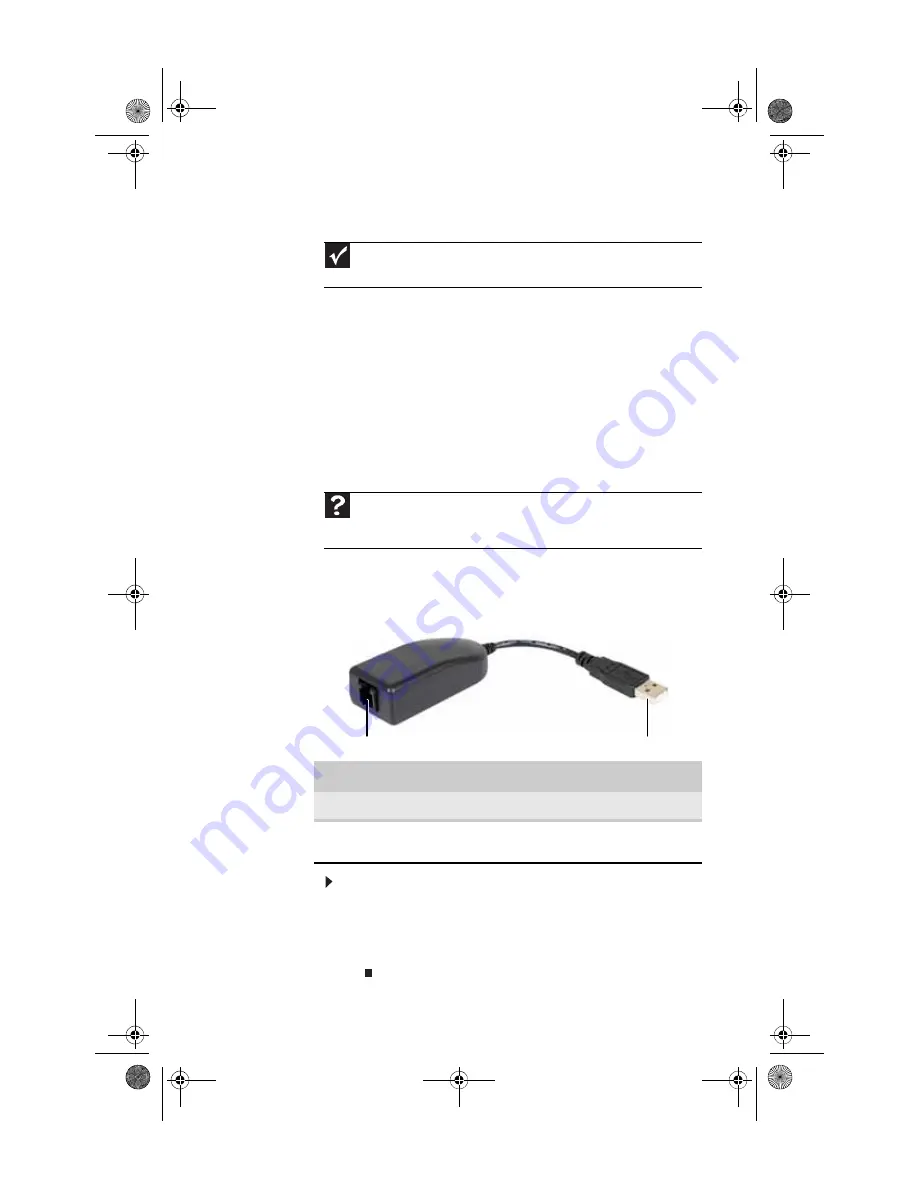
Connecting the dial-up modem

The dial-up modem USB dongle is an optional accessory.

To connect the dial-up modem:


1

Plug a modem cable into the modem jack on the modem 
dongle and into a telephone wall jack.

2

Plug the modem dongle into an available USB port on 
your computer or the power module.

Important

Before you install a printer, scanner, or other peripheral device, see the 

device documentation and installation instructions.

Help

For more information about installing peripheral devices, click 

Start

, then 

click 

Help and Support

. Type 

installing devices

 in the 

Search 

box, then 

press

E

NTER

.

Component

Description

Modem jack

Plug a modem cable into this jack.

USB  plug

Plug this into any available USB port on your 
computer or the power module.

Modem jack

USB plug

8512740.book  Page 41  Thursday, September 27, 2007  2:43 PM

Содержание SZSL95IN0XXXXXXXX

Страница 1: ...Reference Guide 8512740 book Page a Thursday September 27 2007 2 43 PM...

Страница 2: ...8512740 book Page b Thursday September 27 2007 2 43 PM...

Страница 3: ...titive strain 13 Preparing power connections 14 Protecting from power source problems 14 Connecting power 15 Connecting to a broadband modem or network 16 Setting up the keyboard and mouse 17 Installi...

Страница 4: ...rading Your Computer 45 Opening and closing the case 46 Installing memory 48 Adding or replacing a hard drive 50 Adding or replacing Mini PCI cards 51 Replacing the DVD RW drive 52 Installing or repla...

Страница 5: ...manually 73 Chapter 5 Troubleshooting 75 Safety guidelines 76 First steps 76 Troubleshooting 77 Audio 77 CD drive 77 Display 77 DVD RW drive 78 Ethernet 79 File management 80 Hard drive 81 Internet 8...

Страница 6: ...condition 101 Recovering your system using the Windows DVD 102 Telephone support 103 Before calling Gateway Customer Care 103 Telephone numbers 104 Self help 104 Tutoring 105 Training 105 Appendix A...

Страница 7: ...CHAPTER1 1 About This Guide About this guide Accessing your online User Guide Gateway contact information Microsoft Certificate of Authenticity 8512740 book Page 1 Thursday September 27 2007 2 43 PM...

Страница 8: ...your computer s label The Support page also has links to additional Gateway documentation and detailed specifications Accessing your online User Guide In addition to this guide your User Guide has be...

Страница 9: ...Certificate of Authenticity The Microsoft Certificate of Authenticity label found on the bottom of your computer includes the product key code for your operating system If you ever reinstall Windows f...

Страница 10: ...CHAPTER 1 About This Guide 4 8512740 book Page 4 Thursday September 27 2007 2 43 PM...

Страница 11: ...o a broadband modem or network Setting up the keyboard and mouse Starting your computer Turning off and restarting your computer Using the keyboard and mouse Using the remote control Using the DVD RW...

Страница 12: ...T display has 1400 900 resolution displays 16 2 million colors and has an 850 1 contrast ratio DVD RW drive For more detail see Sides on page 8 Power indicator The Gateway logo indicates when power is...

Страница 13: ...position and helps maintain the viewing angle As you push the top of the screen back or pull it forward this support stand automatically adjusts to maintain that angle For more information on adjusti...

Страница 14: ...ry card reader Microphone jack Power button Slot load DVD RW drive Headphone jack IEEE 1394 FireWire port USB ports Slide out support stand Power data cable Power data cable Slide out support stand 85...

Страница 15: ...g the memory card reader on page 32 IEEE 1394 port Plug IEEE 1394 also known as Firewire devices such as a digital camcorder into this 6 pin IEEE 1394 port For more information see Installing a printe...

Страница 16: ...ng and scheduled recording Optical digital audio out jack Plug an optical digital audio cable into this jack and into an optical Audio In jack on an amplifier or entertainment system for digital sound...

Страница 17: ...or Adjust the screen so it is perpendicular to your line of sight and the top of the screen is no higher than eye level Place your feet flat on the floor or on a footrest Keep ventilation openings cle...

Страница 18: ...lders at the same height and distance as the display Avoid focusing your eyes on your display for long periods of time Every 10 or 15 minutes look around the room and try to focus on distant objects S...

Страница 19: ...mfortable distributes your weight evenly and keeps your body relaxed Position your chair so the keyboard is at or slightly below the level of your elbow This position lets your shoulders relax while y...

Страница 20: ...long enough to save your work and shut down your computer normally Warning High voltages can enter your computer through both the power data cable and the modem connection Protect your computer by us...

Страница 21: ...e s clips lock into place 2 Plug the provided AC power cable into the power module then plug the power cable into an AC power outlet We recommend using a surge protector 3 To disconnect the power data...

Страница 22: ...to a broadband modem or to an Ethernet network 1 Insert one end of the network cable into the Ethernet network jack on the power module 2 Insert the other end of the network cable into a cable modem...

Страница 23: ...en close the battery cover 3 Your wireless keyboard is synced with your computer at the factory However if the keyboard does not work after installing new batteries re sync the keyboard with the compu...

Страница 24: ...tery compartment then install the battery cover 3 Your wireless mouse is synced with your computer at the factory However if the mouse does not work after installing new batteries re sync the mouse wi...

Страница 25: ...e and time zone and to create your first user account 4 To open your computer s Start menu click Start From that menu you can run programs and search for files For more information on using your compu...

Страница 26: ...ing on your computer after it has been turned completely off To put your computer to sleep 1 Click Start then click power The computer saves your session and partially shuts down to save power 2 To wa...

Страница 27: ...tarting rebooting your computer If your computer does not respond to any input you may need to restart reboot your computer To restart your computer Click Start click the arrow next to the lock icon t...

Страница 28: ...mputer to the left of the Web cam s mini USB port The RF sync indicator the red LED above the Gateway logo on the front of your computer turns on 2 Press the sync button on the bottom of your keyboard...

Страница 29: ...the page to the beginning of a document or to the end of a document Multimedia controls Press these keys to play your audio files and to adjust the volume Press MUTE and VOL to adjust volume and press...

Страница 30: ...your keyboard out of the way by standing it upright and sliding it against your computer Do not lean it against the screen Using the mouse Mouse components Scroll stripe functions as a scroll wheel Le...

Страница 31: ...the mouse pad then continue moving the mouse Select an object on the computer display Position the pointer over the object Quickly press and release the left mouse button This is called clicking Start...

Страница 32: ...e Media Center remote control is an optional accessory Installing remote control batteries Before using your remote control you must install the two batteries that came with it To install the remote c...

Страница 33: ...tant While loading the batteries into the remote control do not press any buttons or the remote may not work If the remote does not work with fresh batteries installed remove a battery for five second...

Страница 34: ...ay back media on your computer It also lets you turn your computer on and off Power Record Rewind Skip to previous Media Center Home back Menu navigation Volume Play recorded TV Play live TV Pause Sto...

Страница 35: ...enus and settings Volume Changes volume Play recorded TV Plays programs you have recorded using Media Center Play live TV Plays live TV programs Pause Pauses the currently playing media Stop Stops the...

Страница 36: ...d so that you can store it upright taking up less desk space Using the DVD RW drive Loading a disc To load a disc Insert the disc partially into the disc slot The drive pulls the disc in Important Whe...

Страница 37: ...ter to Play music CDs Create MP3 music files from your music CDs Edit music track information Use your music files to build a music library For more information about playing CDs see your online User...

Страница 38: ...either from scratch or from music CDs You can also create video files from home video For more information see your online User Guide Copying optical discs You can copy optical discs to make backups...

Страница 39: ...le click the drive letter for example the E drive then double click the file name 3 To remove a memory card just pull it out of the slot Caution Before inserting a memory card into the slot make sure...

Страница 40: ...iving power from the computer IR sensor Receives signals from the Media Center remote control Do not block S Video in jack Connect an S Video source to this jack to receive an S Video signal Composite...

Страница 41: ...dcast TV signals or connect the F type adapter to the coaxial cable from a video source and connect the cable here FM antenna jack Connect the FM radio Y wire antenna to this jack for FM radio recepti...

Страница 42: ...to the RF antenna jack on the TV tuner OR To receive broadcast TV signals or video from an antenna that uses coaxial cable connect the included F type antenna adapter to the coaxial antenna cable the...

Страница 43: ...DEO in jack You also need to connect the appropriate audio cables to the video source and to the TV tuner s red and white A V IN audio jacks or to one of the computer power module s digital audio jack...

Страница 44: ...Started 38 4 To receive broadcast FM radio signals connect the included FM wire antenna to the FM jack on the TV tuner then extend the antenna as tall as you can into a Y shape 8512740 book Page 38 Th...

Страница 45: ...base and cable for desktop use Component Description Camera lens No focus lens can keep everything in focus from a few inches away to infinity Activity indicator Indicates the camera is active Microp...

Страница 46: ...o recording or video chat software to see the Web cam image on your screen 3 Adjust the angle of the Web cam so you can see yourself clearly Tip The brighter the camera s subject the clearer the Web c...

Страница 47: ...ct and reconnect the device at any time Connecting the dial up modem The dial up modem USB dongle is an optional accessory To connect the dial up modem 1 Plug a modem cable into the modem jack on the...

Страница 48: ...keyboard on page 23 OR Press the volume or mute control buttons on the Media Center remote control For more information see Using the remote control on page 26 OR If you are using external speakers tu...

Страница 49: ...er of the window to close it Tip Adjust the Windows Sounds slider to change system sounds volume independently of general volume such as the volume used for music and game sounds Help For more informa...

Страница 50: ...CHAPTER 2 Setting Up and Getting Started 44 8512740 book Page 44 Thursday September 27 2007 2 43 PM...

Страница 51: ...r Opening and closing the case Installing memory Adding or replacing a hard drive Replacing the DVD RW drive Installing or replacing the graphics card Changing the system battery 8512740 book Page 45...

Страница 52: ...tistatic bags only when you are ready to use them Do not lay components on the outside of antistatic bags because only the inside of the bags provide electrostatic protection 4 Disconnect the optional...

Страница 53: ...bar on the right corner near the hinge holds the panel upright 7 To close the case make sure that all components wires and cables have been returned to their correct locations then slowly close the p...

Страница 54: ...it into the memory slot Your computer uses notebook SO DIMM memory To install or replace memory 1 Open the back panel by following the instructions in Opening and closing the case on page 46 The compu...

Страница 55: ...ule into an available memory slot at a 30 angle then press it down until it clicks into place 6 Close the back panel by following the instructions in Opening and closing the case on page 46 7 Return y...

Страница 56: ...replacing a drive slide the old drive out of the drive bay then slide the new one into the empty bay OR If you are adding a drive slide the new drive into the secondary hard drive bay 3 Close the bac...

Страница 57: ...nel by following the instructions in Opening and closing the case on page 46 The computer should be face down on a soft stable non marring surface before continuing 2 Locate the Mini PCI card slots 3...

Страница 58: ...e in the middle and the gray cable on the left 7 Close the back panel by following the instructions in Opening and closing the case on page 46 8 Return your computer to its upright position then recon...

Страница 59: ...ace before continuing 3 Remove the three screws that secure the ventilation shroud to the inside of the case then remove the shroud Warning Hazardous high voltage exists behind the ventilation shroud...

Страница 60: ...the computer 5 Slide the new drive into the drive slot then secure it to the computer using the screw you removed in Step 4 6 Close the back panel by following the instructions in Opening and closing...

Страница 61: ...the case on page 46 The computer should be face down on a soft stable non marring surface before continuing 2 If the computer has been running within the last few minutes allow the graphics card cool...

Страница 62: ...r clock does not keep time or the settings in the BIOS Setup utility are not saved when you turn off your computer replace the system battery Use a battery of the same size and voltage as the original...

Страница 63: ...Make sure that the positive side of the new battery is facing up usually the side that the battery type and model number are etched into then press the battery into the socket until it snaps into plac...

Страница 64: ...CHAPTER 3 Upgrading Your Computer 58 8512740 book Page 58 Thursday September 27 2007 2 43 PM...

Страница 65: ...tenance schedule Caring for your computer Changing batteries Cleaning your computer Updating Windows Using BigFix Managing hard drive space Scheduling maintenance tasks Moving from your old computer 8...

Страница 66: ...schedule Maintenance task Weekly Monthly When needed Check for viruses X X X Run Windows Update X X Manage hard drive space X Clean up hard drives X X Scan hard drive for errors X X Defragment hard dr...

Страница 67: ...quid can result in expensive repairs that are not covered under a standard warranty Avoid dusty or dirty work environments Dust and dirt can clog internal mechanisms can reduce heat dissipation and ca...

Страница 68: ...er because they can damage the finish on the acrylic covering for the computer the mouse the keyboard and the remote control To clean fingerprints or oily blemishes use a cloth dampened not soaking we...

Страница 69: ...in If the keyboard does not work after it dries you may need to replace it Cleaning the mouse If the mouse pointer begins moving erratically across the computer screen or becomes difficult to control...

Страница 70: ...Windows Security Center For more information see Protecting Your Computer in your online User Guide Using BigFix Your computer may have BigFix installed not available in some locations BigFix monitor...

Страница 71: ...k hard drive space delete unnecessary files defragment files and back up files Checking hard drive space To check hard drive space 1 Click Start then click Computer The Computer window opens Shortcut...

Страница 72: ...ecessary files Delete unnecessary files such as temporaryfiles and files in the Recycle Bin to free hard drive space To delete unnecessary files 1 Click Start All Programs Accessories System Tools the...

Страница 73: ...wed areas on the hard drive so Windows does not use them If you use your computer several hours every day you probably want to run error checking once a week If you use yourcomputer less frequently on...

Страница 74: ...information stored on the drive can improve hard drive performance While Disk Defragmenter is running do not use your keyboard or mouse because using them may continuously stop and restart the defrag...

Страница 75: ...and removing them from the hard drive frees space for new files on the hard drive It also protects you from losing important information if the hard drive fails or you accidentally delete files You sh...

Страница 76: ...then click the Tools tab 3 Click Backup Now then click Run a file backup now 4 Follow the on screen instructions to select a backup storage location and the files and folders to back up Help For more...

Страница 77: ...og box opens 2 Click Create Basic Task for basic tasks or click Create Task for more complex tasks then follow the on screen instructions to finish setting up and scheduling the task Important Your co...

Страница 78: ...se programs on the new computer before running Windows Easy Transfer Windows Easy Transfer copies only the software s settings not the software itself to the new computer 2 Click Start All Programs Ac...

Страница 79: ...lick Documents The Documents folder opens and displays many of your saved personal data files Go to Step 4 OR In Windows XP click Start then click My Documents The My Documents window opens and displa...

Страница 80: ...ista click Start then click Search The Search Results window opens OR In Windows XP click Start then click Search The Search Results window opens OR In Windows 98 Windows Me or Windows 2000 click Star...

Страница 81: ...CHAPTER5 75 Troubleshooting Safety guidelines First steps Troubleshooting Recovering your system Telephone support 8512740 book Page 75 Thursday September 27 2007 2 43 PM...

Страница 82: ...ormed and make sure that you followed each instruction If an error occurs in a program see the program s printed documentation or the online help Warning Never open your computer case while your compu...

Страница 83: ...just brightness press the Bright key on the keyboard The color is not uniform Make sure that the display warms up for at least 30 minutes before making a final judgment about color uniformity The text...

Страница 84: ...cal discs on page 63 An audio CD does not produce sound Make sure that the disc label is facing front facing you then try inserting it again Some music CDs have copy protection software You may not be...

Страница 85: ...o be able to play a DVD the disc s regional code and your DVD drive s regional code must match The regional code on your DVD drive is determined by your computer s delivery address The regional code f...

Страница 86: ...t IP addresses For home networks IP addresses should be 192 168 N N where N is a number you assign between 0 and 254 The first N should be the same for all computers on your network and the second N s...

Страница 87: ...cle Bin Save your files to another drive If the hard drive is full copy any files not regularly used to backup media then delete them from the hard drive You see a Data error message This may be the r...

Страница 88: ...essage still appears disconnect from the ISP connection and close your browser then reconnect and open the browser If you still get the error your ISP may be having technical difficulties Connecting t...

Страница 89: ...message Make sure that nothing is resting on the keyboard Make sure that a key is not stuck Press each key to loosen a key that might be stuck then restart your computer Liquid spilled in the keyboard...

Страница 90: ...ch Q810243 Update You get a Download Error message when Media Center tries to update the Program Guide You must be connected to the Internet to update the Program Guide Make sure that your Internet ac...

Страница 91: ...t the Ethernet network jack on the power module Make sure that your computer is connected to the telephone line and the telephone line has a dial tone Make sure that the modem cable is less than 6 fee...

Страница 92: ...ith your modem Check for line noise scratchy crackling or popping sounds Line noise is a common problem that can cause the modem to connect at a slower rate abort downloads or even disconnect The fast...

Страница 93: ...3K Other factors such as line noise telephone service provider equipment or ISP limitations may lower the speed even further The speed at which you can upload data is limited to 48K The modem is not r...

Страница 94: ...stablishes connection speeds and communication protocols You may hear unusual handshaking sounds when the modems first connect If the handshaking sounds are too loud you can turn down the modem volume...

Страница 95: ...e Try a different mouse pad The surface under the mouse may be transparent or glossy which interferes with mouse operation Use a mouse pad Replace the old batteries with new batteries Networks You can...

Страница 96: ...rinter will not turn on Make sure that the power cable is plugged into an AC power source The printer is on but will not print If the printer you want to print to is not the default printer make sure...

Страница 97: ...o buttons are being pressed Sound You are not getting sound from the internal NXT SoundVu speakers Make sure that the volume controls are turned up For more information see Adjusting the volume on pag...

Страница 98: ...en everything was working correctly For instructions see Using Microsoft System Restore on page 98 If nothing else has solved the problem and you want to return your system to factory condition see Re...

Страница 99: ...ll a new hard drive you need to recover your pre installed software and drivers using a set of software and driver recovery discs Because these discs do not come with your computer you should create y...

Страница 100: ...you do not have enough discs choose a different disc type or click Cancel The disc recording begins Label the discs as they are completed 6 If multiple discs are required insert the additional blank d...

Страница 101: ...ay Recovery Center opens 2 To recover software that was pre installed click Programs then click Application recovery OR Important If you have recently reinstalled Windows or installed a new hard drive...

Страница 102: ...96 To recover device drivers that were pre installed click Hardware then click Device driver recovery 3 Click the software or driver you want to recover then click Next 8512740 book Page 96 Thursday...

Страница 103: ...are and drivers using recovery discs 1 Insert a software and driver recovery disc into a CD or DVD drive If an AutoPlay dialog box appears click Run Grc_Vista exe If an AutoPlay dialog box does not ap...

Страница 104: ...nd saves them as restore points In most cases of hard to resolve software problems you can return to one of these restore points to get your system running again Windows automatically creates an addit...

Страница 105: ...he window click Repair Windows using System Restore then click Next The Choose a restore point dialog box opens 3 Click the restore point you want click Next then click Finish A confirmation message b...

Страница 106: ...r opens 2 On the left side of the window click Create a restore point or change settings then click Next The System Properties dialog box opens to the System Protection tab 3 Click Create The Create a...

Страница 107: ...very Options screen opens If Windows starts to load instead restart the computer and try again 3 Press the arrow keys on your keyboard to select Repair Your Computer then press ENTER Gateway System Re...

Страница 108: ...If you install a new hard drive or completely re format your original hard drive you must recover your system using the Windows Vista operating system DVD You also need to recover your computer s pre...

Страница 109: ...Windows on page 64 Telephone support Before calling Gateway Customer Care If you have a technical problem with your computer follow these recommendations before contacting Gateway Customer Care Make...

Страница 110: ...lowing resources The printed or online documentation that came with your hardware or software In many cases additional product information and online documentation for Gateway supplied hardware can be...

Страница 111: ...way Learning Libraries A variety of courses and tutorials are available on CD Select from several easy to use learning libraries www gateway com training Online Trainingfrom Learn With Gateway More th...

Страница 112: ...CHAPTER 5 Troubleshooting 106 8512740 book Page 106 Thursday September 27 2007 2 43 PM...

Страница 113: ...APPENDIXA 107 Legal Notices Important safety information Regulatory compliance statements Environmental information Notices 8512740 book Page 107 Thursday September 27 2007 2 43 PM...

Страница 114: ...Make sure you provide adequate space at least 6 inches 15 cm around the system for ventilation when you set up your work area Never insert objects of any kind into the computer ventilation openings S...

Страница 115: ...e designed to provide reasonable protection against harmful interference in a residential installation This equipment generates uses and can radiate radio frequency energy and if not installed and use...

Страница 116: ...inuanceof servicemay be required Thetelephonecompany may request that you disconnect the equipment until the problem is resolved The telephone company may make changes in its facilities equipment oper...

Страница 117: ...terations made by the user to this equipment or equipment malfunctions may give the telecommunications company cause to request the user to disconnect the equipment Users should make sure for their ow...

Страница 118: ...ntenna discharge unit connection to grounding electrodes and requirements for the grounding electrode Cable distribution system should be grounded earthed in accordance with ANSI NFPA 70 the National...

Страница 119: ...o keep from touching such power lines or circuits Contact with them could be fatal Reference Grounding component 1 Electric service equipment 2 Power service grounding electrode system NEC Art 250 Par...

Страница 120: ...onmentallyfriendly actionsbyunderstandingand using the energy saving features of this product where applicable recycling the inner and outer packaging including shipping containers this product was de...

Страница 121: ...rposes only and may be the trademarks or registered trademarks of their respective companies Macrovisionstatement If your computer has a DVD compatible drive and an analog TV Out port the following pa...

Страница 122: ...APPENDIX A Legal Notices 116 8512740 book Page 116 Thursday September 27 2007 2 43 PM...

Страница 123: ...ds 51 memory card slot 32 supported memory cards 33 troubleshooting memory cards 85 case opening and closing 46 CD cleaning 63 copying 32 ejecting 31 inserting 30 playing 31 recording 32 troubleshooti...

Страница 124: ...scs 93 97 re installing 92 93 drives backing up files 69 checking for errors 67 checking for free space 65 defragmenting 68 DVD RW 9 30 optical 9 30 troubleshooting 78 81 DSL modem 16 connecting 10 tr...

Страница 125: ...r 34 Web cam 39 inserting discs 30 installing batteries 17 61 devices 41 digital camera 41 graphics card 55 hard drive 50 memory 48 Mini PCI card 51 peripheral devices 41 printer 41 scanner 41 Web cam...

Страница 126: ...moving pointer 18 24 25 moving screen objects 25 opening files folders and programs 25 pointer 25 right clicking 25 scroll stripe 25 scroll wheel 25 selecting screen objects 25 syncing 22 troubleshoot...

Страница 127: ...m Restore 98 recovery discs 93 creating 93 drivers 93 97 programs 93 97 software 93 97 using 97 re installing See recovering remote control buttons 28 changing batteries 26 storing 30 using 26 removin...

Страница 128: ...Libraries 105 Learn with Gateway 105 transferring files from old computer 73 from old computer 72 troubleshooting audio 91 cable modem 85 CD drive 78 dial up modem 85 dial up modem speed 87 DSL modem...

Страница 129: ...1 W waking computer 20 Web cam connecting 39 Windows Product Key Code 3 Windows Easy Transfer 72 Windows Media Center troubleshooting 83 Windows System Restore 92 creating restore point 100 Windows Up...

Страница 130: ...124 Index 8512740 book Page 124 Thursday September 27 2007 2 43 PM...

Страница 131: ...8512740 book Page 125 Thursday September 27 2007 2 43 PM...

Страница 132: ...MAN MOZART HW REF GDE R2 10 07 8512740 Back fm Page 126 Thursday September 27 2007 2 57 PM...

Отзывы: