background image

56

Chapter 4: Installing Components

www.gateway.com

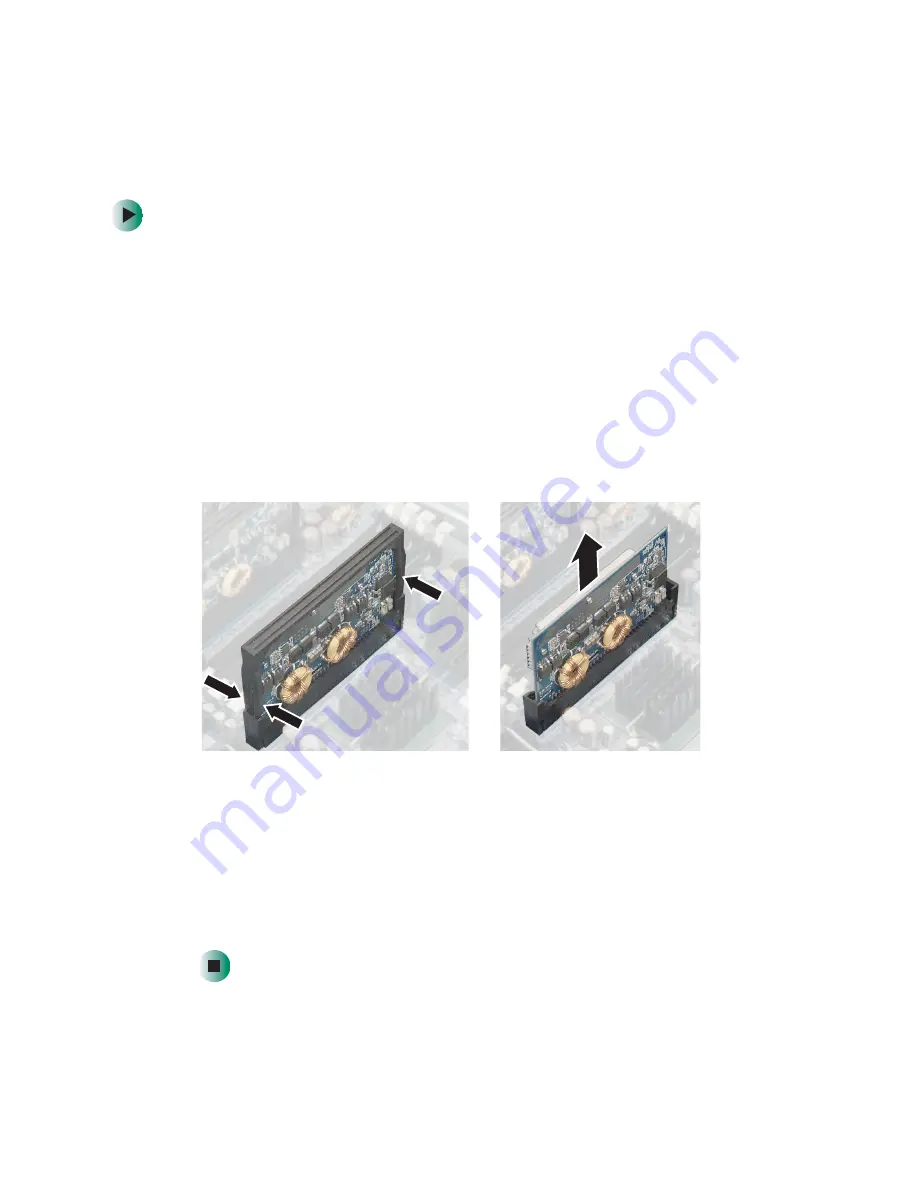
Installing a voltage regulator

To install a voltage regulator:

1

Follow the instructions in 

“Preventing static electricity discharge” on 

page 27

.

2

Follow the instructions in 

“Opening the server case” on page 28

.

3

If you are installing a new voltage regulator, go to 

Step 5

.

- OR -

If you are replacing a voltage regulator, on each end of the voltage regulator 
support bracket, pinch the sides together, then lift the bracket away from 
the server. You may need to first remove a heat sink or some memory 
modules in order to access the sides of the support bracket.

4

Lift the voltage regulator away from the system board.

5

Insert the new voltage regulator into the voltage regulator slot, then replace 
the support bracket.

6

If you removed a heat sink or some memory modules in 

Step 3

, replace 

them.

7

Follow the instructions in 

“Closing the server case” on page 32

.

Содержание 980

Страница 1: ......

Страница 2: ...st 14 Turning off your server 15 Setting up the operating system 16 3 Maintaining Your Server 17 Caring for your server 18 Cleaning your server 18 Preparing for system recovery 21 Recording the BIOS configuration 21 System administration 22 Gateway Server Manager 22 Server security 22 Using your Server Companion CD 24 4 Installing Components 25 Preparing to install components 26 Selecting a place ...

Страница 3: ...tility 75 Opening the BIOS Setup utility 76 Updating the BIOS 77 Recovering the BIOS 77 Resetting the BIOS 78 Resetting BIOS passwords 79 6 Troubleshooting 81 Safety guidelines 82 Error messages 83 Troubleshooting 85 First steps 85 Battery replacement 85 Beep codes 86 BIOS 87 CD drive 88 Diskette drive 88 Expansion cards 89 Hard drive 89 Internet 91 Keyboard 92 Memory 92 Modem telephone dial up 92...

Страница 4: ...ions 101 Environmental specifications 102 Video specifications 103 Resolution support 103 Electronic specifications 104 Memory map 104 Interrupts 104 PCI interrupt routing 105 Additional specifications 106 B BIOS Settings 107 C Safety Regulatory and Legal Information 111 Index 119 ...

Страница 5: ...iv ...

Страница 6: ...1 1 Checking Out Your Gateway Server Read this chapter to learn Where drives ports jacks and controls are located Where system board components are located What help resources are available ...

Страница 7: ...king Out Your Gateway Server www gateway com Front CD drive USB ports Diskette drive Power button Additional drive bays Reset button Key lock Cover release latch Cover release latch Power indicator Hard drive indicator ...

Страница 8: ...3 Front www gateway com Hot swap drives ...

Страница 9: ...eway Server www gateway com Back Mouse port Serial port Power connector USB ports Parallel port Card retention cover lever Monitor port Keyboard port Rear fan System board thumbscrew Kensington lock slot Power connector LAN jack RJ 45 ...

Страница 10: ...5 Interior www gateway com Interior Rear fan Card retention cover release latch Full length card retention clip Cable clip Hot swap bay fan PCI card fan Cable clip SCSI backplane ...

Страница 11: ...6 Chapter 1 Checking Out Your Gateway Server www gateway com System board Left side Processor 1 Processor 2 64 bit PCI card slots 32 bit PCI card slot Rear fan connector ...

Страница 12: ...1 Memory module slots Primary IDE connector Secondary IDE connector SCSI 2 connector SCSI 1 connector PCI card fan connector Configuration jumper JP7 Hot swap bay fan connector Auxiliary power connector CMOS battery Intrusion switch connector Power supply manageability connector SCSI manageability connector Processor 2 fan connector Processor 1 fan connector ...

Страница 13: ...access file utilities Windows 2000 Server drivers and documentation for your server and its components For more information see Using Your Server Companion CD Gateway Web site Gateway provides a variety of information on its Web site to help you use your server Visit the Gateway Web site at support gateway com for Technical documentation and product guides Technical tips and support Updated hardwa...

Страница 14: ...2 9 Setting Up Your Server Read this chapter to learn how to Use your server safely Start and turn off your server Restart reboot your server Set up the operating system ...

Страница 15: ...ver is safest at temperatures that are comfortable for you Keep your server and magnetic media away from equipment that generates magnetic fields such as unshielded stereo speakers Strong magnetic fields can erase data on both diskettes and hard drives Even a telephone placed too close to the server may cause interference Converting to a rackmount server To convert your server to a rackmount confi...

Страница 16: ...fication for your location such as Underwriters Laboratories UL Check the maximum amount of voltage the protector allows to pass through the line The lower the voltage that the protector allows to pass through the better the protection for your server Check the energy absorption dissipation rating The higher the energy absorption rating the better the protection for your server Check for line cond...

Страница 17: ...rcuit with a device that causes electromagnetic interference such as a television or a motor Some surge protectors and uninterruptible power supplies include simple line conditioning capabilities Uninterruptible power supplies Use an uninterruptible power supply UPS to protect your server from data loss during a total power failure A UPS uses a battery to keep your server running temporarily durin...

Страница 18: ...u are using one is turned on Make sure that all cables are connected securely to the correct ports and jacks on the back of the server To start the server 1 Press the power button Warning When you connect peripheral devices to the server make sure that your server and devices are turned off and the power cords are unplugged When the power indicator is It means Green The server is turned on Off The...

Страница 19: ...onfiguration settings See your operating system s documentation for instructions on configuring advanced settings for your specific network To select which device your server boots from 1 During server startup press F10 The Boot menu opens 2 Select the device you want to boot from Common choices include Removable Dev Removable device ATAPI CDROM CD drive Hard Drive IBA GE NIC Network boot Understa...

Страница 20: ... server did not turn off automatically press the power button If nothing happens when you press the power button press and hold it for five seconds and the server will turn off Warning The power button on the server does not turn off server AC power To remove AC power from the server you must unplug both AC power cords from the wall outlet or power source The power cords are considered the disconn...

Страница 21: ...lled by Gateway it is completely installed and the basic settings are already configured See your operating system s documentation for instructions on configuring advanced settings for your specific network If you are installing an operating system because it was not already installed by Gateway see the appropriate installation guide for instructions ...

Страница 22: ...3 17 Maintaining Your Server Read this chapter to learn how to Care for your server Record the BIOS configuration Manage your server and network ...

Страница 23: ...ral rule your server is safest at temperatures that are comfortable for you Keep all liquids away from your server When spilled onto server components almost any liquid can result in extremely expensive repairs that are not covered under your warranty Avoid dusty or dirty work environments Dust and dirt can clog the internal mechanisms and can cause the server to overheat Cleaning your server Keep...

Страница 24: ...the keyboard upside down to let the liquid drain Let the keyboard dry completely before trying to use it again If the keyboard does not work after it dries you may need to replace it Keyboard damage resulting from spilled liquids is not covered by your warranty Cleaning the screen If your computer screen is a flat panel display use only a damp soft cloth to clean it Never spray water directly onto...

Страница 25: ... If you use a tape drive to back up your files regular maintenance will lengthen the life of the drive To maintain the drive s reliability Clean the drive monthly with the cleaning cartridge included with the drive Remove the tape from the drive whenever the drive is not in use ...

Страница 26: ...pair diskette to back up critical operating system files See your operating system s documentation or online help for instructions on using an emergency repair diskette Recording the BIOS configuration To help keep track of your custom changes to BIOS settings and to prepare for system recovery you should record your BIOS configuration after you have your server set up and working To record your B...

Страница 27: ...help Server security To prevent unauthorized use of the server you can set BIOS startup passwords Using BIOS security passwords Set up a supervisor password to prevent unauthorized access to the BIOS Setup utility After you create a supervisor password you can set up a user password to prevent unauthorized access to the server You can Enter either password to finish starting the server Enter the s...

Страница 28: ...cleared To clear the passwords see Resetting BIOS passwords on page 79 User password The supervisor password must be set up before a user password can be set To control access to the server set a user password The supervisor can set the level of access granted to the user password The user password access levels are No Access User cannot access the BIOS Setup utility Limited User can change only t...

Страница 29: ...ver www gateway com Using your Server Companion CD You can use your Server Companion CD to Install hardware drivers Install programs View server documentation Instructions for using the CD are provided in Using Your Server Companion CD ...

Страница 30: ...eplace voltage regulators Check and replace the power supplies Replace the SCSI backplanes Replace the system board Replace case fans Replace the CMOS battery You must open your server case to install components If you are not comfortable with these procedures get help from a more experienced computer user or computer service technician or contact Gateway Technical Support ...

Страница 31: ...ar a grounded outlet so you can test your server after installation Is near a telephone in case you need help from Gateway Technical Support The telephone must be directly connected to a telephone jack and cannot be connected to your server Gathering the tools you need Some tools and supplies that you may need to work on your server are A notebook to take notes A Phillips screwdriver A small flat ...

Страница 32: ...on the server when your work area is extremely humid Remove components from their antistatic bags only when you are ready to use them Do not lay components on the outside of antistatic bags because only the inside of the bags provide electrostatic protection Always hold expansion cards by their edges or their metal mounting brackets Avoid touching the edge connectors and components on the cards Ne...

Страница 33: ... case 1 Follow the instructions in Preventing static electricity discharge on page 27 2 Turn off the server then unplug the power cords and all other cables connected to the server Warning For correct cooling and air flow always reinstall the side panel and the air duct if included before you turn on the server Operating the server without the cover in place can damage server components Warning Th...

Страница 34: ...rver case www gateway com 3 Unlock the front cover 4 Press the two front cover release latches then pull the cover away from the server 5 For more stability place the server on its side Release latch Lock Release latch ...

Страница 35: ...g Components www gateway com 6 Loosen the three captive thumbscrews that secure the side panel to the server 7 Slide the side panel toward the front of the case about inch then lift the panel away from the server Thumbscrews ...

Страница 36: ...31 Opening the server case www gateway com 8 If your server has an air duct pull the tab on the right until it releases the duct from the server then lift the duct away from the server ...

Страница 37: ...e so they will not be pinched when you close the case 3 Replace the air duct if one came with your server 4 Align the side panel s top and bottom tabs into the case notches then slide the side panel toward the back of the case until the back of the side panel is flush with the back of the case 5 Tighten the three captive thumbscrews that secure the front of the cover to the server case 6 Set the c...

Страница 38: ...r case www gateway com 7 Align the notch in the bottom of the front cover with the rail on the front of the case then swing the cover against the case 8 Lock the front cover 9 Reconnect the power cords and all other cables ...

Страница 39: ...ember Do not use the top 5 25 inch drive bay for drives which have electronic components exposed on the top Drive mounting rails at the top of the bay may damage any exposed electronic components Before you install a drive see the drive s documentation for information on configuring the drive setting drive jumpers and attaching cables IDE hard drives can be configured as single master slave or cab...

Страница 40: ...figure the drive as master if it is a CD drive If two drives of any type are attached to the cable configure one as master and one as slave You may need to configure the drives you install using the BIOS Setup utility Press F2 at startup to open the BIOS Setup utility Installing an IDE drive Use these instructions to install or replace a diskette CD hard drive or tape drive To install a 5 25 inch ...

Страница 41: ...cing a drive go to Step 7 OR If you are adding a new drive press and hold the two locking clips against the bay s 3 5 inch drive adapter then pull it out of the server 4 Press the drive bay face plate release tabs inward then pull the face plate away from the front cover ...

Страница 42: ...g drives www gateway com 5 If you are adding a 3 5 inch hard drive use the screws that came with your IDE hard drive to secure the drive to the 3 5 inch drive adapter OR IDE hard drive screws IDE hard drive screws ...

Страница 43: ...ttach the rails to the sides of your new drive Two screws for mounting the rail onto CD and diskette drives are stored on each rail Screws for mounting onto most tape drives are stored in the case near the full length card retention clips 6 Go to Step 11 7 If you are replacing a drive disconnect the old drive s cables Mounting rail screw Mounting rail screw Mounting rail screw Mounting rail screw ...

Страница 44: ...f you are removing a drive from one of the top two bays first remove the 3 5 inch diskette drive so you can reach the 5 25 inch drive s release latch 9 Press the old drive s release latches against the drive then pull the drive out of the bay ...

Страница 45: ...ach the rails to the new drive Screws for mounting the rails onto most tape drives are stored in the case near the full length card retention clips 11 Set any jumpers on the new drive See the drive s documentation for further instructions 12 Slide the new drive into the drive bay until the drive rails snap into place Screw Screw Tape drive screws ...

Страница 46: ...41 Installing drives www gateway com 13 Connect the drive cables For more information see the drive s documentation 14 Follow the instructions in Closing the server case on page 32 ...

Страница 47: ...your Gateway sales representative To install a hard drive 1 Unlock the front cover s lock then swing the hot swap bay door open Important The numbers on the left side of the hot swap bay identify the SCSI ID of each drive Install the topmost drives first Gateway tests and verifies the operation and compatibility of the drives it sells Especially in a hot swap or mission critical environment additi...

Страница 48: ...then pull the tray straight out of the server 4 If you are replacing a hard drive remove the four screws that secure the hard drive to the drive tray then remove the drive from the tray OR Caution Before you remove a failed drive use the appropriate software and utilities installed on the server to stop all activity on the failed drive Instructions for using the software are provided by the softwa...

Страница 49: ...hen remove the screws from the bag 5 Line up the screw holes in the new drive with the holes in the side of the drive tray then secure the drive to the tray with the four screws you removed in Step 4 6 Make sure that the tray s release lever is open then slide the new drive into the empty hot swap bay 7 Close the drive s release lever ...

Страница 50: ...stered ECC DIMM memory The following illustration shows the location of the memory modules on the system board Warning Modules must be installed in identical pairs Use only PC2100 DDR SDRAM registered ECC DIMM memory modules Install memory first into slots 1 and 2 then into slots 3 and 4 If you have memory installed incorrectly your server will not start up DIMM slot 1 DIMM slot 2 DIMM slot 3 DIMM...

Страница 51: ...g a memory module remove the old module 4 Align the notch on the new module with the notch in the memory module slot and press the module firmly into the slot The tabs on the sides of the memory slot should secure the memory module automatically 5 Follow the instructions in Closing the server case on page 32 6 Turn on the server Make sure that the server turns on and that the operating system load...

Страница 52: ...iversal 2 3 Paired slots When only one card is installed in a slot of this pair the slot can run at 64 bit 133 MHz When two 64 bit 100 MHz cards are installed in this pair the slot can run at 64 bit 100 MHz When cards of different speeds are installed in this pair each slot runs at the slowest of the two speeds Supports both 32 bit and 64 bit cards 3 3 V or universal 4 5 Same as slots 2 3 6 Always...

Страница 53: ...2 Follow the instructions in Opening the server case on page 28 3 If you are replacing a card disconnect any cables that are attached to the old card 4 If you are removing a full length card pull back on the card retention clip that secures the end of the card OR If you are adding a full length card to an empty expansion slot pull back on the card retention clip for that slot ...

Страница 54: ... You can slightly seesaw the card end to end to loosen the card but do not bend the card sideways 7 Press the new card into the expansion slot You can slightly seesaw the card end to end to help insert the card but do not bend the card sideways Warning Do not touch the contacts on the bottom part of the expansion card Touching the contacts can cause electrostatic damage to the card Card retention ...

Страница 55: ...retention cover clicks into place under the release lever OR Press on the card retention cover lever on the back of the server until the lever is flush with the back of the case 9 If you are installing a full length card press down on the card retention clip to secure the end of the card Card retention cover Release lever ...

Страница 56: ...y com 10 Connect any cables to the card For more information see the instructions in the card s documentation 11 Follow the instructions in Closing the server case on page 32 12 See the card s documentation for software installation instructions ...

Страница 57: ... You must have a processor in the upper processor 1 slot or your server will not start If you are upgrading your server from one processor to two you may need to reconfigure your operating system so it can recognize the additional processor For more information see your operating system s documentation Warning A heat sink must be installed on the processor Installing a processor without a heat sin...

Страница 58: ...ch side push them slightly away from the heat sink then lift the levers out of the way OR If your server has a heat sink with a fan press down on the heat sink locking lever on each side push them slightly away from the heat sink then lift the levers out of the way Unplug the heat sink s fan from its connector on the system board ...

Страница 59: ...ush with the socket 9 Press the processor locking lever down until it clicks into place 10 Apply thermal grease to the top of the processor if necessary 11 Place the heat sink on the processor then press the heat sink locking levers down until they click into place Important The heat sink mounting paste may harden over time and hold the heat sink securely to the processor If removing the heat sink...

Страница 60: ... time you also need to install a voltage regulator for the processor If you ordered the processor from Gateway it came with a new voltage regulator For instructions on installing a voltage regulator see Installing a voltage regulator on page 56 14 Follow the instructions in Closing the server case on page 32 Warning Only one voltage regulator should be installed for each processor Processor 1 fan ...

Страница 61: ...ltage regulator on each end of the voltage regulator support bracket pinch the sides together then lift the bracket away from the server You may need to first remove a heat sink or some memory modules in order to access the sides of the support bracket 4 Lift the voltage regulator away from the system board 5 Insert the new voltage regulator into the voltage regulator slot then replace the support...

Страница 62: ...heral devices to replace a failed power supply Warning The power supplies in this server contains no user serviceable parts Only a qualified computer technician should service the power supplies Your server comes with 3 wire AC power cords fitted with the correct plug style for your region If this plug does not match the connector on your surge protector UPS or wall outlet do not attempt to modify...

Страница 63: ...ower supply 1 Examine the LED indicators on the back of each power supply to identify the failed power supply The power supply has failed if the center LED indicator is on Server is turned on Fault in power supply center LED Power supply is connected to AC power source ...

Страница 64: ... pull the lever away from the server 4 Pull the power supply straight out of the server 5 Slide the new power supply into the power supply bay as far as it will go then swing the lever up until it snaps into place 6 Plug the power cord into the new power supply The new power supply is ready if the bottom green LED is on and the top LED is on or blinking ...

Страница 65: ...me manner To replace the SCSI backplane 1 Follow the instructions in Preventing static electricity discharge on page 27 2 Follow the instructions in Opening the server case on page 28 3 Remove the fan nearest the SCSI backplane For instructions see Replacing a fan on page 69 4 Remove each of the drives from the hot swap cage and note the location of each drive For instructions see Installing a SCS...

Страница 66: ...61 Replacing the SCSI backplane www gateway com 6 Slide the hot swap cage out about two inches from the case ...

Страница 67: ...gateway com 7 From inside the case remove the power SCSI and manageability cables from the backplane The manageability cable connector is visible after removing the SCSI and power cables 8 Remove the hot swap cage completely from the server ...

Страница 68: ...63 Replacing the SCSI backplane www gateway com 9 Loosen the captive thumbscrew that secures the backplane to the hot swap cage Thumbscrew ...

Страница 69: ...the hot swap cage then tighten the thumbscrew 12 Slide the hot swap cage part way into the hot swap bay Make sure that the side of the cage marked Top is oriented toward the top of the server case 13 Reconnect the power SCSI and manageability cables to the backplane 14 Slide the hot swap cage all the way into the hot swap bay then tighten the four thumbscrews ...

Страница 70: ...com 15 Reinstall the fan 16 Install each of the drives back into the hot swap cage Make sure that you replace the drives in the correct order by referring to your notes from Step 4 17 Follow the instructions in Closing the server case on page 32 ...

Страница 71: ...nks and processors For more information see Installing a processor on page 52 6 If your new system board does not include heat sink mounting brackets remove the heat sink brackets from your old system board by removing the eight screws that secure them to the board 7 Remove the voltage regulators For more information see Installing a voltage regulator on page 56 8 Disconnect the power data and fan...

Страница 72: ...gateway com 10 Remove the system board tray s thumbscrew on the back of the case 11 Slide the tray toward the front of the case If the tray is difficult to move push on the rear port panel for added leverage System board tray thumbscrew ...

Страница 73: ... voltage regulators and fans 16 Connect the power and data cables 17 Reinstall the expansion cards For more information see Installing PCI expansion cards on page 47 18 Follow the instructions in Closing the server case on page 32 19 Turn on your server 20 Press F2 when the Gateway logo screen appears during startup The BIOS Setup utility opens 21 Check BIOS settings to make sure that they detect ...

Страница 74: ... on page 27 2 Follow the instructions in Opening the server case on page 28 3 Unplug the fan from the system board 4 While pressing the locking clip slide the fan away from the system board then pull it away from the case Important Make sure that you replace a fan with an identical replacement fan The arrow on each fan indicates the direction of its air flow and the arrow should point toward the r...

Страница 75: ...w fan s mounting posts into the fan mounting slots then slide the fan down until it snaps into place 6 Reconnect the fan to the system board 7 Follow the instructions in Closing the server case on page 32 Rear fan connector Hot swap bay fan connector PCI fan connector ...

Страница 76: ...IOS Setup utility by following the instructions in Opening the BIOS Setup utility on page 76 3 Record the BIOS settings on your printout then close the utility 4 Turn off your server then follow the instructions in Preventing static electricity discharge on page 27 5 Follow the instructions in Opening the server case on page 28 Warning Danger of explosion if battery is incorrectly replaced Replace...

Страница 77: ...72 Chapter 4 Installing Components www gateway com 6 Locate the old battery on the system board and note its orientation You will need to install the new battery the same way Battery ...

Страница 78: ...hat the positive side of the new battery is facing up then press the new battery into the socket until it snaps into place 10 Follow the instructions in Closing the server case on page 32 11 Turn on the server 12 Press F2 when the Gateway logo screen appears during startup The BIOS Setup utility opens 13 Restore any BIOS settings that you wrote down in Step 3 14 Save all your settings and close th...

Страница 79: ...74 Chapter 4 Installing Components www gateway com ...

Страница 80: ...5 75 Using the BIOS Setup Utility Read this chapter to learn how to Open the BIOS Setup utility Update the BIOS Reset the BIOS settings to their factory defaults Reset the BIOS passwords ...

Страница 81: ... one of these menus Main gives you access to basic information and settings related to your server s hardware and configuration Advanced gives you access to information and settings for system resources hardware and server s configuration Power gives you access to settings that control your server s power management features Boot gives you access to information and settings for startup features an...

Страница 82: ... screen appears during startup 4 Record any custom BIOS settings on your printout 5 Follow the instructions in the self extracting BIOS update file 6 Enter any custom BIOS settings you recorded in Step 4 then save your changes and close the BIOS Setup utility Recovering the BIOS If you encounter a problem while you are updating the BIOS such as a power outage the BIOS update may not be successful ...

Страница 83: ...g startup The BIOS Setup utility opens 4 Record any custom BIOS settings on your printout 5 Follow the instructions in Preventing static electricity discharge on page 27 6 Turn off the server then disconnect the power cords and all other cables connected to the server 7 Remove the side panel For more information see Opening the server case on page 28 Warning Moving the jumper while the power is on...

Страница 84: ...structions in Closing the server case on page 32 11 Turn on the server A message appears saying that the CMOS Date and Time are not set 12 Press F1 to reset the BIOS to factory default settings Resetting BIOS passwords To reset BIOS passwords you must reset and clear all BIOS settings To reset BIOS passwords follow the instructions in Resetting the BIOS on page 78 Configuration jumper JP7 Pin 1 Pi...

Страница 85: ...80 Chapter 5 Using the BIOS Setup Utility www gateway com ...

Страница 86: ...r to learn how to Interpret error messages and codes Troubleshoot Get telephone support and training If the suggestions in this chapter do not correct the problem see Telephone support on page 96 for more information about how to get help ...

Страница 87: ...pening the server case For more information about preventing damage from static electricity see Preventing static electricity discharge on page 27 After you complete any maintenance task where you have to open the server case make sure that you close the case tighten any screws then reconnect all cables before you restart your server Warning To avoid bodily injury do not attempt to troubleshoot yo...

Страница 88: ...hile your server restarts Make sure that the correct drive type is selected Hard disk controller failure press F1 to try reboot The drive controller may be defective Press F1 to try to restart the server For more information about running diagnostics on your hard drive see your operating system s documentation See You need to troubleshoot an IDE hard drive on page 91 Insert bootable media device R...

Страница 89: ...e information see Resetting BIOS passwords on page 79 Memory errors were detected while the system started up See Memory errors were detected during server start up on page 92 for a possible solution Memory size error Restart your server then open the BIOS Setup utility by pressing and holding F2 while your server restarts Save the memory configuration Missing operating system The master boot reco...

Страница 90: ...e screen write down the exact message before calling Gateway Technical Support Restart your server then open the BIOS Setup utility by pressing and holding F2 while your server restarts Check your configuration settings If an error occurs in a program see its documentation or online help Battery replacement If you have problems after installing a new CMOS battery try each of the following items cl...

Страница 91: ...ller or if an expansion card is not functioning correctly A PCI expansion card for example a RAID controller can also issue audible errors by itself usually consisting of one long tone followed by a series of short tones For more information on the beep codes issued check the documentation for that device Several POST routines issue a POST terminal error and shut down the system when they fail Bef...

Страница 92: ... removed the system board is at fault If the beep code does not occur when the expansion cards have been removed one of the cards is causing the problem Install the cards one at a time until the problem happens again When the beep code returns the most recent card you installed is at fault 5 A processor on the system board generated an error Same as for 4 beeps 6 The keyboard controller 8042 may b...

Страница 93: ...a straightened paper clip wire into the CD drive s manual eject hole The drive tray opens If this problem happens frequently while the server is turned on the drive may be defective Diskette drive The diskette drive is not recognized Restart your server Open your server case and make sure that the cables are connected correctly to the diskette drive and the system board The red striped edge of the...

Страница 94: ...alled the necessary software or driver For more information see the card s documentation Reseat the card For more information see Installing PCI expansion cards on page 47 Install the card in a different slot Hard drive The hard drive cannot be accessed or you receive a General failure reading drive C error message If a diskette is in the diskette drive eject it and restart your server by pressing...

Страница 95: ...g a SCSI hard drive on page 42 Your server does not recognize a SCSI drive Make sure that the SCSI controller is enabled in the BIOS Setup utility Reinstall the device driver For more information see Using Your Server Companion CD Change the drive s SCSI address to one that is not being used by your server For more information about SCSI device configurations see your drive s documentation Run SCS...

Страница 96: ...can can also repair some errors that may develop on IDE hard drives To download the GWScan utility Search for the utility at support gateway com For information about how to use GWScan go to ftp ftp gateway com pub hardware_support drivers win3 x_and_dos mass_storage hard_drives 7510801 txt Internet See also Modem You cannot connect to the Internet Make sure that your account with your Internet Se...

Страница 97: ...defective If possible try another memory module and see if the error repeats Modem telephone dial up See also Internet Your modem does not dial or does not connect Make sure that your server is connected to the telephone line and the telephone line has a dial tone Make sure that the modem cable is less than 6 feet 1 8 meters long Remove any line splitters or surge protectors from your telephone li...

Страница 98: ...ake sure that the connectors are free from corrosion and all screws in the wall or telephone jack are secure You can also call your telephone service and have your telephone line checked for noise or low line levels Try connecting with the modem at a lower connection speed If reducing the connection speed lets you connect contact your telephone service The telephone line may be too noisy Try anoth...

Страница 99: ...your monitor to another computer or connect a monitor that you know works to your server The color is not uniform Make sure that the monitor warms up for at least 30 minutes before making a final judgment about color uniformity Make sure that The monitor is not positioned too close to another monitor electric fan or fluorescent light You demagnetize the screen using the monitor s degauss feature F...

Страница 100: ...amp into the outlet then turning it on to test the outlet Open your server and make sure that the power supply cable and power button cable are connected correctly to the system board When you turn on the server it makes several short beeps The short beeps indicate the server has encountered some type of error See Beep codes on page 86 Processor Your server does not recognize a new processor Make ...

Страница 101: ...tation and technical support resources If you have how to questions about using a program see The program s online Help The program s documentation Your operating system s documentation The software or hardware manufacturer s Web site See Troubleshooting on page 85 Have your client ID serial number located on the back of your server case and order number available along with a detailed description...

Страница 102: ...ort on a per issue fee basis 877 485 1464 US 800 846 3609 Canada and Puerto Rico 605 232 2191 all other countries 800 846 1778 TDD Gateway Technical Support Talk to a Gateway Technical Support representative about a non tutorial technical support question See Before calling Gateway Technical Support on page 96 before calling TDD Technical Support for hearing impaired is available Weekdays 6 00 a m...

Страница 103: ...the Internet and the most popular software programs including Microsoft Word Excel and PowerPoint www gateway com country Gateway Learning Libraries A variety of courses and tutorials are available on CD Select from several easy to use learning libraries www gateway com training Online training from Learn Gateway More than 450 online courses are available from Learn Gateway All you have to do is g...

Страница 104: ...A 99 Server Specifications The following specifications are for the standard configuration Your server may contain optional equipment All specifications are subject to change ...

Страница 105: ...hassis fans speed adjustable Ports PS 2 keyboard PS 2 mouse USB 4 Serial VGA Parallel RJ 45 LAN Drives standard 3 5 inch diskette CD ROM Card sizes Supports full length full height PCI expansion cards Power supply 450 W RPS 2 Operating systems Supports Windows 2000 Server Compatible with Windows NT Novell NetWare 6 Certifications FCC Class A UL cUL ...

Страница 106: ...1 1 4 ports Memory Four DIMM slots support up to 8 GB total memory ECC registered DDR SDRAM PCI device slot On board VGA Gb Ethernet and U160 SCSI E7500 or U320 SCSI E7501 PCI slots 32 bit 33 MHz slot 1 64 bit 66 MHz slot 1 64 bit 100 MHz slot 4 or 64 bit 133 MHz slot 2 VGA On board ATI Rage XL 4 MB SDRAM E7500 8 MB SDRAM E7501 LAN On board Intel 82544GC Gb Ethernet NIC 64 bit 133 MHz PCI X interf...

Страница 107: ...e 18 F 10 C per hour Nonoperating 55 to 150 F 48 3 to 65 5 C Operating 41 to 95 F 5 to 35 C derated 0 9 F 0 5 C for every 1 000 feet 305 meters Altitude 10 000 feet 3 048 meters maximum Humidity Operating wet bulb Not to exceed 91 4 F 33 C with diskette drive or hard drive Nonoperating 95 relative noncondensing at 86 F 30 C Shock Operating 2 0 g 11 msec sine Packaged Operational after 30 inch free...

Страница 108: ...ications www gateway com Video specifications DDC 2B support Integrated 230 MHz DAC 4 MB memory Resolution support Refresh Rate Hz Resolution 43 60 66 70 72 75 76 85 90 100 640 480 800 600 1024 768 1280 1024 1600 1200 ...

Страница 109: ...ent to local APIC s Address Range hex Amount Function 0 to 07FFFFh 640 KB DOS region base system memory 0A0000h to 0BFFFFh 128 KB Video or SMM memory 0C0000h and 0DFFFFh 128 KB Expansion card BIOS and buffer area 0E0000h to 0FFFFFh 128 KB System BIOS 0E0000h to 0EFFFFh 2 MB Extended system BIOS FC000000h to FFFFFFFFh 64 MB PCI memory space Important If you disable an IDE controller to free the int...

Страница 110: ...E Device Interrupt A Interrupt B Interrupt C Interrupt D Rage XL ICH3 P IRQB Debug slot ICH3 P IRQE ICH3 P IRQF ICH3 P IRQG ICH3 P IRQH Intel 82544GC P1 IRQ 0 SCSI 7899W S1 IRQ 0 S1 IRQ 1 PCI slot 1 S1 IRQ 4 S1 IRQ 5 S1 IRQ 2 S1 IRQ 3 PCI slot 2 S2 IRQ 4 S2 IRQ 5 S2 IRQ 6 S2 IRQ 7 PCI slot 3 PCI IRQ 0 PCI IRQ 1 PCI IRQ 2 PCI IRQ 3 PCI slot 4 P2 IRQ 4 P2 IRQ 5 P2 IRQ 6 P2 IRQ 7 PCI slot 5 P2 IRQ 0 ...

Страница 111: ...r more information about your server such as memory size hard drive size and processor type visit Gateway s eSupport page at support gateway com The eSupport page also has links to additional Gateway documentation and detailed specifications for your own server ...

Страница 112: ...hich can be changed are listed in this appendix For a complete list of viewable BIOS settings run the BIOS Setup utility To view all BIOS settings 1 Restart your server 2 Press F2 when the Gateway logo screen appears during startup The BIOS Setup utility opens 3 Select menus and submenus to display setting information ...

Страница 113: ... Port1 Address Parallel Port Address Parallel Port Mode ECP Mode DMA Channel Parallel Port Irq IDE Configuration OnBoard PCI IDE Controller IDE Configuration Primary IDE Master Type LBA Large Mode Block Multi Sector Transfer PIO Mode DMA Mode S M A R T 32Bit Data Transfer ARMD Emulation Type IDE Configuration Primary IDE Slave Type LBA Large Mode Block Multi Sector Transfer PIO Mode DMA Mode ...

Страница 114: ...MA Mode S M A R T 32Bit Data Transfer ARMD Emulation Type IDE Configuration Secondary IDE Slave Type LBA Large Mode Block Multi Sector Transfer PIO Mode DMA Mode S M A R T 32Bit Data Transfer ARMD Emulation Type IDE Configuration Floppy Configuration Floppy A OnBoard Devices Configuration OnBoard LAN Device Onboard SCSI Controller BIOS menu BIOS submenu Setting Value ...

Страница 115: ...guration Remote Access Power Power Button Mode AC Power Failure Standby Time Out Boot Quiet Boot Wait for F1 If Error Boot Device Priority 1st Boot Device 2nd Boot Device Removable Devices 1st Removable Device Security Supervisor Password User Password BIOS menu BIOS submenu Setting Value ...

Страница 116: ...s marked on the product and in the documentation are followed Setting up your system Read and follow all instructions marked on the product and in the documentation before you operate your system Retain all safety and operating instructions for future use Do not use this product near water or a heat source such as a radiator Set up the system on a stable work surface Warning Always follow these in...

Страница 117: ...e that the antenna or cable system is electrically grounded to provide some protection against voltage surges and buildup of static charges Care during use Do not walk on the power cord or allow anything to rest on it Do not spill anything on the system The best way to avoid spills is to avoid eating and drinking near your system Some products have a replaceable CMOS battery on the system board Th...

Страница 118: ... in areas classified as hazardous locations Such areas include patient care areas of medical and dental facilities oxygen laden environments or industrial facilities Warning To reduce the risk of fire use only No 26 AWG or larger telecommunications line cord ...

Страница 119: ...ce in which case you will be required to correct the interference at your own expense Telecommunications per FCC part 68 applicable to products fitted with USA modems Your modem complies with Part 68 of the Federal Communications Commission FCC rules On the computer or modem card is a label that contains the FCC registration number and Ringer Equivalence Number REN for this device If requested thi...

Страница 120: ...person to use a computer or other electronic device to send any message via a telephone fax machine unless such message clearly contains in a margin at the top or bottom of each transmitted page or on the first page of the transmission the date and time it is sent an identification of the business other entity or other individual sending the message and the telephone number of the sending machine ...

Страница 121: ...e line individual service may be extended by means of a certified connector assembly The customer should be aware that compliance with the above conditions may not prevent degradation of service in some situations Repairs to certified equipment should be made by an authorized Canadian maintenance facility designated by the supplier Any repairs or alterations made by the user to this equipment or e...

Страница 122: ...mance Standard Should the unit ever need servicing contact an authorized service location California Proposition 65 Warning Warning Use of controls or adjustments or performance of procedures other than those specified in this manual may result in hazardous radiation exposure To prevent exposure to laser beams do not try to open the enclosure of a CD or DVD drive Warning This product contains chem...

Страница 123: ...knowledgments 1 800 GATEWAY ActiveCPR ALR AnyKey black and white spot design CrystalScan Destination DestiVu EZ Pad EZ Point Field Mouse Gateway 2000 Gateway Country gateway net Gateway stylized logo Perfect Scholar Solo TelePath Vivitron stylized G design and You ve got a friend in the business slogan are registered trademarks and black and white spotted box logo GATEWAY Gateway Astro Gateway Wor...

Страница 124: ...ng 77 BIOS Setup utility 75 Advanced menu 108 Boot menu 110 Main menu 108 menus 76 108 navigating through 76 opening 76 passwords 22 79 Power menu 110 recording configuration 21 Security menu 110 settings 107 troubleshooting 87 boot device 14 menu 14 Boot menu BIOS Setup utility 76 110 C cable clips location 5 card fan 5 7 installing 47 paired slots 47 reseating 47 retention clip 5 retention cover...

Страница 125: ...rs installing 24 DIMM see memory diskette drive connector 7 installing 35 location 2 replacing 35 troubleshooting 88 display troubleshooting 94 documentation Gateway Web site 8 Server Companion CD 24 drive adapter 36 drive bays location 2 drivers installing 24 drives CD 2 35 configuring 34 diskette 2 35 hard drive 42 hot swap 3 42 installing 34 installing 5 25 inch 35 installing CD 35 installing d...

Страница 126: ...age 60 hard drives 3 42 power supply 57 hot swap drives fan 5 7 installing 42 location 2 I IDE BIOS configuration 108 cables 34 connectors 7 drive configuration 34 indicators 2 13 installing 5 25 inch drive 35 add in card 47 backplane 60 battery 71 card 47 CD drive 35 diskette drive 35 expansion cards 47 fans 69 hard drive 42 heat sink 52 hot swap cage 60 hot swap drive 42 media drive 35 memory 45...

Страница 127: ...5 map 104 slot location 7 troubleshooting 92 messages 83 modem connection speed 93 troubleshooting 92 monitor cleaning 19 port 4 troubleshooting 94 motherboard see system board mouse port 4 N network jack 4 non technical support Accounting 97 Sales 97 Warranty 97 O opening case 28 operating system setting up 16 P parallel port 4 password resetting BIOS 79 supervisor 22 user 22 PCI card fan 5 7 slo...

Страница 128: ...lacing see installing reset button 2 resolution video 103 resources interrupts 104 memory map 104 RJ 45 jack 4 S safety general precautions 10 111 guidelines for troubleshooting 82 static electricity 27 screen cleaning 19 troubleshooting 94 SCSI backplane 60 connector 7 determining failed 43 ID 42 installing drives 42 SDRAM see memory security set passwords 22 setting up in BIOS 22 supervisor pass...

Страница 129: ... Technical Support 96 97 tips before contacting 96 telephone support 96 training CD 98 classroom 98 Gateway Learning Libraries 98 Learn Gateway 98 troubleshooting add in card 89 battery 85 beep codes 86 BIOS 87 card 89 CD 88 CD drive 88 diskette drive 88 error messages 83 expansion card 89 faxed answers 97 general guidelines 85 general safety guidelines 82 hard drive 89 IDE drive 90 91 Internet co...

Страница 130: ...125 V VGA port 4 video 103 voltage regulator installing 56 location 7 W Web site Gateway 8 ...

Страница 131: ...126 ...

Отзывы: