


ORIUS ™ 833 Use
r
’s Guide Series Rev 3
3-5
Figure 3-3b
Global Info
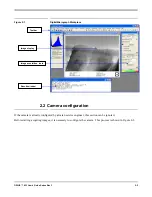
3.4 Image Acquisition
To record the final high resolution image, click on the Start Acquire button in the Camera Acquire palette shown
in Figure 3-4. This mode is preset to acquire a full resolution CCD image. “Streaking correction” can also be
selected in the Setup, Advanced section for use during acquisition of diffraction patterns.
Figure 3-4
Camera Acquire window
3.5 Image Saving and Printing
Images that have been acquired can be saved and printed using the toolbar icons located at the top of the screen
(Figure 3-4). If you would like to save a series of images during your session and have them automatically
Tool icon for
Custom fiields
Содержание ORIUS SC 200D
Страница 40: ...ORIUS 833 User s Guide Series Rev 3 IV Figure A4 Camera Pneumatic Interface Details...
Страница 41: ...ORIUS 833 User s Guide Series Rev 3 V Figure A5 Water lines...
Страница 43: ...ORIUS 833 User s Guide Series Rev 3 VII Appendix 2 Environmental specifications and safety requirements...
Страница 45: ...ORIUS User s Guide Series Rev 3 IX Appendix 3 Camera specifications...
Страница 47: ...ORIUS 833 User s Guide Series Rev 3 XI Appendix 4 CE certification...
Страница 48: ...ORIUS 833 User s Guide Series Rev 3 XII...


