background image

SL320000819 Ed.12 - 07-2013

- 5_EN -

2.3. Technical Data

The technical data and features are listed below.

Model

Granita 

machine 1 

Granita 

machine 2 

Granita 

machine 3

Dimensions 
L x P x H (mm).

With 
standard lid

260 x 400 x 

630

400 x 400 x 

630

600 x 400 x 

630

With lighted lid

260 x 400 x 

685

400 x 400 x 

685

600 x 400 x 

685

Peso (kg). (bowl empty)

22

33

47

Maximum Electrical Input (W).

See rating plate on side of machine

Operating voltage (V).

Operating temperature.

Min. 20°C

Max. 32°C

Number of bowls.

1

2

3

Capacity of each bowl (l.).

5

Sound pressure level. 

<< 70 dB

A

Class.

N

Note: The manufacturer reserves the right to make changes to 
the machine without notice.

Important! Any changes and/or additions of accessories must 
be explicitly approved and implemented by the Manufacturer.

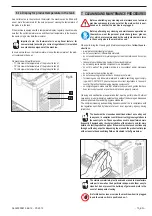
2.4. Control panel

The machine controls are located on the side control panel.

GRANITA MACHINE 1 - (FIG.3)
The following controls are on the panel:

A.  Main switch:  it is used to:

-  turn on the machine and the gearmotor that driver the product mixing 

auger in the bowl.

-  turn off all machine functions.

B.  Refrigeration on/off switch: it is used to turn the refrigeration system on and 

off.

Fig.2

Fig.3

GRANITA MACHINE 1 (GRANITA/COOLER) - (FIG.4)
The following controls are on the panel:

A.  Main switch: it is used to:

-  turn on the machine and the gearmotor that driver the product mixing 

auger in the bowl.

-  turn off all machine functions.

B.  Refrigeration changeover switch:

-  in position “0” the refrigeration system is off;
-  in position “I” the refrigeration system is in the freeze mode (granita);
-  in position “II” the refrigeration system is in the cooling mode (cold 

drinks).

Fig.4

1

1

1

2

3

2

Содержание GRANISMART 1

Страница 1: ...ina OPERATING INSTRUCTIONS Read these operating instructions carefully before using the machine BETRIEBSANLEITUNG Diese Bedienungsanleitung ist vor dem ersten Gebrauch der Maschine aufmerksam zu lesen MODE D EMPLOI Lire attentivement ce mode d emploi avant d utiliser la machine Granitore Granizadora Granita machine Gramolate Geräts Distributeur de granités SL320000819 Ed 12 07 2013 ...

Страница 2: ...5 CE Regulation Materials and items in contact with foodstuffs Para las máquinas con la marca CE se señala lo siguiente El fabricante declara bajo la propia exclusiva responsabilidad que la máquina a la cual se refiere el presente manual ver placa de datos aplicada en la tapa de la pre sente cumple los requisitos esenciales previstos por las siguientes directivas 2006 42 CE Directiva Máquinas 2006...

Страница 3: ...nglish version Pag 2 EN Deutsche Version Pag 2 DE Version française Pag 2 FR Istruzioni originali Traducción de las instrucciones originales Translation of the original instructions Überesetung der originalanleitungen Traduction des instructions originales ...

Страница 4: ...3 granita frigobibita 12 6 7 Avvio Granitore 2 3 13 6 8 Regolazione consistenza granita 14 6 9 Erogazione granita 14 6 10 Situazioni d emergenza 14 6 11 Coperchio luminoso 14 6 12 Visualizzatore temperatura prodotto in vasca 15 7 PROCEDURE DI PULIZIA E MANUTENZIONE 15 7 1 Svuotamento vasche 16 7 1 1 Svuotamento Granitore 1 granita 16 7 1 2 Svuotamento Granitore 1 granita frigobibita 16 7 1 3 Svuot...

Страница 5: ...peratori non devono eseguire operazioni riservate ai tecnici specia lizzati Il costruttore non risponde di danni derivanti dalla mancata osservanza di que sto divieto Il manuale istruzioni è parte integrante del prodotto acquistato e lo deve ac compagnare sempre anche in caso di passaggio a successivi proprietari del prodotto 1 3 3 Conservazione Il Manuale d istruzioni deve essere conservato nelle...

Страница 6: ...onenti principali che costituiscono la macchina variabili in funzione del modello acquistato sono A Coperchio vasca B Regolazione densità C Vasca D Pannello comandi E Termostato elettronico F Piedini G Vasca raccogli gocce H Griglia I Erogatore prodotto L Leva erogazione prodotto D Per rendere più agevole la lettura delle istruzioni nella presente pubblicazione sono utilizzate le seguenti abbrevia...

Страница 7: ...annello comandi I comandi della macchina sono sul pannello posto nella parte laterale GRANITORE 1 GRANITA FIG 3 I comandi posti nel pannello sono A Interruttore Generale ha la funzione di comandare l accensione della macchina e del motoriduttore che aziona la coclea di miscelazione del prodotto in vasca lo spegnimento di tutte le funzioni presenti sulla macchina B Interruttore impianto frigo ha la...

Страница 8: ...ell impianto frigorifero della vasca 2 G Interruttore impianto frigo vasca 3 ha la funzione di comandare l accensio ne e lo spegnimento dell impianto frigorifero della vasca 3 Fig 6 Fig 5 GRANITORE 2 3 GRANITA FRIGOBIBITA FIG 7 I comandi posti nel pannello sono A Interruttore Generale ha la funzione di portare togliere tensione a tutta la macchina B Interruttore miscelazione vasca 1 ha la funzione...

Страница 9: ...cc installarela macchina sopra ad altre apparecchiature l utilizzo della macchina in atmosfera esplosiva aggressiva o ad alta con centrazione di polveri o sostanze oleose in sospensione nell aria l utilizzo della macchina in atmosfera a rischio d incendio l utilizzo della macchina per erogare sostanze non idonee alle caratteristi che della stessa Prima di pulire la macchina accertarsi che la spina...

Страница 10: ...re 3 vasche 660 420 745 51 Nota le dimensioni ed il peso dell imballo sono indicativi Fig 9 4 2 Trasporto e movimentazione Assicurarsi che nessuno sosti nel raggio d azione delle ope razioni di sollevamento e movimentazione del carico e in con dizioni difficoltose predisporre personale addetto al controllo degli spostamenti da effettuare La movimentazione manuale della macchina deve essere eseguit...

Страница 11: ...china Nota nella parte superiore deve essere lasciato uno spazio di 25 cm 10 inch Dopo aver posizionato l imballo nelle vicinanze della zona d installazione pro cedere come segue 1 tagliare le reggette che tengono chiuso l imballo 2 sollevare l imballo di cartone 3 successivamente posizionare la macchina nello spazio predisposto Prima di porre in funzione la macchina per la prima volta si rende ne...

Страница 12: ...ello max indicato Dopo aver versato il prodotto nella vasca chiudere quest ultima con il coper chio Attenzione non mettere in funzione la macchina se manca il coperchio sulla vasca Prima di togliere il coperchio spegnere la macchina e togliere la spina dalla presa di corrente Attenzione all interno della vasca ci sono degli organi in movi mento che possono provocare delle lesioni spegnere la mac c...

Страница 13: ...ne sono disabilitati 6 5 Avvio Granitore 2 3 granita Per semplicità sarà mostrato come azionare la sola vasca destra per azionare le altre vasche è sufficiente compiere la medesima sequenza di operazioni sugli interruttori delle altre vasche Interruttore in posizione I macchina in tensione 6 3 Avvio Granitore 1 granita frigobibita La vasca della macchina con funzione frigobibita è comandata da un ...

Страница 14: ... comandata da due interruttori che devono essere azionati come segue Interruttore in posizione I miscelatore in funzione Interruttore in posizione I impianto frigo in funzione Nota l impianto frigorifero viene avviato solo se Interruttore è in posizione I miscelatore in funzione 6 6 Avvio Granitore 2 3 granita frigobibita Per semplicità sarà mostrato come azionare la sola vasca destra per azionare...

Страница 15: ...na in tensione Interruttore B in posizione I Miscelatori in funzione Per ottenere una GRANITA Deviatori D in posizione I Impianto frigo in funzione granita Per ottenere una BIBITA FREDDA Deviatori D in posizione II Impianto frigo in funzione bibita Per disabilitare il FRIGO solo agitazione Deviatori D in posizione 0 Impianto frigo disabilitato solo agitazione I ALLARMI In caso di sonda guasta il d...

Страница 16: ...to e sul rubinetto stesso in alternativa di lavare con panno pulito e sanitizzante oppure Prelevare una piccola quantità di prodotto dal rubinetto prima di erogare la dose per il cliente 6 10 Situazioni d emergenza ATTENZIONE in ogni situazione d emergenza per fermare la macchina premere con decisione l interruttore generale sulla posizione 0 In caso di congelamento spegnere la macchina e rivolger...

Страница 17: ...e nell ambiente liquidi non lavare i componenti del granitore nella lavastoviglie non utilizzare un forno convenzionale e o a microonde per asciugare parti del granitore non immergere la macchina nell acqua non spruzzare sul granitore getti d acqua diretti per la pulizia utilizzare esclusivamente acqua tiepida e un sanitizzante ido neo conforme con il 21CFR1781010 conforme alle normative vigenti n...

Страница 18: ...esta valido il procedimento sotto elencato 7 1 1 Svuotamento Granitore 1 granita Con la macchina accesa portare l interruttore in pos 0 impianto frigo fermo Fig 37 Successivamente svuotare la vasca da tutto il prodotto che è presente all in terno Fig 38 Successivamente spegnere l interruttore generale miscelatore e togliere la spina dalla presa di corrente Fig 39 7 1 2 Svuotamento Granitore 1 gran...

Страница 19: ...re e l interruttore generale togliere la spina dalla presa di corrente 7 1 4 Svuotamento Granitore 2 3 granita frigobibita Per semplicità sarà mostrato come svuotare la sola vasca destra per svupta re le altre vasche è sufficiente compiere la medesima sequenza d operazioni agendo sui comandi delle altre vasche Con la macchina accesa portare il deviatore frigo su O impianto frigo fermo Fig 46 Fig 4...

Страница 20: ...sitati in una bacinella con acqua calda circa 50 C dopo dovranno essere trattati come descritto nel par 7 4 Fig 53 2 togliere la vasca sollevando la parte anteriore fino al suo sganciamento Fig 54 É vietato smontare il rubinetto se all interno della vasca è pre sente il prodotto o un qualsiasi altro liquido 7 3 Smontaggio vasca e coperchio Lo smontaggio di ogni vasca presente nel granitore è fonda...

Страница 21: ...i di prodotto con un panno umido Lavare e sanitizzare il coperchio Attenzione non immergere in qualsiasi liquido i coperchi prov visti d illuminazione Prima d eseguire le operazioni di pulizia e sanitizzazione del coperchio smontarlo dalla macchina come descritto nel capitolo precedente 4 sfilare la coclea e togliere le guarnizioni A e B Fig 58 Per una corretta pulizia del coperchio luminoso proce...

Страница 22: ... nita in dotazione Fig 60 Fig 61 Nota importante verificare sempre l integrità della guarnizione nel caso sia usurata sostituirla con una nuova Si deve sostituire la guarnizione A almeno una vota all anno Installare la guarnizione B lubrificandola con vaselina su tutta la superficie indicata dalle frecce Introdurre la coclea facendo agganciare la testina C con l albero D Nota l aggancio della cocl...

Страница 23: ...tate sulla confezione del sanitizzante 2 versare la soluzione sanitizzante nella vasca 3 lasciare agire per il tempo necessario vedi istruzioni sanitizzante 4 Svuotare la vasca dal sanitizzante tramite il rubinetto Successivamente si deve proseguire con un opportuno risciacquo della vasca e dell evaporatore per eliminare i residui di sanitizzante Attenzione il risciacquo della vasca dalla soluzion...

Страница 24: ...tuzione della lampadina La sostituzione della lampadina deve essere eseguita con l in terruttore generale sulla posizione 0 e con la spina disinserita Separare le due parti del coperchio luminoso svitando le due viti per eseguire questa operazione utilizzare un cacciavite idoneo Togliere la lampadina U dal portalampada T e sostituirla con quella nuova Fig 68 Riassemblare il coperchio e avvitare le...

Страница 25: ...riodo estrarre la batteria dalla sua sede e conservarla in un luogo idoneo La durata della batteria nuova in condizioni di normale utilizzo è di circa un anno La batteria esausta deve essere smaltita in modo conforme alle norme vigenti nel paese d utilizzo della macchina 7 10 Pulizia condensatore La pulizia del condensatore è di esclusiva competenza del tecnico specializzato che dovrà organizzare ...

Страница 26: ...one periodica La macchina deve essere periodicamente almeno una volta all anno verificata da un tecnico specializzato Questa verifica periodica serve a mantenere alto il livello di si curezza di tutti i componenti installati e della macchina stessa Nel caso un componente sia usurato deve essere sostituito con un ricambio originale nuovo L utilizzo della macchina è vietato quando anche un solo com ...

Страница 27: ...emere l interruttore sulla posizione I Macchina vicina a fonti di calore Installare in un luogo adatto Cap 5 Macchina con insufficiente areazione Condensatore sporco Par 7 10 Chiamare il tecnico specializzato per eseguire un ade guata pulizia del condensatore Errata regolazione della consistenza Par 6 6 Regolare correttamente la consistenza Coclea rumorosa Guarnizione anteriore montata in modo err...

Страница 28: ... SCHEMA ELETTRICO GRANITORE 1 VASCA 230V 50HZ Nota questa linea eviden zia componenti che sono presenti nella macchina in funzione del modello acquistato Nota questa linea eviden zia componenti che sono presenti nella macchina in funzione del modello acquistato 10 SCHEMA ELETTRICO GRANITORE ...

Страница 29: ...G B II 0 I MV M R T250 mA T250 mA per Tr 50VA T32 mA per Tr 3VA SCHEMA ELETTRICO GRANITORE 1 VASCA CON TERMOSTATO ELETTRONICO 230V 50HZ VERSIONE TS E Nota questa linea eviden zia componenti che sono presenti nella macchina in funzione del modello acquistato Nota questa linea evidenzia componenti che sono presenti nella macchi na in funzione del modello acquistato ...

Страница 30: ...T SCHEMA ELETTRICO GRANITORE 1 VASCA BRS 230V 50HZ VERSIONE TS E SCHEMA ELETTRICO GRANITORE 1 VASCA 230V 50HZ VERSIONE TS V Nota questa linea eviden zia componenti che sono presenti nella macchina in funzione del modello acquistato ...

Страница 31: ...HZ F 5A SCHEMA ELETTRICO GRANITORE 2 VASCHE 230V 50HZ T250 mA Nota questa linea eviden zia componenti che sono presenti nella macchina in funzione del modello acquistato Nota questa linea eviden zia componenti che sono presenti nella macchina in funzione del modello acquistato ...

Страница 32: ...RMOSTATO ELETTRONICO 230V 50HZ VERSIONE TS E T250 mA SCHEMA ELETTRICO GRANITORE 3 VASCHE 230V 50HZ Nota questa linea evidenzia componenti che sono presenti nella macchi na in funzione del modello acquistato Nota questa linea evidenzia componenti che sono presenti nella macchi na in funzione del modello acquistato ...

Страница 33: ...ERMOSTATO ELETTRONICO 230V 50HZ VERSIONE TS E T 5A SCHEMA ELETTRICO GRANITORE 3 VASCHE 115V 60HZ Nota questa linea evidenzia componenti che sono presenti nella macchi na in funzione del modello acquistato Nota questa linea evidenzia componenti che sono presenti nella macchi na in funzione del modello acquistato ...

Страница 34: ...terruttore luce coperchio vasca I L1 Interruttore luce coperchio vasca 1 I L2 Interruttore luce coperchio vasca 2 I L3 Interruttore luce coperchio vasca 3 IG Interruttore generale IGM Interruttore generale Motore miscelatore IM1 Interruttore motore miscelatore vasca 1 IM2 Interruttore motore miscelatore vasca 2 IM3 Interruttore motore miscelatore vasca 3 L L Luce coperchio vasca L L1 Luce coperchi...

Страница 35: ...o vasca S c Sensore coperchio S c1 Sensore coperchio vasca 1 S c2 Sensore coperchio vasca 2 S c3 Sensore coperchio vasca 3 S1 Sonda coperchio vasca 1 S2 Sonda coperchio vasca 2 S3 Sonda coperchio vasca 3 TE Termostato elettronico Tm Termostato Tm 1 Termostato vasca 1 Tm 2 Termostato vasca 2 Tm 3 Termostato vasca 3 Tr Trasformatore TR L Trasformatore ...

Страница 36: ...nque Granizadora 2 3 graniz bebida helada 12 6 7 Puesta en marcha Granizadora 2 3 13 6 8 Regulación de la consistencia del granizado 14 6 9 Suministro granizado 14 6 10 Situaciones de emergencia 14 6 11 Tapa luminosa 14 6 12 Visualizador temperatura producto en cuba 15 7 PROCEDIM DE LIMPIEZA Y MANTENIMIENTO 15 7 1 Vaciado de las cubas 16 7 1 1 Vaciado Granizadora 1 granizado 16 7 1 2 Vaciado Grani...

Страница 37: ...cabalmente el contenido del presente manual 1 3 2 Destinatarios Este manual está destinado a operadores y técnicos especializados Los operadores no deben ejecutar operaciones que están reservadas a los técnicos especializados El fabricante declinará toda responsabilidad por daños que deriven de la inob servancia de la precedente prohibición El manual de instrucciones es parte integrante de la máqu...

Страница 38: ...es componentes de la máquina que varían según el modelo ad quirido son A Tapa cuba B Regulador de densidad C Cuba D Panel de mandos E Termostato electrónico F Pies G Cuba receptora de goteo H Rejilla I Suministrador producto L Palanca de suministro producto D A fin de facilitar la lectura de las instrucciones en la presente publicación se utilizan las siguientes abreviaturas Granizadora 1 granizad...

Страница 39: ...uina se encuentran en el respectivo panel situado en su parte lateral GRANIZADORA 1 GRANIZADO FIG 3 Los mandos presentes en el panel son los siguientes A Interruptor General su función es la de gobernar el encendido de la máquina y del motorreductor que acciona el sinfín de mezcla del producto en la cuba la desactivación de todas las funciones presentes en la máquina B Interruptor Sistema refriger...

Страница 40: ...uptor instalación refrigeración vasca 3 tiene la función de controlar el encendido y apagado de la instalación de refrigeración de la cuba 3 Fig 6 Fig 5 GRANIZADORA 2 3 GRANIZADO BEBIDA HELADA FIG 7 Los mandos presentes en el panel son los siguientes A Interruptor General cuya función es la de dar quitar tensión a la máquina en su conjunto B Interruptor mezclado en cuba 1 tiene la función de contr...

Страница 41: ...el uso de la máquina en ambientes potencialmente explosivos agresivos o con alta concentración de polvos o sustancias aceitosas en suspensión en el aire el uso de la máquina en ambientes sujetos a riesgo de incendio el uso de la máquina para suministrar sustancias no previstas considerando las características de la misma Antes de limpiar la máquina controlar que el enchufe esté desconectado de la ...

Страница 42: ... Las dimensiones y el peso de la máquina embalada se indican de manera aproximada Fig 9 4 2 Transporte y desplazamiento Controlar que ninguna persona esté presente dentro del radio operativo de elevación y desplazamiento de la carga y en situa ciones de particular dificultad utilizar personal que controle los desplazamientos a efectuar El desplazamiento manual de la máquina debe ser efectuado al m...

Страница 43: ... de la máquina Nota En la parte superior debe dejarse un espacio libre de 25 cm 10 pulgadas Una vez situada la máquina embalada en proximidad de la zona de emplaza miento se deberá proceder de la siguiente forma 1 cortar las cintas de nylon que mantienen cerrado el embalaje 2 elevar la cubierta de cartón 3 a continuación emplazar la máquina en el lugar previsto para ello Antes de poner en funciona...

Страница 44: ...nivel máximo indicado Después de haber vertido el producto en la cuba cerrar esta última con la tapa Atención No poner en funcionamiento la máquina sin que la tapa esté cerrada Antes de quitar la tapa apagar la máquina y desconectar el enchufe respecto de la toma de corriente Atención Dentro de la cuba se encuentran órganos móviles que pueden causar lesiones apagar la máquina y desconectar el ench...

Страница 45: ...ramación están inhabilitadas 6 5 Arranque Granizadora 2 3 granizado Para más sencillez se mostrará cómo accionar sólo la cuba derecha para ac cionar las otras cubas es suficiente realizar la misma secuencia de operaciones en los interruptores de las otras cubas Interruptor en posición I máquina en tensión 6 3 Arranque Granizadora 1 graniz bebida helada La cuba de la máquina con función bebida hela...

Страница 46: ...uba es gobernada mediante dos interruptores que deben ser acciona dos de la siguiente forma Interruptor en posición I mezclador en funcionamiento Interruptor en posición I sistema refrigerante en funcionamiento Nota El sistema refrigerante es accionado sólo si el interruptor está en posición I mezclador en funcionamiento 6 6 Arranque Granizadora 2 3 graniz bebida helada Para más sencillez se mostr...

Страница 47: ...or B en posición I Mezcladores en marcha Para obtener un GRANIZADO Desviadores D en posición I Instalación refrigeración en marcha granizado Para obtener una BEBIDA FRÍA Desviadores D en posición II Instalación refrigeración en marcha bebida Para inhabilitar el REFRIGERADOR solo agitación Desviadores D en posición 0 Instalación refrigeración inhabilitada sólo agitación ALARMAS En caso de sonda ave...

Страница 48: ...neadora en la zona del grifo y en el mismo grifo como alternativa de lavar con paño limpio y saneador o bien Tomar una pequeña cantidad de producto del grifo antes de erogar la dosis para el cliente 6 10 Situaciones de emergencia ATENCIÓN En caso de emergencia para detener la máquina se debe presionar con energía el interruptor general disponiéndo lo en posición 0 En caso de congelación apagar la ...

Страница 49: ... en el ambiente no lavar los componentes de la granizadora en lavavajillas no utilizar un horno convencional ni microondas para secar piezas de la grani zadora no sumergir la máquina en agua no aplicar a la granizadora chorros de agua de modo directo lavar utilizando exclusivamente agua tibia y un higienizante adecuado conforme con el 21CFR1781010 conforme con lo dispuesto por las normativas vigen...

Страница 50: ... 1 Vaciado Granizadora 1 granizado Con la máquina encendida disponer el interruptor en pos 0 sistema refrigerante detenido Fig 37 A continuación vaciar la cuba retirando enteramente el producto que contiene Fig 38 Por último disponer en Off el interruptor general mezclador y desconectar el enchufe respecto de la toma de corriente Fig 39 7 1 2 Vaciado Graniz 1 granizado bebida helada Con la máquina...

Страница 51: ...al desconectar el enchufe respecto de la toma de corriente 7 1 4 Vaciado Granizadora 2 3 granizado bebida refrigerada Para mayor sencillez se mostrará cómo vaciar sólo la cuba derecha para va ciar las otras cubas es suficiente realizar la misma secuencia de operaciones mediante los mandos de las otras cubas Con la máquina encendida disponer el desviador sistema refrigerante en O sistema refrigeran...

Страница 52: ...a caliente aprox 50 C sucesivamente deberán ser tratados de la manera ilustrada en el apartado 7 4 Fig 53 2 desmontar la cuba elevando su parte delantera hasta desengancharla Fig 54 Está prohibido desmontar el grifo con presencia de producto o de cualquier otro líquido en la cuba 7 3 Desmontaje de la cuba y de la tapa El desmontaje de cada cuba presente en la granizadora es fundamental para poder ...

Страница 53: ...ño húmedo para eliminar del evaporador todo residuo de pro ducto Lavar e higienizar la tapa Atención No sumergir en ningún líquido las tapas provistas de iluminación Antes de efectuar las operaciones de limpieza y de higienización de la tapa hay que desmontarlo de la máquina como describido en el capítulo precedente 4 extraer el sinfín y quitar las guarniciones A y B Fig 58 Para limpiar correctame...

Страница 54: ... vaselina suministrada adjunta Fig 60 Fig 61 Nota importante controlar siempre la integridad de la guarni ción y sustituirla con otra nueva si se encuentra deteriorada La guarnición A debe ser sustituida por lo menos una vez por año Instalar la guarnición B lubricándola con vaselina en toda la superficie indica da mediante las flechas Introducir el sinfín haciendo enganchar el cabezal C en el eje ...

Страница 55: ...n un recipiente aplicar las instrucciones que aparecen en el envase del producto higienizante 2 verter la solución higienizante en la cuba 3 dejar actuar durante el tiempo necesario véanse instrucciones del higieni zante 4 vaciar la cuba del higienizante a través del grifo A continuación enjuagar la cuba y el evaporador para eliminar todo posible residuo de higienizante Atención El enjuague de la ...

Страница 56: ...e la toma 7 8 1 Sustitución de la bombilla Hay que sustituir la bombilla con el interruptor general en la posición 0 y con la clavija desenchufada Separar las dos partes de la tapa luminosa desenroscando los dos tornillos de fijación para efectuar esta operación se deberá utilizar un destornillador adecuado Fig 68 Retirar la bombilla U del portalámpara T y sustituirla con una nueva Reinstalar la t...

Страница 57: ...de no utilizar la máquina durante un largo período se deberá extraer la pila de su alojamiento y conservarla en un lugar adecuado La duración de la pila nueva en condiciones normales de uso es de aproximadamente un año La pila agotada deber ser eliminada en conformidad con lo dispuesto por las normas vigentes en el país de uso de la máquina 7 10 Limpieza del condensador La limpieza del condensador...

Страница 58: ...do periódicamente por lo me nos una vez al año por un técnico especializado Este control periódico sirve para mantener un nivel elevado de seguridad de todos los componentes instalados y del apa rato en cuestión Si se desgasta una parte del aparato hay que cambiarla con un nuevo repuesto original Está prohibido utilizar el aparato incluso cuando un solo com ponente sea defectuoso o esté gastado Es...

Страница 59: ... en posición O Cap 6 Disponer los interruptores en posición I Máquina en proximidad de fuentes de calor Cambiar posición de la máquina Cap 5 Máquina con ventilación insuficiente Condensador sucio Apart 7 10 Llamar al técnico especializado para que efectúe la lim pieza del condensador Regulación errónea de la consistencia Apart 6 6 Regular correctamente la consistencia Sinfín ruidoso Guarnición del...

Страница 60: ...UEMA ELECTRICO GRANIZADORA DE 1 CUBA 230V 50HZ Nota esta línea pone en evidencia los componen tes que se encuentran en la máquina según el mo delo adquirido 10 ESQUEMA ELECTRICO GRANIZADORA Nota esta línea pone en evidencia los componen tes que se encuentran en la máquina según el mo delo adquirido ...

Страница 61: ...FuA D G B II 0 I MV M R T250 mA T250 mA para Tr 50VA T32 mA para Tr 3VA ESQUEMA ELÉCTRICO GRANIZADOR 1 CUBA CON TERMOSTATO ELECTRÓNICO 230 V 50 HZ VERSIÓN TS E Nota esta línea pone en evidencia los componen tes que se encuentran en la máquina según el mo delo adquirido Nota esta línea pone en evidencia los componentes que se encuentran en la máquina según el modelo adquirido ...

Страница 62: ...SQUEMA ELÉCTRICO GRANIZADOR 1 CUBA BRS 230 V 50 HZ VERSIÓN TS E ESQUEMA ELÉCTRICO GRANIZADOR 1 CUBA 230 V 50 HZ VERSIÓN TS V Nota esta línea pone en evidencia los componen tes que se encuentran en la máquina según el mo delo adquirido ...

Страница 63: ... F 5A ESQUEMA ELECTRICO GRANIZADORA DE 2 CUBAS 230V 50HZ T250 mA Nota esta línea pone en evidencia los componen tes que se encuentran en la máquina según el mo delo adquirido Nota esta línea pone en evidencia los componen tes que se encuentran en la máquina según el mo delo adquirido ...

Страница 64: ...OSTATO ELECTRÓNICO 230 V 50 HZ VERSIÓN TS E T250 mA ESQUEMA ELECTRICO GRANIZADORA DE 3 CUBAS 230V 50HZ Nota esta línea pone en evidencia los componentes que se encuentran en la máquina según el modelo adquirido Nota esta línea pone en evidencia los componentes que se encuentran en la máquina según el modelo adquirido ...

Страница 65: ...RMOSTATO ELECTRÓNICO 230 V 50 HZ VERSIÓN TS E T 5A ESQUEMA ELECTRICO GRANIZADORA DE 3 CUBAS 115V 60HZ Nota esta línea pone en evidencia los componentes que se encuentran en la máquina según el modelo adquirido Nota esta línea pone en evidencia los componentes que se encuentran en la máquina según el modelo adquirido ...

Страница 66: ...mático temporizador Fu A Fusible transformador I G Interruptor general I G M Interruptor general Motor mezcladora I L Interruptor luz tapa cuba I L1 Interruptor luz tapa cuba 1 I L2 Interruptor luz tapa cuba 2 I L3 Interruptor luz tapa cuba 3 IGM Interruptor general IM1 Interruptor motor mezcladora cuba 1 IM2 Interruptor motor mezcladora cuba 2 IM3 Interruptor motor mezcladora cuba 3 L L Luz tapa ...

Страница 67: ...ento cuba 3 S Sonda tapa cuba S c Sensor tapa S c1 Sensor tapa cuba 1 S c2 Sensor tapa cuba 2 S c3 Sensor tapa cuba 3 S1 Sonda tapa cuba 1 S2 Sonda tapa cuba 2 S3 Sonda tapa cuba 3 TE Termóstato electrónico Tm Termóstato Tm 1 Termóstato cuba 1 Tm 2 Termóstato cuba 2 Tm 3 Termóstato cuba 2 Tr Transformador TR L Transformador ...

Страница 68: ...11 6 6 Starting a Granita machine 2 3 granita cooler 12 6 7 Starting a Granita machine 2 3 13 6 8 Adjusting granita consistency 14 6 9 Dispensing granita 14 6 10 Emergency situations 14 6 11 Lighted lid 14 6 12 Display for product temperature in the tank 15 7 CLEANING AND MAINTENANCE PROCEDURES 15 7 1 Emptying the bowls 16 7 1 1 Emptying Granita machine 1 granita only 16 7 1 2 Emptying Granita mac...

Страница 69: ... at users and specialized technicians Users must not attempt to carry out any operations restricted to qualified technicians The manufacturer will not be liable for any damage or injury caused as a result of failure to comply with this rule The instruction manual is an integral part of the product purchased and must therefore be handed over to any subsequent owners 1 3 3 How to keep the manual Thi...

Страница 70: ... E H G F 2 2 Main components The main components making up the machine will vary according to the ma chine purchased They comprise A Bowl lid B Thickness regulator C Bowl D Control panel E Electronic thermostat F Feet G Drip tray H Grid I Product dispenser L Product dispensing lever D To make the instructions easier to read the following abbreviations are used herein Granita machine 1 granita iden...

Страница 71: ...licitly approved and implemented by the Manufacturer 2 4 Control panel The machine controls are located on the side control panel GRANITA MACHINE 1 FIG 3 The following controls are on the panel A Main switch it is used to turn on the machine and the gearmotor that driver the product mixing auger in the bowl turn off all machine functions B Refrigeration on off switch it is used to turn the refrige...

Страница 72: ...or system switch this serves to switch the refrigerator sys tem of tank 3 on and off Fig 6 Fig 5 GRANITA MACHINE 2 3 GRANITA COOLER FIG 7 The following controls are on the panel A Main switch it is used to switch on off the power supply to the whole ma chine B Tank 1 mixer switch this serves to switch the gearmotor that drives the product mixing spiral in tank 1 on and off C Tank 2 mixer switch th...

Страница 73: ...f dust or oily substances suspended in the air use the machine in a place where there is a risk of fire use the machine to dispense substances that are not compatible with the ma chine s specifications Before cleaning the machine make sure that it is unplugged do not clean the ma chine with gasoline and or solvents of any kind Repair work may be performed only by a Service Center authorized by the...

Страница 74: ...e Fig 9 4 2 Conveyance and handling Make sure that no one is stationed within range of lifting and handling operations In difficult conditions specialized person nel should be appointed to oversee the movements of the ma chine Manual handling of the machine requires at least two people The machine must be moved into an upright position only after every bowl has been emptied of product Lift the box...

Страница 75: ...ne parts so that they may be serviced in the event of a fault Note clearance of 25 cm 10 inches must be left at the top After positioning the packing container in the vicinity of the installation site pro ceed as follows 1 cut the straps securing the box 2 lift the cardboard box 3 then lift the machine and position it on the prepared site Before the machine is used for the first time its component...

Страница 76: ...ot to overfill be yond the max level indicated After pouring the product into the bowl close the lid on top of the bowl Warning never switch on the machine if the lid is missing Be fore removing the lid switch off the machine and unplug it Warning There are some moving parts inside the bowl which may cause injuries turn off and unplug the machine before car rying out any operation inside the bowl ...

Страница 77: ... Granita machine 2 3 granita only For the sake of simplicity we will describe the operation for the right hand tank only for the other tanks it is sufficient to carry out the same sequence of opera tions on their switches Switch in position I machine powered 6 3 Starting a Granita machine 1 granita cooler The bowl of machines with a beverage cooling function is operated by means of an on off switc...

Страница 78: ...switch is in position I mixer working Each bowl is operated by two switches which must be positioned as follows Switch in position I mixer on Switch in position I refrigeration system on Note The refrigeration system starts only if the switch is in position I mixer working 6 6 Starting a Granita machine 2 3 granita cooler For the sake of simplicity we will describe the operation for the right hand...

Страница 79: ... powered Switch B in position I Mixers operating To make SLUSH DRINKS GRANITA Deviators D in position I Refrigerator system operating slush drinks granita To make COLD DRINKS Deviators D in position II Refrigerator system operating cold drinks To disable the FRIDGE mixing only Deviators D in position 0 Refrigerator system off mixing only ALARMS In case of probe failure the display will show the fo...

Страница 80: ... to spray sanitizer solution around the spigot area and on the spigot itself alternatively wash with a clean cloth and sani tizer or dispense a small amount of the product from the spigot be fore dispensing the serving for the customer 6 10 Emergency situations WARNING in every emergency situation to shut down the ma chine firmly press the main switch into position 0 In case of freezing switch off...

Страница 81: ... in the surrounding area do not wash granita machine components in a dishwasher do not dry parts of the granita machine in a conventional and or microwave oven do not immerse the machine in water do not expose the granita machine to direct sprays of water for cleaning use only lukewarm water and a suitable sanitizing agent comply ing with 21CFR1781010 in accordance with current regulations in the ...

Страница 82: ...stat and temperature display the pro cedure listed here below applies 7 1 1 Emptying Granita machine 1 granita only While the machine is on press the switch into pos 0 to shut down the refrigeration system Fig 37 Then completely empty the bowl of its contents Fig 38 After that put off the main mixer switch and unplug the machine Fig 39 7 1 2 Emptying Granita machine 1 granita cooler While the mach...

Страница 83: ...both the main switch and mixer switch and unplug the ma chine 7 1 4 Emptying the granita maker 2 3 granita cold drinks fridge For the sake of simplicity we will describe the operation for emptying the right hand tank only to empty the other tanks it is sufficient to carry out the same sequence of operations on their switches While the machine is on press the changeover switch into pos 0 to shut do...

Страница 84: ...ig 51 These components may be placed in a basin containing hot water approx 50 C they must later be treated as described in section 7 4 Fig 53 2 raise the front part of the bowl to release it Fig 54 Never disassemble the tap if the product or any other liquid is present inside the bowl 7 3 Removing the bowl and the lid Removal of every granita bowl is fundamental to ensure correct machine clean in...

Страница 85: ... the evaporator Wash and sanitize the lid Warning do not submerge lids equipped with lighting in any type of liquid Before starting the cleaning and sanitising opera tions of the lid remove it from the machine as described in the previous chapter 4 take out the auger and remove the seals A and B Fig 58 To clean the lighted lid correctly proceed as follows 1 Using a clean damp cloth first wipe clea...

Страница 86: ...ed lubricate the seal A in the areas shown in figure 60 Fig 60 Fig 61 Important Note always check the seal integrity should it be worn replace it with a new one Replace the seal A once a year at least Apply seal B lubricating the entire surface indicated by the arrows with vase line Introduce the auger engaging head C with shaft D Note Rotate the auger to engage it Fig 62 Set the bowl back in plac...

Страница 87: ...iner following the direc tions provided on the package of the sanitizing product 2 pour the sanitizing solution into the bowl 3 allow time for the sanitizing solution to act see directions on product pack age 4 empty the tank of sanitizing solution by opening the tap Then thoroughly rinse the bowl and evaporator to eliminate residues of sanitiz ing solution Warning the bowl must be rinsed of sanit...

Страница 88: ...hine and unplug it 7 8 1 Replacing the bulb The bulb must be replaced only when the main switch is in posi tion 0 and power cord is unplugged Separate the two parts of the lid by removing the screws use a suitable screw driver for this purpose Fig 68 Remove bulb U from lamp holder T and fit a new bulb in its place Reassemble the lid and fasten it with the two screws Fig 69 7 9 Replacing the temper...

Страница 89: ...or one of a different type If the machine will remain unused for a long period remove the battery from its compartment and store it in a suitable place In normal conditions of use a new battery will have a life of about one year Spent batteries must be disposed of in accordance with the laws in the user s country 7 10 Cleaning the condenser The condenser may be cleaned solely by a specialized tech...

Страница 90: ...least once a year by a specialised technician This periodic check serves to ensure that all the components installed and the machine itself are maintained at a high level of safety Any worn components must be replaced by an original spare part It is forbidden to use the machine when even only one of its compone nts is faulty or worn Users are forbidden to perform periodic maintenance 8 SCRAPPING E...

Страница 91: ...a The switches are off Cap 6 Press the switch into position I The machine is near sources of heat Install the machine in a suitable place There is insufficient ventilation The condenser is dirty Par 7 10 Call in a specialized technician to clean the condenser The consistency has not been regulated correctly Par 6 6 Correctly regulate the consistency The auger is noisy The front seal has been appli...

Страница 92: ...BOWL GRANITA MACHINE WIRING DIAGRAM 230V 50HZ Note this dotted line shows the components which are present in the machine according to the purchased model Note this dotted line shows the components which are present in the machine according to the purchased model 10 GRANITA MACHINE WIRING DIAGRAM ...

Страница 93: ...G B II 0 I MV M R T250 mA T250 mA for Tr 50VA T32 mA for Tr 3VA WIRING DIAGRAM FOR GRANITA MACHINE 1 TANK WITH ELECTRONIC THERMOSTAT 230 V 50 HZ TS E VERSION Note this dotted line shows the components which are present in the machine according to the purchased model Note this dotted line shows the components which are present in the machine according to the purchased model ...

Страница 94: ... DIAGRAM FOR GRANITA MACHINE 1 TANK BRS 230 V 50 HZ TS E VERSION WIRING DIAGRAM FOR GRANITA MACHINE 1 TANK 230 V 50 HZ TS V VERSION Note this dotted line shows the components which are present in the machine according to the purchased model ...

Страница 95: ...Z F 5A 2 BOWL GRANITA MACHINE WIRING DIAGRAM 230V 50HZ T250 mA Note this dotted line shows the components which are present in the machine according to the purchased model Note this dotted line shows the components which are present in the machine according to the purchased model ...

Страница 96: ...ELECTRONIC THERMOSTAT 230 V 50 HZ TS E VERSION T250 mA 3 BOWL GRANITA MACHINE WIRING DIAGRAM 230V 50HZ Note this dotted line shows the components which are present in the machine according to the purchased model Note this dotted line shows the components which are present in the machine according to the purchased model ...

Страница 97: ... ELECTRONIC THERMOSTAT 230 V 50 HZ TS E VERSION T 5A 3 BOWL GRANITA MACHINE WIRING DIAGRAM 115V 60HZ Note this dotted line shows the components which are present in the machine according to the purchased model Note this dotted line shows the components which are present in the machine according to the purchased model ...

Страница 98: ... granita hardness adjustment limit switch FcTx Timer limit switch Fu A Transformer fuse I G Main switch I G M Main switch Mixer motor I L Bowl cover light switch I L1 Bowl 1 cover light switch I L2 Bowl 2 cover light switch I L3 Bowl 3 cover light switch IGM Main switch IM1 Bowl 1 mixer motor switch IM2 Bowl 2 mixer motor switch IM3 Bowl 3 mixer motor switch L L Bowl cover light L L1 Bowl 1 cover ...

Страница 99: ...S Tank cover probe S c Cover sensor S c1 Bowl 1 cover sensor S c2 Bowl 2 cover sensor S c3 Bowl 3 cover sensor S1 Tank 1 cover probe S2 Tank 2 cover probe S3 Tank 3 cover probe TE Electronic thermostat Tm Thermostat Tm 1 Bowl 1 thermostat Tm 2 Bowl 2 thermostat Tm 3 Bowl 3 thermostat Tr Transformer TR L Transformer ...

Страница 100: ...ranitamaschine 2 3 Granita Kaltgetränk 12 6 7 Start Granitamaschine 2 3 13 6 8 Einstellung der Festigkeit der Gramolate 14 6 9 Ausgabe von Gramolate 14 6 10 Notsituationen 14 6 11 Leuchtdeckel 14 6 12 Temperaturanzeige des Produkts im Behälter 15 7 REINIGUNG UND WARTUNG 15 7 1 Leerung der Behälter 16 7 1 1 Entleerung Granitamaschine 1 Granita 16 7 1 2 Entleerung Granitamaschine 1 Granita Kaltgeträ...

Страница 101: ...erstanden wurde 1 3 2 Zweckbestimmung Dieses Handbuch ist an Benutzer und Fachtechniker gerichtet Benutzer dürfen die den Fachtechnikern vorbehaltenen Arbeiten nicht ausführen Der Hersteller haftet nicht für Schäden die wegen Missachtung dieses Verbots entstanden sind Die Betriebsanleitung ist Bestandteil des gekauften Produkts und muss dieses immer auch im Falle eines Besitzerwechsels begleiten 1...

Страница 102: ...Die Hauptkomponenten der Maschine die je nach dem erworbenen Modell va riieren sind die folgenden A Behälterdeckel B Dichteeinstellung C Behälter D Bedientafel E Elektronischer Thermostat F Füße G Tropfschale H Schwimmer Tropfschale voll I Produktausgabe L Hebel Produktausgabe D Zum einfacheren Verständnis der Anweisungen wurden in dieser Betriebsanleitung die folgenden Abkürzungen verwendet Grani...

Страница 103: ...uszuführen 2 4 Schaltpult Die Maschinensteuerungen befinden sich auf dem seitlichen Paneel GRANITAMASCHINE 1 GRANITA ABB 3 Die auf dem Paneel angebrachten Steuerungen sind die folgenden A Hauptschalter hat die Steuerungsfunktion das Einschalten der Maschine und des Getriebemotors der die Misch schnecke im Behälter aktiviert das Ausschalten aller auf der Maschine vorhandenen Funktionen B Schalter K...

Страница 104: ... Behälters 2 zu kontrollieren G Schalter Kühlanlage Behälter 3 hat die Funktion das Ein und Ausschalten der Kühlanlage des Behälters 3 zu kontrollieren Abb 6 Abb 5 GRANITAMASCHINE 2 3 GRANITA KALTGETRÄNK ABB 7 Die auf dem Paneel angebrachten Steuerungen sind die folgenden A Hauptschalter hat die Funktion Spannung der Maschine zuzuführen oder von der Maschine zu trennen B Schalter Mischvorgang Behä...

Страница 105: ... usw zu benutzen die Maschine auf anderen Maschinen zu installieren die Maschine in explosionsfähiger und aggressiver Atmosphäre oder bei hoher Konzentration von Staub und ölhaltigen Schwebestoffen zu benut zen die Maschine in feuergefährdeter Umgebung zu benutzen die Maschine zur Ausgabe von Stoffen zu verwenden für die sie nicht geeignet ist Bevor der die Maschine gereinigt wird kontrollieren ob...

Страница 106: ... Granita maschi ne 1 Behälter 320 420 745 24 Granita maschi ne 2 Behälter 460 420 745 36 Granita maschi ne 3 Behälter 660 420 745 51 Anmerkung Die Abmessungen und das Gewicht sind unver bindliche Angaben Abb 9 4 2 Transport und Lagerung Sicherstellen dass sich beim Heben und Handhaben der Last niemand im Aktionsbereich aufhält Unter schwierigen Bedin gungen Personal für die Überwachung der auszufü...

Страница 107: ...hten Seite zu den Baugruppen im Fall von Störungen der Maschine Hinweis Im oberen Teil müssen 25 cm 10 Zoll frei gelassen werden Nach dem Abstellen der verpackten Maschine in der Nähe des Bestimmungs orts wie folgt vorgehen 1 die Verschlussbänder der Verpackung durchschneiden 2 die Kartonverpackung abheben 3 dann die Maschine am vorbereiteten Ort aufstellen Bevor die Maschine zum ersten Mal in Bet...

Страница 108: ...malen Füllstand nicht übersteigt Nachdem das Produkt im Behälter gegossen zu haben schließen mit dem De ckel Achtung Einschalten das Gerät nicht wenn der Deckel nicht auf dem Behälter ist Bevor der Deckel aufnehmen schalten das Gerät aus und trennen die Steckdose ab Achtung Im Inneren des Behälters befinden sich bewegliche Organe die Verletzungen verursachen können vor Eingriffen in das Innere des...

Страница 109: ...6 5 Start Granitamaschine 2 3 Granita Aus Gründen der Einfachheit wird nur die Aktivierung des rechten Behälters gezeigt zur Aktivierung der anderen Behälter dieselbe Vorgangssequenz über die Schalter der anderen Behälter ausführen Schalter in Position I Maschine unter Spannung 6 3 Start Granitamaschine 1 Granita Kaltgetränk Der Behälter der Maschine mit Kaltgetränk Funktion wird über einen Schalt...

Страница 110: ...i Schalter gesteuert die wie folgt betätigt werden müssen Schalter in Position I Mischer in Betrieb Schalter in Position I Kühlanlage in Betrieb Hinweis die Kühlanlage wird nur in Betrieb gesetzt wenn sich der Schalter in Position I bef indet Mischer in Betrieb 6 6 Start Granitamaschine 2 3 Granita Kaltgetränk Aus Gründen der Einfachheit wird nur die Aktivierung des rechten Behälters gezeigt zur A...

Страница 111: ...nung Schalter B in Position I Mischer in Betrieb Für die Zubereitung einer GRANITA Umsteller D in Position I Kühlanlage in Betrieb Granita Für die Zubereitung eines KALTGETRÄNKS Umsteller D in Position II Kühlanlage in Betrieb Getränk Zur Deaktivierung der KÜHLUNG nur Rührvorgang Umsteller D in Position 0 Kühlanlage deaktiviert nur Rührvorgang ALARME Bei defekter Sonde werden auf dem Display die f...

Страница 112: ...m Fall von Milchprodukten wie folgt vorzugehen Desinfektionsmittel auf den Hahn und den umliegenden Bereich sprühen andernfalls mit einem sauberen Tuch und Desinfektionsmittel reinigen oder Eine kleine Menge Produkt durch den Hahn ablassen bevor die Dosis für den Kunden entnommen wird 6 10 Notsituationen ACHTUNG In jeder Notsituation den Ein Ausschalter der Ma schine unverzüglich auf 0 stellen Bei...

Страница 113: ...Die Maschinenteile nicht im Backofen und oder in der Mikrowelle trocknen Die Maschine nicht ins Wasser tauchen Keinen direkten Wasserstrahl auf die Maschine richten Zur Reinigung ausschließlich lauwarmes Wasser und ein geeignetes Des infektionsmittel gemäß den im Benutzungsland geltenden Bestimmungen verwenden das die Maschinenteile nicht beschädigen kann Zum Schluss alle Schutzsysteme wieder korr...

Страница 114: ...e unten dargestellte Vorgehensweise gültig 7 1 1 Entleerung Granitamaschine 1 Granita Bei eingeschalteter Maschine den Schalter in pos 0 bringen die Kühl anlage steht still Abb 37 Anschließend aus dem Behälter das Produkt komplett entleeren Abb 38 Anschließend den Hauptschalter Mischer ausschalten den Stecker aus der Steckdose ziehen Abb 39 7 1 2 Entleerung Granitamaschine 1 Granita Kaltgetränk Be...

Страница 115: ...chalter ausschalten den Stecker aus der Steckdose ziehen 7 1 4 Entleerung Granitamaschine 2 3 Granita Kaltgetränk Aus Gründen der Einfachheit wird nur die Entleerung des rechten Behälters gezeigt zur Entleerung der anderen Behälter dieselbe Vorgangssequenz über die Steuerungen der anderen Behälter ausführen Bei eingeschalteter Maschine den Umsteller der Kühlanlage auf O Kühl anlage steht still bri...

Страница 116: ...ne mit heißem Wasser circa 50 C gefüllte Schüssel gegeben werden dann müssen sie wie in Abs 7 4 beschrieben be handelt werden Abb 53 2 Zum Abnehmen den Behälter vorn anheben bis er ausgehängt werden kann Abb 54 Es ist verboten den Hahn auszubauen solange das Produkt oder irgendeine andere Flüssigkeit im Behälter ist 7 3 Ausbau Behälter und Deckel Der Ausbau aller Behälter ist für eine einwandfreie...

Страница 117: ...ch alle Produktreste vom Verdampfer entfernen Den Deckel reinigen und desinfizieren Achtung Die Deckel mit Beleuchtung nicht in Flüssigkeiten ein tauchen Den Deckel zur Reinigung und Desinfektion von der Maschine abmachen wie im vorigen Kapitel beschrieben 4 die Rührschnecke herausziehen und die Dichtungen A und B abneh men Abb 58 Zur vorschriftsmäßigen Reinigung des Leuchtdeckels wie folgt vorgeh...

Страница 118: ...ten Abb 60 Abb 61 Wichtiger Hinweis Immer den Zustand der Dichtung kontrollie ren und sie bei Abnutzung durch eine neue ersetzen Die Dichtung A muss mindestens ein Mal im Jahr ausge tauscht werden Die Dichtung B anbringen und auf der ganzen durch die Pfeile bezeichneten Fläche mit Vaseline einfetten Die Rührschnecke einführen und den Kopf C auf die Welle D aufsetzen Hinweis Die Rührschnecke wird d...

Страница 119: ...tungen folgen 2 das Desinfektionsmittel in den Behälter füllen 3 die notwendige Zeit einwirken lassen siehe die Anleitungen des Desinfekti onsmittels 4 Das Desinfektionsmittel aus dem Behälter entfernen Danach muss der Behälter und der Verdampfer abgewaschen werden um die Rückstände des Desinfektionsmittels zu entfernen Achtung der Behälter muss von dem Desinfektionsmittel so gereinigt werden wie ...

Страница 120: ...eckdose gezogen werden 7 8 1 Lampenersetzung Zum Auswechseln der Lampe muss der Hauptschalter auf 0 stehen und der Stecker abgezogen sein Die zwei Schrauben lösen und die zwei Teile des Leuchtdeckels voneinander trennen für diesen Eingriff muss ein geeigneter Schraubenzieher benutzt wer den Abb 68 Die Glühbirne U aus der Halterung T entfernen und durch eine neue erset zen Den Deckel wieder aufsetz...

Страница 121: ...ne über einen längeren Zeitraum nicht benutzt wird die Batterie herausnehmen und an einem geeigneten Ort aufbewah ren Die Dauer einer neuen Batterie beträgt bei normalen Nutzungsbedin gungen circa ein Jahr Die aufgebrauchte Batterie muss entsprechend der geltenden Richtli nien des Landes in dem die Maschine benutzt wird entsorgt werden 7 10 Reinigung des Kondensators Die Reinigung des Kondensators...

Страница 122: ...Wartung Die Maschine muss regelmäßig und zwar mindestens ein Mal im Jahr von einem Fachmann überprüft werden Durch diese turnusmäßige Überprüfung soll das Sicherheits niveau aller installierten Komponenten und der Maschine selbst hoch gehalten werden Wenn eine Komponente abgenutzt ist muss sie durch ein neues Origina lersatzteil ersetzt werden Die Benutzung der Maschine ist verboten wenn auch nur ...

Страница 123: ...zeugt keine Gramolate Schalter in Stellung O Kap 6 Den Schalter auf I stellen Maschine in der Nähe von Wärmequellen An einem geeigneten Ort aufstellen Kap 5 Maschine unzureichend belüftet Kondensator verschmutzt Par 7 10 Den Fachtechniker rufen und eine gründliche Reinigung des Kondensators durchführen lassen Falsche Einstellung der Festigkeit Par 6 6 Festigkeit richtig einstellen Rührschnecke mac...

Страница 124: ...HALTPLAN GRANITAMASCHINE 1 BEHÄLTER 230V 50HZ Hinweis diese Linie hebt die Komponenten hervor die bei Maschinenbetrieb des erworbenen Modells vorhanden sind Hinweis diese Linie hebt die Komponenten hervor die bei Maschinenbetrieb des erworbenen Modells vorhanden sind 10 SCHALTPLAN GRANITAMASCHINE ...

Страница 125: ... 0 I MV M R T250 mA T250 mA per Tr 50VA T32 mA per Tr 3VA SCHALTPLAN GRANITAMASCHINE 1 BEHÄLTER MIT ELEKTRONISCHEM THERMOSTAT 230V 50HZ VERSION TS E Hinweis diese Linie hebt die Komponenten hervor die bei Maschinenbetrieb des erworbenen Modells vorhanden sind Hinweis diese Linie hebt die Komponenten hervor die bei Maschinenbe trieb des erworbenen Modells vorhanden sind ...

Страница 126: ...CHALTPLAN GRANITAMASCHINE 1 BEHÄLTER BRS 230V 50HZ VERSION TS E SCHALTPLAN GRANITAMASCHINE 1 BEHÄLTER 230V 50HZ VERSION TS V Hinweis diese Linie hebt die Komponenten hervor die bei Maschinenbetrieb des erworbenen Modells vorhanden sind ...

Страница 127: ...F 5A SCHALTPLAN GRANITAMASCHINE 2 BEHÄLTER 230V 50HZ T250 mA Hinweis diese Linie hebt die Komponenten hervor die bei Maschinenbetrieb des erworbenen Modells vorhanden sind Hinweis diese Linie hebt die Komponenten hervor die bei Maschinenbetrieb des erworbenen Modells vorhanden sind ...

Страница 128: ...NISCHEM THERMOSTAT 230V 50HZ VERSION TS E T250 mA SCHALTPLAN GRANITAMASCHINE 3 BEHÄLTER 230V 50HZ Hinweis diese Linie hebt die Komponenten hervor die bei Maschinenbe trieb des erworbenen Modells vorhanden sind Hinweis diese Linie hebt die Komponenten hervor die bei Maschinenbe trieb des erworbenen Modells vorhanden sind ...

Страница 129: ...ONISCHEM THERMOSTAT 230V 50HZ VERSION TS E T 5A SCHALTPLAN GRANITAMASCHINE 3 BEHÄLTER 115V 60HZ Hinweis diese Linie hebt die Komponenten hervor die bei Maschinenbe trieb des erworbenen Modells vorhanden sind Hinweis diese Linie hebt die Komponenten hervor die bei Maschinenbe trieb des erworbenen Modells vorhanden sind ...

Страница 130: ...or I G M Hauptschalter Motor Mischer I L Lichtschalter Deckel Behälter I L1 Lichtschalter Deckel Behälter 1 I L2 Lichtschalter Deckel Behälter 2 I L3 Lichtschalter Deckel Behälter 3 IG Hauptschalter IGM Hauptschalter Motor Mischer IM1 Schalter Motor Mischer Behälter 1 IM2 Schalter Motor Mischer Behälter 2 IM3 Schalter Motor Mischer Behälter 3 L L Beleuchtung Deckel Behälter L L1 Beleuchtung Deckel...

Страница 131: ... Behälter S c Deckelsensor S c1 Deckelsensor Behälter 1 S c2 Deckelsensor Behälter 2 S c3 Deckelsensor Behälter 3 S1 Deckelsensor Behälter 1 S2 Deckelsensor Behälter 2 S3 Deckelsensor Behälter 3 TE Elektronisches Thermostat Tm Thermostat Tm 1 Thermostat Behälter 1 Tm 2 Thermostat Behälter 2 Tm 3 Thermostat Behälter 3 Tr Transformator TR L Transformator ...

Страница 132: ...émarrer Granitore 2 3 granité boisson froide 12 6 7 Démarrage du Distributeur de Granités 2 3 13 6 8 Régler la consistance du granité 14 6 9 Débiter le granité 14 6 10 Situations d urgence 14 6 11 Couvercle avec éclairage 14 6 12 Afficheur de température du produit dans la cuve 15 7 PROCEDURES DE NETTOYAGE ET ENTRETIEN 15 7 1 Vider les réservoirs 16 7 1 1 Vider Granitore 1 granité 16 7 1 2 Vider G...

Страница 133: ...s le contenu de ce manuel 1 3 2 Destinataires Ce Manuel s adresse aux opérateurs et aux techniciens spécialisés Les opérateurs ne doivent pas exécuter les opérations réservées aux techniciens spécialisés Le Fabricant décline toute responsabilité en cas de dommages dérivant de la violation de cette interdiction Ce manuel d instructions fait partie intégrante de l appareil que vous venez d acheter i...

Страница 134: ... qui varient en fonction du modèle en votre possession sont A Couvercle du réservoir B Réglage de la densité C Réservoir D Tableau de commande E Thermostat électronique F Pieds G Cuvette d écoulement H Grille I Robinet L Levier du robinet D Pour faciliter la lecture des instructions nous avons utilisé dans cette notice les sigles suivants Granitore 1 granité désigne le distributeur de granités à 1...

Страница 135: ...commandes de la machine sont sur le tableau situé sur la partie la térale GRANITORE 1 GRANITE FIG 3 Les commandes du tableau sont A Interrupteur général su función es la de gobernar la mise sous tension de la machine et du réducteur qui actionne la vis s f de mélange du produit dans le réservoir la mise hors tension de toutes les fonctions présentes sur la machine B Interrupteur du circuit de froi...

Страница 136: ...érée cuve 2 la fonction de cet interrupteur est de commander la marche arrêt de l installation réfrigérée de la cuve 2 G Interrupteur installation réfrigérée cuve 3 la fonction de cet interrupteur est de commander la marche arrêt de l installation réfrigérée de la cuve 3 Fig 6 Fig 5 GRANITORE 2 3 GRANITE BOISSON FROIDE FIG 7 Les commandes du tableau sont A Interrupteur mélange cuve 1 la fonction d...

Страница 137: ... ou à haute concentration de poussières ou substances huileuses en suspension dans l air utiliser la machine dans un milieu à risque d incendie utiliser la machine pour distribuer des substances non adaptées aux caracté ristiques de celle ci Avant de nettoyer la machine vérifiez si le cordon d alimentation est débranché ne lavez pas la machine avec de l essence et ou des solvants quelle que soit l...

Страница 138: ...5 51 Nota bene les dimensions et le poids de l emballage sont in dicatifs Fig 9 4 2 Transport et levage Assurez vous que personne ne stationne dans le rayon d action des opérations de levage et transport de la charge Si les condi tions sont difficiles faites appel à des personnes chargées de vous assister et de contrôler les mouvements à effectuer Le levage manuel de la machine doit être effectué ...

Страница 139: ...ntérieur de la machine en cas de panne Nota bene Laissez un espace de 25 cm 10 pouces dans la partie supérieure Après avoir placé la machine emballée à proximité de la zone d installation procédez comme suit 1 coupez les cerclages qui assurent la fermeture de la boîte 2 soulevez la boîte en carton 3 positionnez ensuite la machine sur son emplacement Avant de mettre la machine en service la premièr...

Страница 140: ...oir versé le produit dans la cuve fermer avec le couvercle Attention ne pas mettre en fonction la machine si le couvercle n est pas sur la cuve Avant d enlever le couvercle éteindre la machine et enlever la fiche de la prise électrique Attention à l intérieur du réservoir se trouvent des organes en mouvement qui peuvent provoquer des lésions éteignez la machine et retirez la fiche de la prise de c...

Страница 141: ...mation sont exclues 6 5 Démarrer Granitore 2 3 granité Pour des raisons de simplicité nous illustrerons seulement comment actionner la cuve de droite pour actionner les autres cuves il suffit d effectuer la même séquence d opérations sur les interrupteurs des autres cuves Interrupteur sur I la machine est sous tension 6 3 Démarrer Granitore1 granité boisson froide Le réservoir de la machine avec l...

Страница 142: ...oir est commandé par deux interrupteurs qui doivent être action nés comme suit Interrupteur sur I le mélangeur est en marche Interrupteur sur I le circuit de froid est en fonction Nota bene le circuit de froid démarre uniquement si l interrup teur est sur I mélangeur en marche 6 6 Démarrer Granitore 2 3 granité boisson froide Pour des raisons de simplicité nous illustrerons seulement comment actio...

Страница 143: ...ctriquement Interrupteur B en position I Mélangeurs en fonction Pour obtenir un GRANITE Déviateurs D en position I Installation réfrigérée en fonction granités Pour obtenir une BOISSON FROIDE Déviateurs D en position II Installation réfrigérée en fonction boissons Pour exclure le REFRIGERATEUR agitation seulement Déviateurs D en position 0 Installation réfrigérée exclue agitation seule ment ALARME...

Страница 144: ...e robinet même ou en alternative laver avec un chiffon propre et désinfectant ou Prélever une petite quantité de produit du robinet avant de distribuer la dose pour le client 6 10 Situations d urgence ATTENTION dans toutes les situations d urgence pour arrêter la machine mettez l interrupteur général sur la position 0 En cas de gel éteignez la machine et adressez vous à un centre d assis tance ou ...

Страница 145: ...la machine dans un lave vaisselle ne séchez pas les pièces de la machine dans un four conventionnel et ou à micro ondes n immergez pas la machine dans l eau ne lavez pas la machine avec un tuyau d arrosage pour le nettoyage utilisez exclusivement de l eau tiède et un produit stérilisant ap proprié conforme au 21CFR1781010 conforme aux réglementations en vigueur dans le pays d utilisation qui ne pe...

Страница 146: ...at électronique et afficheur de tem pérature la procédure valable demeure celle indiquée ci après 7 1 1 Vider Granitore 1 granité La machine sous tension mettre l interrupteur sur 0 le circuit de froid est à l arrêt Fig 37 Vider entièrement le réservoir de produit Fig 38 Puis éteindre l interrupteur général mélangeur et retirer la fiche de la prise de courant Fig 39 7 1 2 Vider Granitore 1 granité...

Страница 147: ... l interrupteur général retirer la fi che de la prise de courant 7 1 4 Vidage du Distributeur de Granités 2 3 granités réfrigérateur à boissons Pour des raisons de simplicité nous illustrerons seulement le vidage de la cuve de droite pour vider les autres cuves il suffit d effectuer la même séquence d opérations en agissant sur les commandes des autres cuves La machine sous tension mettre le commu...

Страница 148: ...uvent être déposés dans une bassine d eau chaude envi ron 50 C avant d être lavés et stérilisés voir rubr 7 4 Fig 53 2 déposez le réservoir en le soulevant par l avant pour le désencastrer Fig 54 Il est interdit de démonter le robinet si le réservoir contient en core du produit ou un tout autre liquide 7 3 Démonter le réservoir et le couvercle Pour bien nettoyer et stériliser la machine tous les r...

Страница 149: ...e Lavez et stérilisez le couvercle Attention n immergez pas les couvercles avec éclairage dans un liquide Avant d effectuer les opérations de nettoyage et de stérilisation du couvercle il faut le démonter de la machine comme indiqué au paragraphe précédent 4 extraire la vis s f et retirer les joints A et B Fig 58 Pour nettoyer correctement le couvercle lumineux procédez comme suit 1 Nettoyez avec ...

Страница 150: ...Fig 61 Note importante vérifiez toujours l intégrité du joint qui doit être remplacé avec un joint nouveau en cas d usure Le joint A doit être remplacé au moins une fois par an Installez le joint B en la lubrifiant avec de la vaseline sur toute la superficie indiquée par les flèches Introduisez la vis s f de manière à enclencher la tête C dans l arbre D Nota bene pour embrayer la vis s f il suffit...

Страница 151: ...nstructions reportées sur l emballage du produit stérilisant 2 versez la solution stérilisante dans le réservoir 3 laissez agir le temps nécessaire voir les instructions du produit stérilisant 4 videz le réservoir contenant la solution stérilisante avec le robinet Ensuite il faut rincer le réservoir et l évaporateur pour éliminer les résidus de solution stérilisante Attention le rinçage du réservo...

Страница 152: ...ez le connecteur de la prise 7 8 1 Remplacer l ampoule Le remplacement de la lampe doit être effectué avec l interrup teur général sur la position 0 et la fiche débranchée Séparez les deux parties du couvercle avec éclairage en dévissant les deux vis pour effectuer cette opération utilisez un tournevis Fig 68 Retirez l ampoule U de la douille T et remplacez la par une neuve Remontez les deux parti...

Страница 153: ... et conservez la dans un lieu approprié La durée de vie d une batterie neuve dans des conditions d utilisation normales est d environ un an La batterie à plat doit être mise à la décharge conformément à la régle mentation en vigueur dans le pays où la machine est utilisée 7 10 Nettoyer le condensateur Le nettoyage du condensateur est de la compétence exclu sive du technicien spécialisé qui devra o...

Страница 154: ...ine doit être vérifiée par un technicien spécialisé pé riodiquement au moins une fois par an Ce contrôle périodique sert à conserver le haut niveau de sé curité de la machine et de tous ses composants Dans le cas où un composant est usé il doit être remplacé par une nouvelle pièce originale L utilisation de la machine est interdite quand un composant est défectueux ou usé L entretien périodique es...

Страница 155: ...machine ne fait pas de granité L interrupteur est sur la position O Rubr 6 Appuyez sur la position I La machine est à proximité de sources de chaleur Installez la machine dans un lieu adapté Rubr 5 La machine n est pas suffisamment aérée Le condensateur est sale Rubr 7 10 Appelez un technicien spécialisé pour effectuer un nettoyage approprié du condensateur La consistance est mal réglée Rubr 6 6 R...

Страница 156: ...T250 mA SCHEMAS DES CIRCUITS ELECTRIQUES DU DISTR À 1 RÉSERVOIR 230V 50HZ Note cette ligne repré sente les composants présents dans la machine en fonction du modèle acheté Note cette ligne repré sente les composants présents dans la machine en fonction du modèle acheté 10 SCHEMAS DES CIRCUITS ELECTRIQUES ...

Страница 157: ...m Fc Tx Fc MTx t FuA D G B II 0 I MV M R T250 mA T250 mA per Tr 50VA T32 mA per Tr 3VA SCHEMA ELECTRIQUE MACHINE A GRANITES 1 CUVE AVEC THERMOSTAT ELECTRONIQUE 230 V 50 HZ VERSION TS E Note cette ligne repré sente les composants présents dans la machine en fonction du modèle acheté Note cette ligne représente les composants présents dans la machine en fonction du modèle acheté ...

Страница 158: ...EMA ELECTRIQUE MACHINE A GRANITES 1 CUVE BRS 230 V 50 HZ VERSION TS E SCHEMA ELECTRIQUE MACHINE A GRANITES 1 CUVE 230 V 50 HZ VERSION TS V Note cette ligne repré sente les composants présents dans la machine en fonction du modèle acheté ...

Страница 159: ...RS 115V 60HZ F 5A SCHEMAS DES CIRCUITS ELECTRIQUES DU DIST À 2 RÉSERVOIRS 230V 50HZ T250 mA Note cette ligne repré sente les composants présents dans la machine en fonction du modèle acheté Note cette ligne repré sente les composants présents dans la machine en fonction du modèle acheté ...

Страница 160: ...EC THERMOSTAT ELECTRONIQUE 230 V 50 HZ VERSION TS E T250 mA SCHEMAS DES CIRCUITS ELECTRIQUES DU DIST À 3 RÉSERVOIRS 230V 50HZ Note cette ligne représente les composants présents dans la machine en fonction du modèle acheté Note cette ligne représente les composants présents dans la machine en fonction du modèle acheté ...

Страница 161: ...VEC THERMOSTAT ELECTRONIQUE 230 V 50 HZ VERSION TS E T 5A SCHEMAS DES CIRCUITS ELECTRIQUES DU DIST À 3 RÉSERVOIRS 115V 60HZ Note cette ligne représente les composants présents dans la machine en fonction du modèle acheté Note cette ligne représente les composants présents dans la machine en fonction du modèle acheté ...

Страница 162: ...général Moteur mélangeur I L Interrupteur lumière couvercle réservoir I L1 Interrupteur lumière couvercle réservoir 1 I L2 Interrupteur lumière couvercle réservoir 2 I L3 Interrupteur lumière couvercle réservoir 3 IGM Interrupteur général IM1 Interrupteur moteur mélangeur réservoir 1 IM2 Interrupteur moteur mélangeur réservoir 2 IM3 Interrupteur moteur mélangeur réservoir 3 L L Lumière couvercle r...

Страница 163: ...seur couvercle S c1 Senseur couvercle réservoir 1 S c2 Senseur couvercle réservoir 2 S c3 Senseur couvercle réservoir 3 S1 Sonde couvercle cuve 1 S2 Sonde couvercle cuve 2 S3 Sonde couvercle cuve 3 TE Thermostat électronique Tm Thermostat reservoir Tm 1 Thermostat reservoir 1 Tm 2 Thermostat reservoir 2 Tm 3 Thermostat reservoir 3 Tr Transformateur TR L Transformateur ...

Страница 164: ......

Отзывы: