background image

19 


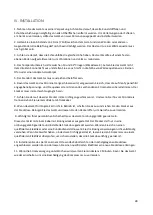
IV. INSTALLATION: 


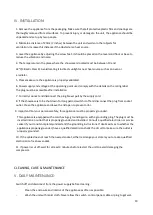
1. Remove the appliance from the packaging. Make sure that all protective plastic film and coatings are 
thoroughly removed from all surfaces. To prevent injury or damage to the unit, the appliance should be 
unpacked and set up by two people. 

2. Maintain a distance of 20cm (7 inches) between the unit and walls or other objects for 
ventilation. Increase this distance if the obstacle is a heat source. 

3. Level the appliance by adjusting the screw feet. It should be placed on the level solid floor or base to 
reduce the vibration and noise. 

4. The temperature in the place where the showcase is located must be between 10 and 

32

(Climatic Class 4). Avoid locating it in direct sunlight or near heat source such as an oven or 

a radiator. 

5. Please make sure the appliance is properly ventilated. 

6. Power supply and voltage at the operating point used comply with the details on the rating label. 
The plug must be accessible after installation 

7. Correctly connect and disconnect the plug. Never pull by the supply cord. 

8. If the showcase is to be shut down for long period, switch it off and disconnect the plug from socket 
outlet. Clean the appliance and leave the lid open to prevent odor. 

 9. Important! For your personal safety, this appliance must be properly grounded. 

This appliance is equipped with a cord having a grounding wire, with a grounding plug. The plug must be 
inserted into an outlet that is properly grounded and installed. Consult a qualified electrician or service 
center if you do not completely understand the grounding instructions. If doubt exits as to whether the 
appliance is properly grounded, have a qualified electrician check the circuit to make sure the outlet is 
properly grounded. 

10. If the cable does not reach the nearest socket, either rearrange your store layout or ask a qualified 
electrician to fix a new socket. 

11. If power is cut off, wait for at least 3 minutes before restart the unit to avoid damaging the 
compressor. 


CLEANING, CARE & MAINTENANCE 

V. DAILY MAINTENANCE: 


Switch off and disconnect from the power supply before cleaning. 

Clean the enclosure and interior of the appliance as often as possible. 

Wash the unit with moist cloth. Never allow the switch, control panel, cable or plug to get wet. 

Содержание BERING03

Страница 1: ...ORI DI TEMPERATURA BLAST CHILLERS SCHOCKFROSTER ABATIDOR DE TEMPERATURA BERING03 BERING05 BERING10 BERING14 BERING14 BERING05E BERING10E BERING14E Manuale d uso User manual Betriebsanleitung Manual de...

Страница 2: ...2...

Страница 3: ...ES 18 IV INSTALLATION 19 V DAILY MAINTENANCE 19 VI SPECIAL MAINTENANCE 20 VII TROUBLESHOOTING 20 VIII DISPOSAL 22 I EINLEITUNG 24 II SICHERHEITSANWEISUNGEN 25 III MERKMALE 27 IV INSTALLATION 28 V T GL...

Страница 4: ...ERING05 BERING10 BERING14 BERING14 BERING05E BERING10E BERING14E Manuale d uso IMPORTANTE Per la vostra sicurezza leggete attentamente il manuale prima di installare o usare questo prodotto Conservare...

Страница 5: ...semplice installazione e per garantire il miglior utilizzo dell apparecchio Per la vostra sicurezza leggete attentamente il manuale prima di montare o utilizzare questo prodotto Conservare questo man...

Страница 6: ...truttura incorporata libere da ostruzioni NON usare dispositivi meccanici o altri mezzi per accelerare il processo di sbrinamento diversi da quelli raccomandati dal produttore NON danneggiare il circu...

Страница 7: ...n adatto all installazione in un area dove potrebbe essere usato un getto d acqua Non deve essere pulito da un getto d acqua Per garantire un funzionamento sicuro assicurarsi che l apparecchio sia imp...

Страница 8: ...40 18 40 18 40 18 40 Gas refrigerante e quantit di carica g R290 150 R452A 1100 R452A 1300 R290 76 Alimentazione AC230V 50Hz AC380V 50Hz AC380V 50Hz AC230V 50Hz Potenza nominale Assorbimento W 630 120...

Страница 9: ...dentificazione La spina deve essere accessibile dopo l installazione 7 Collegare e scollegare correttamente la spina Non tirare mai il cavo di alimentazione direttamente 8 Se l apparecchio deve rimane...

Страница 10: ...zione quando si pulisce la parte posteriore dell apparecchio Se necessario le riparazioni devono essere effettuate da un agente o da un tecnico qualificato Se l apparecchio deve rimanere inattivo per...

Страница 11: ...apparecchio si accende ma la temperatura troppo alta bassa Troppo ghiaccio sull evaporatore Fermare la macchina e sbrinare manualmente Condensatore bloccato dalla polvere Chiamare un tecnico qualifica...

Страница 12: ...stituire la sonda Ci sono perdite di gas o di fluido refrigerante Identificare la perdita e chiudere far eseguire il controllo e la riparazione da un tecnico specializzato Le alette del condensatore s...

Страница 13: ...ante non sia danneggiato prima dello smaltimento Potete contribuire alla consapevolezza ambientale insistendo su un metodo di smaltimento appropriato e non inquinante Le informazioni relative al refri...

Страница 14: ...ERING03 BERING05 BERING10 BERING14 BERING14 BERING05E BERING10E BERING14E User s manual IMPORTANT For your safety read this manual carefully before installing or using this product Save this manual fo...

Страница 15: ...estions that must be followed for simpler installation and to ensure the best use of the appliance For your safety read the manual carefully before assembling or using this product Save this manual fo...

Страница 16: ...re clear of obstruction DO NOT use mechanical device or other means to accelerate the defrosting process other than those recommended by the manufacturer DO NOT damage the refrigerant circuit DO NOT s...

Страница 17: ...ppliance For indoor used only Not suitable for installation in an area where a water jet could be used Must not be cleaned by a water jet To guarantee safe operation ensure that the appliance is set u...

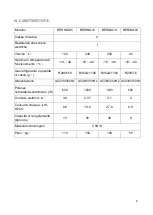
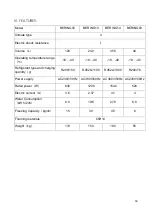
Страница 18: ...0 18 40 18 40 18 40 Refrigerant type and charging quantity g R290 150 R452A 1100 R452A 1300 R290 76 Power supply AC230V 50Hz AC380V 50Hz AC380V 50Hz AC230V 50Hz Rated power W 630 1200 1540 520 Electri...

Страница 19: ...ply cord 8 If the showcase is to be shut down for long period switch it off and disconnect the plug from socket outlet Clean the appliance and leave the lid open to prevent odor 9 Important For your p...

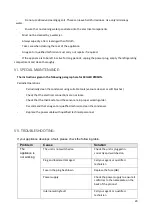
Страница 20: ...dically clean the condenser using suitable tools vacuum cleaner or soft brushes Check that the electrical connections are not loose Check that the thermostat and the sensor are in proper working order...

Страница 21: ...liance has not been installed in a level or stable position Check installation position and change if necessary The appliance has difficulty in reaching and or maintaining the set temperature The set...

Страница 22: ...s not damaged prior to disposal You can contribute to environmental awareness by insisting on an appropriate non polluting method of disposal Information concerning the refrigerant and insulation mate...

Страница 23: ...ERING14 BERING14 BERING05E BERING10E BERING14E BEDIENUNGSANLEITUNG WICHTIG Um Ihrer Sicherheit willen lesen Sie bitte diese Bedienungsanleitung vor der Installation und Inbetriebnahme des Ger tes sorg...

Страница 24: ...ion m ssen die in dieser Anleitung enthaltenen wichtigen Hinweise und Ratschl ge beachtet Lesen Sie dieses Handbuch zu Ihrer Sicherheit sorgf ltig durch bevor Sie das Produkt installieren oder benutze...

Страница 25: ...mmer frei Verwenden Sie KEINE mechanischen Vorrichtungen oder andere Mittel zur Beschleunigung des Abtauprozesses die nicht vom Hersteller empfohlen werden Der K ltemittelkreislauf darf NICHT besch di...

Страница 26: ...Innenbereich Es darf nicht in einem Bereich positioniert werden in dem es mit Wasser in Ber hrung kommen k nnte Es darf nicht mit einem Wasserstrahl gereinigt werden Um einen sicheren Betrieb zu gew h...

Страница 27: ...0 18 40 18 40 18 40 K ltemittelgas und F llmenge g R290 150 R452A 1100 R452A 1300 R290 76 Stromversorgung AC230V 50Hz AC380V 50Hz AC380V 50Hz AC230V 50Hz Stromleistung Watt 630 1200 1540 520 Elektrisc...

Страница 28: ...zes bereinstimmen Der Stecker muss immer leicht zug nglich sein 7 Achten Sie darauf dass der Stecker immer richtig angeschlossen ist Und wenn Sie ihn vom Stromkreis trennen ziehen Sie niemals direkt a...

Страница 29: ...ung muss das Ger t immer mit einem weichen Tuch getrocknet werden Seien Sie vorsichtig bei der Reinigung der R ckseite des Ger ts Falls erforderlich muss die Reparatur von einem qualifizierten Vertret...

Страница 30: ...eingeschaltet aber die Temperatur ist zu niedrig oder zu hoch Es befindet sich zu viel Eis auf dem Verdampfer Stoppen Sie das Ger t und lassen sie es manuell abtauen Staub verstopft den Verdampfer Ru...

Страница 31: ...ura o sostituire la sonda Er verliert Gas oder K ltemittel Stellen Sie fest wo es das Gas oder das K ltemittel veliert und stoppen sie den Austritt lassen Sie diese Arbei von einem qualifizierten Tech...

Страница 32: ...ltemittelkreislauf vor der Entsorgung nicht besch digt ist Sie k nnen zum Umweltschutz beitragen indem Sie auf eine angemessene und umweltfreundliche Entsorgungsmethode achten Informationen ber das K...

Страница 33: ...33 ABATIDOR DE TEMPERATURA BERING03 BERING05 BERING10 BERING14 BERING14 BERING05E BERING10E BERING14E Manual del usuario Lea atentamente las instrucciones antes de utilizarlo...

Страница 34: ...iones y sugerencias que deben seguirse para facilitar la instalaci n y garantizar el mejor uso del aparato Por su seguridad lea atentamente este manual antes de instalar o utilizar este producto Conse...

Страница 35: ...ceso de descongelaci n que no sean los recomendados por el fabricante NO da e el circuito de refrigerante NO se ponga de pie ni se apoye en el aparato NO permita que el aceite o la grasa entren en con...

Страница 36: ...cene sustancias explosivas como botes de spray con propelente inflamable en esta unidad El BERING05 BERING03 utiliza el refrigerante R290 preste atenci n a la protecci n contra incendios y explosiones...

Страница 37: ...e nunca del cable de alimentaci n directamente 8 Si el aparato va a estar apagado durante un periodo prolongado ap guelo y desench felo Limpie el aparato y deje la tapa abierta para evitar los olores...

Страница 38: ...u s de la limpieza Tenga cuidado al limpiar la parte trasera del aparato Si es necesario las reparaciones deben ser realizadas por un t cnico cualificado Si el aparato va a permanecer inactivo durante...

Страница 39: ...l aparato se enciende pero la temperatura es demasiado alta baja Demasiado hielo en el evaporador Parar la m quina y descongelar manualmente Condensador bloqueado por el polvo Llamar a un t cnico cual...

Страница 40: ...de temperatura o sustituirla Hay fugas de gas o de l quido refrigerante Identificar la fuga y cerrarla hacerla revisar y reparar por un especialista Las aletas del condensador est n cubiertas de polvo...

Страница 41: ...aci n Se puede contribuir a la concienciaci n medioambiental insistiendo en un m todo de eliminaci n adecuado y no contaminante Las informaciones sobre el refrigerante y los materiales de aislamiento...

Страница 42: ...42...

Отзывы: