background image

43

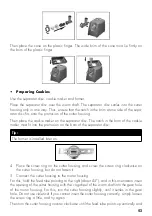
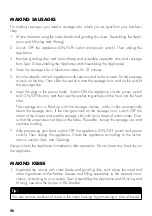
Then place the cone on the plastic finger. The wide brim of the cone must lie firmly on 

the brim of the plastic finger.

•  Preparing Cookies

Use the separator disc, cookie maker and former.
Place the separator disc over the worm shaft. The separator disc settles into the cutter 

housing only in one way. Thus, ensure that the notch in the brim at one side of the sepa-

rator disc fits onto the protrusion of the cutter housing.
Then place the cookie maker on the separator disc. The notch in the brim of the cookie 

maker must fit into the protrusion on the brim of the separator disc.

Tip:

The former is installed later on.

4.   Place the screw ring on the cutter housing, and screw the screw ring clockwise on 

the cutter housing, but do not fasten it.

5.   Connect the cutter housing to the motor housing.
For this, hold the feed tube pointing to the right (about 45°), and in this orientation insert 

the opening of the cutter housing with the cogwheel of the worm shaft into the gear hole 

of the motor housing. For this, turn the cutter housing slightly, until it settles in the gear 

hole. Do not use violence! If you cannot insert the cutter housing correctly, simply loosen 

the screw ring a little, and try again.
Then turn the cutter housing counter clockwise until the feed tube points up vertically and 

Содержание Design Fleischwolf Pro M

Страница 1: ...Bedienungsanleitung vor Gebrauch unbedingt lesen Modell und Zubehöränderungen vorbehalten Nur für den Hausgebrauch BEDIENUNGSANLEITUNG DESIGN FLEISCHWOLF PRO M Art Nr 41408 Design Fleischwolf Pro M ...

Страница 2: ...ogeräten 8 Bewegliche Bauteile Verletzungsgefahr 9 Technische Daten 10 Vor der ersten Verwendung 10 Eigenschaften Ihres Design Fleischwolfes Pro M 11 Netzschalter 11 Die Betriebsarten ON OFF und REVERSE 11 Werkzeuge 12 Tipps für beste Ergebnisse 13 Bedienung 14 Das Gerät zusammensetzen 14 Zerkleinern und Mischen 15 Würste stopfen 16 Fleischtaschen Kebbe 16 Spritzgebäck 17 Beseitigen von Problemen ...

Страница 3: ...Mühelos zer kleinern und mischen Sie damit die Zutaten für Frikadellen und Gehacktes oder bereiten Ihre eigenen raffinierten Wurstspezialitäten oder Füllungen für Ravioli und Tortellini zu immer ganz frisch Bitte lesen Sie diese Bedienungsanleitung sorgfältig durch Sie können am schnellsten alle Vorteile Ihres neuen Fleischwolfs nutzen wenn Sie sich vor Inbetriebnahme über alle Eigenschaften infor...

Страница 4: ...ttel d Netzschalter E Ein Aus Taste ON OFF Schaltet den Motor aus und in Vorwärtsrichtung ein F Entriegelungstaste G Motorgehäuse Kupplungsöffnung hier installie ren Sie das Fleischwolfgehäuse K Schnecke transportiert die Nahrungsmittel im Fleischwolfgehäuse N Klemmschraube Werkzeuge Zubehör Zerkleinern und Mischen L Messerkreuz M Grobe Lochscheibe I Feine Lochscheibe J Mittlere Lochscheibe Würste...

Страница 5: ...t nicht in Booten oder fahrenden Fahrzeugen Verwenden Sie nur Bauteile Zubehöre und Ersatzteile für das Gerät die vom Hersteller für diesen Zweck vorgesehen und empfohlen sind Beschädigte oder ungeeignete Bauteile und Zubehöre können während des Betriebes brechen schmelzen sich verformen und zur Überhitzung führen sowie Sachschäden und Personenschäden verursachen Überprüfen Sie regelmäßig die Baut...

Страница 6: ...elen Die Reinigung und Wartung des Gerätes darf nicht von Kindern ohne Aufsicht durchgeführt werden Dieses Gerät darf nicht von Kindern benutzt werden Das Gerät und sein Netzkabel sind von Kindern fernzuhalten Niemals Kinder mit dem Gerät den Bauteilen oder dem Verpackungsma terial spielen lassen Ziehen Sie den Netzstecker des Gerätes immer aus der Steckdose wenn das Gerät unbeaufsichtigt gelassen...

Страница 7: ...e bis der Motor vollständig zum Stillstand gekommen ist bevor Sie das Gerät bewegen oder reinigen oder Teile abnehmen oder einbauen und wenn Sie das Gerät nicht benutzen Fassen Sie das Motorgehäuse immer an beiden Seiten unten an wenn Sie das Motorgehäuse bewegen wollen Niemals das Gerät am Fleischwolfgehäuse halten um es zu bewegen Wenn das Netzkabel dieses Gerätes beschädigt wird muss es durch d...

Страница 8: ... Ausland erfüllen die genannten Voraussetzungen eventu ell nicht Da im Ausland zum Teil abweichende Normen für Stromversorgungen gelten können wir das Gerät nicht für alle möglichen Stromversorgungen kon struieren und testen Wenn Sie das Gerät im Ausland betreiben wollen dann vergewissern Sie sich bitte zuerst dass ein gefahrloser Betrieb dort möglich ist Verwenden Sie keine Verlängerungskabel ode...

Страница 9: ... wird Niemals mit den Händen in den Füllschacht greifen oder Haare Klei dungsstücke Bürsten Tücher oder andere Fremdkörper Beispiel Knochen Stiele von Gemüse Kochbesteck in den Füllschacht oder in den Auswurf des Fleischwolfgehäuses stecken oder halten wenn der Netzstecker in der Steckdose steckt Vergewissern Sie sich immer dass keine Fremdkörper im Füllschacht oder dem Fleischwolfgehäuse stecken ...

Страница 10: ...nd alle Zubehöre vorsichtig aus dem Karton und vergewis sern Sie sich dass alle Bauteile und Zubehöre vorhanden und unbeschädigt sind Hinweis Der Stopfer ist hohl und einige Werkzeuge sind eventuell in seinem Inneren enthalten Öffnen Sie den Deckel des Stopfers einfach abheben und nehmen Sie die Werkzeuge heraus 2 Entfernen Sie vor der Verwendung unbedingt alle Verpackungen und Werbemateri alien v...

Страница 11: ...t vollständig auszuschalten Wenn das Gerät eingeschaltet und an die Stromversorgung angeschlossen ist dann leuchten die beiden Betriebstasten Ein Aus Taste ON OFF und Rücklauf Taste REVERSE auf der Oberseite des Motorgehäuses weiß auf Schalten Sie das Gerät immer zusätz lich am Netzschalter AUS wenn Sie das Gerät für einige Minuten nicht benutzen DIE BETRIEBESTASTEN ON OFF UND REVERSE Mit den beid...

Страница 12: ...llen von Fleischtaschen Kebbe Spritzgebäckvorsatz und Formblech zum Herstellen von Spritzgebäck Hierfür brauchen Sie ebenfalls die Trennscheibe ACHTUNG Verwenden Sie immer nur einen zusammengehörigen Satz von Werk zeugen Verwenden Sie zum Zerkleinern immer nur eine der drei mitgelieferten Lochschei ben Wählen Sie die Lochscheibe zum Zerkleinern nach der Beschaffenheit der Nahrungsmit tel und dem g...

Страница 13: ...die Sie jeweils in 2 bis 3 Minu ten mit dem Fleischwolf verarbeiten können Schalten Sie den Fleischwolf nach jeder Portion AUS während Sie die nächste Portion vorbereiten damit der Motor in dieser Zeit abkühlen kann Schneiden Sie Fleisch und Nahrungsmittel mit ähnlicher Beschaffenheit in etwa 10cm lange und 2cm dicke Streifen Schneiden Sie festere Nahrungsmittel in höchstens 1cm große Würfel Wenn ...

Страница 14: ...arte oder scharfkantige Gegenstände Beispiel Gabeln Mes ser für die Arbeit mit dem Gerät verwenden um eine Beschädigung der Oberflächen zu vermeiden Niemals die Nahrungsmittel auf dem Tablett des Gerätes schneiden Nie mals Gewalt anwenden DAS GERÄT ZUSAMMENSETZEN WARNUNG Die Unterlage muss ausreichend fest stabil trocken eben und sauber sein Legen Sie keine Tücher oder Servietten über oder unter d...

Страница 15: ... ein Setzen Sie zum Zerkleinern immer nur eine der Lochscheiben am Gerät ein ZERKLEINERN UND MISCHEN Verwenden Sie das Messerkreuz und eine der Lochscheiben Setzen Sie das Messerkreuz mit den Schneiden nach oben vorsichtig auf die Schnecke und drehen Sie das Messerkreuz bis es über der Welle der Schnecke nach unten glei tet Das Messerkreuz darf nicht über den Rand des Fleischwolfgehäuses hinausste...

Страница 16: ...schwolfgehäuse liegen muss Wenn die Trennscheibe richtig eingelegt ist dann kann sie nicht über dem Rand des Fleischwolfgehäuses gedreht werden Setzen Sie danach den Wurstaufsatz auf die Trennscheibe so dass der weite Rand des Wurstaufsatzes gleichmäßig auf der Trennscheibe aufliegt VORBEREITUNG VON FLEISCHTASCHEN KEBBE Verwenden Sie den Kunststofffinger und den Konus Legen Sie den Kunststofffinge...

Страница 17: ...nn die Trennscheibe richtig eingelegt ist dann kann sie nicht über dem Rand des Fleischwolfgehäuses gedreht werden Setzen Sie den Gebäckaufsatz auf die Trennscheibe Die Rille im Gebäckaufsatz muss dabei über dem Vorsprung auf der Trennscheibe liegen so dass der Gebäckaufsatz nicht über der Trennscheibe gedreht werden kann Hinweis das Formblech setzen Sie erst später ein 4 Setzen Sie die Klemmschra...

Страница 18: ... der Klemmschraube um eine Beschädigung des Gewindes zu vermeiden 8 Setzen Sie die Fleischwanne mit ihrer Öffnung auf den Füllschacht und drücken Sie sie leicht nach unten bis sie ohne zu wackeln stabil sitzt Das Gerät ist jetzt bereit zur Verwendung ZERKLEINERN UND MISCHEN WARNUNG Niemals mit den Händen in den Füllschacht oder die Auswurföffnung greifen oder irgendwelche Fremdkörper Beispiel Koch...

Страница 19: ...n Sie dann die Nahrungsmittel mit dem Stopfer in den Füllschacht Drücken Sie die Nahrungsmittel leicht und ohne Gewaltanwendung nach unten Tipp Sie können grobe Reste von Fleisch aus dem Fleischwolfgehäuse entfernen indem Sie eine Brotscheibe verarbeiten 4 Sobald Sie mit der Arbeit fertig sind schalten Sie das Gerät mit der Ein Aus Taste und am Netzschalter AUS Ziehen Sie den Netzstecker aus der S...

Страница 20: ...in Aus Taste und Netzschalter und ziehen Sie den Netzstecker aus der Steckdose Reinigen Sie danach das Gerät nach der Anleitung in Kapitel Pflege und Reinigung Reinigen Sie das Gerät sofort nach der Verwendung Lassen Sie keine Nahrungsmittel auf dem Gerät antrocknen FLEISCHTASCHEN KEBBE 1 Bereiten Sie den Fleischwolf zum Zerkleinern des Fleisches mit Messerkreuz und Lochscheibe vor siehe Das Gerät...

Страница 21: ...chfüllung Verschließen Sie dann die Enden der Kebbe Hüllen Die Fleischta schen Kebbe sind nun bratfertig SPRITZGEBÄCK 1 Bereiten Sie den Teig für das Gebäck nach Ihrem Rezept zu Stellen Sie den Teig eventuell vor der Verarbeitung für etwa 1 2 Stunde in den Kühlschrank 2 Bereiten Sie den Fleischwolf für Spritzgebäck mit Trennscheibe Gebäckaufsatz und Formblech vor siehe Das Gerät zusammensetzen 3 G...

Страница 22: ...ständig AUS und ziehen Sie den Netzstecker aus der Steckdose Zerlegen Sie das Gerät um das Hindernis zu entfernen siehe Das Gerät zerlegen Lassen Sie das Gerät abkühlen siehe Überhitzungs schutz Wenden Sie sich an eine autorisierte Fachwerkstatt Der Rücklauf startet nicht Die ON OFF Taste leuchtet blau Sie können den Rücklauf nur ein schalten wenn die ON OFF Taste ausgeschaltet ist leuchtet weiß S...

Страница 23: ...Rücklauf startet erst nach etwa 4 Sekunden Zusätzlich arbeitet der Motor nur etwa 5 Sekunden lang in Rückwärts bewegung und schaltet sich danach automatisch AUS Im Allgemeinen genügt es jedoch wenn Sie den Rücklauf des Motors nur für einen Moment einschalten 3 Sie können die Rücklauffunktion jederzeit AUSschalten Drücken Sie dazu die Ein Aus Taste ON OFF Die Betriebestasten leuchten danach wieder ...

Страница 24: ...l dazu Mischen Sie Zwiebel Lammfleisch und Weizengrütze noch einmal gut durch und verar beiten Sie die Mischung noch zwei weitere Male im Fleischwolf Verwenden Sie dazu die feine Lochscheibe Die Mischung ist danach fertig für die Bearbeitung mit dem Kebbe Aufsatz Füllung 400g Lammfleisch in Streifen geschnitten 15ml 1 Esslöffel Öl 2 mittelgroße Zwiebeln fein gehackt 5 10ml 1 2 Esslöffel Piment gem...

Страница 25: ...t immer zuerst mit der Ein Aus Taste und am Netzschalter AUS ziehen Sie den Netzstecker aus der Steckdose und warten Sie bis der Motor vollständig zum Stillstand gekommen ist bevor Sie Bauteile abnehmen und oder das Gerät reinigen 1 Schalten Sie das Gerät mit der Ein Aus Taste und dann am Netzschalter AUS und warten Sie bis der Motor vollständig zum Stillstand gekommen ist Ziehen Sie dann den Netz...

Страница 26: ...n Sie ein sauberes Tuch oder einen weichen Spülschwamm mit etwas warmer Spülmittellösung an und wischen Sie damit die Außenseiten des Gerätes und das Netzkabel ab WARNUNG Achten Sie darauf dass das Gerät und alle Bauteile und Zubehöre stets für kleine Kinder unzugänglich sind 3 Trocknen Sie das Motorgehäuse und alle Teile danach sorgfältig ab und lassen Sie die Teile etwa Stunde an der Luft trockn...

Страница 27: ...dem Fleischwolfgehäuse halten wenn Sie das Gerät bewegen Fassen Sie das Motorgehäuse immer an beiden Seiten unten an um es zu bewegen 5 Fassen Sie das Motorgehäuse mit beiden Händen an den Seiten unten an und stel len Sie es auf eine geeignete Oberfläche von der es nicht herunter fallen kann und zu der kleine Kinder keinen Zugang haben Sie sollten die Bauteile und Werkzeuge am selben Ort aufbewahr...

Страница 28: ...icklung möchten wir Sie bitten Gastroback Produkte an folgende Anschrift zu senden Gastro back GmbH Gewerbestr 20 21279 Hollenstedt Kunden anderer Länder Bitte kontaktieren Sie Ihren Händler Bitte haben Sie dafür Verständnis dass unfreie Sendungen nicht angenommen werden können Einsendung von Geräten Bitte verpacken Sie das Gerät transportsicher ohne Zubehör und legen Sie den Garantiebeleg sowie e...

Страница 29: ...Read all provided instructions before first usage Model and attachments are subject to change For household use only OPERATING INSTRUCTIONS DESIGN FLEISCHWOLF PRO M Art No 41408 Design Fleischwolf Pro M ...

Страница 30: ... CONTENTS Knowing Your Design Mincer Pro M 32 Important Safeguards 33 Important Safeguards for Electrical Appliances 35 Moving Parts Risks of Injuries 36 Technical Specifications 37 Before First Use 37 Properties of Your Design Mincer Pro M 38 Tools 39 Tips for Best Results 39 Operation 40 Assembling the Appliance 40 Mincing and Mixing 44 Making Sausages 45 Making Kebbe 45 Making Cookies 46 Solvin...

Страница 31: ...ts for meat balls vegetable burgers and minced meat With great refinement you can prepare your own sausage specialities or fillings for ravioli or tortellini always really fresh These instructions for use will inform you about the various functions and features which makes it easy to take pleasure in your new mincer We hope that you will enjoy your new mincer Your Gastroback GmbH ...

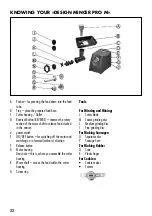
Страница 32: ...N OFF button for switching off the motor and switching on in forward ordinary direction F Release button G Motor housing Gear hole this is where you assemble the cutter housing K Worm shaft moves the food within the cutter housing N Screw ring Tools For Mincing and Mixing L Cutter blade M Coarse grinding disc J Medium grinding disc I Fine grinding disc For Making Sausages O Separator disc P Sausag...

Страница 33: ...e is likely to be damaged if the appliance has been subject to inadmissible strain e g overheating mechanical or electric shock or if there are any cracks excessively frayed or melted parts or distortions or if the appliance is not working properly In this case immediately unplug the appliance and return the entire appliance including all parts and accessories to an authorised service centre for e...

Страница 34: ... children without supervision Do not use any hard sharp or edged objects e g knives forks with the appliance Only use the provided pusher for feeding food into the feed tube Do not handle the appliance or any part of it with violence Do not let the motor work continuously for more than 3 minutes Always use only one mat ching sets of tools to avoid damage See Knowing Your Design Mincer Pro M For mi...

Страница 35: ...shwasher Do not leave any food dry on the appliance Always clean the appliance after each use to prevent a build up of baked on foods see Care and Clea ning Always keep the appliance and the tools clean IMPORTANT SAFEGUARDS FOR ELECTRICAL APPLIANCES The appliance is driven electrically Place the appliance near a suitable wall power socket to connect the appliance directly to a protected mains powe...

Страница 36: ...e motor housing or power cord immediately unplug and switch OFF ON OFF button and power switch the appliance If the supply cord is damaged it must be replaced by the manufacturer its service agent or similarly qualified persons in order to avoid a hazard MOVING PARTS RISKS OF INJURIES The mincer is suited for finely chopping food Thus moving parts of the appli ance can cause severe injuries when u...

Страница 37: ... Weight 5 35kg Dimensions width x depth x height ca 16 5cm x 36 0cm x 37 0cm Certification www tuv com ID 1419041714 BEFORE FIRST USE WARNING DO NOT let young children play with the appliance or any part of it or the packaging 1 Unpack the appliance and all accessories carefully and check that no parts are damaged or missing Tip The pusher is hollow and some tools may be stored in its interior Rem...

Страница 38: ...the appliance connected to the power supply the indi cators of the operating buttons on top of the motor housing ON OFF and REVERSE illuminate white Always switch OFF the appliance at the power switch when it is not in use for several minutes The Buttons ON OFF and REVERSE Using the operating buttons ON OFF and REVERSE you switch the motor on and off The arrows on the buttons indicate the directio...

Страница 39: ...ods To get a really fine consistency e g for Kebbe process the foods several times beginning with the coarse or medium grinding disc Then use the fine grinding disc for the second or third run Example For steak tartare mince the meat with the medium grinding disc twice TIPS FOR BEST RESULTS Only process edible foods that are not off and not over stored Only use meat that is really fresh Additional...

Страница 40: ...g the appliance before assembling or disassembling any parts Before operation always ensure that you have assembled the appliance completely and correctly accor ding to the instructions in this booklet and that there are no foreign objects in the feed tube Carefully remove hard uneatable parts of your foods e g bones gristle sinews seeds stalks hard shells completely before mincing Do not place cl...
Страница 41: ...r housing with the threaded end upwards Then insert the worm shaft into the cutter housing the smaller end with the cogwheel pointing downwards Doing so put the cogwheel through the opening in the lower end of the cutter hou sing 3 Insert the appropriate tools WARNING The cutter blade is very sharp edged Handle with care Always assem ble only one matching set of tools For mincing and mixing only u...

Страница 42: ...nto the protrusion of the cutter housing Then place the sausage horn on the separator disc The wide brim of the sausage horn must lie firmly on the separator disc Making Kebbe Middle Eastern meat pâté Use the plastic finger and the cone Place the plastic finger on the worm shaft The pla stic finger settles into the cutter housing only in one way Thus ensure that the notch in the brim of the plasti...

Страница 43: ...ion on the brim of the separator disc Tip The former is installed later on 4 Place the screw ring on the cutter housing and screw the screw ring clockwise on the cutter housing but do not fasten it 5 Connect the cutter housing to the motor housing For this hold the feed tube pointing to the right about 45 and in this orientation insert the opening of the cutter housing with the cogwheel of the wor...

Страница 44: ...ie maker For this pos sibly you must turn the screw ring backwards a little Tip With the former in place the screw ring cannot loosen during operation CAUTION Do not use any tools for fastening the screw ring to avoid damage to the thread 8 Place the tray with its outlet on the top of the feed tube and press the tray gently downwards Ensure that the tray is tightly in place and will not fall or wo...

Страница 45: ...ge bowl or dish under the outlet of the cutter housing 2 Put the meat on the tray Connect the appliance to the power supply and switch the power switch on The indicators of the buttons on top of the motor housing are illu minated white WARNING Do not push the food with your hands or any cooking utensils in the feed tube Always use the provided pusher Do not let the motor work continuously for more...

Страница 46: ...d into the feed tube The sausage skin is filled up with the sausage mixture while it slips automatically down the sausage horn If the skin gets stuck on the sausage horn switch OFF the motor of the mincer and wet the sausage skin with some drops of warm water Ensu re that the water does not drip on the table Thereafter loosen the sausage skin and continue working 7 After processing your food switc...

Страница 47: ...ntinuous hollow cylinder produced by your mincer to the desired length ca 7 8cm and fill up the pieces with the prepared filling Press the ends of the fil led Kebbe sleeves together to close them Now the Kebbe is ready for frying MAKING COOKIES 1 Prepare the pastry for your cookies according to your recipe Possibly place the pastry in the refrigerator for about hour 2 Assemble the mincer for makin...

Страница 48: ...of the motor Wait until the motor starts automatically Switch OFF the appliance completely and unplug Then disassemble the appliance to remove the obstacle See Disassembling the Appliance Let the motor cool down See Overheat Protection Contact an authorized service centre for repair The reverse operation does not work The ON OFF button is illuminated blue You cannot start reverse operation while f...

Страница 49: ...d the reverse operation starts with a time delay of 4 seconds Additionally reverse operation is switched OFF automatically after 5 seconds of operation However to release stuck food in the cutter housing it is sufficient in general to operate the motor in reverse direction for just a moment 3 You can switch OFF the reverse operation of the motor any time Press the ON OFF button to switch OFF rever...

Страница 50: ...um grinding disc adding the onion before all the lamb and wheat are minced Mix the minced lamb onion and wheat thoroughly Then process in the mincer a second and third time using the fine grinding disc The mixture is now ready to extrude through the Kebbe tool Filling 400g lamb meat cut into strips 15ml 1 tablespoon of oil 2 medium onions finely chopped 5 10ml 1 2 tablespoons of allspice grinded 1...

Страница 51: ...till and unplug from power outlet before disassem bling or cleaning the appliance 1 Switch OFF the ON OFF button and power switch wait until the motor comes to complete standstill and unplug from power outlet 2 Remove the pusher Then lift the tablet upwards to remove it 3 Grasp the cutter housing with one hand then press the release button near the gear hole in the front plate of the appliance See...

Страница 52: ...he pusher take the tools out first Stubborn residues on the surfaces can be removed better by soaking in warm dishwater for some minutes 2 Moisture a clean cloth or soft sponge with a little warm dishwater and carefully wipe the exterior of the appliance and the power cord WARNING Always ensure that the appliance and all parts of it are out of reach of young children 3 Thoroughly dry the motor hou...

Страница 53: ...s of the appliance with the appliance 1 Always clean the appliance and its parts before storage see Care and Cleaning 2 It is good a advice to re assemble the cutter housing with cutter blade and a grinding disc before storage See Assembling the Appliance to avoid injuries by the cutter blade 3 Additionally you can insert some tools in the pusher For this remove the cover of the pusher and place t...

Страница 54: ...in landfills dumps or refuse incineration hazardous substances can leak into the groundwater or can be emitted into air thus getting into the food chain and damaging your health and well being as well as poisoning flora and fauna When replacing old appliances with new once the vendor is legally obligated to take back your old appliance for disposal at least for free of charge INFORMATION UND SERVI...

Страница 55: ...r countries Please contact your dealer Please agree that we cannot bear the charge of receipt Submission of appliances Please ensure packing the appliance ready for shipment without accessories Add the sales slip and a short fault description The processing time after receipt of the defective appliance will be approx 2 weeks we will inform you automatically After the warranty period please send de...

Страница 56: ...GASTROBACK GmbH Gewerbestraße 20 21279 Hollenstedt Germany Telefon 49 0 4165 2225 0 Telefax 49 0 4165 2225 29 info gastroback de www gastroback de 20191213 ...

Отзывы: