10
11
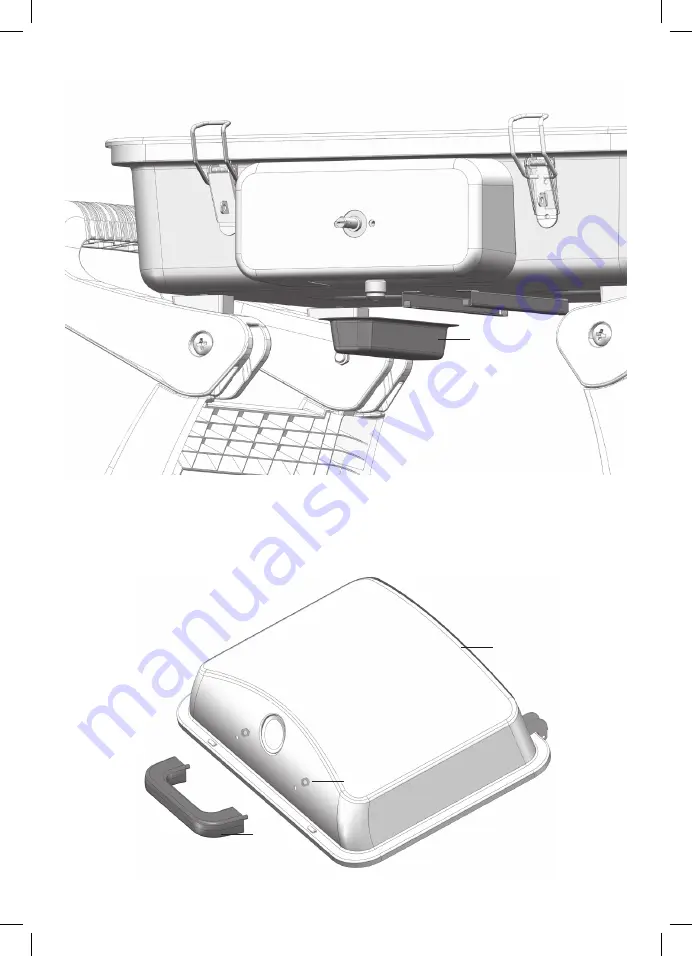
STEP 5
Slide the fat cup (14) into position from the back.
STEP 6
Attach the hood handle (3) to the hood (1) using two M6 nuts (EE) and washers (CC) as shown.
14
3
1
EE
Страница 1: ...oking area of 1600cm2 Satin enamel cast iron cooking surface Integrated temperature gauge Includes hose and regulator Gas certified to Australian and New Zealand Standards 5112 05 19 Gasmate is a regi...
Страница 2: ...er ON by rotating the knob to open position Using a brush or spray bottle apply the soap solution to the gas line and each join in the gas line including the gas connection at the inlet of the BBQ all...
Страница 3: ...necting the hose and regulator assembly to the gas cylinder take care to avoid unnecessary twisting of the flexible hose After the assembly has been secured turn on the gas and check for leaks by brus...
Страница 4: ...ylinder DO NOT USE ADAPTERS Maximum hose length 900mm After use turn the gas cylinder valve off wait for the flame to go out then turn the appliance control valve off GENERAL INFORMATION Avoid twistin...
Страница 5: ...other enclosed areas Your barbecue is to be used OUTDOORS The barbecue is not intended to be installed in or on recreational vehicles and or boats and should not be placed under any surface that will...
Страница 6: ...Pad 4 6 Side Handle 2 7 Leg 2 8 Control Knob 1 9 Fascia Panel 1 10 Valve 1 11 Valve Cover 1 12 Ignition Electrode 1 13 Gas Hose and Regulator 1 14 Grease Cup 1 15 Grease Cup Support 2 16 Body 1 17 Hin...
Страница 7: ...above is not scaled to exact size A screwdriver is required on assembly Lid pin R pin Flat washer AA 4 PC BB 4 PCS CC 4 PCS DD 4 PCS EE 6 PCS FF 2 PCS GG 6 PCS HH 6 PCS II 2 PCS M8 45 Bolt M6 25 Bolt...
Страница 8: ...to the body 16 with four M5 x 8mm screws GG and nuts HH as shown Remove any transit protection material Estimated assembly time 20 minutes STEP 1 Attach the hood hinges 18 to the hood 1 with two M5 x...
Страница 9: ...he side handles 6 to the body 16 ensuring the 4 insulation pads 5 are inserted into the handles before securing with four M6 x 25mm screws DD and nuts EE Attach the legs 7 to the handles using four M8...
Страница 10: ...10 STEP 5 Slide the fat cup 14 into position from the back STEP 6 Attach the hood handle 3 to the hood 1 using two M6 nuts EE and washers CC as shown 14 3 1 EE...
Страница 11: ...11 STEP 7 Align the hood to the body Place the 2 hinge pins 17 through the hinges and secure with the R clips STEP 8 Align the D shape and push on the control knob 8 17 8...
Страница 12: ...park at the electrode barbecue can be lit by a long barbecue match with hood open insert the match into a hole on the underside of the barbecue and turn gas control to high Check performance of burner...
Страница 13: ...is not cooking or is taking too long Burner has gone out Check that the gas bottle is not empty and re ignite the burner Cooking surface was not given enough time to warm up before the food was appli...
Страница 14: ...clean the burner tubes and burner ports Cleaning the Cooking Surface After cooking turn burner control to OFF and let barbecue cool before attempting to clean the grill plate or grate Before first use...
Страница 15: ...hat includes an overhead cover and no more than two walls Within a partial enclosure that includes an overhead cover and more than two walls the following will apply at least 25 of the total wall area...
Страница 16: ...result of the misuse or abuse negligent handling or if the product has not been installed and used in accordance with the instructions The warranty is void if there is evidence of the product being ta...