


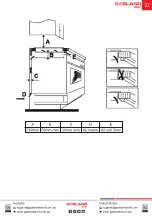


Technical Specification
Weight and Dimensions are approximate. Because we continually strive to
improve our products we may change specifications and designs without prior
notice.
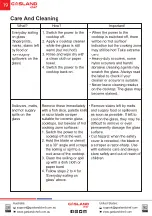
1. Switch the power to the
cooktop off.
2. Soak up the spill
3. Wipe the touch control
area with a clean damp
sponge or cloth.
4. Wipe the area completely
dry with a paper towel.
5. Switch the power to the
cooktop back on.
• The cooktop may beep and
turn itself off, and the touch
controls may not function while
there is liquid on them. Make
sure you wipe the touch control
area dry before turning the
cooktop back on.
Spillovers on the
touch controls
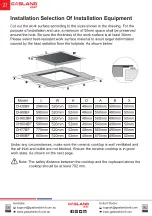
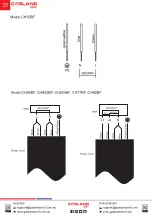
Model
CH30BF
2 Zones
Cooking Zones
220-240V~
Supply Voltage
50/60Hz
Frequency
2745-3267W
Rating Power
288x520x52mm
Product Size LxWxH
268x500mm
CH60BF
4 Zones
220-240V~
50/60Hz
5490-6533W
590x520x52mm
560x490mm
CH603BF
3 Zones
220-240V~
50/60Hz
4941-5880W
590x520x52mm
560x490mm
Built-in Dimension AxB
Model
Cooking Zones
Supply Voltage
Frequency
Rating Power
Product Size LxWxH
CH77BF
4 Zones
220-240V~
50/60Hz
6039-7186W
770x520x52mm
560x490mm
CH604BF
4 Zones
220-240V~
50/60Hz
6039-7186W
590x520x52mm
560x490mm
CH90BF
5 Zones
220-240V~
50/60Hz
6130-7295W
900x520x52mm
870x490mm
Built-in Dimension AxB
20
Australia:
[email protected]
www.gaslandchef.com
[email protected]
www.gaslandchef.com.au
United States:
Содержание chef CH30BF
Страница 28: ...support gaslandchef com www gaslandchef com...


