background image

5

Warning

1. To reduce the risk of fire, use only metal ductwork.

2. This appliance must be grounded. In the event of an electrical short circuit, grounding reduces   

    the risk of electric shock by providing an escape wire for the electric current. This appliance is 

    equipped with a cord having a grounding wire with a grounding plug. The plug must be 

    plugged into an outlet that is properly installed and grounded.

Warning: 

Improper grounding can result in a risk of electric shock. Consult a qualified electrician if 

the grounding instructions are not completely understood or if  doubt about whether the appliance 

is properly grounded exists. Do not use an extension cord. If the power supply cord is too short, 

have a qualified electrician install an outlet near the appliance.

Caution: 

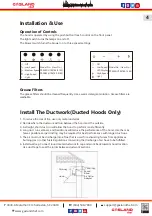
To reduce risk of fire and to properly exhaust air, be sure to duct air outside.

Do not vent exhaust air into spaces within walls or ceilings or into attics, crawl spaces, or garages.


Install The Hood

Note 1: On stainless steel hoods, carefully remove the plastic protective film from all exterior 

             surfaces of the hood and chimney prior to final installation.

Note 2: At least two people will be required to mount the hood.

Minimum hood distance above the cooker must not be less than 25 

/

”.

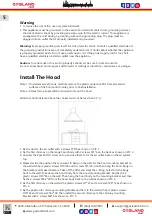
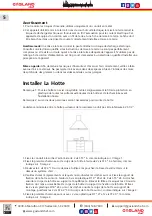
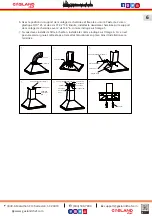
1. Fix the duct to the air outlet with 2 screws ST3*6 as shown on PIC. 1.

2. Fix the first chimney on the range hood body with 2 screws ST3*6 on the back as shown on PIC

2. 

3. Unscrew the 4pcs M4*10 screw on top and use them to fix the air outlet base on the air system

    top.

4. Please decide the position that you want to hang on the wall. Fix the hood mounting bracket on

    the wall with 3pcs plastic screws Φ10*45 and 3 screws ST5*45. And then hang the hood body on

    the bracket and make it balance. Take off the filter and mark the 2 fixing holes from the body    

    back to the wall. Take down the hood body from the hood mounting bracket. And fix the 2 

    plastic screws Φ10*45 on the wall. Then hang the hood body on the mounting bracket and then 

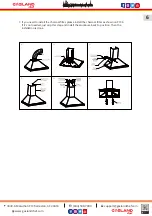
    fix the 2 screws ST4.2*30 from the hood body back to the wall as shown on PIC. 3.

5. Fix the first chimney on the wall with 2 plastic screws Φ7*27 and 2 screws ST2.9*14 as shown on 

    PIC. 4.

6. Fix the position for chimney mounting bracket and fix it to the wall with 2pcs plastic screws 

    Φ10*45 and 2 screws ST4.2*30. Then install the second chimney to the chimney mounting 

    bracket with 2 screws M4*6 as shown on PIC. 5.

(844) 538-7890

[email protected]

www.gaslandchef.com

3330-A Marathon Ct Charleston, SC 29418

Содержание PR30SP

Страница 1: ...gaslandchef com www gaslandchef com 3330 A Marathon Ct Charleston SC 29418 Important Read these instructions for installation and use carefully Keep these instructions for future reference Any questi...

Страница 2: ...do not extinguish immediately Evacuate and call the fire department B Never pick up a flaming pan You may be burned C Do not use water including wet dishcloths or towels a violent steam explosion wil...

Страница 3: ...other than those for which it was designed Never leave high open flames under the hood when it is in operation Adjust the flame intensity to direct it onto the bottom of the pan only making sure that...

Страница 4: ...gas c When cutting or drilling into wall or ceiling do not damage electrical wiring and other hidden utilities d Ducted fans must always be vented to the outdoors Don t use this product outdoors This...

Страница 5: ...l wall cap Connect round metal ductwork to cap and work back towards hood location Use duct tape to seal the joints between ductwork sections Chimney Hood Wall Cap Round Elbow Air Outlet Adapter Off L...

Страница 6: ...two people will be required to mount the hood Minimum hood distance above the cooker must not be less than 25 1 Fix the duct to the air outlet with 2 screws ST3 6 as shown on PIC 1 2 Fix the first chi...

Страница 7: ...install the charcoal filter as shown on PIC 6 If it s not needed just skip this step and install the aluminum back to position Then the installation is done 844 538 7890 support gaslandchef com www g...

Страница 8: ......

Страница 9: ...gaslandchef com www gaslandchef com 3330 A Marathon Ct Charleston SC 29418 Important Lisez attentivement ces instructions d installation et d utilisation Conservez ces instructions pour une future r f...

Страница 10: ...t vacuez et appelez le service des incendies B Ne prenez jamais une casserole en flammes vous risquez de vous br ler C N utilisez pas d eau y compris les torchons humides ou serviettes mouill es une v...

Страница 11: ...n d liminer les vapeurs de cuisine Ne jamais utiliser la hotte des fins autres que celles pour lesquelles elle a t con ue Ne laissez jamais de grandes flammes nues sous la hotte lorsqu elle est en mar...

Страница 12: ...mbustion correcte et une vacuation ad quate des gaz par le conduit de chemin e de l appareil combustible afin d viter les refoulements c Lorsque vous coupez ou percez un mur ou un plafond n endommagez...

Страница 13: ...les performances de la hotte Utilisez en le moindre possible Des conductions plus larges peuvent tre n cessaires pour une performance optimale des conduits plus longs 5 L air ne doit pas tre vacu dans...

Страница 14: ...gneusement le film de protection en plastique de toutes les surfaces ext rieures de la hotte et de la chemin e avant l installation finale Remarque 2 au moins deux personnes seront n cessaires pour mo...

Страница 15: ...e comme indiqu sur l image 6 Si ce n est pas n cessaire ignorez cette tape et remettez l aluminium en place Ainsi l installation sera termin e Conduit Vis ST3 6 Vis en plastique 7 27mm Vis ST2 9 14 Vi...

Страница 16: ......

Отзывы: