background image

INTRODUCTION 

Wi-Fi  weather  station  with  an  integrated  wireless  sensor,  model  GARNI  940,  has  many  features 
providing  the  weather  forecast  information. The  integrated  wireless  sensor  operates  at  868  MHz, 
measuring  temperature  and  relative  humidity,  wind  speed  and  direction,  precipitation  total, 
temperature, humidity, UV radiation and solar radiation. 
The  main  unit  has  an  easy-to-read  inverse  display  that  displays  weather  forecast,  indoor 
and outdoor temperature and relative humidity, barometric pressure, precipitation, wind speed and 
direction,  UV  index,  solar  radiation,  time  and  date,  dew  point  value,  Wind  Chill  and  temperature 
index. 
The  main  unit  memory  stores  the  minimum  and  maximum  measurements  and  the  barometric 
pressure values measured in the last 12, 24, 48 and 72 hours. There are also various alarm setting 
options. The time and date are updated from the Internet automatically. 
The weather station has a function for uploading measured values to a selected Internet server via 
Wi-Fi. 

BEFORE INSTALLATION 

Before installing the weather station on the place of operation, we recommend placing the weather 
station at a temporary location with easy access for one week. This will let you check all functions, 
ensure proper operation, and get familiar with the weather station and its calibration procedures. 
During this time, you can also test the wireless range between the main unit and the integrated 
wireless sensor. 

COMMISSIONING 

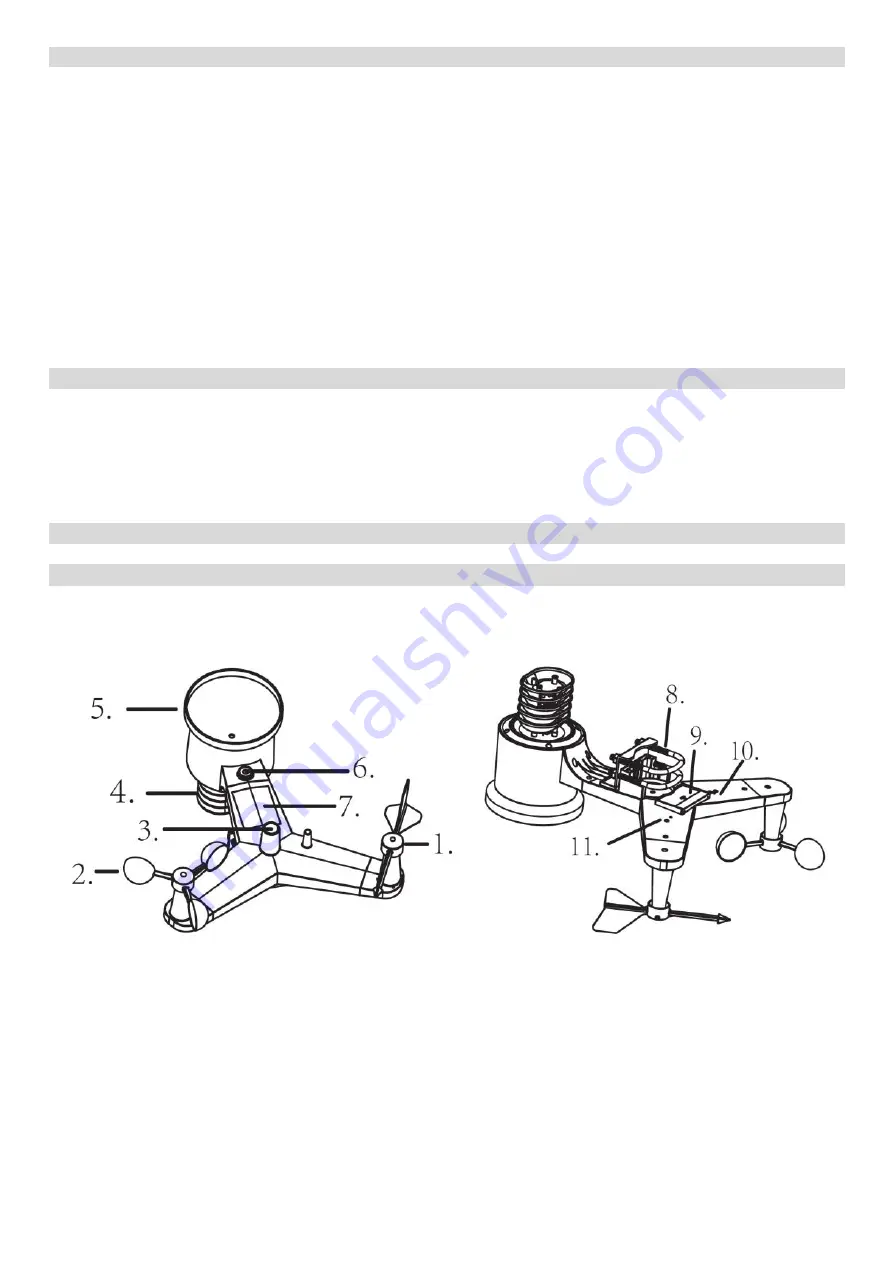
Integrated wireless sensor 

The integrated wireless sensor measures wind speed and direction, precipitation total, 
temperature, humidity, UV radiation and solar radiation. It is designed for easy installation. 

1) Anemometer - weather vane
2) Anemometer - propeller
3) UV radiation sensor
4) Humidity and temperature sensor
5) Water collection funnel
6) Spirit level
7) Solar panel

8) Sensor stand mounting bolt
9) Battery cover

10)

RESET

 button

11) LED: Turns on for 4 seconds after power-

up, then flashes every 16 seconds during
data transmission to the main unit

Содержание 940

Страница 1: ...INSTRUCTION MANUAL FOR Wi Fi WEATHER STATION MODEL GARNI 940 EN GARNI 940 ...

Страница 2: ...weather station has a function for uploading measured values to a selected Internet server via Wi Fi BEFORE INSTALLATION Before installing the weather station on the place of operation we recommend placing the weather station at a temporary location with easy access for one week This will let you check all functions ensure proper operation and get familiar with the weather station and its calibrat...

Страница 3: ...otates freely A small amount of friction ensures more precise measurement of wind direction The wind direction section on the main unit display shows the letters N North E East S South and W West The integrated wireless sensor must be oriented so that the arrow marked North on the top of the wireless sensor is pointing north If the integrated wireless sensor is oriented incorrectly wind direction ...

Страница 4: ...bstacles such as other buildings trees etc that prevent free wind flow to ensure undistorted measurements of individual weather elements Point the part with the vane and propeller north for correct wind direction measurement Place the integrated wireless sensor onto the stand not included at a minimum distance of 1 5 metres from the ground to prevent the measured values being affected by the groun...

Страница 5: ...ng the integrated wireless sensor near any sources of electromagnetic radiation such as power masts otherwise the operation of electrical devices such as the lightning detector will be greatly affected Please ensure that the vane and propeller are not blocked and provide accurate data The integrated wireless sensor should be located in an open space where the sunlight can shine directly at the UV ...

Страница 6: ...o simulate rain 5 Proceed by placing the wireless sensor after 15 minutes Note Place the wireless sensor within 1 5 to 3 metres of the main unit and wait a few minutes to establish the connection If the main unit is powered only by batteries press the LIGHT SNOOZE button to illuminate the LCD In addition to the folding stand on the back of the main unit the delivery also includes a vertical table ...

Страница 7: ...utdoor temperature 12 Outdoor humidity 13 Wireless sensor signal reception icon 14 Indoor humidity 15 Indoor temperature 16 Date 17 Wi Fi connection icon 18 DST icon Starting of the main unit Connect the main unit to the power adaptor The display will show the software version number for 2 seconds All LCD segments will activate for 3 seconds The main unit will commence searching for the wireless s...

Страница 8: ...ent day precipitation total records 4 WIND button press to display the wind speed gusts and direction 5 PRESURE button press to display the absolute barometric pressure for the last 12 24 48 and 72 hours press and hold for 2 seconds to switch between display of absolute and relative barometric pressure 6 ALARM button press to display the set alarm time set alarm value HI and LO for temperature hum...

Страница 9: ...tton to set day Note WiFi firmware V1 4 4 or later supports global time synchronization When the main unit is connected to the Internet the time and date are automatically synchronized and the appropriate time zone and DST daylight saving time are set The seconds will be reset when setting minute If the main unit is connected to a Wi Fi network the time and date will be updated automatically 4 Set...

Страница 10: ...IND button to display the measured values of wind speed wind gusts and wind direction 8 Setting of the precipitation total units press the SET button to move to the setting of the precipitation total units press the WIND or PRESSURE button to select in or mm in the basic display mode press the RAIN button to display measured precipitation values hourly day week month or precipitation total hold th...

Страница 11: ...inutes after that it will go off again The alarm is cancelled by pressing any button other than SNOOZE LIGHT When the alarm is activated the corresponding icon for the measured quantity and the upper or lower limit icon will flash Order of setting of the alarm time and alarm value 1 Setting of alarm time 2 Setting of alarm for the upper limit of indoor temperature 3 Setting of alarm for the lower ...

Страница 12: ...onds to erase the recording of all maximum and minimum measured values Press the MAX MIN or LIGHT SNOOZE button again to return to the basic display Calibration mode Press and hold the TEMP and MAX MIN button simultaneously for 5 seconds to enter the calibration mode Press the WIND or PRESSURE button to change the set values Press the SET button to confirm and to move to the next setting Press the...

Страница 13: ... values over the last 3 hours at regular half hour intervals For example the values measured at 15 00 will be compared to values measured at 12 00 values measured at 15 30 will be compared to values measured at 12 30 etc Trend indicators Humidity Temperature Barometric pressure Increases Increases by more than 3 Increases by more than 1 C Increases by more than 1hpa Unchanged Unchanged by more tha...

Страница 14: ...respective app for iPad iPhone and Android is available from the Internet Weathercloud WeatherCloud net WeatherCloud net is a social network of weather observers from all parts of the world It provides the current values of measured weather variables WeatherObservationsWebsite wow metoffice gov uk The purpose of this website is to provide a platform for sharing current weather observations from ar...

Страница 15: ...View app from Google Play store to your mobile device 3 Run the app Select the device in the upper left corner and click on NEXT Connect or disconnect and reconnect the power adaptor to the main unit Hold the WIND and PRESSURE buttons simultaneously for 5 seconds M B will flash at the top of the display Check Completed operation and click on NEXT ...

Страница 16: ...itt To connect to Ecowitt enter the Station ID and Authentication Key assigned by this service for registration see www ecowitt net After connecting the AC adapter to the main unit briefly press the SET button on the main unit to display the MAC address it is displayed as eg 12 34 56 AB CD EF With the MAC address obtained register your device with Ecowitt or your own server If you do not want to l...

Страница 17: ... a password for the device which will also be sent to the specified e mail address Click on Back to return to the main screen Click OK to confirm the automatic entering of the identification number and password If you want to setup more servers click on Next otherwise click on Back Weathercloud To connect to the Weathercloud server enter the Weathercloud ID and Weathercloud Key assigned by this se...

Страница 18: ...mobile device from Apple App Store 3 Run the app Note If you have a dual band modem make sure that you connect the device to a network operating at 2 4 GHz Click on the gear icon in the upper left part of the screen and select Configure a New Device Select the device in the upper left corner and click on NEXT Connect or disconnect and reconnect the power adaptor to the main unit Hold the WIND and ...

Страница 19: ...lect the required Wi Fi network and return to the Ws View app Click on Select Wi Fi Select your device from the list The device name will be as follows EasyWeather WIFIxxxx where x will be replaced with letters and digits After a successful connection the app automatically switches to the Upload Setting screen ...

Страница 20: ... Underground account click on Next If you already have a Weather Underground account enter the ID number in the Station ID box and the password received from the Weather Underground server in the Station Key box Click on SAVE to save and then on Next If you do not have an account click at Register at Wunderground com and the following screen will appear see on the right Registration to the Weather...

Страница 21: ...derground account with a PC Note It is recommended that you use Google Chrome throughout the registration process 1 Enter the following web address www wunderground com into your web browser and click on JOIN in the upper right corner Enter the registration data according to the instruction of the home screen your e mail and the password that you want to use for login check I agree to the Terms of...

Страница 22: ...n Up 2 Sign in weathercloud and then you will go the Devices page click New or Create device to create new device 3 Enter all the information in Create new device page for the Model selection box select the 940 under GARNI section for the Link type selection box select the SETTINGS Once you have completed click Create 4 On the next page click the Options button and then the Link button Jot down yo...

Страница 23: ...There are two items associated with webpages that are needed to upload data Site ID o A number that distinguishes the page from anther This number will appear in parentheses next to or below the site name on the site information page for example 6a571450 df53 e611 9401 0003ff5987fd Authentication Key o This is a six digit number that is used to ensure that the data comes from you and not from any ...

Страница 24: ...ed data of your weather station Another way to view your station is use the web browser URL bar type below in the URL bar https www wunderground com dashboard pws XXXX Then replace the XXXX by your Weather underground station ID to view your station live data VIEW YOUR WEATHER DATA IN WEATHERCLOUD 1 To view your weather station live data in a web browser PC or mobile version please visit https wea...

Страница 25: ...play the measured values click on Menu in the upper left corner of the app and then on the WU Dashboard If you have multiple devices connected to Weather Underground in your app click on the name of the station with measured data you want to browse ...

Страница 26: ...or WeatherObservationsWebsite download the respective app or view these values online on that server s website Removing or adding a device linked to the Weather Underground account To delete a device from the app click on Menu in the upper left corner then on Manage Wunderground and click on Delete net to that device and confirm the selection The app will stop displaying the measured values of the...

Страница 27: ...Add WU Station ID or just ADD Fill in the respective boxes Android iOS Unit settings To set the measured values units click on Menu on the main screen and then on Unit Settings a Temperature temperature units C Celsius degrees centigrade F Fahrenheit degrees Fahrenheit b Pressure barometric pressure units ...

Страница 28: ... wind speed units km h kilometres per hour mph miles per hour d Rain precipitation total units mm millimetres in inches e Light solar radiation measurement fc foot candle lux illuminance intensity unit w m2 luminous flux intensity unit Android iOS ...

Страница 29: ...t cloth regularly every 3 months 3 Replace the batteries every 1 2 years If the batteries are not replaced in time the integrated wireless sensor may be damaged 4 In winter treat the surface of the integrated wireless sensor with an anti freeze spray to prevent snow build up on the sensor Lift Open To activate the application enter the code eg 0000 1111 2222 located on the back side of the weather...

Страница 30: ...ative barometric pressure is different than the value form the official local sources Make sure that the absolute barometric pressure is not displayed instead of relative Perform calibration from a trusted source for your location The rain gauge displays measured precipitation values even with no rain Unstable mounting of the integrated wireless sensor can cause sensor tilt and movement within the...

Страница 31: ... this manual may differ from the actual display Dispose of this product in accordance with applicable regulations The contents of this manual may not be reproduced without the consent of the author Do not throw old batteries to unsorted municipal waste but use the designated areas TECHNICAL PARAMETERS MAIN UNIT GARNI 940 Dimensions 188 x 118 x 18 mm Weight 2246 g without batteries Power supply pow...

Страница 32: ...75 mm Weight 702 g without batteries Power supply 2 pcs AA batteries 1 5 V lithium recommended Signal frequency 868 MHz Maximum RF power 14 dBm 25 mW Signal range up to 100 m in open space Data transmission Every 16 seconds OUTDOOR TEMPERATURE Temperature unit C F Display range 25 C to 60 C 14 F to 140 F Accuracy 1 C or 2 F Resolution 0 1 C or 0 1 F F resolution is derived from 0 1 C Memory max an...

Страница 33: ...rement range 0 400k Lux Precision of measurement 15 Resolution 0 01 Note The technical specifications and contents of this product s user manual are subject to changes without further notice DECLARATION OF CONFORMITY GARNI technology a s hereby declares that the type of the radio equipment weather station type GARNI 940 conform to the Directive 2014 53 EU The full EU Declaration of Conformity is a...

Отзывы: