Introduction
WARNING
See the
Important Safety and Product Information
guide in the
product box for product warnings and other important
information.
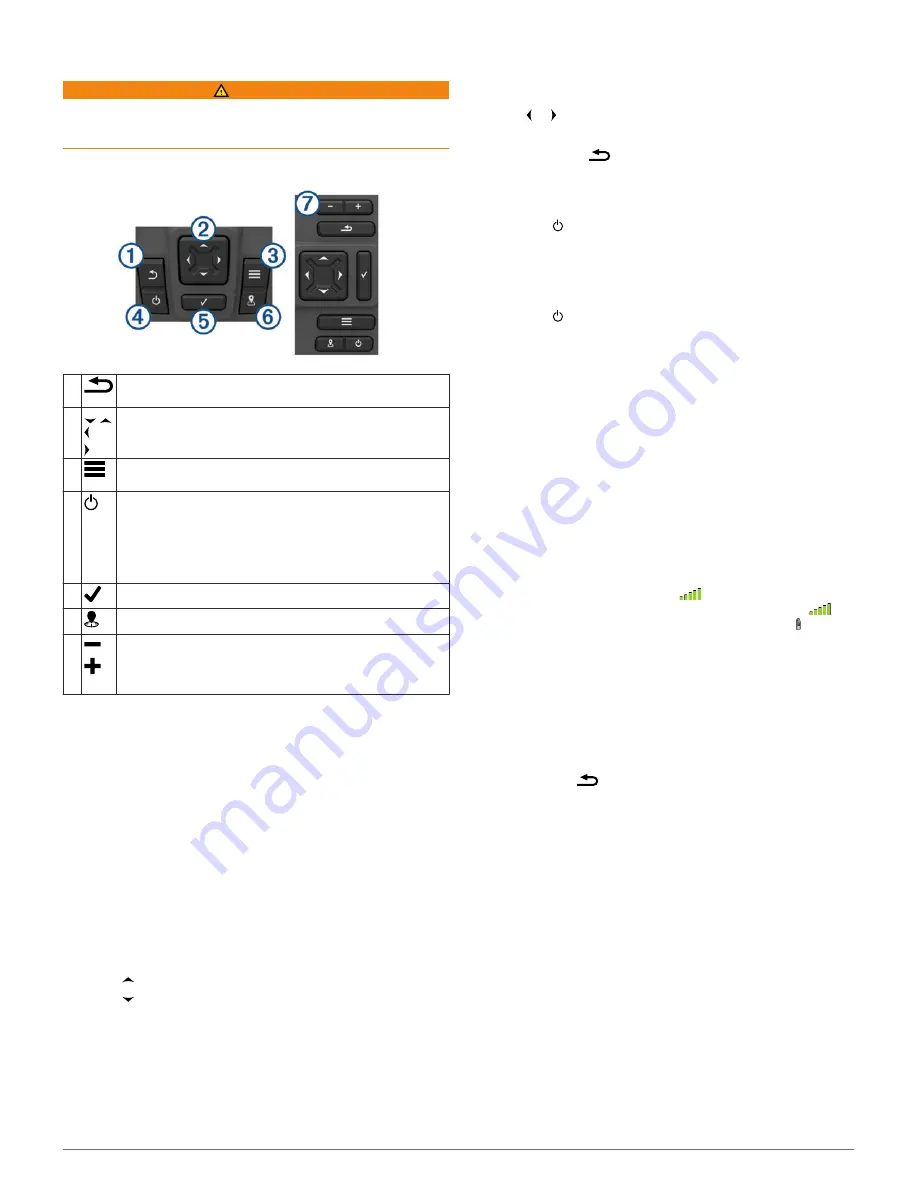
Device Overview
À
Returns to the previous screen.
Returns to the home screen when held.
Á
Scrolls, highlights options, and moves the cursor.
Zooms in and out of a view. (Available only on the 4 in.
models.)
Â
Closes a menu, when applicable.
Opens a menu of options for the page, when applicable.
Ã
Turns on and off the device when held.
Performs one or more of these actions when quickly press
and release:
• adjust the backlight
• adjust the color mode
• enable and disable sonar
Ä
Acknowledges messages and selects options.
Å
Saves the present location as a waypoint.
Æ
Zooms out of a view. (Available only on the 5 in. and 7 in.
models.)
Zooms in to a view. (Available only on the 5 in. and 7 in.
models.)
Selecting the Transducer Type
If you are connecting a transducer that was not included with the
chartplotter, you may need to set the transducer type to make
the sonar function properly. If the device automatically detected
your transducer, this option does not appear.
This chartplotter is compatible with the Garmin ClearVü
™
transducer as well as a range of accessory transducers
including Garmin GT transducer
s.
1
Select
Settings
>
My Vessel
>
Transducer Type
.
2
Select the type of transducer you are using.
Zooming on the STRIKER 4
You can zoom in and out of the Waypoint Map.
• Select to zoom in.
• Select to zoom out.
Panning on the STRIKER 4
You can move the Waypoint Map to view an area other than
your present location.
1
Select or to start panning.
2
Use the arrow keys to pan.
TIP:
You can select
to zoom.
Adjusting the Backlight
1
Select
Settings
>
System
>
Display
>
Backlight
.
TIP:
Press from any screen to open the backlight settings.
2
Adjust the backlight.
Adjusting the Color Mode
1
Select
Settings
>
System
>
Display
>
Color Mode
.
TIP:
Press from any screen to access the color settings.
2
Select an option.
Setting the Beeper
You can set when the device makes sounds.
1
Select
Settings
>
System
>
Beeper
.
2
Select an option:
• To have the device beep when you select an item and
when an alarm is triggered, select
On (Selections and
Alarms)
.
• To have the device beep only when alarms are triggered,
select
Alarms Only
.
GPS Satellite Signal Acquisition
When you turn on the fishfinder, the GPS receiver must collect
satellite data and establish the current location. When the
fishfinder acquires satellite signals,
appears at the top of the
Home screen. When the fishfinder loses satellite signals,
disappears and a flashing question mark appears over on the
screen.
Home Screen
The fishfinder home screen provides access to all of the
features in the fishfinder. The features are dependant on the
accessories you have connected to the fishfinder. You may not
have all of the options and features discussed in this manual.
When viewing another screen, you can return to the home
screen by holding
. You can customize the layout of the
screens.
Customizing the Home Screen
You can add items to and rearrange items on the Home screen.
1
From the Home screen, select
Customize Home
.
2
Select an option:
• To rearrange an item, select
Rearrange
, select the item to
move, and select the new location.
• To add an item to the Home screen, select
Add
, and
select the new item.
• To remove an item you have added to the Home screen,
select
Remove
, and select the item.
Adding a New Layout to the Home Screen of the
STRIKER 5 or 7
You can create a custom screen to suit your needs, which is
added to your home screen.
1
Select
Customize Home
>
Add
>
Add New Layout
.
Introduction
1
Содержание striker 4
Страница 1: ...STRIKER Series Owner s Manual ...


