Pairing the Wireless Remote Control with a Chartplotter
1
On the chartplotter, select
Settings
>
Communications
>
Wireless Devices
>
Wireless Remotes
>
Autopilot
Remote
.
2
If necessary, select
Enable
.
3
Select
New Connection
.
4
On the remote control, select
>
Pair with MFD
.
The chartplotter beeps and shows a confirmation message.
5
On the chartplotter, select
Yes
to complete the pairing
process.
Operation
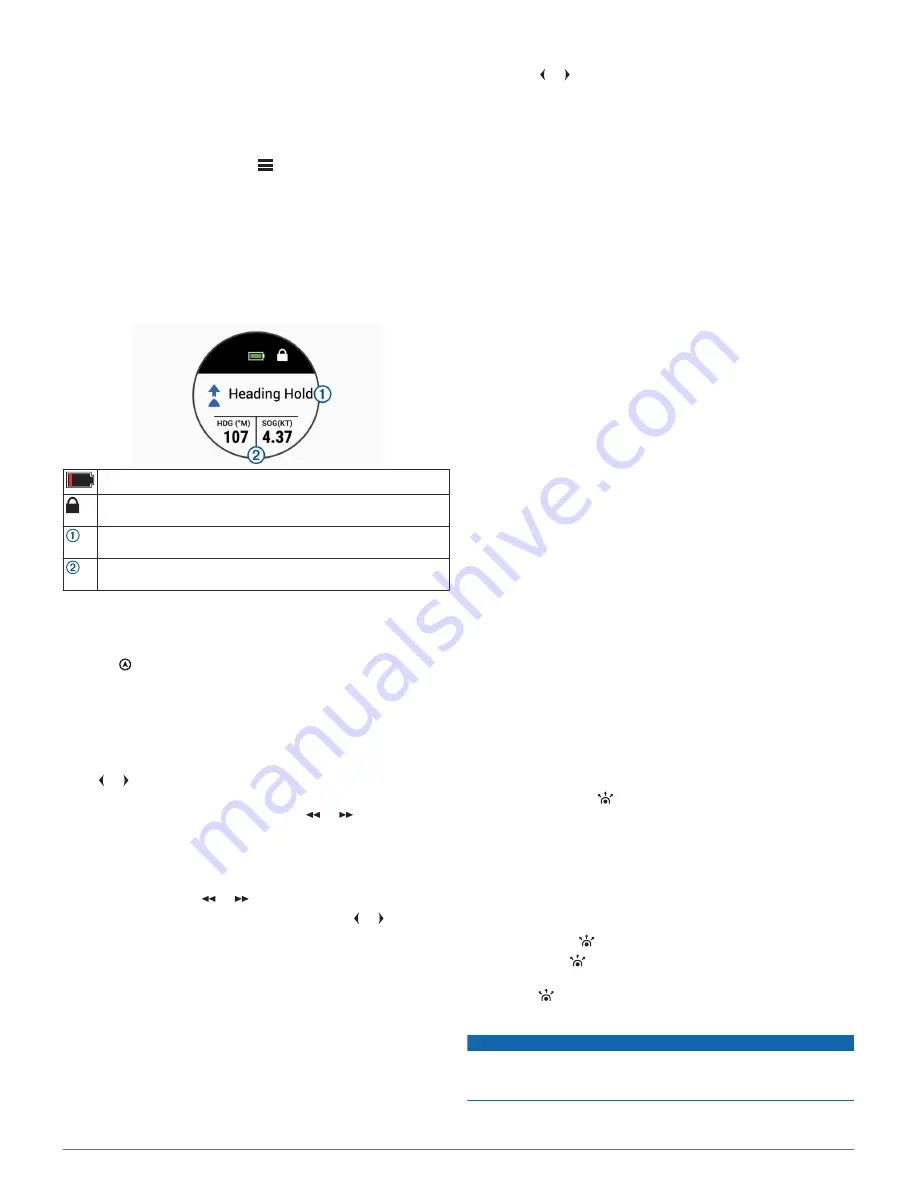
Remote Control Screen
The remote control screen shows the status of the autopilot and
other important information.
Remote control battery level indicator.
Remote control key lock indicator. Appears when the keys are
locked.
Autopilot status. Indicates when the autopilot is in standby, in a
heading hold, or steering a pattern.
Autopilot data. Displays information relevant to the autopilot
status.
Engaging and Disengaging Heading Hold
You can use the remote control to engage and disengage the
autopilot.
Press .
The status of the autopilot changes on the remote screen.
Adjusting the Heading
1
If necessary, engage the autopilot.
2
Select an option:
• To adjust the heading one degree port or starboard, press
or .
• To adjust the heading by the configured step-turn
increment port or starboard, press or .
NOTE:
The default step-turn increment is 10 degrees. You
can configure the step-turn increment on the connected
helm control or chartplotter.
• To adjust the heading by multiple, accumulated step-turn
increments, hold or .
• To steer the rudder port or starboard, hold or , and
release.
Activating Patterns or Actions Assigned to the Action
Keys
The action keys on the remote control are pre-programmed with
patterns or other actions, depending on the type of autopilot
system. You can change the patterns or actions assigned to
these keys (
Changing the Functions of the Action Keys
,
page 2
).
1
Press the action key assigned to the pattern or action you
want to use.
The pattern or action appears on the remote control screen.
2
Select an option:
• If the pattern or action requires you to choose a direction,
press or .
• If the pattern or action does not require you to choose a
direction, press the action key again to begin the pattern
or action.
Changing the Functions of the Action Keys
You can change the patterns or actions assigned to the action
keys using a connected helm control or chartplotter.
1
Select an option:
• On a helm control, select
Menu
>
Setup
>
Remote
.
• On a chartplotter, select
Settings
>
Communications
>
Wireless Devices
>
Wireless Remotes
>
Autopilot
Remote
>
Button Actions
.
2
Select an action key to change.
3
Select a pattern or action to assign to the action key.
Activating a Route To Action
Before you can use the Route To feature on the remote control,
you must connect your autopilot system to a compatible
chartplotter, assign the Route To action to a programmable key
on the remote (
Changing the Functions of the Action Keys
,
page 2
), and define a route on the chartplotter.
1
Press the action key assigned to the
Route To
action.
Route To appears on the remote screen.
2
Press the action key again to activate the
Route To
action.
Changing Directions Using an Action Key
Before you can use an action key to change the autopilot
direction (forward or reverse), you must program a key for the
direction control action (
Activating Patterns or Actions Assigned
to the Action Keys
, page 2
).
1
Bring the boat to a stop and disengage the autopilot.
2
Press the action key assigned to the direction control action
to switch between forward and reverse.
Gesture Controls
You can point or move the remote control to interact with the
autopilot system. You must calibrate the compass in the remote
control before you can use the gesture-controls feature
(
Calibrating the Compass
, page 2
).
Using Gesture Controls to Engage Heading Hold
You can use the remote control to set the autopilot heading hold
in a specified heading.
1
Point the remote control toward where you want to engage or
change the heading hold.
2
Press and release .
The autopilot engages or changes the heading hold, and
steers the boat in the direction you were pointing toward
when you pressed the key.
Using Gesture Controls to Adjust your Heading
You can adjust the heading of the autopilot by moving the
remote control.
1
If necessary, engage the autopilot.
2
Press and hold .
3
While holding , move the remote control to the left or right
to adjust the heading port or starboard.
4
Release to stop adjusting the heading.
Calibrating the Compass
NOTICE
Calibrate the electronic compass outdoors. To improve heading
accuracy, do not stand near objects that influence magnetic
fields, such as vehicles, buildings, and overhead power lines.
2
Содержание REACTOR
Страница 4: ...support garmin com ...


