background image

98

Section 4 

System Options

Interface Tab

Serial Data Format 
Options Menu

Interface Settings

‘Interface’ Settings 

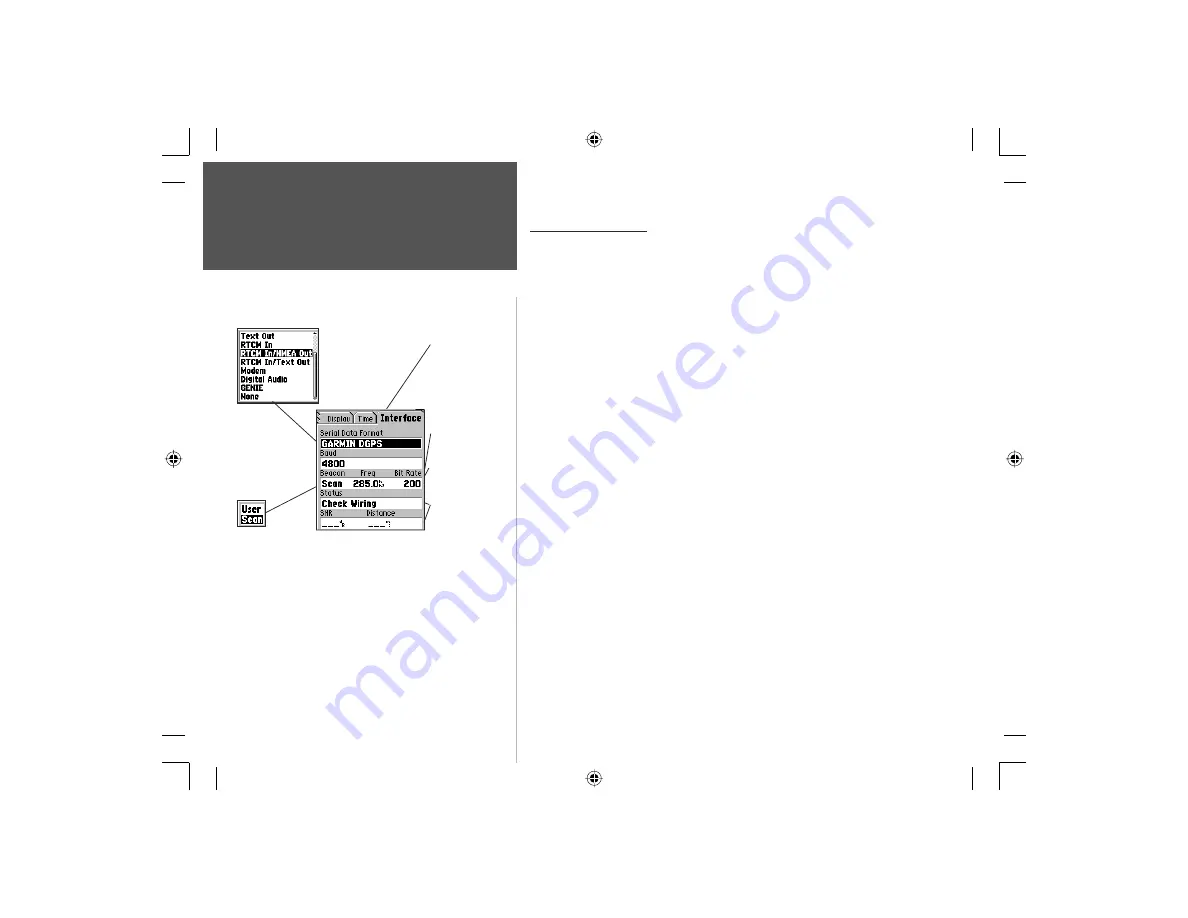
     The ‘Interface’ Settings Page allows you to choose from 12 different 
input/output serial data formats, or none at all. This feature is used when 
connecting your unit to external NMEA devices, DGPS beacon receiver, a 
personal computer, etc. It is necessary to have a working knowledge of 
these applications. Below is a description of each format:

GARMIN

 - the proprietary format used to exchange waypoint, track, 

and map data with a PC.

GARMIN DGPS

 - Allows DGPS input using a GARMIN beacon 

receiver and a standard RTCM SC-104 format and DGPS tuning. 

NMEA

 - supports the input and output of standard NMEA 0183 

version 2.3 data.

Text Out

 - allows simple ASCII text output of location and velocity 

information, without any input capabilities.

RTCM In

 - allows DGPS input using a standard RTCM SC-104 format 

without any output capabilities.

RTCM In/NMEA Ou

t - allows DGPS input using a standard RTCM 

SC-104 format and supports the output of standard NMEA 0183 ver-
sion 2.3 data. 

RTCM In/Text Out

 - allows DGPS input using a standard RTCM 

SC-104 format and simple ASCII text output of location and velocity 
information.

Modem

 - allows connection for data transmission using a PC. Refer to 

Appendix H on page 111.

None

 - Provides no interfacing capabilities.

The Baud rate 
options are select-
able only for  Text 
Out , RTCM In, 
and RCTM In/Text 
Out, Format 
options.

Beacon Options

Status, SMR, and 
Distance data is 
independent of 
menus and is dis-
played for only 
certain Serial Data 
Format options. 

Frequency is 
selectable for only 
certain Formats

Bit Rate is select-
able for only cer-
tain Formats.

Select the desired Serial data Format from the list. If ‘GARMIN 

DGPS’ or ‘RTCM In/NMEA Out’ format is selected, additional fi elds 
are provided to control a GARMIN differential beacon receiver (e.g. 
GBR 21) directly from your unit. Tuning is automatic with ‘Scan’ or 
you can enter the beacon frequency and bit rate when you select 
‘User’ from the Beacon list to manually tune the receiver. For more 
information, refer to instructions supplied with the beacon receiver. 

When selecting, ‘Text Out’, ‘RCTM In’, and ‘RTCM In/Text Out’ 
formats, a Baud Rate fi eld with a list of options will display.

Section 5

NvTlkGSMManual copy.indd   98

12/2/2002, 8:43:22 AM

Содержание NavTalk NavTalk GSM

Страница 1: ...owner s manual and reference guide NavTalk GSM Phone GPS ...

Страница 2: ...her electronic storage medium to be viewed and to print one copy of this manual or of any revision hereto provided that such electronic or printed copy of this manual must contain the complete text of this copyright notice and provided further that any unauthorized commercial distribution of this manual is strictly prohibited Information in this document is subject to change without notice GARMIN ...

Страница 3: ...man readable form the Software or any part thereof or create any deriva tive works based on the Software You agree not to export or re export the Software to any country in violation of the export control laws of the United States of America Help us better support you by completing our on line registration today Have the serial number of your NavTalk handy and connect to our web site www garmin co...

Страница 4: ...GARMIN retains the exclusive right to repair or replace the unit or software or offer a full refund of the purchase price at its sole discre tion SUCH REMEDY SHALL BE YOUR SOLE AND EXCLUSIVE REMEDY FOR ANY BREACH OF WARRANTY To obtain warranty service contact your local GARMIN authorized dealer Or call GARMIN Customer Service at one of the numbers shown below for shipping instructions and an RMA t...

Страница 5: ...d a pacemaker to avoid possible interference with the pacemaker These recommendations are consistent with independent research and recommendations of Wire less Technology Research Persons with pacemakers should ALWAYS keep the phone more than six inches from their pacemaker when the phone is turned ON should not carry the phone in a breast pocket and should use the ear opposite the pacemaker to mi...

Страница 6: ... obey them Also if using your phone while driving give full attention to driving Driving safely is your first responsibility Pull off the road and park before making or answering a call if driving conditions so require Vehicles RF signals may affect improperly installed or inad equately shielded electronic systems in motor vehicles Caution The Global Positioning System GPS is operated by the gover...

Страница 7: ...SE REQUIRING PRECISE MEA SUREMENT OR DIRECTION DISTANCE LOCATION OR TOPOGRAPHY THIS PRODUCT SHOULD NOT BE USED AS AN AID TO DETERMINE GROUND PROXIMITY FOR AIRCRAFT NAVIGATION Service and Repair This product does not contain any user serviceable parts Repairs should be made only by an authorized service center European Union Directives Conformance Statement This product is in conformance with the r...

Страница 8: ...ard Feature 7 Turning the GPS On Off 7 Marking your current location as a Waypoint 7 Using the Profiles Feature 8 The Main Menu 12 24 The Phone Tab 12 16 The GPS Tab 17 18 The PDA Tab 19 The Settings Tab 20 24 SECTION 3 Phone Operation 25 60 Making a Call 25 27 Handling a Call 28 29 Answering a Call 28 Placing a Call on Hold 28 Muting a Call 28 Ending a Call 28 Conference Calls 29 Sending a Call to...

Страница 9: ...d Out 71 Map Navigator Options 72 76 Find n Go 77 83 Creating a Route To a Destination 84 Auto Routing 85 SECTION 5 System Settings Options 96 98 Display Settings 96 Time Settings 97 Interface Settings 98 SECTION 6 Appendices 99 118 Appendix A Accessories 99 101 Appendix B Specifications 102 Appendix C Messages 103 106 Appendix D Unit Care 107 Appendix E UTC Offset Chart 108 Appendix F Intellisync ...

Страница 10: ...der can offer connection to the desired features Some network provided features such as Voice Mail may function in a manner unique to your provider s system and are not discussed in detail in this manual The network provider will provide you with proper instruction for their use It is assumed that your network service provider will test the function of network dependent features supported by this ...

Страница 11: ...e insulating strip from the electrical contacts on the battery Discard the strip 3 Reinstall the battery on the back of the unit Charging the Battery 1 With the battery in place and the insulating strip removed from the contacts connect the charger supplied with the unit to the connector on the base of the unit 2 Then connect the charger power input to an appropriate power source power point etc T...

Страница 12: ... occur Your SIM card is secured by a Personal Identification Number PIN to discourage theft or unauthorized use Your cellular ser vice provider will often perform this installation for you in order to check the phone for proper operation NOTE Switch off your unit before inserting or removing your SIM card to prevent damage to the SIM card memory SIM Card Installation Removal 1 Switch off the unit ...

Страница 13: ... call Dialling and Data Entry KEYPAD Used to dial phone numbers and enter alpha numeric characters for data entry Also some special key functions for speed and emergency dialling international prefixes etc Remote Earpiece Microphone Connection Volume UP Zoom OUT key Press and Hold to increase earpiece volume or to zoom out on the map page to show more map area with less detail Press and Release to ...

Страница 14: ...commended that you change this code when setting up your unit Record your new PIN code and store in a safe place 3 If you make a mistake press the CLEAR key and begin again If you fail to enter your PIN 1 code in three attempts the unit will lock and a SIM Blocked message will appear To learn how the PIN Code Security feature is set up and how to use an unblock code PUK see the section of Phone Op...

Страница 15: ...de of the unit 1 Press and hold the UP key to display the volume control window with a slider control for the earpiece 2 Use the UP DOWN Volume or ARROW keys to raise or lower the volume Press the CLEAR key to close the window when done or allow it to timeout 3 To adjust the earpiece ringer and key press tone volumes at the same time refer to the Phone Settings Profiles Page on page 53 4 For quick ...

Страница 16: ...page also allows you to select a time format 12 or 24 hour and to activate deactivate daylight savings time options The Service Status Indicator LED The current service status is indicated by an LED located at the top of the unit next to the wireless antenna see page 3 When the Service Status feature is turned On the LED will Flash Red when no service is available Flash Amber when roaming Flash Gr...

Страница 17: ... attempted Press and Hold the CLEAR key to cancel Keyguard Incom ing calls and messages will temporarily unlock the keypad Synchronizing Contact Data Begin Sync Applies only to units provided with the Intellisync for GARMIN CD ROM To begin synchronizing PC contact program data using Intellisync for GARMIN highlight this option and press ENTER Refer to page 109 Turning the GPS Receiver On or Off To...

Страница 18: ... cradle Personal 1 2 settings for use in any other type environment Settings for each profile type are made from the Profiles Settings tab of the Phone Option of the Main Menu Settings tab as described on Page 53 When viewed on this page each setting displays a list of custom settings for Calls SMS Alarms Data Calls Vibrate Message Beeps and Key Beeps Using the Standby and Power Saver Features The...

Страница 19: ... and options or a set of tabbed pages with features and options These pages often include an Option Menu that allows you to customize the page s features Individual features on these pages contain data fields that display useful information most can be programmed by selecting options from a list or allow you to enter specific data using the KEYPAD keys To move about the fields on these pages use t...

Страница 20: ...enter user specific data into a data field Not only do they dial phone numbers but they also allow you to enter alpha numeric characters in data fields by repeatedly pressing the key The alpha characters are entered in sequence starting with first letter on the key and ending with the numeral A character chart for each key press sequence is provided on the following page To enter data using the KE...

Страница 21: ...hift to an upper case character for the first letter of an entry Press twice to enter all char acters in upper case characters The status bar will display a solid arrow for first character caps only and an arrow with a dash for all upper case Pressing this key will not enter a symbol when entering text Use the 1 Key Use the NumLock feature for quick entry of numerals only To engage the NumLock featu...

Страница 22: ...s you with a list of phone feature pages which allow you to manage your calls The first is Contacts which is a tabbed directory of the names you have entered and saved for future use Names and numbers entered in Contacts can be synchronized with those contained in PC Contact management programs using the Intellisync for GARMIN CD ROM see page 109 Options for creating a New Phone Number entry are F...

Страница 23: ...eceived Calls page maintains a record of the last calls you have received allowing you to redial them if desired Page Options are Delete All The Air Time in minutes page keeps track of the number of call minutes used for your last call and for all accumulated calls Page Options are No Options The Call Cost page provides you with accurate information about your call units for the last call made and...

Страница 24: ... Info Messages The Inbox page is a comprehensive listing of received messages information and voice mail Page Options Clear Folder Set Signature and View Info Messages The Read page is a listing of received messages that have been read and retained for review or reference Page Options Clear Folder Set Signature and View Info Messages The Draft page is a comprehensive list of messages informa tion ...

Страница 25: ...on report has been sent Page Options Clear Folder Set Signature and View Info Messages Messages Page Options The Messages Page provides three options Set Signature include a From signature that identifies you as the author of the message and View Info Messages which provides access to a service provider feature page that displays information messages for service or other type promotions The Clear ...

Страница 26: ... wireless web Page Options Add to Bookmark Show URL View Air Time Encryption and Restart This feature will not be functional unless your service provider offers support and you add it to your sub scription Like internet service at your home or office there will be air time fee charges for its use The Main Menu NvTlkGSMManual copy indd 16 12 2 2002 8 42 03 AM ...

Страница 27: ...On Off The second feature is Find n Go which consists of a database of map locations for waypoints points of interest cities exits addresses and junctions Select a map item from the lists provided and then press ENTER to view on the map create a route and Goto it or save it as a waypoint You can choose from lists of Nearest or By Name The type of mapping information available to Find n Go func tio...

Страница 28: ... Page Options Reset Trip Reset Max Speed and Reset Odometer The final feature on the list is the Satellite Information Page which displays both an overhead view of the GPS satellites being tracked by the unit and the relative strength of each signal being received In addition it displays your present latitude and longitude elevation current speed and relative accuracy of your position Page Options...

Страница 29: ...sk on the list will display the due date for the task at bottom of the page Data contained in this feature can be synchronized with contact management data for a PC as explained on page 109 Page Options Delete All The third feature on the list is Notes which allows you to store important information in note form To retrieve that information with out scrolling through long lists just use the on scr...

Страница 30: ...ions None The Network page allows you select a network choose a preferred network and select a service operator Page Options Restore Defaults The Calls page allows you to setup the ways calls are handled Page Options Restore Defaults The SMS page allows you to enter a Service Center No determine the length that a message is valid choose a format and select how the recipient replies Page Options Re...

Страница 31: ...f Reach Voice if Not Available All Fax Calls and All Data Calls Page Options None The Call Barring Page allows you to bar All Outgoing Calls International Calls International if not Home All Incoming Calls Incoming if Roaming and Cancel All Barrings Page Options None The Call Waiting Page allows you to be notified of all incoming calls while on another call Page Options None The Setup Page allows ...

Страница 32: ...lay Timeout Units of Measure and Language options Page Options Restore Defaults The Time page with Time Setting Time Format Time Zone options and Daylight Savings Time options Page Options Restore Defaults The Interface page with Serial Data Format options Baud Rate options Beacon Frequency Bit Rate options and Beacon Receiver Status Information Page Options Restore Defaults The Main Menu NvTlkGSM...

Страница 33: ...a tion and Direction Displays and Cardinal Letters or Numeric Degrees Page Options Restore Defaults and Setup User Grid The Guidance page which allows re calculation of a route after you have traveled off the original path to a destination an optional pop up message to advise you of upcoming turns on a route and three optional avoidance selections to make a route more efficient Page Options Restor...

Страница 34: ...e All The Line page with text and zoom options for Track Log Railroad and Street Label Page Options Restore Defaults The Point page with text and zoom options for Waypoint Exit and Point of Interest Page Options Restore Defaults The City page with text and zoom options for Large City Medium City Small City and Small Town Page Options Restore Defaults The Area page with text and zoom options for Ri...

Страница 35: ...ent program Intellisync is compatible with Microsoft Outlook ACT Lotus Notes and Palm Desktop applications Refer to instructions provided with the CD ROM 1 Highlight Contacts from the Main Menu Phone Tab and press the ENTER key to display the tabbed list of names and phone numbers 2 Select the desired name from the list and press the ENTER key to display the Information Page for that name 3 With t...

Страница 36: ... the SEND key to display the Dialled Calls list 2 Use the ARROW key to select the desired tab for the list you want to view 3 Use the ARROW key to select the desired name and number and then press ENTER to display the list of options or the SEND key to dial the number listed Pressing the MENU key will display the Delete All option to clear the list 4 If you chose the Options Menu use the ARROW key...

Страница 37: ...he phone number entered in that slot on the Speed Dial List Refer to page 31 for setting up the Speed Dial List and page 60 for entering your Voice mail number Dialling from the SIM Card or Fixed Dialling List As with Speed Dialling prior to using these two Dialling Lists you must place phone numbers on the lists Note that if you have previously added numbers to your SIM card prior to installing i...

Страница 38: ... mail messages or perform a task that takes you away from the phone 2 To return to the person just placed on hold highlight the Hold tab to display the Hold List Then highlight call on hold and press ENTER Muting a Call 1 Highlight the on screen Mute button and press the ENTER key to mute the microphone in order to talk privately with someone nearby without the person on the phone overhearing your...

Страница 39: ...te select Private and press ENTER 4 To return to the regular conference mode return to the Hold List and press the on screen Join button 5 To end a conference call press the END key Sending an Incoming Call to your Voice Mailbox If you have voice mail service any unanswered call will be for warded to your voice mailbox However when you are using CLIP Caller Line Identification Presentation the nam...

Страница 40: ...to highlight the next field and repeat the process described in Step 2 4 Once you reach the Phone Number field press ENTER to display the Change Type To or Swap With option Select one and press ENTER to display a list of entry categories You can select any for entry 5 To edit an entry highlight the desired field and use the KEYPAD to enter new names phone numbers etc 6 To view the Options menu for Ne...

Страница 41: ...ry page by choosing Add To Speed Dial from the options menu 3 Once an entry on the list is highlighted pressing the MENU key will display the Entry Options Menu From this menu you can edit an entry select a number from Contacts edit using Contacts Entry page call directly from the list move the number on the list swap the number with another on the list or delete the entry 4 To dial a Speed Dialli...

Страница 42: ... To Save a Phone Number to the SIM Numbers List 1 With Contacts page displayed highlight a name from the All tab list and press ENTER to display the information page for that name 2 Press the MENU key to display the Options Menu for that page 3 Use the Down ARROW key to highlight the Save To SIM Numbers option and press ENTER If there is more than one phone number listed on the page a prompt windo...

Страница 43: ...lect the Phone option and then press ENTER to display the tabbed index of features 2 Use the ARROW key to select the Security tab then highlight the Fixed Dial Mode field and press ENTER to display the On Off menu 3 Select On and press ENTER to display the PIN 2 Code Entry box To insert phone numbers on the Fixed Dialling Numbers list 1 With Contacts page displayed press the MENU key to display the...

Страница 44: ...cts press ENTER to display the Options Menu again select Save To Phonebook and press ENTER 7 To delete a Name and Number press ENTER to display the Options Menu select Delete press ENTER select Yes from the Delete prompt and press ENTER My Phone No s Enter up to two user Phone Numbers Phone Operation Using Contacts Use the Edit Name and Edit Number options to change both the name and number of an ...

Страница 45: ...t not answered If the caller had Caller Line id enabled you will see the Name and Number of the caller as well as the time and date of the call To view Missed Calls 1 Highlight Call History and then press ENTER to display the Call History tabs 2 Use the Up Down ARROW keys to scroll through the list Each entry lists the phone number name of individual called if listed in the Phone Book or Caller id...

Страница 46: ...the Last Call and All Calls Since the last time you cleared the time entries and Total Minutes 3 Use the Up Down ARROW key to highlight the on screen Clear button to reset the All Calls Since field Call Cost To view Call Cost 1 Highlight Call History and then press ENTER to display the Call History tabs Highlight Call Cost and press ENTER to display the Call Cost Page 2 Observe the Accumulated Char...

Страница 47: ...highlight the To field to enter a desired name from Contacts or enter the desired number in the adjacent data field using the KEYPAD You must either enter the recipient s phone number or a valid name from Contacts 4 Next move to the Message field press ENTER and begin to enter your message using the phone KEYPAD 5 When the message is complete press the SEND or SAVE button Note that Information Messag...

Страница 48: ...eived that are unread It may also include voice mail notification To view the Message Inbox 1 Highlight the Inbox tab and press ENTER to view received messages 2 To read a desired message use the ARROW key to highlight it and then press ENTER to display the message You will have three options to choose from Reply Forward or Delete Once read the message will move to the Read page Read Messages Once...

Страница 49: ...cts or Add To Contacts 4 Highlight the option of your choice and press ENTER to initiate To view and bookmark websites included in Messages 1 Highlight the desired message from the Inbox list and press ENTER to display the message 2 Press the MENU key to display the Options Menu for the Message Page Highlight Use Web Address and press ENTER to move to the Browser Enter Address window where you wil...

Страница 50: ...e To send a Draft as a Message 1 Highlight the Drafts tab and then use the ARROW keys to highlight the desired drafted message and then press ENTER to display the message 2 Highlight the on screen Send key and press ENTER to send the message Sent Messages Sent Messages are those which have been forwarded to the recipient as opposed to those which you have created and placed in the Draft List to be...

Страница 51: ...t the recipient field and enter a phone number then highlight the Send button and press ENTER Or while composing a message press MENU and select Insert Template and select a template to insert in your message Message Templates List Template inserted in a Message Select a message from the Templates List Message selected from the Templates List Message recipient selected from Contacts Signature Repor...

Страница 52: ...time minutes or hours Then move to the adjacent field press ENTER and select either Minutes or Hours then press ENTER again 7 Move down to the Timeout field and press ENTER to place a check mark next to the Timeout option 8 Use the ARROW key to highlight the number field below the timeout option and then use the KEYPAD to enter the units minutes or hours before the report stops repeating Then highlig...

Страница 53: ...ose from is network dependent if your service provider does not provide a gateway to sites then you will need to know the URL web address for a site and enter it manually To Set Up the MiniBrowser 1 Select the Settings Tab of the Main Menu then highlight the Phone feature and press ENTER to display the Phone Settings tabs 2 Use the ARROW keys to tab over to the Browser tab 3 Refer to page 61 for d...

Страница 54: ...ing a Site 1 With the web site open press MENU to display the options menu 2 Highlight Add To Bookmarks and press ENTER to place the URL or label on the Bookmarks List 3 To display the Options Menu for an individual entry press ENTER Viewing a site URL 1 With the web site displayed press MENU to display the options menu 2 Highlight Show URL and then press ENTER to display the URL dialog window Pre...

Страница 55: ... deleted from the list You can setup appointments for recurring events as well To mark a date on the calendar 1 Select Calendar from the Main Menu PDA tab and press the ENTER key to display the Calendar page calendar 2 Use the ARROW key to move to the desired date on the calendar and then press ENTER to display the Appointment page for that day 3 If there are no notes for that day and you want to ...

Страница 56: ...h the New Appointments Page displayed press the MENU key to display the options menu 2 Select Recurrences and press ENTER to display the Recurrences setup page On this page you will observe and Interval field with a default entry of None Press ENTER to display the list of interval options When you highlight any other option than None and then press ENTER to display the Frequency Day of the Week and...

Страница 57: ... display the due date option menu Select Choose Due Date and press ENTER to display a calendar page Use the ARROW key and ENTER key to select a month year and day After the day is selected the Task Item Details page will reappear 5 Next highlight the Task description box and press ENTER to begin entering the description Use the KEYPAD keys to enter the description Press the key prior to the desire...

Страница 58: ...ight the New button and then press ENTER to display a new Note Detail page 4 Begin entering your note using the keypad as explained on page 10 5 When completed press the ENTER key and then move down to highlight the Done key and then press ENTER to save the note to Notes List 6 To view the Note Detail page for any note select the on screen Find key and press ENTER Then use the keypad to enter a ke...

Страница 59: ...me With each new hand the first card is dealt to the dealer The dealer s cards are shown at the top of the display and your cards are shown at the bottom Face cards count as 10 points number cards count as face value and aces count as either 11 or 1 point An ace and face card is blackjack and automatically wins against any other hand If you and the dealer have the same score neither wins To play B...

Страница 60: ...se the ARROW keys to move your ships about Press the MENU key to pop up the rotation option 3 When your ships have been deployed press ENTER to begin firing A blank playing field will display with the enemy ships deployed and hidden from view Use the ARROW keys to select a square where you believe an enemy ship to be hidden 4 Press ENTER to fire A pop up message will tell wether you missed or hit a s...

Страница 61: ...t from platform to platform 4 When you land on a light or dark grey platform you are near a pit or the dragon If you plunder into a pit you will fall to the bottom If you move into the dragon you will be incinerated by his fiery breath These hazards will almost always be surrounded by grey platforms 5 To kill the dragon with an arrow and win the game stop on the dark grey platform you believe to ne...

Страница 62: ...eys to enter a number or function The phone keypad key also performs the function The keypad acts as a decimal point 2 To select the Standard or Scientific calculator function press the MENU key to display the options menu 3 From the options menu use the ARROW and ENTER keys to select the calculator type and method of angle measurement Radians or Degrees 4 To exit the calculator feature press the C...

Страница 63: ...ovide signals for the different types of incoming events such as Calls SMS messages Alarms Data Calls and Vibrate On Off The Ringer choices are Standard Ringer Ringers 1 5 10 Melodies and Off To set a ringer for the event type 1 Use the ARROW key to highlight the event field 2 Press the ENTER key to display the list of choices 3 Use the ARROW key to highlight your choice then press ENTER When you s...

Страница 64: ...the ENTER key to isolate the slider bar and then use the Up Down ARROW key to adjust the Ringer volume 5 Use the Right ARROW key to highlight to the volume control slider for the Key Beeps 6 Press the ENTER key to isolate the slider bar and then use the Up Down ARROW key to adjust the Key Beep volume 7 Press the ENTER key to isolate the slider bar and then use the Up ARROW key to return to the Vol...

Страница 65: ... call This is of particular convenience when using the NavTalk Hands Free Kit Auto Redial This feature allows you to redial a number you are attempting to call when there is no answer during the initial call The unit will automatically redial the number up to 7 times To turn On Off the above mentioned features 1 Use the ARROW key to highlight the desired feature and then press ENTER to place or re...

Страница 66: ...xed Dialling Mode Allows you to set Fixed Dialling Mode feature to On or Off using the PIN 2 code When Fixed Dialling is On only those phone numbers on the List may be called using the NavTalk Change Codes Allows you to change the access codes for PIN 1 PIN 2 and the Network Your service provider can set the PIN 1 code and PIN 2 code initially and inform you of the number sequence To change a code...

Страница 67: ...referred Network List 2 Use the ARROW key to move to an empty slot on the list and press ENTER to start the entry process Use the KEYPAD to enter the code for the network The network name will appear above the entered code To select a network from the preferred networks list 1 Select Manual from the Network Selection Field Options 2 Highlight the Preferred Networks field and press ENTER to display ...

Страница 68: ...of the Main Menu Settings Tab to display the SMS page 2 Use the ARROW key to highlight the Service Center field and press ENTER and begin using the KEYPAD keys as explained on page 10 to enter the number of the service center providing you with SMS service Press ENTER when finished 3 Use the ARROW key to move down to highlight the Messages Valid For field Press ENTER to view the Options Menu You can ...

Страница 69: ...re allows you to enter a specific phone number that you want dialled when pressing and holding the NINE key to auto dial the number which sends an SMS message If you want to insert your own message you may enter it in the message box or insert a template from the templates list However if you delete the L and T characters from the message your loca tion will not be sent with the message When your ...

Страница 70: ...eactivate a pop up warning window prior to each time you use the Browser Require Authorization This feature allows you to require an autho rization code prior to active use of the Browser The authorization code you will be prompted to enter will be your PIN 2 code See page 56 for information on PIN codes Enable Push Content This feature allows you to enable disable certain types of internet commun...

Страница 71: ...ed at the bottom of the page Choose any or all from the list below All voice calls to send all voice calls to a number you have specified Voice if busy to divert voice calls to the specified number only when your phone is busy Voice if no answer if you don t want to answer your phone and prefer to send the call to the specified number Voice if out of reach if out of your service area or the phone ...

Страница 72: ... phone International calls to restrict any outgoing international calls Int l if not home to restrict international calls to your home coun try only All incoming calls to restrict all incoming calls Incoming if roaming to restrict all incoming calls if roaming outside your home network Cancel all barrings to cancel all call restrictions 4 Press the ENTER key to pop up the options menu and use the ...

Страница 73: ...ay the Call Waiting Page 3 Use the ARROW key to highlight All incoming calls A Select this to notify of all incoming calls message will appear at the bottom of the page 4 Press ENTER to pop up the menu Highlight Activate Cancel or Check Status and then press ENTER to confirm 5 An activation page will appear if you selected Activate This page will cycle off when the activation message has been recei...

Страница 74: ...ges 2 Use the ARROW key to highlight the Setup tab and then press ENTER to display the call Setup Page 3 Use the ARROW key to highlight Send Own field press ENTER to display the On and Off option Use the ARROW key to highlight your choice and then press ENTER 4 Highlight the Default Divert Delay field and press ENTER to display the list of delay options Highlight your choice and press ENTER Call Ser...

Страница 75: ...the display When your location has been determined the Map Navigator Page will state Ready To Navigate and display Cardinal letters North South East West and your current location will be shown on the map above it If there are not enough satellites in view to determine its location the unit will display a Poor Satellite Reception message with four options A brief explanation for each option will a...

Страница 76: ...roads that is automatically placed on the map Auto routing also provides text directions at the top of the display indicating direction to go and when to make turns Using an earpiece or the Handfree Kit with remote speaker you can receive voice commands for each change in direction The Map Navigator Page Options Menu provides you with a variety of features to enhance your navigation capabilities Y...

Страница 77: ... an active Goto Track or Route These letters can be changed to degrees Speed Field Speed Your rate of travel can be displayed in miles per hour kilome ters per hour or nautical miles per hour Distance To Go Field Distance When on a route to a destination the distance remaining to the destination will be displayed in the left side of the field below the map Time Remaining Field Time The time remain...

Страница 78: ...le The smaller the circle the more accurate your location More detailed map features as well as information about those features can be displayed using map data transferred from a GARMIN MapSource CD ROM When using MapSource data the word MapSource will appear below the map scale whenever you zoom in to view map details Accuracy Circle The Accuracy Circle defines your location by placing the positi...

Страница 79: ...n the display The pan function is activated by the ARROW keys which move the arrow in the desired direction As the arrow moves to the edge of the dis play screen the map will also move to reveal more map area When moving to the edge of the display the map will take some time to draw the new area of the map An hourglass will display in place of the panning arrow when the map is redrawing Pressing t...

Страница 80: ... option to mark this item as a waypoint You can also use the panning arrow to measure the distance between two map items as explained in the section titled Measure Distance on page 75 When using the panning arrow on the map page and pressing the MENU key and then selecting Find n Go from the options menu the Find Menu will display items with the panning arrow map pointer loca tion used as a refere...

Страница 81: ...eets within a MetroGuide or other MapSource coverage area more detailed map scales 500 to 100 meters may be preferred since they provide a good view of all streets and not just major roadways When traveling on major roadways highways and Inter states map scales of two kilometers or more may be more practical With certain types of MapSource data such as MetroGuide data the unit may match your locat...

Страница 82: ...on option will be replaced by a Resume Navigation option View Turns This feature is only available when navigating an auto matically generated route and displays a list of turns in the route Routes This feature allows you to save a current route or to access previously traveled routes that are stored in the unit Refer to page 85 for more information Full Screen Map The Full Screen Map option uses ...

Страница 83: ... Detail setting to prevent map clutter Map Options Detail Adjusts the amount of map information such as roads that is displayed Most shows maximum detail and Least shows minimum detail The higher level of detail the slower the map redrawing time Orientation Selecting North Up will display the map with North at the top Selecting Track Up will automatically rotate the map to keep your current direct...

Страница 84: ...Options Menu Line Options Text Options Menu City Options Large City Controls the display of large cities on the map Medium City Controls the display of medium sized cities on the map Small City Controls the display of small cities on the map Small Town Controls the display of small towns on the map Area Options River Lake Controls the display of river lakes and other bodies of water on the map Par...

Страница 85: ...ss the ENTER key A field for distance will appear at the top of the map 3 Move the panning arrow to the location you want to measure from and press the ENTER key 4 Move the panning arrow to the location you want to measure to and the distance information will be displayed in the field 5 Press the CLEAR key or select Stop Measuring to exit this feature Routes You can create a route to a destination w...

Страница 86: ...Info will be grayed if there are no recognizable maps loaded or an unlock code is required to open the map Stop Calculating This option is available when a route is being calculated Choose this option if you no longer want to navigate to a destination or if you have chosen a destination that is very difficult for the unit to create a route to When this occurs a recalculating message will be repeat...

Страница 87: ... Using Map Pointer depending on which reference point is used Using By Name and Nearest Lists All items on Find Menu option lists can be viewed in two formats By Name a list of every item available for a category or by Nearest a list of only those items for a category that are nearby The Nearest option pres ents you with a much smaller list of items and speeds the selection process To switch back ...

Страница 88: ...described on page 10 5 Press the ENTER key to display the information page for the item Selecting a Map You can select the type of map data from which to base your Find List items by choosing from either the built in basemap or a down loaded MapSource product such as City Navigator or City Select 1 With a By Name find list displayed press the MENU key to display the Options Menu 2 Use the ARROW key...

Страница 89: ...atabase can be found by selecting the Cities option of the Find Menu You can find a city from a list of cities By Name or by Nearest using the procedure explained on the previous page to display the City Information page You can use the options menu Select Map option to display the city from the maps contained in your map data storage area The City Information Page for the selected city displays t...

Страница 90: ... bottom of the list a distance field indicates the distance from your location to the highlighted exit The options menu allows you to Select Map if the exit is shown on more than one map on your map data base 5 Scroll through the list to highlight the desired exit 6 Press the ENTER key to display the Info Page for that exit This page contains the exit description at the top of the page and a list o...

Страница 91: ...on and then press the ENTER key to display the map choices Highlight the map you wish to use and press the ENTER key to return to the list 5 Follow instructions on page 78 to find a point of interest by name or nearest 6 Highlight the desired point of interest on the list and press the ENTER key to display the item information page The information page will include the full name address and often t...

Страница 92: ... the Map Page 7 If the address is incorrect or not in the map data base a None Found message will appear and you must re enter new data 8 If the address is accurate Select Address page will display those addresses that match your entry As each is highlighted a match quality index will display at the bottom of the page 9 If there are many matches use the optional city and postal code fields to place...

Страница 93: ...ly Found Places option and press ENTER to display the tabbed pages for Points of Interest Addresses and Junctions Cities and Other 3 Use the ARROW Right or Left key to move to the tab with the desired category then move down the list of places to highlight your selection and then press ENTER to display the Information Page for that item 4 Highlight the Map or Goto key on the page and press ENTER t...

Страница 94: ...to display an information page which contains a Goto button 3 Highlight the Goto button on the page and press the ENTER key To Goto a Find Menu Item 1 Use the Find Menu to display the various lists of map items Select a category and highlight an item on the list 2 Press the ENTER key to display the item s information page which contains the Goto button 2 Highlight the Goto button on that page and ...

Страница 95: ...y with the View Turns Page displayed Options are Stop Navigation Recalculate Use Detour Save Route and Show Arrival Times Show Time to Go To view the Route Turns list press the MENU key while navigating by selecting View Turns from the Map page options menu Use the ARROW key to scroll up and down the list of turns Press ENTER for a zoomed in view of that turn with distance from your current locati...

Страница 96: ...er 1 With the Trip Computer page displayed press the MENU key to display the Options Menu 2 Use the ARROW key to highlight the Reset Trip option 3 Press the ENTER key to clear the Trip Odometer field To Reset the Maximum Speed 1 Follow the steps defined above To Reset the Odometer 1 Follow the steps used to reset the Trip Odometer above To select the Units of Measurement 1 Distance can be set to Sta...

Страница 97: ...rk a waypoint for your current location It will automatically be assigned a 3 digit number If the GPS function is turned Off or the unit is acquiring satellites the Mark Waypoint option will appear gray and cannot be activated 2 To change the name of the waypoint use the ARROW keys to highlight the waypoint name field Follow instructions titled Entering Each Letter or Number on page 10 You can ente...

Страница 98: ...of roads streets or other items 2 The New Waypoint page will display the waypoint that was created at the panning arrow location Be certain to press and release the ENTER key for these operations Pressing and holding the key will mark your current location See Marking Your Current Location on page 87 To create a new waypoint by manually entering its coordi nates lat lon 1 Press and hold the ENTER ...

Страница 99: ...t Menu Then highlight Mark Waypoint from the list of options 2 Press and hold the ENTER key to display the Mark Waypoint page Your current lat lon will be displayed in the Location field 3 Press the CLEAR key before pressing any other key to close the page without storing your location as a waypoint Sending your latitude and longitude position data to another NavTalk GSM Phone Refer to the section ...

Страница 100: ...int symbol name location and elevation fields following the instructions in the section titled How To Enter Data on page 10 3 Highlight the OK button and press the ENTER key to save changes To delete a waypoint 1 Use the Find n Go feature to display the Waypoint Page as described on page 79 2 Highlight the Delete button and press the ENTER key Highlight the field you want to edit and enter new data ...

Страница 101: ...age a Location 1 With the waypoint page displayed press the MENU key to display the Waypoint Option Menu 2 With Average Location highlighted press the ENTER key to display the Average Location Page 3 Observe the Estimated Accuracy field and press the ENTER key with Save highlighted when the estimated accuracy reaches the desired value 4 Press the CLEAR key to cancel Average Location and leave the w...

Страница 102: ...s North Up Track Up You can set the Satellite Information Page skyview orientation to either North Up with the skyview oriented north or Track Up with the skyview oriented toward your current direction of travel These settings affect only the satellite skyview Elevation and Location You can set a new elevation and new location to help the unit obtain a position fix New Location will not be availab...

Страница 103: ...ually listed in the title block of the map If you are comparing GPS coordinates to a paper map chart or other refer ence the map datum in this field must match the horizontal map datum used to generate the map or other reference The default datum is WGS 84 World Geodetic Survey 1984 and should only be changed when using maps or charts specifying a different datum If a map does not specify a datum ...

Страница 104: ...e this setting may result in substantial differences between the information displayed on the unit and external references such as a magnetic compass Magnetic Variation Provides the magnetic variation for Magnetic north reference when selected and allows you to enter corrections for the magnetic variation when using a User based North Reference program True and Grid north reference selections do n...

Страница 105: ...Automatic Only Avoid Allows you to avoid calculation of a route that involves U Turns Toll Roads or Highways Highlight the box next to each option to activate the avoid options in your route Routing Settings Tab Route Preference Allows you to choose one of three methods for routing you to a destination The three options are Faster Time which primarily selects freeways highways and thoroughfares Sh...

Страница 106: ...ve Mode Turn On for maximum power saving on Standby Units Units of measure can be set to Statute Metric or Nautical miles and miles per hour kilometers and kilometers per hour or nautical miles and knots Language You can choose from five languages to display page and menu text English German French Italian Swedish Danish and Dutch Page Options Press the MENU key to display the options for this pag...

Страница 107: ...ime Can be turned On or Off or set to Automatic Current Date and Current Time Can set by highlighting the Set button and pressing ENTER to display the Set Time page To Set the Time and Date 1 Highlight the Set Time button and press ENTER to display the Set Time Page 2 With the Date field highlighted press ENTER to display the Calendar Page Use the ARROW to highlight the year and then move it LEFT o...

Страница 108: ... ver sion 2 3 data RTCM In Text Out allows DGPS input using a standard RTCM SC 104 format and simple ASCII text output of location and velocity information Modem allows connection for data transmission using a PC Refer to Appendix H on page 111 None Provides no interfacing capabilities The Baud rate options are select able only for Text Out RTCM In and RCTM In Text Out Format options Beacon Option...

Страница 109: ...es on the unit packaging for additional accessories that may be included with your particular model of the NavTalk GSM Phone GPS Optional Accessories Not included with the Unit Carrying Case Protects the unit from scratches and abrasion Not shown Non Skid Vehicle Dash Mount Used with Hands Free Kit Not shown Cigarette Lighter Adapter Provides power from an automobile cigarette lighter Hands Free K...

Страница 110: ... Kit for installation Remove the protective cover before placing the NavTalk in the Hands Free Kit Cradle Hands Free Headset Port Lift cover to install Battery Release Tab Press Down to remove depleted battery and replace with a spare or to access SIM Card slot Carry Lanyard Slot Auxiliary Power or Data Cable Hands Free Headset Connector Cigarette Lighter Adapter GA 26 C Remote GPS Antenna Belt Cl...

Страница 111: ...sing the Belt Clip Clip Knob Plug Attaches to the belt or waistband Slot accepts the Clip Knob and locks it into place 1 Squeeze the Belt Clip to open the clip and insert over a belt or waistband 2 Slide the Clip Knob into the slot on the Belt Clip until it clicks into place 3 Press Down on the Release Tab to remove the NavTalk from the Belt Clip Release Tab Press Clip to open Clip Knob Slot NavTa...

Страница 112: ...andby Time 300 hours 4 Specifications are subject to change without notice 1 Subject to accuracy degradation to 100m 2DRMS under the U S DoD imposed Selective Availability Program 2 With optional GARMIN GBR 21 Beacon Receiver input 3 External power can only be applied using the GARMIN Vehicular Power Adapter or Travel Charger Modification to these or other applications will void the product warranty...

Страница 113: ...On to reset the list Bookmark Memory Full Delete old data to allow space for new data Call Barred An incoming call has been barred Call Barring ON Acknowledgement that at least one Call Barring feature is now active Call Cost Not Available Contact your service provider to set up this feature Call Diverted The incoming call has been diverted Call Diverted ON Acknowledgement that a Call Divert featu...

Страница 114: ...hed Code entry error retry entry Cost Limit Exceeded Cancel call or reset Cost Limit Database Error There was an error in the unit s database Detail Maps Don t Support Routing Install MetroGuide City Select or City Navigator MapSource mapping data Dialling The Browser session is dialling a phone number Entry Already Exists Modify the name for the entry Emergency Only The keypad is locked and you c...

Страница 115: ... is entered in Contacts entry for this name None Found There is no such address Junction point of inter est or city in the map information database Check spelling or number entry and try again Note Memory Full Delete selected old Notebook notes to allow space for new notes Number Blacklisted You have been redialling a number that has not responded for multiple redials and is now being sent to the ...

Страница 116: ...y been assigned Choose another name Waypoint Memory Full All of the waypoints have been assigned You Bust You have exceeded 21 points in the game of Blackjack Recurrence Memory Full Appointment recurrence memory is full Shorten the number of months for posting of recurring appointments Registration Failed When using Manual Network Search network registration has failed Try another network entry RO...

Страница 117: ...face Battery Care and Storage Do not store spare battery packs in a location where the metal contacts may become shorted by metal objects contained in a brief case glove compartment etc Do not store where exposure to temperature extremes may occur i e automobile trunk Do not dispose of batteries in a fire as they may explode Batteries should be disposed of using environmentally safe methods such a...

Страница 118: ...inal zone press and hold the ENTER key and observe the longitude value in the Mark Waypoint Location field It should fall within the sets of values on the chart Press the CLEAR key to avoid marking a waypoint Longitudinal Zone Offset W180 0 to W172 5 12 00 W172 5 to W157 5 11 00 W157 5 to W142 5 10 00 W142 5 to W127 5 09 00 W127 5 to W112 5 08 00 W112 5 to W097 5 07 00 W097 5 to W082 5 06 00 W082 ...

Страница 119: ...keyboard to enter data into one of the contact management programs listed above you can eliminate the need to use the NavTalk Keypad to enter data characters one by one You can also transfer existing contact data from those programs to the NavTalk Detailed instructions for using Intellisync are provided in the manual shipped with the CD ROM and in the program Help files Note that there are help fi...

Страница 120: ...formation Here is the list of the hierarchy for your reference beginning with those titles that take precedence 1 City Navigator 2 City Select 3 MetroGuide 4 Fishing Hot Spots 5 U S Waterways Lights 6 U S Topo 7 Roads and Recreation 8 WorldMap You can place a check in the boxes on the MapSource Info Page to select which maps will display Removing the check prevents it from drawing over a map you w...

Страница 121: ...and Control Panel Then click on the Phone and Modem Options icon to display the dialog pages 4 Select the Modems tab Add a 14400 bps Modem from the list displayed when you click on the Add button Configure this new modem to use the COM port connected to the NavTalk 5 Select the properties dialog and be certain to set the modem for a maximum port speed of 19200 and Not to wait for a dial tone unchec...

Страница 122: ...roperly installed The unit has not had time to make connection with your service provider Ringer control settings are set to Off You are outside the range of your cell or the signal is blocked Your SIM card is not installed The feature is service provider dependent which must be activated and subscribed to Charge battery The unit may require service or repair Contact your GARMIN Dealer Recharge th...

Страница 123: ...the service provider PDA Personal Digital Assistant PIN1 Code The first of two Personal Identification Numbers PIN2 Code The second of two Personal Identification Numbers PUK1 Code The first of two SIM PIN unblock codes PUK2 Code The second of two SIM PIN unblock codes Report A message sent to another phone or location reporting your current position coordinates Recurrences A list of the number of...

Страница 124: ... your destina tion Distance to Destination The measured distance remaining while traveling to a set destination Distance to Next The measure distance to the next turn in a route Max Speed The maximum speed attained over a given period of time Odometer The cumulative record of distance traveled Route The direction of travel laid out by the unit over existing roads and highways to a destination Time...

Страница 125: ...l Divert 61 Call Timers 36 Call Services 61 64 Call Waiting 63 Calling Line Identification Presentation CLIP CLIR 13 113 Cautions and Warnings iii v Changing Volume 5 Cities 79 Conference Calls 29 Contrast Adjustment 4 Index By Subject D Data Fields 10 Date and Time 6 97 Dialling Errors Call Failed 103 Dialling Page 25 Distance Measuring 75 E Emergency Calls 27 59 Ending a Call 28 ENTER Key 3 Enter...

Страница 126: ...on As a Waypoint 7 87 Marking Waypoints 7 87 MENU Key 3 Messages 37 41 58 59 Missed Calls 35 Mini Browser 43 44 Modem Set Up 111 N Navigation 63 93 Nearest Waypoints Cities etc 77 78 NMEA 98 Normal Mode GPS 93 Normal Mode Profiles 53 North Up 73 92 North Reference 92 Notes 19 48 O Odometer 86 Offset Time 97 108 Options Menus 9 Orient Map 73 P Panning Map 69 70 Personal Digital Assistant PDA 19 45 5...

Страница 127: ...age Service SMS 37 42 58 Simulator 93 Software Version System Info 96 Specifications 102 Speed Dialling One Touch 27 31 59 Speed Display Moving Avg Overall Avg Max 86 Synchronization Intellisync for GARMIN 109 T Table of Contents vi vii Time Format 97 108 Time Offset Chart 108 Tasks 19 47 U Unit Features 3 Units of Measure 96 V Voice Mail 29 61 Volume 5 54 W Warranty ii Waypoints List 79 Waypoints ...

Страница 128: ...118 On the Water NvTlkGSMManual copy indd 118 12 2 2002 8 43 53 AM ...

Страница 129: ......

Страница 130: ...tional Inc 1200 East 151st Street Olathe Kansas 66062 U S A GARMIN Europe Ltd Unit 5 The Quadrangle Abbey Park Industrial Estate Romsey SO51 9DL U K GARMIN Corporation No 68 Jangshu 2nd Road Shijr Taipei County Taiwan www garmin com Part Number 190 00218 00 Rev C ...

Отзывы: