background image

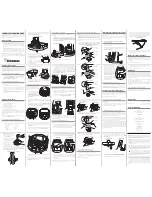
Flush Mounting the Device

NOTICE

Be careful when cutting the hole to flush mount the device. There is only a small amount of clearance between 
the case and the mounting holes, and cutting the hole too large could compromise the stability of the device 
after it is mounted.

The included template and hardware can be used to flush mount the device in your dashboard.
Trim the template, and make sure it fits in the location where you want to mount the device.
Secure the template to the mounting location.
Using a 14 mm (

9

/

16

 in.) drill bit, drill one or more of the holes inside the corners of the solid line on the 

template to prepare the mounting surface for cutting.

Using a jigsaw or a rotary tool, cut the mounting surface along the inside line on the template.
Place the device in the cutout to test the fit.
If necessary, use a file and sandpaper to refine the size of the cutout.
Use a pry tool, such as a flat piece of plastic or a screwdriver, to carefully pry up the corners of the trim caps, 

slide the pry tool to the center, and remove the trim caps.

NOTICE

Use a plastic pry tool when possible. Using a metal pry tool such as a screwdriver can damage the trim caps 
and the device.

After the device fits correctly in the cutout, ensure the mounting holes on the device line up with the larger 

6 mm (

1

/

4

 in.) holes on the template.

If the mounting holes on the device do not line up, mark the new hole locations.
10 Select an option:

• If you are using a nut plate, drill a 6 mm (

1

/

4

 in.) hole in the larger hole location.

• If you are not using a nut plate, drill 3.2 mm (

1

/

8

 in.) holes in the larger hole locations.

11 Starting in one corner of the template, place a nut plate   over the larger hole   drilled in the previous step.

If you are using a nut plate, the smaller hole   on the nut plate should line up with the smaller hole on the 
template.

12 If the smaller hole on the nut plate does not line up with the smaller hole on the template, mark the new hole 

location.

13 If you are using a nut plate, drill a 3.6 mm (

9

/

64

 in.) hole in the smaller hole location.

14 Repeat to verify placement of the remaining nut plates and holes on the template.
15 Remove the template from the mounting surface.

4

Содержание GPSMAP 12 2 Series

Страница 1: ...ginning to install the device To avoid possible personal injury or damage to the device or vessel before applying power to the device make sure that it has been properly grounded following the instruc...

Страница 2: ...by the warranty When selecting a mounting location you should observe these considerations The location should provide optimal viewing as you operate your boat The location should allow for easy acce...

Страница 3: ...yer when the screws are tightened You can use a bail mount bracket not included to bail mount the device on a flat surface 1 Using the bail mount bracket as a template mark the pilot holes 2 Drill the...

Страница 4: ...trim caps slide the pry tool to the center and remove the trim caps NOTICE Use a plastic pry tool when possible Using a metal pry tool such as a screwdriver can damage the trim caps and the device 8...

Страница 5: ...device after you mount it connect all necessary cables to the device before placing it into the cutout NOTICE To prevent corrosion of the metal contacts cover unused connectors with the attached weath...

Страница 6: ...essary to extend the NMEA 0183 or alarm wires you must use 22 AWG 33 mm wire This cable provides one differential NMEA 0183 input and output port Item Wire Color Wire Function Red Power Black Ground p...

Страница 7: ...device such as a FLIR camera to a Garmin Marine Network Connecting a Power over Ethernet PoE device directly to a Garmin Marine Network chartplotter damages the Garmin chartplotter and may damage the...

Страница 8: ...0 devices will drain your battery if the NMEA 2000 power cable is connected to the battery directly This device can connect to a NMEA 2000 network on your boat to share data from NMEA 2000 compatible...

Страница 9: ...plotter and you can connect up to three NMEA 0183 devices in parallel to the Tx port to receive data output by this chartplotter See the NMEA 0183 device installation instructions to identify the tran...

Страница 10: ...armin device Item Description Power source Power NMEA 0183 cable NMEA 0183 device Item Garmin Wire Function Garmin Wire Color NMEA 0183 Device Wire Function Power Red Power Power ground Black Power gr...

Страница 11: ...ower Cable Pinout Pin Number Wire Function Wire Color NMEA 0183 Tx A Out Blue NMEA 0183 Rx A In Brown NMEA 0183 Tx B Out Gray NMEA 0183 Rx B In Violet Alarm Yellow Accessory on Orange Ground shield Bl...

Страница 12: ...hese considerations The alarm circuit switches to a low voltage state when the alarm sounds The maximum current is 1 A and a relay is needed to limit the current from the chartplotter to 1 A To manual...

Страница 13: ...ing NMEA 2000 LEN 9 Vdc 2 NMEA 2000 draw 75 mA max Compass safe distance 65 cm 25 5 in Memory card 2 SD card slots 32 GB max card size Wireless frequency transmit power 2 4 GHz 15 26 dBm maximum 10x2...

Страница 14: ...control 127245 Rudder 127250 Vessel heading 127258 Magnetic variance 127488 Engine parameters Rapid update 127489 Engine parameters Dynamic 127493 Transmission parameters Dynamic 127505 Fluid level 12...

Страница 15: ...Rate of turn 127257 Attitude 127498 Engine parameters Static 127503 AC input status obsolete 127504 AC output status obsolete 127506 DC detailed status 127507 Charger status 127509 Inverter status 12...

Страница 16: ...origin to destination GPBWC BWC Bearing and distance to waypoint GPGGA GGA Global positioning system fix data GPGLL GLL Geographic position latitude and longitude GPGSA GSA GNSS DOP and active satelli...

Страница 17: ...ssage You can purchase complete information about National Marine Electronics Association NMEA format and sentences from www nmea org 2020 Garmin Ltd or its subsidiaries Garmin the Garmin logo and GPS...

Страница 18: ...2020 Garmin Ltd or its subsidiaries support garmin com...

Отзывы: