background image

14

Introduction

14

Reference

   Zoom Setting 

 This setting determines when items will be displayed on the map.  

You have the option of selecting ‘Off’, ‘Auto’ or a ‘Zoom’ Scale that coincides with the 
Zoom Scales for the map. 

If you select ‘Off’, the items for that option will not be displayed on the Map Page.  If 
you select ‘Auto’, the GPS 72 will automatically determine the zoom level at which to 
display the selected items.   If you select a scale setting, the items will be displayed on 
the map only when the Map Zoom Scale is at or less than the selected scale .

As an example, if you select 500 ft as ‘Zoom’ Scale setting, the selected items will only 
be displayed when the Map Zoom Scale is at 500 ft or less. 

 Setup Map — ‘General’ Tab

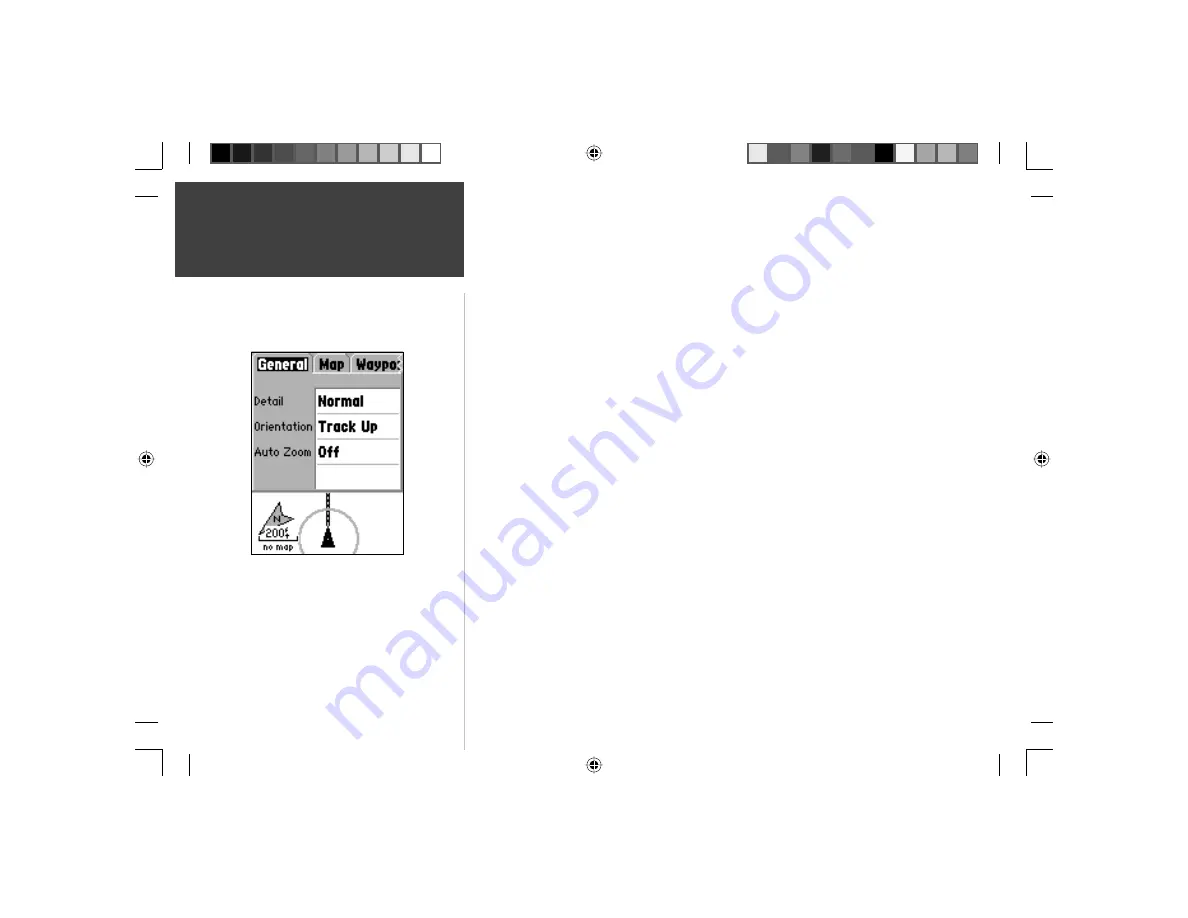
The ‘General’ Tab contains the settings for Detail, Orientation and Auto Zoom.  Below is 
a description of each feature.  To change a setting, highlight the appropriate fi eld then 
press 

ENTER

.  Make your selection, then press 

ENTER

 to accept the new selection.

 Detail — 

Settings: Most, More, Normal, Less, and Least.  The Detail settings allow you 

to control the amount of map data displayed on the unit.  If you select a setting with 
high detail, the screen redraw times will be slower.

     Orientation — 

Settings: North Up, Track Up, and  Course Up.  This option allows you 

to determine how the map is displayed.  If ‘North Up’ is selected, North will always 
be at the top of the display.  If ‘Track Up’ is selected, your current track will always 
be toward the top of the display.  If ‘Course Up’ is selected, the active course line will 
always be toward the top of the display.  If you have ‘Course Up’ selected and do not 
have an active course, your current track will be toward the top of the display.

  Auto Zoom —

 This option allows you to have the map automatically zoom in on a 

waypoint as you approach it.

Setup Map — ‘General’ Tab

Map Page Options

190-00294-00_0B.indd   14

9/25/2002, 2:37:15 PM

Содержание GPS 72

Страница 1: ...owner s manual reference guide GPS 72 Personal Navigator 72 Manual covers Rev B indd 1 9 25 2002 2 35 12 PM ...

Страница 2: ...hard drive or other electronic storage medium to be viewed and to print one copy of this manual or of any revision hereto provided that such electronic or printed copy of this manual or revision must contain the complete text of this copyright notice and provided further that any unauthorized commercial distribution of this manual or any revision hereto is strictly prohibited Information in this d...

Страница 3: ...egarding the use of the GPS 72 you can visit our Web Site or contact our Customer Service Department M F 8 00 5 00 CST except holidays at 1 800 800 1020 If you have previously registered a GARMIN product purchase using a mail in registration card we invite you to reregister that product using our NEW on line system Many services provided by our new product registration system are now being automat...

Страница 4: ...by the operator of a vehicle equipped with an GPS 72 to pay full attention to operating the vehicle and road conditions while the vehicle is in motion could result in an accident or collision with property damage and personal injury CAUTION IT IS THE USER S RESPONSIBILITY TO USE THIS PRODUCT PRU DENTLY THIS PRODUCT IS INTENDED TO BE USED ONLY AS A TRAVEL AID AND MUST NOT BE USED FOR ANY PURPOSE RE...

Страница 5: ...terference will not occur in a particular installation If this equipment does cause harmful interference to radio or television reception which can be determined by turning the equipment off and on the user is encouraged to try to correct the interference by one or more of the following measures Reorient or relocate the receiving antenna Increase the separation between the equipment and receiver C...

Страница 6: ...r GPS in no time Your GPS 72 can provide one more critical benefit peace of mind With your GPS 72 you will know where you are where you ve been and where you re going And since you ll always know the way back home you can concentrate on what you set out to do explore the great outdoors Thank you for choosing GARMIN Other features include Waypoints 500 with name and graphic symbol Tracks Automatic T...

Страница 7: ...g Waypoints 29 Points of Interest 30 Cities 30 Routes 31 34 Proximity 35 Goto Navigation 36 37 Celestial 38 40 MapSource Info 41 Setup Menu General Tab 42 43 Setup Menu Time Tab 43 Setup Menu Units Tab 44 Setup Menu Location Tab 44 45 Setup Menu Alarms Tab 46 Setup Menu Interface Tab 47 Appendices 48 65 Appendix A Specifications 48 Appendix B Wiring Interfacing 49 Appendix C Time Offsets 50 Appendi...

Страница 8: ...e Pointer Page 18 Learn about the Highway Page 19 21 Setup and reset the Trip Computer 22 Clear the Track Log 23 Learn about waypoints 25 Create Waypoints 26 28 Edit Waypoints 41 Points of Interest 30 Create a route 31 Learn about the GOTO key 36 View celestial information 38 40 Change the displayed time zone 43 Change units of measure statute nautical metric 44 Set Alarms 46 View a unit message 5...

Страница 9: ...ger valid If the Almanac is cold your unit may have trouble locking on to satellite signals If the unit is unable to receive enough satellite signals to determine its location it will display an options menu Initializing the GPS Receiver 1 With fresh batteries installed take the unit outside where a clear 360 view of the sky can be obtained 2 Turn the unit on and hold it in front of you with the t...

Страница 10: ...menu will be displayed This menu contains the options Automatic or Use Map If you select Automatic the unit will switch to the AutoLocate mode and begin searching for satellites If you select Use Map you can use the Pointer on the Map Page to select your approximate location and the unit will continue to acquire satellites normally Automatic may take longer to acquire satellites Stored w o Batteri...

Страница 11: ...tion is achieved the GPS will display your current position but is inca pable of providing an altitude reading 3D GPS Location Indicates the receiver is currently using at least four satellite signals and is capable of providing your current position and altitude 2D Differential Location Indicates the receiver is using DGPS or WAAS differential data on three satellites A D will be displayed in or ...

Страница 12: ... the GPS is receiving a signal from the satellite and is in the process of storing orbital data provided in the GPS signal When the bar turns solid black the GPS is using the satellite signal for navigation A D in or above the bar means that differential corrections are being applied to that satellite Date Time and Current Location The GPS gets date and time information from the satellites The sat...

Страница 13: ...or country and you are having trouble locking onto satellite signals select New Location When you select New Location an options menu will be displayed This menu contains the options Automatic or Use Map If you select Automatic the unit will switch to AutoLocate and begin searching for satellites This method can take up to five minutes for the unit to begin navigation If you select Use Map you can ...

Страница 14: ... the IN Key to decrease the Zoom Scale 2 Press the OUT Key to increase the Zoom Scale Map Page Options To access the Map Page Options with the Map Page displayed press the MENU Key To select an option from the Menu highlight the desired selection then press ENTER Full Screen Map This option hides the data fields and expands the map to include the entire display When Full Screen Map is selected the ...

Страница 15: ...TER to accept the selection Setup Map This option contains the Map Page Setup features The features are arranged on a tab menu making it easy to locate the different setup items The Map Waypoint Point and Line Tabs have setting for Text Zoom or both Please read the description of these settings to understand how they affect the display characteristics of the options on the Map Page Text Setting Th...

Страница 16: ...e To change a setting highlight the appropriate field then press ENTER Make your selection then press ENTER to accept the new selection Detail Settings Most More Normal Less and Least The Detail settings allow you to control the amount of map data displayed on the unit If you select a setting with high detail the screen redraw times will be slower Orientation Settings North Up Track Up and Course U...

Страница 17: ...ids will begin displaying on the Map Page If you select Auto and have the MapSource options set to ON the unit will not display a Lat Lon Grid Grid Labels This option allows you to display the coordinates on the grid You must have the Lat Lon Grid displayed for Grid Labels to be displayed If you select Auto and have the MapSource options set to ON the unit will not display Grid Labels Setup Map Wa...

Страница 18: ...s milemarkers hazards light houses buoys etc Points of Interest include general business listings such as restaurants hotels gas stations etc Points of Interest are only available if MapSource data has been loaded in the unit Geo include points such as schools cemeteries churches towers glaciers parks etc Geo data is only available if MapSource data has been loaded in the unit Exit information abo...

Страница 19: ...Auto is the selected Zoom set ting the Large and Medium cities will be displayed at a higher Map Zoom Scale setting Setup Map Other Tab The Other Tab contains the Text and Zoom settings for Railroad and an On Off setting for the Accuracy Circle To change a setting highlight the appropriate field then press ENTER Make your new selection then press ENTER to accept the selection Accuracy Circle The Ac...

Страница 20: ...e Compass Ring and Pointer to update and provide accurate navigation Pointer Page Options To access the Pointer Page Options from the Pointer Page press the MENU Key Setup Page Layout This option allows you to select the number of data field rows and the size of text used in the fields You have the option of displaying None Small 1 Row Small 2 Rows Small 3 Rows Large 1 Row or Large 2 Rows To select ...

Страница 21: ...d As you approach your destination the message Arriving at Destination will be displayed Highway Page Options To access the Highway Page Options with the Highway Page displayed press the MENU Key To select an option from the Menu highlight the desired selection then press ENTER Setup Page Layout This option allows you to select the text size and the number of data fields rows You have the option of...

Страница 22: ...ected the Track Log will not be displayed Saved Tracks If Off is selected Saved Tracks will not be displayed Setup Highway Waypoint Tab The Waypoint Tab contains the On Off settings for Next Route and Other To change a setting highlight the appropriate field then press ENTER Make your new selection then press ENTER to accept the selection Next This setting determines if the next waypoint in a Route...

Страница 23: ...lay the total distance traveled since the Trip Computer was last reset Stopped Time The Stopped Time field will display the total time that the unit was not moving since the Trip Computer was last reset Moving Avg The Moving Average Speed field will display an average speed based on the time the unit was in motion since the Trip Computer was last reset Moving Time The Moving Time field will display t...

Страница 24: ...eled since it was last reset Trip Computer Options To access the Trip Computer Options with the Trip Computer displayed press the MENU Key To select an option highlight the desired option then press ENTER Reset Trip This option will reset all data fields except max speed and odometer to zero Reset Max Speed This option will reset the Max Speed data field to zero Reset Odometer This option will reset...

Страница 25: ...ons with the Tracks Page displayed press the MENU Key Delete Saved Track If you have saved tracks this option will allow you to delete the saved track Delete All Tracks This option will delete all saved tracks Setup Track Log This selection displays the Track Log Setup menu This menu con tains options for Track Recording Record Method and Interval Record Off Wrap When Full or Stop When Full If Wra...

Страница 26: ...naccurate Show on Map and Highway when checked will allow a Saved Track to be displayed on the Map and Highway Pages Delete Button if the Delete Button is selected you will be prompted to verify you want to delete the Saved Track TracBack Button will initiate TracBack Navigation TracBack Navigation uses Track Points in a saved track to automatically create a route You will have the option of navig...

Страница 27: ...est will display a list containing the nearest waypoints within a 100 mile radius The waypoints will be listed with the nearest waypoint at the top of the list Find By Name will display a list containing all User Waypoints You have the option of entering a waypoint name in the data field or scrolling through the Waypoint List As you enter a waypoint name the GPS 72 will update the waypoint list to ...

Страница 28: ...ng waypoints To save the waypoint to memory highlight the OK button and press ENTER Creating a waypoint manually using existing coordinates Press and hold ENTER MARK until the Mark Waypoint Page is displayed The unit will capture its current location Highlight the Location Field and press ENTER Using the ROCKER enter the new location Press ENTER to accept the change At this point you can edit the ...

Страница 29: ...stance from a specified point The Project Location page has four fields Location From Distance and Bearing There are three ways to establish a From reference point you can use the current location select a location on the map or use the location of an item found in the points menu To select one of these options highlight the From field and press the ENTER key Project Location Options To project a way...

Страница 30: ...and distance When you have finished highlight Save and press ENTER This will return you to the Mark Waypoint page The waypoint s location will have changed reflecting the projected bearing and distance from your reference point To save the waypoint highlight OK and press ENTER Delete Waypoint This option will delete the waypoint that is currently displayed After selecting this option a conformation ...

Страница 31: ...ging the Location Elevation or Depth Highlight the desired field and press ENTER Using the ROCKER scroll through the numeric list until the desired number is displayed Press the ROCKER to the right to move to the next character When finished press ENTER to accept the changes Show Name on Maps When Show Name on Maps is checked the waypoint name will be displayed on the Map Page To check uncheck the b...

Страница 32: ...int press the MENU Key and with Save as Waypoint selected press ENTER Along the bottom of the list or Information Page are three buttons Goto Map and OK Goto begins direct navigation to the point Map displays the item on the Map Page and OK returns the display to the list Points of Interest Options The types of Points of Interest displayed depend on the MapSource data that is loaded Cities When Ci...

Страница 33: ...hen press ENTER Routes Page Options With the Routes Page displayed press MENU to view the available options Start Stop Navigation Will start navigation of a highlighted route Will stop navigation of an Active Route Copy Route Will make a copy of a highlighted route Delete Route Will remove the highlighted route Delete All Routes Will remove all routes from the Routes Page Creating a New Route Ther...

Страница 34: ...Waypoint List If you would like to save a Map Feature Point as a User Waypoint highlight the point in the route press ENTER this will display an Information Page With the Information Page displayed press MENU and select Save as Waypoint Add Waypoint This will display the Points Menu see page 28 for information on the Points Menu As a note if you highlight the dashed line in the waypoint field on th...

Страница 35: ...s Review Remove Move and Next Review Route Waypoint To review information on a route waypoint place the Map Pointer on the waypoint then press ENTER This will display an options menu Highlight Review then press ENTER to display the waypoint information Inserting a New waypoint There are two methods that can be used to insert a new waypoint into a route 1 Place the Map Pointer on the route leg that...

Страница 36: ...nter at the desired new location and press ENTER to move the waypoint As a note using this feature will change the stored waypoint s location Next point in Route To move the Map Pointer to the next point in the route with the Map Pointer on a route point or waypoint press ENTER This will display an options menu Highlight Next press ENTER and the Map Pointer will move to the next point or waypoint ...

Страница 37: ...y Proximity waypoints can be used to alert you when you are approaching a predeter mined area When you place a waypoint in the Proximity List you will enter a Radius that will determine when a Proximity Alarm will be displayed You can turn the Proximity Alarm On or Off for your convenience Proximity Options To view the available options with the Proximity Page displayed press MENU Add Waypoint Whe...

Страница 38: ...t waypoints To display the nearest list press MENU and with Find Nearest highlighted press ENTER Finding a waypoint by name If you have many waypoints in the list the easiest way to find a waypoint is to enter the waypoint name As you spell the name the GPS 72 will update the waypoint list showing the waypoints that closely match the spelling When you see the waypoint on the list press ENTER and sc...

Страница 39: ... City Highlight City on the Go To Selection page and press ENTER A list of Cities by Name will be displayed Scroll through the displayed list make a selection and press ENTER to begin navigation to that city Exit Highlight Exit on the Go To Selection page and press ENTER A catagory list will be displayed containing the selections All Types Services Rest Area or Other Make a catagory selection and ...

Страница 40: ...our span starting at midnight station time You can choose from different dates and over 3000 tide stations around the USA coastline Alaska Hawaii western Canada and several of the Caribbean Islands Main Menu Celestial Station Name Date Local Time Current Time Low Tide Curve Min Level Station Time MLLW Current Tide Level Event Times Day Night Main Menu Celestial 190 00294 00_0B indd 38 9 25 2002 2 ...

Страница 41: ...l intersect the tide graph to show their relation The tide curve will show as a shaded area with higher tides being taller and lower tides shorter The dark horizontal line with arrows at the ends of the line will indicate the current tide height The figure to the left of the line will show the current tide level in feet The Mean Lower Low Water MLLW will appear as a solid vertical line near the bot...

Страница 42: ...ay display this information for your current location or you can use the Map or Points Menu to select a location To display the location options press ENTER with Location field highlighted You can also use the current date and time or enter a date and time of your choice Data Fields Date Location Time Moon Phase Sky View Moon Position Sun Position Horizon 0 45 Overhead 90 Location Options Main Menu...

Страница 43: ...To select deselect a box place the highlight over the MapSource Item then press ENTER Pressing MENU displays a list of Show options that allows you to choose Show All Show None or select from a list of map data that is loaded in the unit System Info The System Info Page will show your software version number and the unit ID number Setup Menu The Setup Menu is arranged in an easy to use tab format ...

Страница 44: ...en the unit is indoors and you wish to practice with the unit WAAS WAAS is an acronym for Wide Area Augmentation System You can use the WAAS capability of the GPS 72 to increase the accuracy to approximately 3 meters When enabled the GPS receiver searches for a WAAS satellite then receives data that will help correct differentials in the GPS signal When the unit is using WAAS data a D will be disp...

Страница 45: ...ntic Eastern Central Mountain Pacific Alaska Hawaii Samoa and Other If you choose Other a new field UTC Offset will be displayed Enter the correct offset for your Time Zone You can find a chart with UTC Offsets in Appendix C Daylight Savings Time Has three options Yes No and Auto If you select Auto the unit will automatically determine when Daylight Savings Time should be displayed If you select Yes ...

Страница 46: ...cified in the time setting Setup Menu Location Tab The Location Tab contains the settings for Location Format Map Datum North Reference and Magnetic Variation The settings are used in fields throughout the unit Location Format There are 29 different formats to choose from See the sidebar for a list of the formats You should not need to change the format from the default setting unless you are using ...

Страница 47: ... magnetic north heading references which are automatically determined from your current loca tion True provides headings based upon a true north reference Grid provides head ings based on a grid north reference User allows you to specify the magnetic variation at your current location and provides magnetic north heading references based on the value you entered WARNING If User is selected you must...

Страница 48: ...stination Automatic will alert you between 15 and 90 seconds before depending on your speed Distance and Time alert you at the specified distance or time Off Course The Off Course Alarm will alert you when you are off course more than the distance set The Off Course alarm can be turned On or Off Shallow Water This alarm requires input from a NMEA device supplying the DPT sentence The Shallow Water ...

Страница 49: ...ata in a SC 104 format The Baud can be set to 1200 2400 4800 or 9600 bps RTCM In NMEA Out Functions the same as the GARMIN DGPS setting except the unit will output NMEA 0183 version 2 3 sentences GPRMC GPGGA GPGSA GPGSV GPGLL GPBOD GPRTE and GPWPL RTCM In Text Out The same as the RTCM In setting except the unit will output simple text data that includes date time position and velocity information ...

Страница 50: ... DGPS USCG Accuracy 3 5 meters 10 16 ft 95 typical DGPS WAAS Accuracy 3 meters 10ft 95 typical with DGPS corrections Velocity Accuracy 0 1 knot RMS steady state Dynamics 6g s Subject to accuracy degradation to 100m 2DRMS under the U S DOD imposed Selective Availability Program Power Batteries Two 1 5 volt AA batteries1 Source 8 35V DC Fuse AGC 3AG 2 0 Amp 1 The temperature rating for the GPS 72 ma...

Страница 51: ...The following are the sentences for NMEA 0183 version 2 3 output Approved sentences GPRMC GPGGA GPGSA GPGSV GPGLL GPBOD GPRTE and GPWPL Proprietary sentences PGRME PGRMZ and PSLIB The GPS 72 also includes NMEA input with support for the DPT MTW and VHW sentences You can download a copy of GARMIN s proprietary communication protocol on the Help and Support section of our Web Site at www garmin com ...

Страница 52: ...º to W112 5º 8 W112 5º to W097 5º 7 W097 5º to W082 5º 6 W082 5º to W067 5º 5 W067 5º to W052 5º 4 W052 5º to W037 5º 3 W037 5º to W022 5º 2 W022 5º to W007 5º 1 W007 5º to E007 5º 0 E007 5º to E022 5º 1 E022 5º to E037 5º 2 E037 5º to E052 5º 3 E052 5º to E067 5º 4 E067 5º to E082 5º 5 E082 5º to E097 5º 6 E097 5º to E112 5º 7 E112 5º to E127 5º 8 E127 5º to E142 5º 9 E142 5º to E157 5º 10 E157 5...

Страница 53: ...s 1968 Gizo Island New Georgia Islands Dutch Dutch Easter Isld 67 Easter Island 1967 European 1950 European 1950 Austria Belgium Denmark Finland France Germany Gibraltar Greece Italy Luxembourg Netherlands Norway Portugal Spain Sweden Switzerland European 1979 European 1979 Austria Finland Netherlands Norway Spain Sweden Switzerland Finland Hayfrd Finland Hayford Finland Gandajika Base Gandajika B...

Страница 54: ... Man Scotland Shetland Isl Wales Pico De Las Nv Canary Islands Potsdam Potsdam Germany Ptcairn Ast 67 Pitcairn Astro 67 Pitcairn Prov S Am 56 Prov So Amricn 56 Bolivia Chile Colombia Ecuador Guyana Peru Venezuela Prov S Chln 63 So Chilean 63 S Chile Puerto Rico Puerto Rico Virgin Isl Qatar National Qatar South Greenland Qornoq Qornog South Greenland Reunion Reunion Mascarene Island Rome 1940 Rome ...

Страница 55: ... your destination waypoint based on current speed and track ETA at Dest The estimated time you will reach a GOTO destination or the final waypoint in a route ETA at Next The estimated time you will reach a GOTO destination or the next waypoint in a route Fuel The fuel required to travel from current location to the indicated route waypoint Leg Dist The distance between two route waypoints Leg Fuel ...

Страница 56: ...ion to steer in order to reduce course error or stay on course Provides the most efficient heading to get back to the desired course and proceed along your route Track The direction of movement relative to a ground position Also referred to as ground track Trip Odometer A running tally of distance travelled since last reset Also see Odometer Total Average Speed Average speed of unit for both moving...

Страница 57: ...ellite signals Memory Full Unit memory is full no further data can be saved Near Proximity Point You have reached the distance set for a proximity waypoint No Diff GPS Location RTCM is selected but the unit is not receiving DGPS data None Found No data matched the search criteria No Tide Stations for that Area No tide stations within 100 miles of the area Off Course You are off course the distance...

Страница 58: ... and turn track recording on This will only be displayed when the track recording setting is set to Stop When Full Track Truncated A complete uploaded track will not fit in memory The oldest track log points have been deleted Can t Unlock Maps No applicable unlock code for one or more maps was found All MapSource map are not accessible Waypoint Already Exists A waypoint with the same name already e...

Страница 59: ...om this conversion is approximately thirty meters When the unit is placed in the LORAN TD format mode it simulates the operation of a LORAN receiver Position coordinates may be displayed as TDs and all navigation functions may be used as if the unit was actually receiving LORAN signals Using the LORAN TD Format When creating new waypoints using LORAN TD coordinates you must set the correct LORAN c...

Страница 60: ...setting then press ENTER 4 When done press the PAGE Key to return to the Main Menu If the active GRI Chain secondary stations or offsets have been changed since the waypoint was created the waypoint will now reference the active GRI chain and secondary stations and adjust the TD coordinates accordingly Remember that the GPS is not relying on the LORAN signal for navigation and actually converts th...

Страница 61: ... and tilt more than 45 backward or forward Carrying Case Protects the GPS 72 when not in use Power Data Cable Wiring harness can be used to hardwire the unit to auxiliary power and to interface with other NMEA devices PC Data Cable Allows for serial data transfer with a PC Cigarette Lighter Adapter Allows the GPS 72 to operate from external auto power MapSourceTM Map Data CD ROMs Enhance the Map D...

Страница 62: ... Saver Mode 42 Bearing Line 17 Beeper 43 C Cautions 2 Celestial Page 38 Changing Data Fields 13 18 20 Cities 30 Course Line 17 Clearing the Track Log 23 Creating Waypoints 26 Current Date 43 Current Location 10 Current Time 43 Customer Service 65 D Data Transfer 47 Date 10 Daylight Savings Time 43 Deep Water Alarm 46 Delete Waypoint 28 Deleting Waypoints 29 Depth 44 DGPS Interface Settings 47 DGPS...

Страница 63: ...rid Labels 15 H Heading North Reference 45 Heading Line 17 Highway Page 19 Highway Page Setup 20 How To Index 6 Hunt and Fish 41 I IN Key 12 Initialize the Receiver 7 Interface Tab 47 Interfacing 49 L Language 43 Local Time Offset 43 Limited Warranty 65 Location Format 44 Location Tab 44 Loran TD Setup 57 58 M Main Menu 22 47 Magnetic Variation 45 MapSource Info 41 Map Datums 45 51 52 Map Page 12 ...

Страница 64: ...eference 45 O Odometer Trip 22 Off Course Alarm 46 Orientation 14 Overzoom 12 P Plan Route 35 Pointer Page 18 Pointer Page Options 18 Points of Interest 16 30 Power Data Cable 49 Project Location 27 Proximity Alarm 35 Proximity List 35 Proximity Waypoints 35 R Receiver Status 9 Registration 1 Reviewing Waypoints 29 Reset Max Speed 22 Reset Odometer 22 Reset Trip 22 Reverse Route 34 Routes 31 35 Ro...

Страница 65: ...e Settings 44 Text Setting 13 Tides 38 Time 10 Time Daylight Savings Time 43 Time Format 43 Time Tab 43 Time Zone 43 Track Information Page 24 Track Back 24 Track Log 16 Trip Computer 21 U Units Tab 44 Universal Time Coordinate 50 WAAS 42 Warranty 65 Waypoints 25 Waypoint Options 25 Waypoints Creating 26 29 Waypoints Deleting 29 Waypoints Editing 29 Waypoints Proximity Wiring 49 Z Zoom Scale 12 Zo...

Страница 66: ... you GARMIN retains the exclusive right to repair or replace the unit or software or offer a full refund of the purchase price at its sole discretion SUCH REMEDY SHALL BE YOUR SOLE AND EXCLUSIVE REMEDY FOR ANY BREACH OF WARRANTY To obtain warranty service contact your local GARMIN authorized dealer Or call GARMIN Customer Service at one of the numbers shown below for shipping instructions and an R...

Страница 67: ... Quadrangle Abbey Park Industrial Estate Romsey SO51 9AQ U K GARMIN Corporation No 68 Jangshu 2nd Road Shijr Taipei County Taiwan www garmin com Part Number 190 00294 00 Rev B For the latest free software updates throughout the life of your GARMIN products visit the GARMIN web site at www garmin com 72 Manual covers Rev B indd 2 9 25 2002 2 35 41 PM ...

Отзывы: