background image

GNS 430 Quick Reference

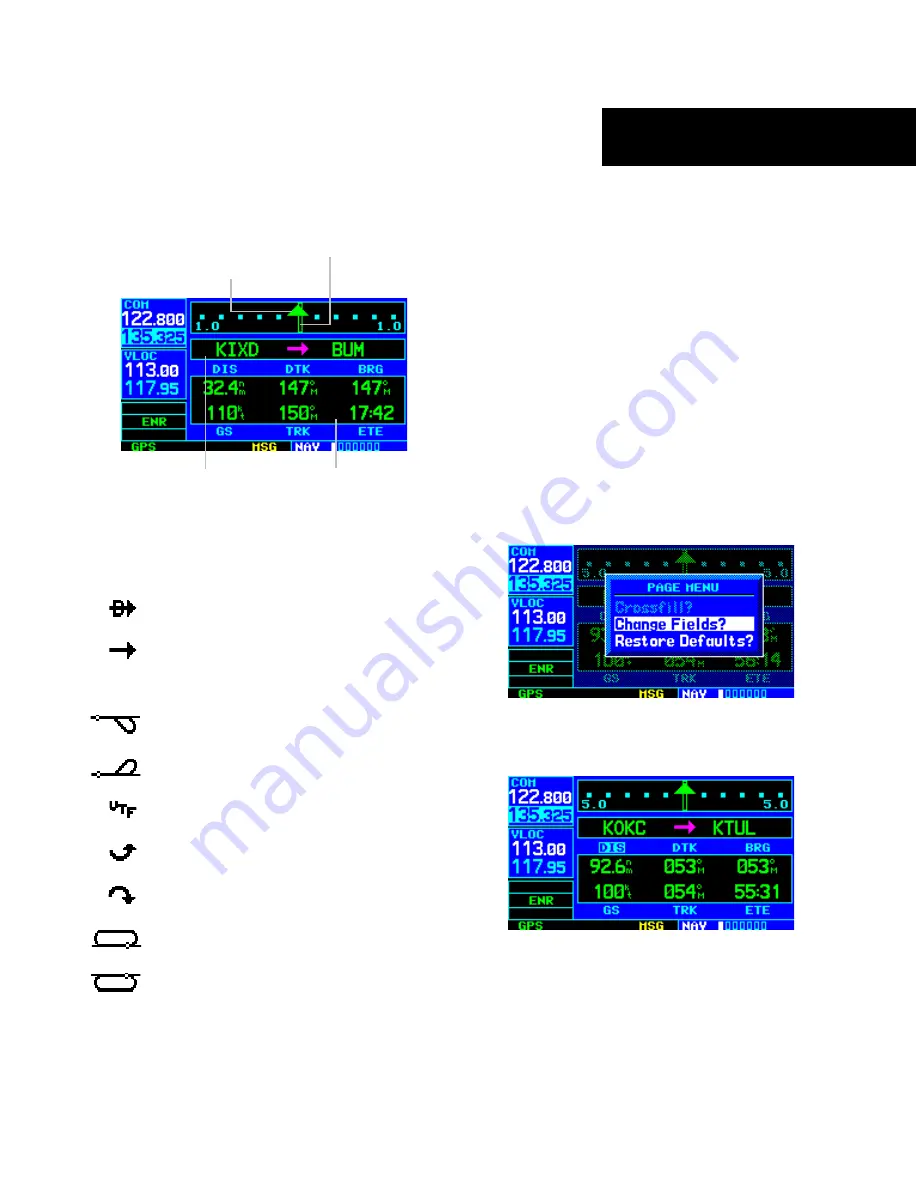
DEFAULT NAV PAGE

11

DEFAULT NAV PAGE

Course Deviation Indicator (CDI)


User-selectable

Data Fields

Active Leg of Flight Plan 

TO/FROM Flag


The following symbols are used on the Default NAV 

Page (directly below the CDI), to depict the ‘active leg’ of 
a flight plan or direct to:

  Direct-to a Waypoint

  Course to a Waypoint, or Desired 

Course between Two Waypoints

  Procedure Turn

  Procedure Turn

  Vectors-to-Final

  DME Arc to the Left

  DME Arc to the Right

  Left-hand Holding Pattern

  Right-hand Holding Pattern

TO QUICKLY DISPLAY THE DEFAULT NAV 

PAGE


From any page, press and hold the 

CLR

 Key for 

approximately two seconds.

TO SELECT A DIFFERENT DATA ITEM FOR 

ANY DATA FIELD

1)  With the Default NAV Page displayed, press the 

MENU

 Key to display the Default NAV Page 

Menu.

2)  The  ‘Change  Fields?’  option  is  already 

highlighted,  so  press  the 

ENT

  Key  to  select 

this option.

3)  Use the large 

right

 knob to highlight the data 

field to be changed.

Содержание GNS 430

Страница 1: ...GNS 430 430A Quick Reference...

Страница 2: ...alizer frequency Press momentarily to enable disable the ident tone Thelargeleftknobisusedtotunethemegahertz MHz value of the standby frequency for the COM transceiver or the VLOC receiver whichever i...

Страница 3: ...p turn clockwise or down counterclockwise when the map panning function is active BOTTOM ROW KEYS The CDI Key is used to toggle which navigation source GPS or VLOC provides output to an external HSI o...

Страница 4: ...r screen areas The left 1 4 of the display provides a COM window top two lines and a VLOC window bottom two lines The right 3 4 of the display consists of a GPS window which shows the various navigati...

Страница 5: ...rtz kHz value For example the 80 portion of the frequency 117 80 4 To activate the selected frequency press the COM Flip opKeyforCOMfrequencies orthe VLOC Flip op Key for VLOC frequencies TO QUICKLY T...

Страница 6: ...group is currently being displayed e g NAV WPT AUX orNRST thenumberofscreensavailablewithinthat group indicated by the square icons and the placement of the current screen within that group indicated...

Страница 7: ...ST Airspace NOTE The ight plan pages are selected by pressing the FPL Key and using the small right knob to select the desired page TO SELECT A DIRECT TO DESTINATION 1 Press the Direct to Key The Sele...

Страница 8: ...A DIRECT TO DESTINATION BY FACILITY NAME OR CITY 1 Press the Direct to Key The Select Direct to Waypoint Page appears with the waypoint identi er eld highlighted 2 Turn the large right knob to highli...

Страница 9: ...W AIRPORT INFORMATION 1 Turn the large right knob to select the WPT Page Group WPT appears in the lower right corner of the screen 2 Turn the small right knob to select the desired WPT page Airport in...

Страница 10: ...ort information pages press the small right knob to remove the ashing cursor and turn the small right knob to select the desired page TO AUTO TUNE A FREQUENCY FROM A LIST The GNS 430 s auto tune featu...

Страница 11: ...ypoints Procedure Turn Procedure Turn Vectors to Final DME Arc to the Left DME Arc to the Right Left hand Holding Pattern Right hand Holding Pattern TO QUICKLY DISPLAY THE DEFAULT NAV PAGE From any pa...

Страница 12: ...om the page MAP PAGE Present Position Desired Track Data Fields Map Range Map Display The following symbols are used to depict the various airports and navaids on the Map Page Airport with hard surfac...

Страница 13: ...ype of data for this eld and press the ENT Key 5 Press the small right knob to remove the cursor TO TURN THE DATA FIELDS OFF AND DISPLAY A FULL SCREEN MAP 1 With the Map Page displayed press the MENU...

Страница 14: ...iscretion when inhibiting the TERRAIN system and always remember to enable the system when appropriate NAVCOM PAGE The NAVCOM Page provides a list of the airport communication and navigation frequenci...

Страница 15: ...Flashing TER FAIL TER INHB or TER N A see Pilot s Guide for detailed information CDI RAIM Mode Approach Enroute Oceanic Terminal or 0 30 for VLOC approaches Navigation Source GPS or VLOC Integrity Fa...

Страница 16: ...the small right knob to return the ashing cursor to the screen 4 To return to the NearestAirport Page verify that Done is highlighted by the ashing cursor and press the ENT or CLR Key TO SELECT A NEA...

Страница 17: ...ypoint 6 Once all waypoints have been entered press the small right knob to return to the Flight Plan Catalog Page TO NAVIGATE A FLIGHT PLAN 1 Press the FPL Key and turn the small right knob to displa...

Страница 18: ...he waypoint to be deleted and press the CLR Key to display a remove waypoint con rmation window a With Yes highlighted press the ENT key to remove the waypoint 6 Once all changes have been made press...

Страница 19: ...proper frequency and coupling the VLOC receiver to the external CDI or HSI A selected approach may be activated or loaded Once an approach is selected it may be activated for navigation from the Proce...

Страница 20: ...by pressing the CDI Key VLOC will appear directly above the CDI Key see page 15 An Auto ILS CDI setting provides automatic switching to VLOC once established inbound on the nal course segment of an ap...

Страница 21: ...OBS Key indicating that automatic sequencing of waypoint is suspended at the missed approach point and a from indication will appear on the CDI or HSI TO FLY A MISSED APPROACH 1 Press the OBS Key The...

Страница 22: ...97302 U S A p 503 391 3411 f 503 364 2138 Garmin Europe Ltd Unit 5 The Quadrangle Abbey Park Industrial Estate Romsey SO51 9DL U K p 44 0870 8501241 f 44 0870 8501251 Garmin Corporation No 68 Jangshu...

Отзывы: