background image

GMA 340 Installation Manual

Page 3-3

190-00149-01

Rev. L

3.1.5

Split Com (Not Applicable to Dual ADF)

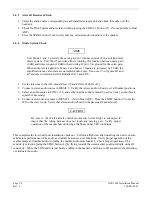
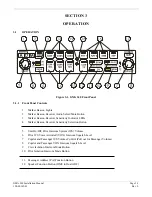
Pressing the COM 1/2 button (15) activates the split com function.  While this mode is active, COM 2 is
dedicated solely to the copilot as a MIC/audio source while COM 1 is dedicated to the pilot as a MIC/audio
source.  The pilot can still listen to COM 3, NAV 1, NAV 2, DME, ADF, and MKR.  The pilot and copilot can
simultaneously transmit in this mode, the pilot transmitting over COM 1 and the copilot transmitting over COM 2.
The SPLIT COM mode is cancelled by pressing the COM 1/2 button a second time.

While in the split com mode the copilot may make PA announcements while the pilot continues using COM 1
independently.  When the PA button is pressed after the split com mode is activated, the copilot’s mic is output
over the cabin speaker when keyed.  A second press of the PA button returns the copilot to normal split com
operation.

NOTE

If the com radios in the installation utilize a “transmit interlock” system, the split
com function may require that this feature is enabled.  Refer to the radio’s
installation manual for guidance.  Garmin makes no expressed or implied
guarantees regarding the suitability of the split com feature in a given
installation.

3.1.6

Com Swap Function

The GMA 340 allows the use of a remote mounted switch (typically on the yoke) to alternately transfer the active
microphone back and forth between COM 1 and COM 2.  The remote switch should be a momentary type,
connected between J2 pin 20 (SWAP*) and J2 pin 21 (SWAP return).  Pressing the remote switch will have no
affect if COM 3 is the active transceiver or when split com is in use.

3.1.7

Aircraft Radios & Navigation

NOTE

Audio level is controlled by the selected nav radio volume control.

Pressing NAV 1, NAV 2, DME, ADF (16), or MKR (2) (see MKR beacon operation) selects that audio source.  A
second button press deselects the audio source.

In addition, the GMA 340 provides inputs for an unswitched aircraft radio (TEL RINGER) and an unmuted,
unswitched aircraft radio (ALT WRN).

3.1.8

Speaker Output

Pressing the SPKR button (12) selects Aircraft radios over the cabin speaker.  The speaker output is muted when a
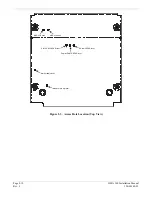
COM microphone is keyed.  Speaker level is adjustable through an access hole in the top of the unit (see figure 2-
3).

Содержание GMA 340

Страница 1: ...A 340 and GMA 340 Dual ADF Shown Garmin International Inc 1200 E 151st Street Olathe KS 66062 USA 190 00149 01 Revision L June 2003 GMA 340 AUDIO PANEL INSTALLATION MANUAL GMA 340 GMA 340H GMA 340 DUAL ADF ...

Страница 2: ...ll Free 1 888 606 5482 Dealer Line 1 800 800 1420 Web Site Address www garmin com Garmin Europe Ltd Unit 5 Quadrangle Abbey Park Industrial Estate Romsey SO51 9DL U K Telephone 44 1794 519944 INFORMATION SUBJECT TO EXPORT CONTROL LAWS This document may contain information which is subject to the Export Administration Regulations EAR issued by the United States Department of Commerce 15 CFR Chapter...

Страница 3: ...ENT 2 1 2 3 ANTENNA INSTALLATION 2 1 2 3 1 Location Considerations 2 1 2 3 2 Antenna Installation 2 1 2 3 3 Antenna Cable Installation 2 1 2 3 4 Installation Approval Considerations for Pressurized Aircraft 2 2 2 4 GMA 340 INSTALLATION 2 2 2 5 REAR CONNECTIONS 2 3 2 5 1 Location 2 3 2 5 2 Audio Shield Termination 2 5 2 5 3 Noise 2 6 2 6 POST INSTALLATION CHECKOUT 2 6 2 6 1 Lamp Test 2 6 2 6 2 Fail...

Страница 4: ... 6 Com Swap Function 3 3 3 1 7 Aircraft Radios Navigation 3 3 3 1 8 Speaker Output 3 3 3 1 9 PA Function 3 4 3 1 10 Auxiliary Entertainment Inputs 3 4 3 1 11 Intercom System ICS 3 4 3 1 12 Mono Stereo Headset 3 5 3 1 13 Marker Beacon Receiver 3 6 APPENDIX A CERTIFICATION DOCUMENTS A 1 CONTINUED AIRWORTHINESS A 1 A 2 ENVIRONMENTAL QUALIFICATION FORM A 4 APPENDIX B INSTALLATION DRAWINGS B 1 GENERAL ...

Страница 5: ...A 340 FRONT PANEL 3 1 B1 GMA 340 OUTLINE DRAWING B 3 B2 CONNECTOR RACK KIT DRAWING B 5 B3 GMA 340 RECOMMENDED PANEL CUTOUT DIMENSIONS B 7 B4 J1 INTERCONNECT WIRING DIAGRAM B 9 B5 J2 INTERCONNECT WIRING DIAGRAM B 11 B6 J1 INTERCONNECT WIRING DIAGRAM B 13 B7 J2 INTERCONNECT WIRING DIAGRAM B 15 LIST OF TABLES Table PAGE 2 1 J1 and J2 Pin Assignments 2 4 2 2 Recommended Crimp tools 2 5 ...

Страница 6: ...rovided user name and password MOD LEVEL SERVICE BULLETIN NUMBER SERVICE BULLETIN DATE PURPOSE OF MODIFICATION 1 0103 2 2 01 Configurable option to mute other com audios when transmitting 2 0113 6 13 01 Provides times ten gain 20 dB for entertainment music system 3 0208B 5 17 02 Provides correct marker beacon output loading for interface with a Sandel SN3308 EHSI 4 0209 5 2 02 Provides failsafe op...

Страница 7: ... six position intercom ICS with electronic cabin noise de emphasis two stereo music inputs and independent pilot copilot and passenger volume controls To further simplify the cockpit workload the intercom provides three selectable modes of isolation One hundred percent solid state circuitry and extensive use of surface mount technology are employed A pilot selectable cabin speaker output can be us...

Страница 8: ...RISTIC TSO Compliance TSO C50c C35d JTSO C50c and JTSO 2C35d using DO 160C DO 170 and DO 143 Temperature Range 20 C to 55 C Weight Unit Only 1 2 lbs 0 6 kg Installed with rack and connectors 1 7 lbs 0 8 kg Physical Dimensions Bezel Height 1 30 inches 33 mm Bezel Width 6 29 inches 160 mm Rack Height Dimple to Dimple 1 33 inches 34 mm Rack Width 6 30 inches 160 mm Depth Behind Panel with Connectors ...

Страница 9: ...utputs Outputs selectable 1 pilot selectable Output power 10 Watts into 4 or 8ȍ any normal supply voltage Frequency response 350 Hz to 6 kHz nominal Special functions PA Mode pilot selectable including split operation Marker Beacon Receiver Frequency Crystal controlled at 75 MHz Sensitivity LO 1000 µV hard HI 200 µV hard Selectivity 6 dB 10 kHz min 40 dB 200 kHz max Input impedance 50ȍ External la...

Страница 10: ... 2A Cables The installer will fabricate and supply all system cables Interconnect wiring diagrams are detailed in Appendix B Hardware 6 32 100 flat head screw 6 ea and 6 32 self locking nut 6 ea Hardware required to mount the installation rack is not provided Stereo headphone jacks up to 6 microphone jacks up to 6 3 5mm stereo jacks up to 2 and insulating washers for all ...

Страница 11: ...HE USE MISUSE OR INABILITY TO USE THIS PRODUCT OR FROM DEFECTS IN THE PRODUCT Some states do not allow the exclusion of incidental or consequential damages so the above limitations may not apply to you Garmin retains the exclusive right to repair or replace the unit or software or offer a full refund of the purchase price at its sole discretion SUCH REMEDY SHALL BE YOUR SOLE AND EXCLUSIVE REMEDY F...

Страница 12: ...Page 1 6 GMA 340 Installation Manual Rev L 190 00149 01 This page intentionally left blank ...

Страница 13: ...ontainers for storage If the original containers are not available a separate cardboard container should be prepared that is large enough to accommodate sufficient packing material to prevent movement 2 3 ANTENNA INSTALLATION 2 3 1 Location Considerations The marker beacon antenna should be mounted on a flat surface on the underside of the aircraft Mount the antenna so that there is a minimum of s...

Страница 14: ...ontact a DER from the roster of individuals identified there under Contact an aviation industry organization such as the Aircraft Electronics Association and request their assistance 2 4 GMA 340 INSTALLATION NOTE Avoid installing the unit near heat sources If this is not possible insure that additional cooling is provided Allow adequate space for installation of cables and connectors The installer...

Страница 15: ...s are given in table 2 1 When viewed from the back of the rack J1 and J2 look like the following Figure 2 1 Rear Connectors NOTES These notes apply to the following table Denotes Active Low Ground to activate Refer to Figures B4 through B7 for GMA 340 interconnect wiring diagrams The GMA 340 provides inputs for an unswitched aircraft radio TEL RINGER and an un muted unswitched aircraft radio ALT W...

Страница 16: ...ilot Headset L 17 Nav 1 In 8 Ohm Select 18 Nav 1 Return Reserved 19 Nav 2 In Tone Enable 20 Nav 2 Return Swap 21 DME In ADF 1 In Swap Return 22 DME Return ADF 1 Return NC 23 Com 3 Spkr Load Music 1 L In 24 Com 3 Spkr Load Return Music 1 R In 25 Com 1 Spkr Load Music 1 Return 26 Com 1 Spkr Load Return Music 2 L In NC 27 Com 2 Spkr Load Music 2 R In DME In 28 Com 2 Spkr Load Return Music 2 Return DM...

Страница 17: ... M81969 1 04 ITT Cannon 995 0001 584 995 0001 739 N A AMP 601966 1 601966 6 91067 1 Daniels AFM8 K42 M24308 18 1 Astro 615717 615725 M81969 1 04 Table 2 2 Recommended Crimp Tools NOTE Non Garmin part numbers shown are not maintained by Garmin and consequently are subject to change without notice 2 5 2 Audio Shield Termination The audio shield wires should be terminated at the rear of the unit to t...

Страница 18: ...e This is the main reason why all audio jacks should be isolated from ground Terminating audio shields just at one end eliminates another potential ground loop injection point Single point grounding cannot be overstressed for the various avionics producing and processing audio signals Single point in this context means that the various pieces of equipment share a single common ground connection ba...

Страница 19: ...nal Check 1 Perform a ramp test radio check by exercising the installed transceivers microphone microphone key and audio over the headphones and speaker 2 Verify that communications are loud and clear and PTT operation is correct 2 6 4 Intercom System ICS Check NOTE If a monaural headset is used in one position no damage will occur if plugging into a stereo jack In the case of passenger positions ...

Страница 20: ...source to MUSIC 1 Verify that stereo audio is heard over all headset positions 3 Select an audio source to COM 1 13 and verify that the sound is muted by active Com 1 audio break squelch if necessary 4 Connect a stereo music source to MUSIC 2 NA to Dual ADF Press the CREW button 9 to set the ICS to the crew mode Verify that stereo audio is heard in the passenger headsets only CAUTION Be sure to ch...

Страница 21: ...ally forced against unintended components or circuit board paths Use a 2 mm max blade width flat blade non conductive screw driver or adjustment tool CCW adjustment increases the marker audio level CW adjustment increases the levels for the speaker outputs and MUSIC 1 mute For the marker beacon sensitivity adjustments CW increases the sensitivity The LOW sensitivity can be adjusted without affecti...

Страница 22: ... Installation Manual Rev L 190 00149 01 A C radio SPKR level Pilot PA MIC SPKR level Copilot PA MIC SPKR level Marker audio level Music1 mute trip level MKR LO Sense MKR HI Sense Figure 2 3 Access Hole Location Top View ...

Страница 23: ...y Indicator LEDs 4 Marker Beacon Receiver Sensitivity Selection Button 5 Unit On Off Pilot Intercom System ICS Volume 6 Pilot ICS Voice Activated VOX Intercom Squelch Level 7 Copilot and Passenger ICS Volume Control Pull out for Passenger Volume 8 Copilot and Passenger VOX Intercom Squelch Level 9 Crew Isolation Intercom Mode Button 10 Pilot Isolation Intercom Mode Button 11 Passenger Address PA F...

Страница 24: ... Nomenclature backlighting is controlled by the aircraft dimmer bus See installation wiring diagrams in Appendix B for guidance on connecting the dimmer bus to the GMA 340 3 1 4 Transceivers NOTE Audio level is controlled by the selected com radio volume control Selection of either COM 1 COM 2 or COM 3 13 for both MIC and audio source is accomplished by pressing either COM 1 MIC COM 2 MIC or COM 3...

Страница 25: ...ire that this feature is enabled Refer to the radio s installation manual for guidance Garmin makes no expressed or implied guarantees regarding the suitability of the split com feature in a given installation 3 1 6 Com Swap Function The GMA 340 allows the use of a remote mounted switch typically on the yoke to alternately transfer the active microphone back and forth between COM 1 and COM 2 The r...

Страница 26: ...s are reversed on the 340H Intercom volume and squelch VOX are adjusted using the following front panel knobs note that knobs are reversed in the 340H version LEFT SMALL KNOB Unit on off power control and Pilot ICS volume 5 Full CCW DETENT position is OFF LEFT LARGE KNOB Pilot ICS mic VOX squelch level 6 CW rotation increases the amount of mic audio VOX level required to break squelch Full CCW is ...

Страница 27: ...ssengers MUSIC 1 Selected Radios Pilot Copilot Passengers MUSIC 1 Aircraft radio activity MKR activity ICS activity MUSIC 1 is normally muted during ICS activity However an installation option is available to disable ICS MUTE When ICS MUTE INHIBIT J2 pin 13 is connected to ICS MUTE INHIBIT RETURN J2 pin 14 muting of MUSIC 1 will not occur due to ICS activity The MUSIC 1 mute trip level is adjustab...

Страница 28: ...rough 4 The SENS button 4 selects either high or low sensitivity as indicated by the HI or LO LED being lit Low sensitivity is used on ILS approaches while high sensitivity allows operation over airway markers or to get an earlier indication of nearing the outer marker during an approach The marker audio is selected initially by pressing the MKR mute button 2 If no marker beacon signal is received...

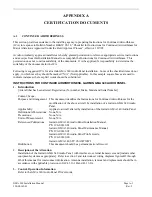
Страница 29: ...NESS GARMIN GMA 340 AUDIO PANEL 1 Introduction Aircraft that has been altered Registration N number Make Model and Serial Number Content Scope Purpose and Arrangement This document identifies the Instructions for Continued Airworthiness for the modification of the above aircraft by installation of a Garmin GMA 340 Audio Panel Applicability Applies to aircraft altered by installation of the Garmin ...

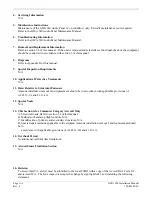
Страница 30: ...ta Relative to Structural Fasteners Antenna installation removal and replacement should be in accordance with applicable provisions of AC43 13 1A and 43 13 2A 12 Special Tools N A 13 This Section is for Commuter Category Aircraft Only A Electrical loads Refer to section 1 3 of this manual B Methods of balancing flight controls N A C Identification of primary and secondary structures N A D Special ...

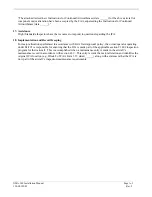
Страница 31: ...nd Record Keeping For major alterations performed in accordance with FAA field approval policy the owner operator operating under Part 91 is responsible for ensuring that the ICA is made part of the applicable section 91 409 inspection program for their aircraft This is accomplished when a maintenance entry is made in the aircraft s maintenance record in accordance with section 43 9 This entry rec...

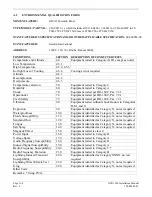
Страница 32: ... 8 0 Equipment tested without shock mounts to Categories B M and N Explosion 9 0 Equipment identified as Category X no test required Waterproofness 10 0 Equipment identified as Category X no test required Fluids Susceptibility 11 0 Equipment identified as Category X no test required Sand and Dust 12 0 Equipment identified as Category X no test required Fungus 13 0 Equipment identified as Category ...

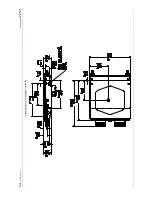
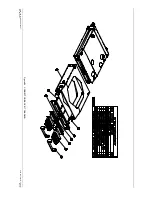
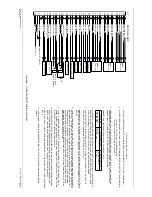
Страница 33: ...AL This section contains the following installation drawings B1 GMA 340 Outline Drawing B2 Connector Rack Kit Drawing B3 GMA 340 Recommended Panel Cutout Dimensions B4 J1 Interconnect Wiring Diagram B5 J2 Interconnect Wiring Diagram B6 J1 Interconnect Wiring Diagram B7 J2 Interconnect Wiring Diagram ...

Страница 34: ...Page B 2 GMA 340 Installation Manual Rev L 190 00149 01 This page intentionally left blank ...

Страница 35: ...GMA 340 Installation Manual Page B 3 Page B 4 blank 190 00149 01 Rev L Figure B1 GMA 340 OUTLINE DRAWING ...

Страница 36: ...GMA 340 Installation Manual Page B 5 Page B 6 blank 190 00149 01 Rev L Figure B2 CONNECTOR RACK KIT DRAWING ...

Страница 37: ...GMA 340 Installation Manual Page B 7 Page B 8 blank 190 00149 01 Rev L Figure B3 GMA 340 RECOMMENDED PANEL CUTOUT DIMENSIONS ...

Страница 38: ...R AS WOULD NORMALLY BE DELIVERED TO A 4 OHM SPEAKER IF AN 8 OHM SPEAKER IS USED AND THE SPEAKER VOLUME IS ACCEPTABLE THEN THIS PIN SHOULD BE LEFT OPEN IF AN 8 OHM CABIN SPEAKER IS USED BUT MORE SPEAKER VOLUME IS DESIRED THEN J2 PIN 17 MUST BE TIED TO GROUND AND THE SPEAKER VOLUME SHOULD BE READJUSTED DO NOT GROUND J2 PIN 17 IN A 4 OHM CABIN SPEAKER INSTALLATION 9 J2 PIN 19 TONE ENABLE CAN BE LEFT ...

Страница 39: ...mono Headset Return Headset R NOTES PERTAINING TO J1 AND J2 Cont d GMA 340 See note 15 See note 4 See note 4 See note 4 See note 12 Aircraft Power Buss Mute Trigger to EXT PA See note 6 See note 9 See note 8 See note 7 Cabin Speaker PILOT HEADSET RETURN PILOT HEADSET R PILOT HEADSET L 14V LGT LO 28V LGT LO 14V LGT HI 28V LGT HI COM TX MUTE NC NC HI MUSIC GAIN SELECT 14V LGT HI 28V LGT LO RESERVED ...

Страница 40: ...TIONS WHERE AN 8 OHM CABIN SPEAKER IS INSTALLED THE FUNCTION ALLOWS THE SAME POWER TO BE DELIVERED TO AN 8 OHM SPEAKER AS WOULD NORMALLY BE DELIVERED TO A 4 OHM SPEAKER IF AN 8 OHM SPEAKER IS USED AND THE SPEAKER VOLUME IS ACCEPTABLE THEN THIS PIN SHOULD BE LEFT OPEN IF AN 8 OHM CABIN SPEAKER IS USED BUT MORE SPEAKER VOLUME IS DESIRED THEN J2 PIN 17 MUST BE TIED TO GROUND AND THE SPEAKER VOLUME SH...

Страница 41: ... See note 8 See note 12 See note 4 See note 4 See note 4 See note 15 PASS 1 MIC PASS 2 MIC PASS 3 MIC RETURN PASS 3 MIC PASS 4 MIC MUSIC 1 RETURN MUSIC 1 R MUSIC 1 L DME RETURN DME IN SPKR RETURN SPKR OUT See note 6 ICS MUTE INHIBIT RETURN SWAP AIRCRAFT PWR AIRCRAFT GND AIRCRAFT GND COM TX MUTE NC NC NC PILOT HEADSET R PILOT HEADSET L 14V LGT LO 28V LGT LO 14V LGT HI 28V LGT HI 14V LGT HI 28V LGT ...

Страница 42: ...nual Page C 1 190 00149 01 Rev L APPENDIX C STC PERMISSION C 1 GENERAL Consistent with N8110 69 or Order 8110 4 Aviation Authority approved installers are hereby granted permission to use STC SA00710WI data to modify aircraft ...

Страница 43: ...Page C 2 GMA 340 Installation Manual Rev L 190 00149 01 ...

Отзывы: