Tools Needed
• Phillips screwdriver
• Electric drill
• Drill bit (size varies based on surface material and screws used)
• Rotary cutting tool or jigsaw
• Silicone-based marine sealant (optional)
Mounting Considerations
• You must mount the stereo on a flat surface that provides open airflow around the rear of the stereo for heat
ventilation.
• If you are installing the stereo in a location that may be exposed to water, you must mount it within 45
degrees below or 15 degrees above the horizontal plane.
• If you are installing the stereo in a location that may be exposed to water, you must add a drip loop to the
cable to allow water to drip off of the cable and avoid damage to the stereo.
Mounting the Stereo
NOTICE
Do not use the stereo as a template when drilling the mounting holes because this may damage the display and
void the warranty. You must only use the included template to correctly drill the mounting holes.
Be careful when cutting the hole to mount the stereo. There is only a small amount of clearance between the
case and the mounting holes, and cutting the hole too large could compromise the stability of the stereo after it
is mounted.
Do not apply grease or lubricant to the screws when fastening the stereo to the mounting surface. Grease or
other lubricants can cause damage to the stereo housing.
Before you can mount the stereo in a new location on the mounting surface, you must select a location in
accordance with the mounting considerations.
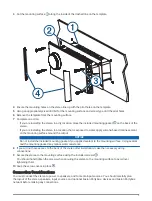
1 Adhere the template to the mounting surface.
2 Drill a hole inside the corner of the dashed line on the template.
2


