background image

Changing the Backlight Settings

1

From the watch face, hold  .

2

Select 

Settings

 > 

System

 > 

Backlight

.

3

Select an option:
• Select 

During Activity

.

• Select 

Not During Activity

.

4

Select an option:
• Select 

Keys

 to turn on the backlight for key presses.

• Select 

Alerts

 to turn on the backlight for alerts.

• Select 

Gesture

 to turn on the backlight by raising and 

turning your arm to look at your wrist.

• Select 

Timeout

 to set the length of time before the 

backlight turns off.

• Select 

Brightness

 to set the brightness level of the 

backlight.

Customizing the Hot Keys

You can customize the hold function of individual keys and 

combinations of keys.

1

From the watch face, hold  .

2

Select 

Settings

 > 

System

 > 

Hot Keys

.

3

Select a key or combination of keys to customize.

4

Select a function.

Changing the Units of Measure

You can customize units of measure for distance, pace and 

speed, elevation, weight, height, and temperature.

1

From the watch face. hold  .

2

Select 

Settings

 > 

System

 > 

Units

.

3

Select a measurement type.

4

Select a unit of measure.

Clock

Setting the Time Manually

1

From the watch face, hold  .

2

Select 

Settings

 > 

System

 > 

Time

 > 

Set Time

 > 

Manual

.

3

Select 

Time

, and enter the time of day.

Setting an Alarm

You can set up to ten separate alarms. You can set each alarm 

to sound once or to repeat regularly.

1

From the watch face, hold  .

2

Select 

Clock

 > 

Alarm Clock

 > 

Add Alarm

.

3

Select 

Time

, and enter the alarm time.

4

Select 

Repeat

, and select when the alarm should repeat 

(optional).

5

Select 

Sounds

, and select a type of notification (optional).

6

Select 

Backlight

 > 

On

 to turn on the backlight with the alarm.

7

Select 

Label

, and select a description for the alarm 

(optional).

Deleting an Alarm

1

From the watch face, hold  .

2

Select 

Clock

 > 

Alarm Clock

.

3

Select an alarm.

4

Select 

Delete

.

Starting the Countdown Timer

1

From the watch face, hold  .

2

Select 

Clock

 > 

Timer

.

3

Enter the time.

4

If necessary, select 

Restart

 > 

On

 to automatically restart the 

timer after it expires.

5

If necessary, select 

Sounds

, and select a type of notification.

6

Select 

Start Timer

.

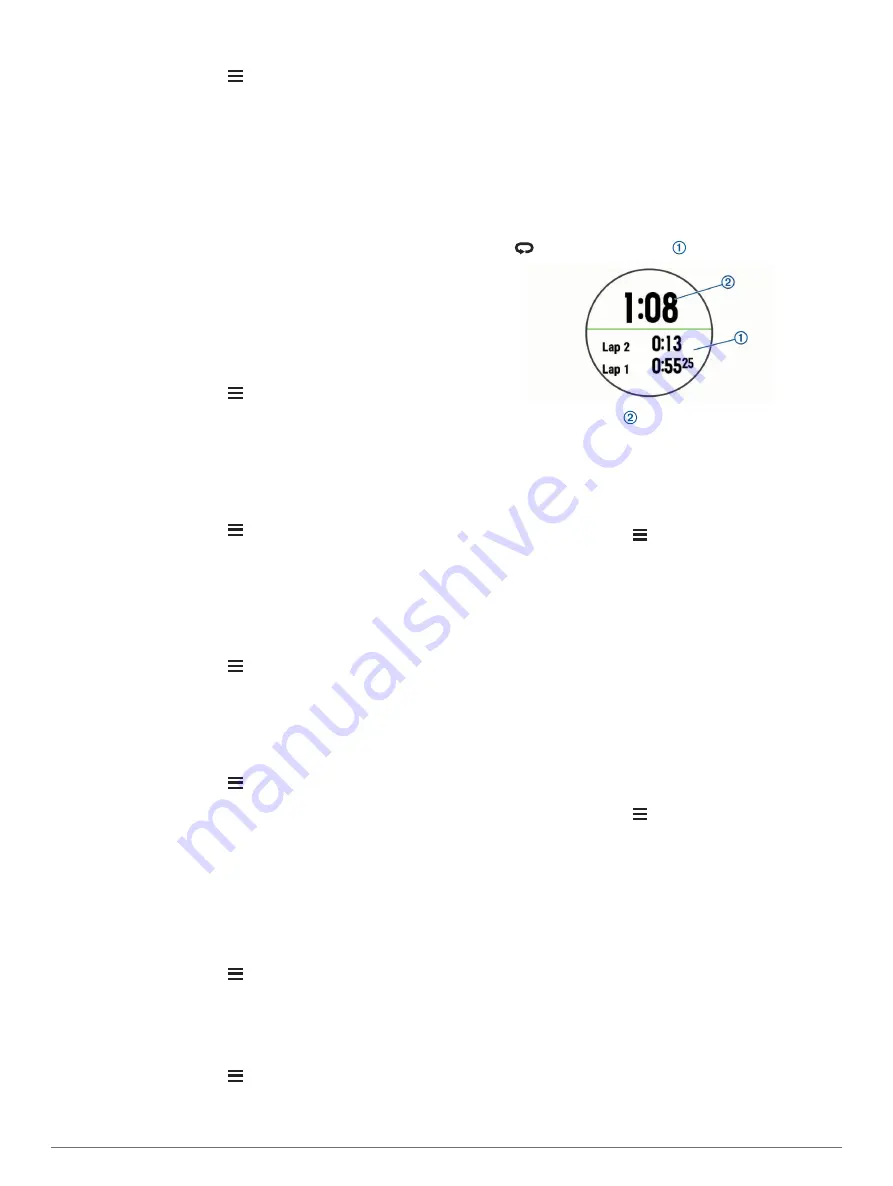
Using the Stopwatch

1

From any screen, hold 

LIGHT

.

2

Select 

Stopwatch

.

NOTE: 

You may need to add this item to the controls menu 

(

Customizing the Controls Menu

, page 17

).

3

Select 

START

 to start the timer.

4

Select 

 to restart the lap timer  .

The total stopwatch time   continues running.

5

Select 

START

 to stop both timers.

6

Select an option.

7

Save the recorded time as an activity in your history 

(optional).

Setting Clock Alerts

1

From the watch face, hold  .

2

Select 

Clock

 > 

Alerts

.

3

Select an option:
• To set an alert to sound a specific number of minutes or 

hours before the actual sunset occurs, select 

Til Sunset

 > 

Status

 > 

On

, select 

Time

, and enter the time.

• To set an alert to sound a specific number of minutes or 

hours before the actual sunrise occurs, select 

Til Sunrise 

Status

 > 

On

, select 

Time

, and enter the time.

• To set an alert to sound every hour, select 

Hourly

 > 

On

.

Syncing the Time with GPS

Each time you turn on the device and acquire satellites, the 

device automatically detects your time zones and the current 

time of day. You can also manually sync the time with GPS 

when you change time zones, and to update for daylight saving 

time.

1

From the watch face, hold  .

2

Select 

Clock

 > 

Sync With GPS

.

3

Wait while the device locates satellites (

Acquiring Satellite 

Signals

, page 30

).

VIRB Remote

The VIRB remote function allows you to control your VIRB 

action camera using your device. Go to 

www.garmin.com/VIRB 

to purchase a VIRB action camera.

Controlling a VIRB Action Camera

Before you can use the VIRB remote function, you must enable 

the remote setting on your VIRB camera. See the 

VIRB Series 

Owner's Manual

 for more information. You must also set the 

VIRB widget to be shown in the widget loop (

Customizing the 

Widget Loop

, page 23

).

1

Turn on your VIRB camera.

2

On your Forerunner device, select 

UP

 or 

DOWN

 from the 

watch face to view the VIRB widget.

3

Wait while the device connects to your VIRB camera.

Customizing Your Device

27

Содержание FORERUNNER 935

Страница 1: ...FORERUNNER 935 Owner sManual ...

Страница 2: ...ks of Garmin Ltd or its subsidiaries These trademarks may not be used without the express permission of Garmin Android is a trademark of Google Inc Apple and Mac are trademarks of Apple Inc registered in the U S and other countries The BLUETOOTH word mark and logos are owned by the Bluetooth SIG Inc and any use of such marks by Garmin is under license The Cooper Institute as well as any related tr...

Страница 3: ...our Power Zones 7 Activity Tracking 8 Auto Goal 8 Using the Move Alert 8 Sleep Tracking 8 Using Automated Sleep Tracking 8 Using Do Not Disturb Mode 8 Intensity Minutes 8 Earning Intensity Minutes 8 Garmin Move IQ Events 8 Activity Tracking Settings 8 Turning Off Activity Tracking 8 Menstrual Cycle Tracking 9 Heart Rate Features 9 Wrist based Heart Rate 9 Wearing the Device 9 Tips for Erratic Hear...

Страница 4: ...2 Course Pointer 22 Setting Up a Heading Bug 22 Setting Navigation Alerts 22 ANT Sensors 22 Pairing ANT Sensors 22 Tips for Pairing ANT Accessories with Your Garmin Device 22 Foot Pod 22 Going for a Run Using a Foot Pod 22 Foot Pod Calibration 22 Improving Foot Pod Calibration 22 Calibrating Your Foot Pod Manually 23 Setting Foot Pod Speed and Distance 23 Using an Optional Bike Speed or Cadence Se...

Страница 5: ...ice 30 Clearing User Data 30 Restoring All Default Settings 30 Updating the Software Using Garmin Express 31 My device is in the wrong language 31 Is my smartphone compatible with my device 31 My phone will not connect to the device 31 Maximizing the Battery Life 31 The temperature reading is not accurate 31 How can I manually pair ANT sensors 31 Can I use my Bluetooth sensor with my watch 31 Appe...

Страница 6: ......

Страница 7: ...ide and wait while the device locates satellites 3 Select START to start the timer 4 Go for a run 5 After you complete your run select STOP to stop the timer 6 Select an option Select Resume to restart the timer Select Save to save the run and reset the timer You can select the run to view a summary Select Resume Later to suspend the run and continue recording later Select Lap to mark a lap Select...

Страница 8: ...dmill or after each run 1 Start a treadmill activity Starting an Activity page 1 and run at least 1 5 km 1 mi on the treadmill 2 After you complete your run select STOP 3 Select an option To calibrate the treadmill distance the first time select Save The device prompts you to complete the treadmill calibration To manually calibrate the treadmill distance after the first time calibration select Cal...

Страница 9: ...ot one of the four major strokes 1 During your pool swim activity select UP or DOWN to view the drill log screen 2 Select to start the drill timer 3 After you complete a drill interval select The drill timer stops but the activity timer continues to record the entire swim session 4 Select a distance for the completed drill Distance increments are based on the pool size selected for the activity pr...

Страница 10: ... for that hole Your total score is updated TruSwing The TruSwing feature allows you to view swing metrics recorded from your TruSwing device Go to www garmin com golf to purchase a TruSwing device Using the Golf Odometer You can use the odometer to record the time distance and steps traveled The odometer automatically starts and stops when you start or end a round 1 Select START Odometer 2 If nece...

Страница 11: ...m up select to begin the first interval 7 Follow the on screen instructions After you complete all of the intervals a message appears Stopping an Interval Workout At any time select to end an interval At any time select STOP to stop the timer If you added a cool down to your interval workout select to end the interval workout Using Virtual Partner The Virtual Partner feature is a training tool des...

Страница 12: ...Downloaded to select an activity you downloaded from your Garmin Connect account 6 Select the activity The Virtual Partner screen appears indicating your estimated finish time 7 Select START to start the timer 8 After you complete your activity select START Save Personal Records When you complete an activity the device displays any new personal records you achieved during that activity Personal re...

Страница 13: ... You can use the Auto Detect feature to automatically record your lactate threshold during an activity Detecting Performance Measurements Automatically page 13 5 Select Resting HR and enter your resting heart rate You can use the average resting heart rate measured by your device or you can set a custom resting heart rate 6 Select Zones Based On 7 Select an option Select BPM to view and edit the z...

Страница 14: ...nnect account You can enable the Sleep Time option in the system settings to automatically enter do not disturb mode during your normal sleep hours System Settings page 26 1 Hold LIGHT 2 Select Do Not Disturb Intensity Minutes To improve your health organizations such as the World Health Organization recommend at least 150 minutes per week of moderate intensity activity such as brisk walking or 75...

Страница 15: ...roadcasting Heart Rate Data to Garmin Devices You can broadcast your heart rate data from your Forerunner device and view it on paired Garmin devices NOTE Broadcasting heart rate data decreases battery life 1 From the heart rate widget hold 2 Select Options Broadcast Heart Rate The Forerunner device starts broadcasting your heart rate data and appears NOTE You can view only the heart rate widget w...

Страница 16: ...e monitor backward to easily adjust the slider on the strap extender Put on the heart rate monitor forward to easily adjust the slider on the heart rate monitor Putting On the Heart Rate Monitor You should wear the heart rate monitor directly on your skin just below your sternum 1 Select a strap extender for the best fit 2 Wear the heart rate monitor with the Garmin logo facing right side up The h...

Страница 17: ...lap against the heart rate monitor can create static electricity that interferes with heart rate signals Move away from sources that can interfere with your heart rate monitor Sources of interference may include strong electromagnetic fields some 2 4 GHz wireless sensors high voltage power lines electric motors ovens microwave ovens 2 4 GHz cordless phones and wireless LAN access points Running Dy...

Страница 18: ... 25 5 Ground Contact Time Balance 52 2 L 50 8 52 2 L 50 7 L 50 7 R 50 8 52 2 R 52 2 R While developing and testing running dynamics the Garmin team found correlations between injuries and greater imbalances with certain runners For many runners ground contact time balance tends to deviate further from 50 50 when running up or down hills Most running coaches agree that a symmetrical running form is...

Страница 19: ...ult The device can automatically detect your maximum heart rate and lactate threshold during an activity When paired with a compatible power meter the device can automatically detect your functional threshold power FTP during an activity NOTE The device detects a maximum heart rate only when your heart rate is higher than the value set in your user profile 1 Hold 2 Select Settings Physiological Me...

Страница 20: ...own your heart rate is 90 bpm Your recovery heart rate is 50 bpm 140 minus 90 Some studies have linked recovery heart rate to cardiac health Higher numbers generally indicate healthier hearts TIP For best results you should stop moving for two minutes while the device calculates your recovery heart rate value You can save or discard the activity after this value appears Training Load Training load...

Страница 21: ...ature requires wrist based heart rate or a compatible chest heart rate monitor 1 Add Perform Cond to a data screen Customizing the Data Screens page 24 2 Go for a run or ride After 6 to 20 minutes your performance condition appears 3 Scroll to the data screen to view your performance condition throughout the run or ride Lactate Threshold Lactate threshold is the exercise intensity at which lactate...

Страница 22: ...e on screen instructions If you already paired another device with the Garmin Connect app from the or menu select Garmin Devices Add Device and follow the on screen instructions Tips for Existing Garmin Connect Users 1 From the Garmin Connect app select or 2 Select Garmin Devices Add Device Enabling Bluetooth Notifications Before you can enable notifications you must pair the Forerunner device wit...

Страница 23: ... Music controls Provides music player controls for your smartphone My day Displays a dynamic summary of your activity today The metrics include timed activities intensity minutes floors climbed steps calories burned and more Notifications Alerts you to incoming calls texts social network updates and more based on your smartphone notification settings Performance Displays your current training stat...

Страница 24: ...LIGHT to view the controls menu 2 Select Starting a GroupTrack Session Before you can start a GroupTrack session you must have a Garmin Connect account a compatible smartphone and the Garmin Connect Mobile app These instructions are for starting a GroupTrack session with Forerunner devices If your connections have other compatible devices you can see them on the map The other devices may not be ab...

Страница 25: ...in each heart rate zone can help you adjust your training intensity 1 From the watch face hold 2 Select History Activities 3 Select an activity 4 Select Time in Zone Viewing Data Totals You can view the accumulated distance and time data saved to your device 1 Hold 2 Select History Totals 3 If necessary select an activity 4 Select an option to view weekly or monthly totals Using the Odometer The o...

Страница 26: ...example you can save and follow a bike friendly commute to work You can also follow a saved course trying to match or exceed previously set performance goals For example if the original course was completed in 30 minutes you can race against a Virtual Partner trying to complete the course in under 30 minutes Creating and Following a Course on Your Device 1 From the watch face select START Navigate...

Страница 27: ...ory 3 Respond to the on screen prompts to choose a destination 4 Select Go To Navigation information appears 5 Select START to begin navigation Marking and Starting Navigation to a Man Overboard Location You can save a man overboard MOB location and automatically start navigation back to it TIP You can customize the hold function of the keys to access the MOB function Customizing the Hot Keys page...

Страница 28: ...packaged with an ANT sensor they are already paired 1 Install the sensor or put on the heart rate monitor 2 Bring the device within 1 cm of the sensor and wait while the device connects to the sensor When the device detects the sensor a message appears You can customize a data field to display sensor data 3 If necessary select Settings Sensors and Accessories to manage ANT sensors Tips for Pairing...

Страница 29: ... ANT Sensors page 22 You can customize the optional data fields Customizing the Data Screens page 24 The Forerunner device displays current adjustment values when the sensor is in adjustment mode Situational Awareness Your Forerunner device can be used with the Varia Vision device Varia smart bike lights and rearview radar to improve situational awareness See the owner s manual for your Varia devi...

Страница 30: ... adjust the number of data fields on the data screen Select a field to change the data that appears in the field Select Reorder to change the location of the data screen in the loop Select Remove to remove the data screen from the loop 8 If necessary select Add New to add a data screen to the loop You can add a custom data screen or select one of the predefined data screens Adding a Map to an Acti...

Страница 31: ...imer automatically when you stop moving select When Stopped To pause the timer automatically when your pace or speed drops below a specified level select Custom Enabling Auto Climb You can use the auto climb feature to detect elevation changes automatically You can use it during activities such as climbing hiking running or biking 1 Hold 2 Select Settings Activities Apps 3 Select an activity NOTE ...

Страница 32: ...face select Dial To change the style of the hands for the analog watch face select Hands To change the style of the numbers for the digital watch face select Layout To change the style of the seconds for the digital watch face select Seconds To change the data that appears on the watch face select Additional Data To add or change an accent color for the watch face select Accent Color To change the...

Страница 33: ...art On to automatically restart the timer after it expires 5 If necessary select Sounds and select a type of notification 6 Select Start Timer Using the Stopwatch 1 From any screen hold LIGHT 2 Select Stopwatch NOTE You may need to add this item to the controls menu Customizing the Controls Menu page 17 3 Select START to start the timer 4 Select to restart the lap timer The total stopwatch time co...

Страница 34: ...to a computer Refer to the cleaning instructions in the appendix 1 Plug the small end of the USB cable into the charging port on your device 2 Plug the large end of the USB cable into a USB charging port 3 Charge the device completely Specifications Forerunner Specifications Battery type Rechargeable built in lithium ion battery Watch mode battery life Up to 2 wk with activity tracking smartphone ...

Страница 35: ...age or lose the O ring gasket The O ring gasket should remain around the outside of the raised plastic ring 6 Replace the front cover and the four screws Observe the orientation of the front cover The raised screw should fit in the matching raised screw hole on the front cover NOTE Do not overtighten 7 Replace the sleeve After you replace the heart rate monitor battery you may need to pair it with...

Страница 36: ... the Garmin Connect application does not sync your data or update your step count The floors climbed amount does not seem accurate Your device uses an internal barometer to measure elevation changes as you climb floors A floor climbed is equal to 3 m 10 ft Avoid holding handrails or skipping steps while climbing stairs In windy environments cover the device with your sleeve or jacket as strong gus...

Страница 37: ...res page 18 When pausing your activity for a longer period of time use the resume later option Stopping an Activity page 2 Turn off activity tracking Activity Tracking Settings page 8 Use a watch face that is not updated every second For example use a watch face without a second hand Customizing the Watch Face page 26 Limit the smartphone notifications the device displays Managing Notifications pa...

Страница 38: ...set for the current activity Avg R PP The average power phase angle for the right leg for the current activity Avg R PPP The average power phase peak angle for the right leg for the current activity Avg Speed The average speed for the current activity Avg Stride Len The average stride length for the current session Avg Strk Len The average number of strokes per pool length during the current activ...

Страница 39: ...ty Interval Lengths The number of pool lengths completed during the current interval Interval Time The stopwatch time for the current interval Int Strk Len The average number of strokes per pool length during the current interval Int Strk Rate The average number of strokes per minute spm during the current interval Int Strk Type The current stroke type for the interval L Lap Stk Rate Swimming The ...

Страница 40: ...set Moving Time The total time moving for the current activity Multisport Time The total time for all sports in a multisport activity including transitions Muscle O2 Sat The estimated muscle oxygen saturation percentage for the current activity Nautical Dist The distance traveled in nautical meters or nautical feet Nautical Speed The current speed in knots Next Waypoint The next point on the route...

Страница 41: ... 4 39 5 36 7 Good 60 45 4 44 42 4 39 2 35 5 32 3 Fair 40 41 7 40 5 38 5 35 6 32 3 29 4 Poor 0 40 41 7 40 5 38 5 35 6 32 3 29 4 Females Percentile 20 29 30 39 40 49 50 59 60 69 70 79 Superior 95 49 6 47 4 45 3 41 1 37 8 36 7 Excellent 80 43 9 42 4 39 7 36 7 33 30 9 Good 60 39 5 37 8 36 3 33 30 28 1 Fair 40 36 1 34 4 33 30 1 27 5 25 9 Poor 0 40 36 1 34 4 33 30 1 27 5 25 9 Data reprinted with permiss...

Страница 42: ...2180 700 40C 2200 700 44C 2235 700 45C 2242 700 47C 2268 Symbol Definitions These symbols may appear on the device or accessory labels Alternating current The device is suitable for alternating current Direct current The device is suitable for direct current only Fuse Indicates a fuse specification or location WEEE disposal and recycling symbol The WEEE symbol is attached to the product in complia...

Страница 43: ...J jumpmaster 3 K keys 1 18 26 28 L lactate threshold 12 13 15 language 26 laps 1 layup 4 lengths 3 lifetime athlete 7 LiveTrack 18 locations 21 deleting 20 editing 20 saving 20 M main menu customizing 23 man overboard MOB 21 map 21 maps 21 24 browsing 21 navigating 21 measurements 4 measuring a shot 4 menstrual cycle 9 menu 1 metronome 6 MOB 21 multisport 2 19 music controls 18 N navigation 20 22 ...

Страница 44: ...31 uploading data 18 USB 31 disconnecting 19 user data deleting 19 user profile 7 V vertical oscillation 11 12 vertical ratio 11 12 VIRB remote 27 28 Virtual Partner 5 6 VO2 max 12 14 35 W watch faces 18 26 watch mode 26 waypoints projecting 21 weather 17 wheel sizes 35 Wi Fi 31 connecting 19 widgets 9 17 18 workouts 4 loading 4 Z zones heart rate 7 power 7 time 27 38 Index ...

Страница 45: ......

Страница 46: ...support garmin com June 2019 190 02166 00_0C ...

Отзывы: