background image

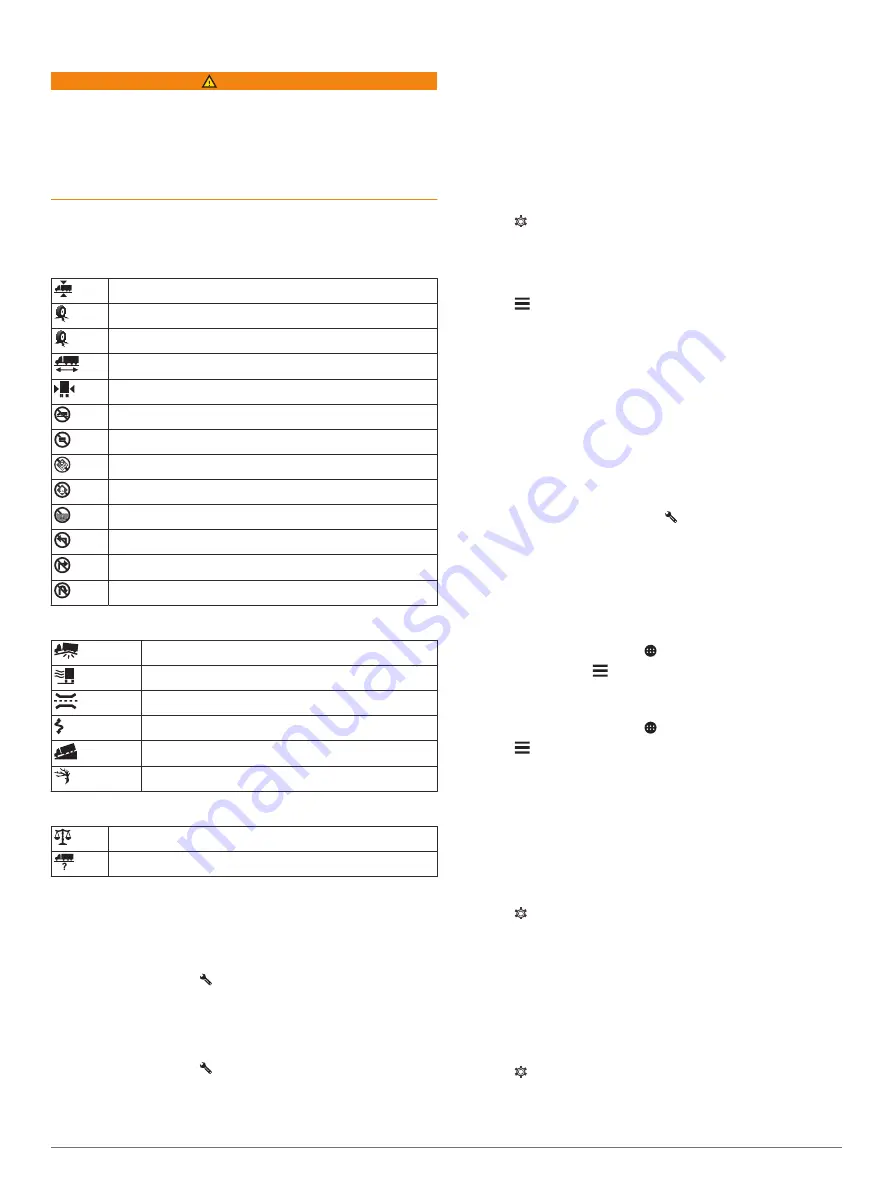
Warning and Alert Symbols

 WARNING

Entering your vehicle profile characteristics does not guarantee 

that your vehicle's characteristics will be accounted for in all 

route suggestions or that you will receive the warning icons in all 

cases. Limitations may exist in the map data such that your 

device cannot account for these restrictions or road conditions in 

all cases. Always defer to all posted road signs and road 

conditions when making driving decisions.
Warning and alert symbols may appear on the map or in route 

directions to alert you to potential hazards, road conditions, and 

upcoming weigh stations.

Restriction Warnings

Height

Weight

Axle Weight

Length

Width

No Trucks Allowed

No Trailers Allowed

No Hazardous Materials Allowed

No Flammables Allowed

No Water Pollutants Allowed

No Left Turn

No Right Turn

No U Turn

Road Condition Warnings

Risk of grounding

Lateral wind

Narrow road

Sharp curve

Steep down hill

Tree overhang

Alerts

Weigh station

Road not verified for trucks

Trip Information

Viewing Trip Data from the Map

Before you can view trip data on the map, you must add the tool 

to the map tools menu (

Enabling Map Tools

, page 9

).

From the map, select   > 

Trip Data

.

Customizing the Trip Data Fields

Before you can customize the data that appears in the trip data 

map tool, you must add the trip data tool to the map tools menu 

(

Enabling Map Tools

, page 9

).

1

From the map, select   > 

Trip Data

.

2

Select a trip data field.

3

Select an option.
The new trip data field appears in the trip data map tool.

Viewing the Trip Information Page

The trip information page displays your speed and provides 

statistics about your trip.

NOTE: 

If you make frequent stops, leave the device turned on, 

so it can accurately measure elapsed time during the trip.

From the map, select 

Speed

.

Viewing the Trip Log

Your device keeps a trip log, which is a record of the path you 

have traveled.

1

Select   > 

Navigation

 > 

Map & Vehicle

 > 

Map Layers

.

2

Select the 

Trip Log

 check box.

Resetting Trip Information

1

From the map, select 

Speed

.

2

Select   > 

Reset Field(s)

.

3

Select an option:
• When not navigating a route, select 

Select All

 to reset 

every data field except the speedometer, on the first page.

• Select 

Reset Trip Data

 to reset the information on the trip 

computer.

• Select 

Reset Max. Speed

 to reset the maximum speed.

• Select 

Reset Trip B

 to reset the odometer.

Viewing Upcoming Traffic

You can view traffic incidents coming up along your route or 

along the road on which you are traveling.

1

While navigating a route, select   > 

Traffic

.

The nearest upcoming traffic incident appears in a panel on 

the right side of the map.

2

Select the traffic incident to view additional details.

Viewing Traffic on the Map

The traffic map shows color-coded traffic flow and delays on 

nearby roads.

1

From the main menu, select   > 

Traffic

.

2

If necessary, select   > 

Legend

 to view the legend for the 

traffic map.

Searching for Traffic Incidents

1

From the main menu, select   > 

Traffic

.

2

Select   > 

Incidents

.

3

Select an item in the list.

4

If there is more than one incident, use the arrows to view 

additional incidents.

Customizing the Map

Customizing the Map Layers

You can customize which data appear on the map, such as 

icons for points of interest and road conditions.

1

Select   > 

Navigation

 > 

Map & Vehicle

 > 

Map Layers

.

2

Select the check box next to each layer you want to show on 

the map.

Changing the Map Data Field

1

From the map, select a data field.

NOTE: 

You cannot customize Speed.

2

Select a type of data to display.

Changing the Map Perspective

1

Select   > 

Navigation

 > 

Map & Vehicle

 > 

Driving Map 

View

.

10

Using the Map

Содержание Fleet 770

Страница 1: ...GARMINFLEET 770 Owner sManual...

Страница 2: ...t Garmin Express myTrends are trademarks of Garmin Ltd or its subsidiaries These trademarks may not be used without the express permission of Garmin The Bluetooth word mark and logos are owned by the...

Страница 3: ...ing 8 Finding Parking Near Your Current Location 8 Understanding Parking Colors and Symbols 8 Search Tools 8 Finding an Address 8 Finding an Intersection 8 Finding a City 8 Finding a Location Using Co...

Страница 4: ...15 Device Information 15 Viewing Regulatory and Compliance Information 15 Specifications 15 Charging the Device 15 Device Maintenance 15 Garmin Support Center 15 Updating Maps and Software Using a Wi...

Страница 5: ...2 Press the mount onto the suction cup until it snaps into place NOTE The mount and suction cup may already be assembled in the package The Garmin logo on the mount should face right side up It is eas...

Страница 6: ...cannot account for these restrictions or road conditions in all cases Always defer to all posted road signs and road conditions when making driving decisions Routing and navigation are calculated diff...

Страница 7: ...age when you approach a road where there is risk of lateral wind Narrow road The device plays a tone and displays a message when you approach a road that may be too narrow for your vehicle Steep hill...

Страница 8: ...ation of the road appears beside the map if available A colored line indicates the proper lane for the turn Viewing Turns and Directions While navigating a route you can view upcoming turns lane chang...

Страница 9: ...p Tools page 9 2 Select an option To detour your route for a specific distance select Detour by Distance To detour around a specific road on the route select Detour by Road To find a new route select...

Страница 10: ...deleting it 1 Select Navigation Route Preferences Custom Avoidances 2 Select an avoidance 3 Select Disable Deleting Custom Avoidances 1 Select Navigation Route Preferences Custom Avoidances 2 Select a...

Страница 11: ...ected location Select to find parking areas near the location Select to view alternate routes to the locations Go Select to start navigating to the location using the recommended route Select to view...

Страница 12: ...ere To Categories Coordinates 2 If necessary select and change the coordinate format or datum 3 Enter the latitude and longitude coordinates 4 Select View on Map Viewing Recently Found Locations Your...

Страница 13: ...ns Displays a list of upcoming turns in your route Viewing Turns and Directions page 4 Trip Data Displays customizable trip data such as speed or mileage Viewing Trip Data from the Map page 10 Volume...

Страница 14: ...e device turned on so it can accurately measure elapsed time during the trip From the map select Speed Viewing the Trip Log Your device keeps a trip log which is a record of the path you have traveled...

Страница 15: ...oth connection and remain on the call or if you need privacy To use the dial pad select TIP You can use this feature to use automated systems such as voice mail To mute the microphone select To hang u...

Страница 16: ...el Used field 4 Enter the amount of fuel purchased 5 If necessary select the fuel type To record the amount in liters select Gallons Liters Save To record the amount in gallons select Liters Gallons S...

Страница 17: ...ect Select Destination 5 Choose a location for a destination and select Select 6 Select Add Location to add more locations optional 7 After you have added all the necessary locations select Next Save...

Страница 18: ...hen disabled you must zoom in or out manually myMaps Sets which installed maps the device uses Enabling Maps You can enable map products installed on your device TIP To purchase additional map product...

Страница 19: ...time format Device Settings Select About device System updates Allows you to update map and device software Status Displays the battery status and network information Legal Information Allows you to v...

Страница 20: ...een using a cloth dampened with a mild detergent solution 2 Wipe the device dry Cleaning the Touchscreen 1 Use a soft clean lint free cloth 2 If necessary lightly dampen the cloth with water 3 If usin...

Страница 21: ...ds You can purchase memory cards from an electronics supplier or purchase pre loaded Garmin mapping software www garmin com In addition to map and data storage the memory card can be used to store fil...

Страница 22: ...nd longitude 8 locations 8 14 current 8 recently found 8 saving 8 searching for 6 8 M map layers customizing 10 map view 2 D 10 3 D 10 maps 4 9 10 14 data field 4 10 detail level 14 layers 10 purchasi...

Страница 23: ...3 editing a trip 13 shaping points 13 troubleshooting 16 17 truck map 12 points of interest 6 profiles 2 3 trailer 2 turn list 4 U unit ID 15 up ahead 9 customizing 9 updating maps 15 software 15 V ve...

Страница 24: ...support garmin com September 2017 190 02200 00_0A...

Отзывы: