background image

Apollo CNX80 Pilot’s Guide

12

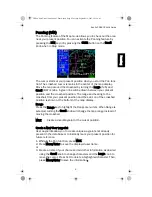
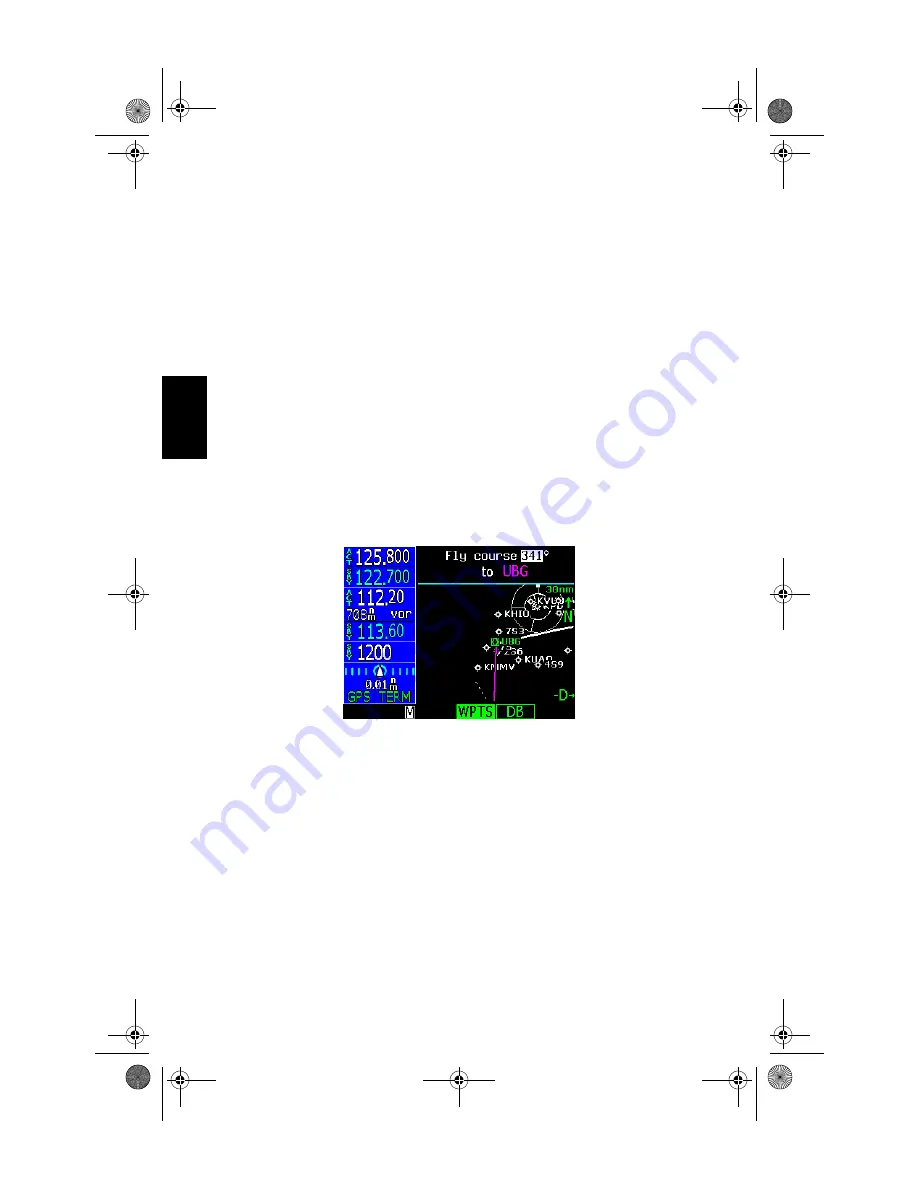
Course To (CrsTo)
Course To operation allows you to select an inbound to the intercept 
course for the selected waypoint. The default course for the operation 
is the course from the present position to the selected waypoint. The 
length of the magenta course to line will be the distance from the 
present position to the selected waypoint or 20 NM; whichever is 
larger to a maximum of 300 NM. Upon reaching the selected waypoint, 
if the waypoint is in the active flight plan, the flightplan will sequence 
to the next waypoint in the flightplan normally. Maps are always drawn 
with True North at the top of the display (Up). 

1. Press Direct-To. Select a new waypoint, if desired, with the Large 

and Small knobs. 

2. Press CrsTo. A map is displayed showing the selected course. 
3. Change the course bearing, if desired. Turn the Large knob to 

change the 10’s value. Turn the Small knob to change the 1’s value. 

4. Press Menu/Enter. 
 

Course From (CrsFr)
The Course From operation allows you to navigate from a waypoint on 
a pre-defined course. The default course for the Course From opera-
tion will depend on whether the ownship symbol is heading toward the 
selected waypoint or away from it. If the ownship symbol is heading 
toward the selected waypoint, the default course will be the bearing 
from the present position to the selected waypoint. If the ownship sym-
bol is heading away from the waypoint, the default course will be the 
bearing from your present position to the selected waypoint plus 
180°. The length of the magenta course line will always be 100 NM. 

Dir

ect

-T

o

CNX80 Pilot Guide 560-0984-00C Draft1.book  Page 12  Tuesday, September 2, 2003  10:36 AM

Содержание Fishfinder 80

Страница 1: ...CNX80 Pilot Guide 560 0984 00C Draft1 book Page 1 Tuesday September 2 2003 10 36 AM ...

Страница 2: ...idential business and or financial information and falls within exemption b 4 of 5 USC 552 FOIA and the prohibitions of 18 USC 1905 Garmin AT is a trademark of Garmin International Inc 2003 by Garmin AT Inc All rights reserved Garmin AT Inc 2345 Turner Rd SE PO Box 13549 Salem OR 97302 Salem OR 97309 USA Phone 503 581 8101 www garminat com 1 800 525 6726 In Canada 1 800 654 3415 FAX 503 364 2138 C...

Страница 3: ...12 OBS 13 FlyLeg 14 Nearest Waypoints NRST 15 Nearest Frequency 15 Info on Nearest Waypoint 16 Fly Direct To a Nearest Waypoint 16 Change Your Approach to a Nearest Waypoint 16 Information on Waypoints INFO 17 Com Radio COM 18 Nav Radio VOR 21 Transponder Control XPDR 24 Ident 24 Standby 24 ON 24 Alt 24 Transponder Line Selection Keys 24 Manually Select a Squawk Code 25 Flight Planning FPL 26 View...

Страница 4: ... Distance 34 Trigger Speed 35 Checklist CHK 35 Creating a New or Editing an Existing Checklist 35 Using Your Checklist 36 Move a Checklist 36 User Waypoints USER 37 Creating or Editing a User Waypoint 37 Searching for a User Waypoint 37 System Mode SYS 38 GPS Status 38 Software Versions 38 Configuration 39 Parallel Track PTK 40 Activating Parallel Track 40 Simulator Mode 41 Automatic Track ATK 41 ...

Страница 5: ...onder controller all in a single unit The CNX80 with the GPS WAAS navigator is certified for use as primary navigation This User s Guide focuses on the basics so you can get the most out of your CNX80 quickly For more details and examples refer to the CNX80 User Reference Manual and the CNX80 Computer Based Train ing CBT both of which are provided on Compact Disc for your conve nience These docume...

Страница 6: ...ing When waypoint sequencing is suspended the SUSP annunciator will be displayed in the bottom left corner of the display MAP Selects Map mode Press MAP twice to view Map page 1 Direct To Selects the Direct To menu Menu options allow setting up Direct To D setting a customized holding pattern around a waypoint Hold Course To CrsTo a waypoint Course From CrsFr a waypoint OBS mode and jumping to a g...

Страница 7: ...der mode it allows editing codes FN Press the FN key to page through the available gro of Functions that appear at the bottom display The smart keys located below each label will activate that function Datacard The Map database and other information is stored on a data card The use of a data card allows you to easily update information Note Only change the data card when the power is turned off or...

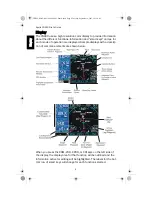
Страница 8: ...plays with a descrip tion of common elements are shown below When you press the COM VOR XPDR or CDI keys on the left side of the display the display area for that function will be outlined and the information active for editing will be highlighted The labels for the bot tom row of smart keys will change for each function selected Display CNX80 Pilot Guide 560 0984 00C Draft1 book Page 4 Tuesday Se...

Страница 9: ... a position error or is unable to calculate the integrity of the position BC The Back Course annunciation appears to the right of LOC when the Back Course Localizer mode is enabled DR The Dead Reckoning annunciator appears on the left side of the map display when GPS position is lost and the CNX80 is in Dead Reckoning mode Dead Reckon ing mode will continue until GPS position is restored or the fi...

Страница 10: ...y enter your present position or just wait a few seconds for the CNX80 to establish your position 3 The CNX80 performs a number of tests at startup to ensure proper operation You may press SKIP to bypass the startup tests however completing these tests is required for IFR flight Any failures will be noted by a message Database Check The CNX80 verifies the integrity and expiration date of the datab...

Страница 11: ...re key to go to the next page of Menu items Menu Item Description Airports VORs NDBs Intersec tions User Way points Lo and Hi Airways Solid reversed label means identifier and location symbol are displayed A bold outline means only the location symbol will be displayed A thin outline means this item will not be displayed on the map Airspace Solid reversed means the airspace outline and sec tor lin...

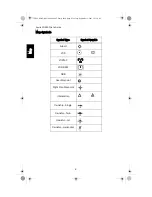
Страница 12: ...l Type Symbol Graphic Airport VOR VORTAC VOR DME NDB User Waypoint Flight Plan Waypoint Intersection Ownship Single Ownship Twin Ownship Jet Ownship Helicopter Map CNX80 Pilot Guide 560 0984 00C Draft1 book Page 8 Tuesday September 2 2003 10 36 AM ...

Страница 13: ... position is shown at the bottom of the map display Range Press the Range key to highlight the Range menu item When Range is selected turning the Small knob will change the map range instead of moving the crosshair MRK Create a User Waypoint at the cursor position Create a New User waypoint User waypoints allow you to create unique waypoints not already present in the database or to instantly mark...

Страница 14: ...s to select the waypoint Direct The Direct Menu selection key activates the direct course to the dis played waypoint 1 When you press Direct To the default waypoint shown will be the highlighted waypoint in your flight plan unless another waypoint is highlighted in another operation then that waypoint would be used You can turn the Large knob to select a different waypoint in your flight plan 2 Yo...

Страница 15: ...n and return to the flight plan Destination Dest The Dest Menu selection key replaces the active flight plan with a direct course to the displayed waypoint You can choose a waypoint from your flight plan WPTS or another waypoint from the database DB 1 When you press Direct To the default waypoint shown will be the highlighted waypoint in your flight plan when the WPTS smart key is highlighted You ...

Страница 16: ... Press CrsTo A map is displayed showing the selected course 3 Change the course bearing if desired Turn the Large knob to change the 10 s value Turn the Small knob to change the 1 s value 4 Press Menu Enter Course From CrsFr The Course From operation allows you to navigate from a waypoint on a pre defined course The default course for the Course From opera tion will depend on whether the ownship s...

Страница 17: ...tation Automatic flight plan sequencing will be sus pended initially Note When using OBS mode for a VOR station declination provided by the database is used This corresponds to the magnetic variation actually used by the VOR rather than the value calculated from your present position OBS to a Waypoint in Your Flight Plan If the OBS waypoint is on the map display a magenta line will be drawn for th...

Страница 18: ...the DB smart key 2 Select a new waypoint outside of your flight plan with the Large and Small knobs 3 Press OBS Now use the external CDI HSI resolver to control the selected course The CNX80 will read the OBS information and will change the course displayed on the Map displays 4 After reaching the waypoint you will need to select a new desti nation FlyLeg With the FlyLeg Menu selection you can act...

Страница 19: ...lay the Nearest waypoints 2 The Nearest waypoint type labels are shown on the right side of the display Press the Line Selection key next to the waypoint type label that you want 3 Turn the Large knob to highlight green the waypoint you want to select SRCH Search near a selected waypoint Nearest Frequency While viewing the Nearest waypoints that have frequency information you can transfer the disp...

Страница 20: ...o select the desired nearest waypoint 3 Press the INFO button Note if IFR is listed with the identifier instrument approaches are available Press INFO again to toggle back to the Nearest Waypoint list 4 With the desired airport selected press the D key 5 Press the Dest key Press Menu Enter to accept the change to your flight plan Press Menu Enter to activate the new flight plan direct to the selec...

Страница 21: ...tion Frequencies Map of area and runway Runway information length lighting surface type category type and frequency VOR Information Identifier city state country bearing and distance from present position frequency lat lon coordinates and magnetic variation Map of area NDB Information Identifier city state country bearing and distance from present position frequency lat lon coordinates and magneti...

Страница 22: ...ity When Active frequency receives a signal you will hear the Active frequency until its activity stops The frequency monitoring function is inhibited while you are transmitting Recall RCL 1 Press the RCL key to display the menu of Recent User or Emer gency frequencies 2 Press the SBY key to insert the selected frequency as the Standby frequency 3 Press the A key to insert the selected frequency a...

Страница 23: ...enu Enter and then the Weather key to bring up the list of Weather frequencies where available The Weather menu label will be highlighted 2 Turn the Large knob to highlight a frequency 3 Press SBY to insert the highlighted frequency as the Standby fre quency or A to insert it as the Active frequency 4 Press the Weather key again to turn the value display off Audio 1 Press Menu Enter and then the A...

Страница 24: ...bring up the Save Channel box The Save Chnl menu label will be highlighted 2 Press the Save Chnl key again to turn the value display off 3 Turn the Small knob to change the value 4 Turn the Large knob to move the cursor to another character 5 Press the Menu Enter key to save the name and frequency Com Radio CNX80 Pilot Guide 560 0984 00C Draft1 book Page 20 Tuesday September 2 2003 10 36 AM ...

Страница 25: ...function When monitor mode is active a MON annunciator will appear on the left side of the standby frequency the standby radial replaces the active identifier and the MON function label will be highlighted Frequency monitoring allows you to listen to the Standby VOR fre quency while the CNX80 monitors the Active frequency for activity When Active frequency receives a signal you will hear the Activ...

Страница 26: ...ed Audio This function operates the same as in Com mode Save Channel This function operates the same as in Com mode Test Log The Test Log function allows you to store information about the last time you tested your Nav receiver The information you can enter includes Date month day year Type of test Differential Ground Air Location text Bearing Error 5 to 5 and name of person log ging the test info...

Страница 27: ...ange the character When editing is complete press the Cursor knob again to exit editing the Location 7 Turn the Large knob to move to the Brg Error selection Turn the Small knob the change the value required to center the needle Left for and right for corrections 8 Turn the Large knob to move to the Name selection This value if for recording the name of the person entering the values in the Test L...

Страница 28: ... No information will be transmitted while in Standby mode A SBY annunci ator will appear to the left of the squawk code ON Press the ON key to enable Mode A operation which shows the four digit squawk code An ON annunciator will appear to the left of the squawk code Alt Press the Alt key to enable Mode C operation which also sends alti tude data along with your squawk code An ALT annunciator will ...

Страница 29: ...l knobs Press Menu Enter 3 Press Menu Enter Press the Auto key Auto mode is active when it is highlighted Press Auto again when you want to deactivate the Auto mode Manually Select a Squawk Code 1 Press the CRSR in or turn the Large knob to activate squawk code editing Numbers 0 7 will be displayed adjacent to the Smart and Line Selection keys 2 Press the key for the desired number After pressing ...

Страница 30: ... an existing flight plan Editing a displayed flight plan will not change the active flight plan Expand XPND Pressing the XPND key toggles between a simple view of the way points in the flight plan and one that shows the details of the pro cedures and airways Reverse Rvrse Pressing the Rvrse key will create a copy of the active flight plan and reverse the waypoints Any procedures or approaches will...

Страница 31: ...smart keys give you the choice of Back Executing or Expanding and viewing details in the new Flight Plan Execute Exec Use the Execute command to make the modified flight plan the Active flight plan A flight plan that is being modified will not be used until you press Exec and confirm the activation Comment Cmnt This function allows you to place a comment of up to one line of text for the flight pl...

Страница 32: ... in general how you can select a waypoint for one of the points in a flight plan 1 Press the FN key if necessary and then the FPL key 2 Press the NEW key The waypoint database will be displayed You can choose to search for a waypoint by the Identifier Facility Name Location or Waypoint Type 3 Select by Identifier a With the first character of the Identifier highlighted turn the Small knob to selec...

Страница 33: ...se to search for a waypoint by the identifier facility name city or waypoint type 3 Select the Origin waypoint as described in Building a New Flight Plan above Press Menu Enter 4 Select the Destination waypoint Press Menu Enter 5 Turn the Large knob to highlight the Discontinuity Press CLR to remove the Discontinuity This creates a direct path between way points 6 Select the final operation for cr...

Страница 34: ...DP C Insert en route flight plan of Airways and or Waypoints D Modifying a Flight Plan While in Flight E Add Arrival Procedures STARS F Add Approach Procedures when you receive clearance A Set Origin Destination and Alternate Waypoints 1 In Flightplan mode press the NEW key 2 Use the Large and Small knobs to select the Origin waypoint Press Menu Enter 3 The Destination waypoint selection page will...

Страница 35: ...lect the desired point to enter the airway You may also press one of the Line Selection keys that display the available airways 3 Turn the Large knob CW one position to highlight the Intersection choices Turn the Small knob to choose the desired point to exit the Airway Press Menu Enter D Modifying a Flight Plan While In Flight Flight plans may be modified in either the Flight Plan FPL or Proce du...

Страница 36: ...r flight plan If you want to choose a different Alternate airport press Modify choose another airport with the Large and Small knobs and press Menu Enter and then press the Load key If you do not have an Alternate airport select one by pressing Modify and select one with the Large and Small knobs followed by press ing Menu Enter and then pressing the Load key 4 Insert any waypoints or airways for ...

Страница 37: ...intersection is shown with the bearing and distance of each leg Verify the way points in your flight plan and resolve any discontinuities 3 Press EXEC Vector To Final When you are in the Terminal area you may be directed to fly a vector to final approach 1 Press FN and then PROC 2 Press VTF 3 Follow the guidance from the CNX80 as the inbound course to the Final Approach Fix FAF is now active Misse...

Страница 38: ...he 1 Min or 2 Min keys to instantly insert 1 or two minutes as the time Press the Disp key to display the Timer value on the Map pages The Disp key will be highlighted and an asterisk will appear next to the value that will be displayed on the Map pages Press the CLR key to reset the values to 0 Trip Time and Distance The Trip Time and Distance counters display the time and distance traveled since...

Страница 39: ... name the new list Press Menu Enter when finished 3 With the name of your new list highlighted press the EDIT key 4 Turn the Small knob to choose the desired checklist item See the following table for available checklist items If you want to make your own item press the CRSR knob in and use the Small and Large knobs to name the new item Press Menu Enter when finished 5 Then turn the Large knob to ...

Страница 40: ... pressing the CHK key the next item in the list will be highlighted 4 After the last item is checked the CHECKLIST COMPLETE line will be highlighted Press CHK to check this item and return to the main Checklist page Move a Checklist 1 Press FN and then the CHK key to start the Checklist function 2 Press the MOV key 3 Turn the Large knob to the position in the order of lists where you want to put t...

Страница 41: ...2 Press the NEW or EDIT key 3 Use the Small and Large knobs to name or edit the waypoint name 4 Turn the Large knob to go to each field on the page and edit the val ues 5 Press Menu Enter when finished Searching for a User Waypoint 1 Press FN and then the USER key to start the User Waypoint func tion 2 Press the SEARCH key 3 Use the Small and Large knobs to select the waypoint name You can also se...

Страница 42: ...mputed from the GPS constellation EPU Estimated Position uncertainty in meters Dashes are shown if the value is not valid HPL Horizontal Protection Level in meters Dashes are shown if the value is not valid VPL Vertical Protection Level in meters Dashes are shown if the value is not valid Lat Lon Current position in degrees minutes and hundredths of minutes Software Versions The Software Version p...

Страница 43: ...ns 2 Turn the Large knob to highlight the value you want to change The green arrow on the right side of the display indicates the direction to turn the Large knob to view more choices 3 Press the CRSR knob in to start editing 4 Turn the Small knob to change the value 5 Press the CRSR knob in again or press the Menu Enter key to save the value System CNX80 Pilot Guide 560 0984 00C Draft1 book Page ...

Страница 44: ...matically cancel Paral lel Track Parallel track is cancelled if a course change occurs greater than 120 or the parallel tracks overlap as a result of the course change Activating Parallel Track 1 Press FN and then the PTK key to reach the Parallel Track function 2 Press the CRSR knob 3 Turn the Small knob to change the value for the Distance parallel from the flight track With the Distance field s...

Страница 45: ...and title ends and the left side of the display information just appears press SUSP three times 2 Press Menu Enter to continue in Simulator mode or press CLR to continue with normal operation 3 Turn the Small knob if desired to change the Local Altimeter Set ting Press Menu Enter to continue to the start up test phase Press SKIP to bypass the start up tests 4 Select Automatic Track mode present po...

Страница 46: ... to cancel the selection and return to the previous display Messages MSG Message mode lets the pilot know about conditions that require imme diate attention Depending on the level of importance a message box may appear on the display over the active mode A flashing annuncia tor M will appear at the bottom of the display when a message is available for viewing The CNX80 provides both visual text an...

Страница 47: ...e Out of Range Check Altitude Encoder Pilot awareness Check unit prior to next flight WARNING Altitude Encoder Communica tions Failure Altitude information is not being received by the CNX WARNING Fuel Air Data Communications Failure Fuel Air Data information is not being received by the CNX Library Flight Plan Memory Loss x Library Plans Deleted A checksum error has occurred and x number of plans...

Страница 48: ...iguration Corrupt Use Ground Maint Mode to correct Checked on power up System configuration invalid See dealer or call Customer Service Configuration Error Verify User Settings Go to System Configuration page and check user settings CDI Selection Should be set To Localizer ILS or VOR Pilot awareness VOR Receiver Should Be Tuned To xxx xx For name of approach Pilot awareness Database Invalid Databa...

Страница 49: ...CNX80 Pilot Guide 560 0984 00C Draft1 book Page 1 Tuesday September 2 2003 10 36 AM ...

Страница 50: ... S E Salem OR 97302 U S A Phone 503 581 8101 800 525 6726 In Canada 800 654 3415 FAX 503 364 2138 http www garminat com Part 560 0984 00 Rev C August 2003 CNX80 Pilot Guide 560 0984 00C Draft1 book Page 2 Tuesday September 2 2003 10 36 AM ...

Отзывы:

Похожие инструкции для Fishfinder 80