fēnix™ Quick Start Manual
WARNING
See the
Important Safety and Product Information
guide in the
product box for product warnings and other important
information.
WARNING
Always consult your physician before you begin or modify any
exercise program.
Getting Started
When using your device the first time, you should complete
these tasks to set up the device and get to know the basic
features.
1
Charge the device (
page 1
).
2
Register the device (
page 4
).
3
Learn about the sensor data and modes (
page 1
).
4
Acquire satellites (
page 2
).
5
Go for a hike (
page 2
).
6
Create a waypoint (
page 2
).
7
Get the owner's manual (
page 3
).
Charging the Device
NOTICE
To prevent corrosion, thoroughly dry the contacts and the
surrounding area before charging or connecting to a computer.
The device is powered by a built-in lithium-ion battery that you
can charge using a standard wall outlet or a USB port on your
computer.
1
Plug the USB end of the cable into the AC adapter or a
computer USB port.
2
Plug the AC adapter into a standard wall outlet.
3
Align the left side of the charging cradle
À
with the groove on
the left side of the device.
4
Align the hinged side of the charger
Á
with the contacts on
the back of the device.
When you connect the device to a power source, the device
turns on.
5
Charge the device completely.
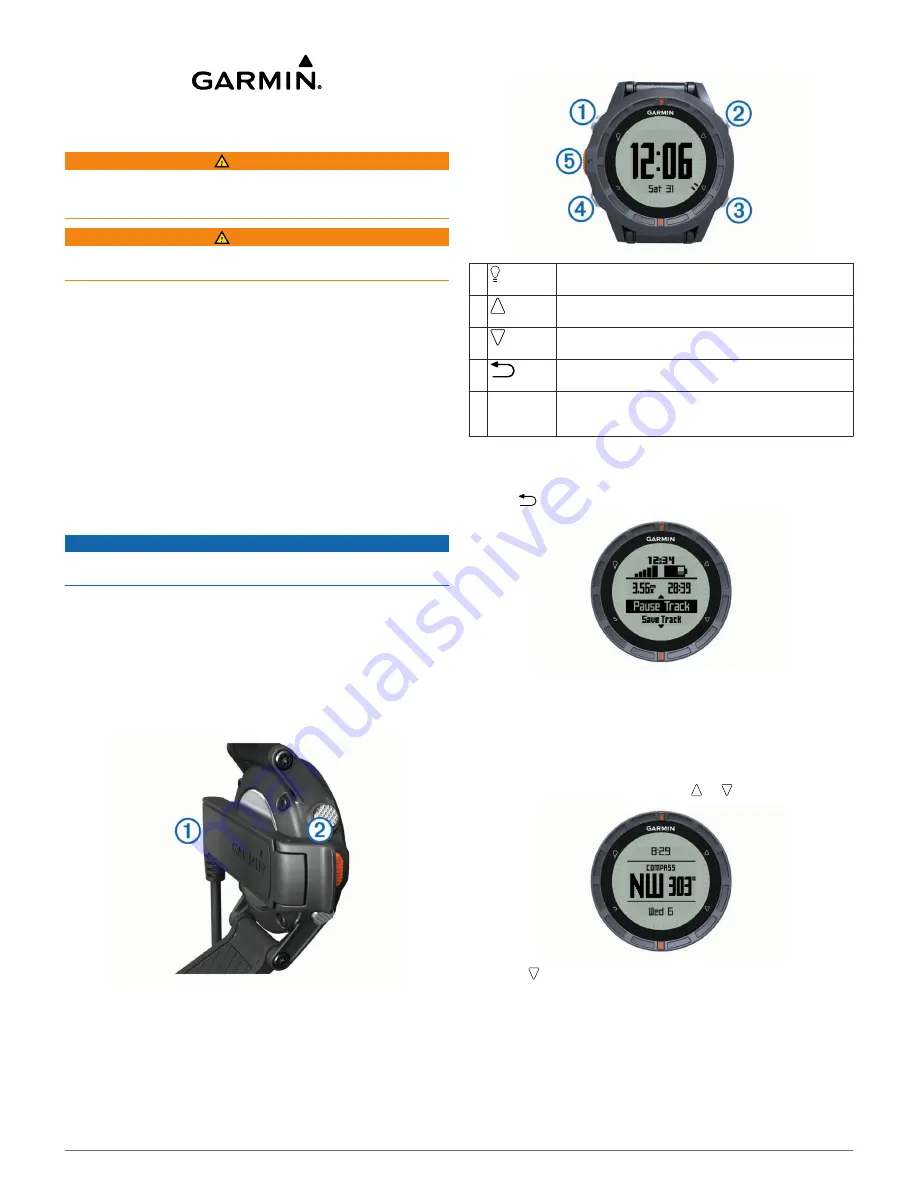
Keys
À
Select to turn the backlight on and off. Hold to turn the
device on and off.
Á
Select to scroll through the data pages, options, and
settings.
Â
Select to scroll through the data pages, options, and
settings.
Ã
Select to return to the previous screen. Hold to view
the status page.
Ä
Orange key Select to open the menu for the current screen. Select
to choose an option and to acknowledge a message.
Hold to mark a waypoint.
Viewing the Status Page
You can quickly switch to this page to view the time of day,
battery life, and GPS status information from any other page.
Hold
.
Viewing the Sensor Data
You can quickly access real-time data for the compass,
altimeter, barometer, and temperature sensors.
NOTE:
These data pages automatically time out to low-power
mode.
NOTE:
This data is not recorded to the device (
page 2
).
1
From the time of day page, select or .
2
Select .
July 2012
190-01507-01
Printed in Taiwan
Содержание f?nix
Страница 1: ...fēnix Owner s Manual August 2012 190 01507 00_0A Printed in Taiwan ...
Страница 6: ......
Страница 19: ...æ ßQ í â píˆ ÏeÆW 0ìy ãñj...
Страница 20: ...ît ß The two pointer marks à ˇ ã ÍNÞ...
Страница 21: ...æ ß Œí3 Ôâ p ˆÌ ÖeÉW cì üñb...
Страница 22: ...çt ßYª 5 5 ú2 êG 3 orange mark Ä ˇ à ÍUÞ æ ßG í ıâVpüˆÆ ê ÖeÕW ì úñd...
Страница 23: ...çtüßEªC n ˆ µúw ò êK ÏŒk À Žé 9 ˇ Ñ ÍUÞ æ ß í âVpøˆÁ fl ÚeÕW ì8 áñ ...
Страница 25: ... t ßRª...
Страница 30: ...ìt ß ª...
Страница 31: ... y M 5 ú ú ...
Страница 35: ...çt ßHª n 0 ú9 ç EÊ Map ˇ ÍYÞ æ ßQ í ıâ pûˆ Ł Íe W7 ì òñ ...
Страница 36: ...àt ßRª...
Страница 37: ... t V ú2 êI 3ÏÖK ÀÙ r iÄ ÜDö åÞŠ ÕŽZã7 ...
Страница 38: ... R uxG ˇ ý ÍJÞ æ ß Œí âVpäˆË Ìe W cì áñj...
Страница 39: ...êt ß ª t _ q ú õ êD jÏÖK ÀÙ r iÄ uÜD åÉŠƒÕ Z 7 â ˇ ã ÍQÞ æ ßX í Łâ pøˆË À ÐeÉW 7ì1 öñ ...
Страница 40: ...ät ßLª 1 µú9 êG 6ÏØkzÀ h c pÄ ÉDð åÆŠ ÕÕZ 7J ˇ ô ÍOÞ æ ßZ Œí4 šâˇpæˆ H ÊeÕW 1ì6 æñ ...
Страница 44: ...ët ß ªD T ú ê ÏŒk À 6 k hĈ ÑDë åÚŠËÕ Z 7 O µRüucG ˇ ó ÍQÞ æíß í â píˆ ÖeËW ì òño...
Страница 47: ...æ ß ží ıâVpìˆÏ Î Navigation 5 ...
Страница 56: ...ÃàÀfl ÅeœI 4ö AÝ cÒ Ü DÞÈ âÂ...
Страница 74: ...Àã hK PZ ÙÄÒ Å ævQ Ùû ü æ Ï y0Ê ê óÚ Žr 7 b4Ù Å A6Rº Q Àè 1d_ÄŒ Ýg Ê Ñ ...
Страница 80: ...Öã H Device Care NOTICE Ï 0 ˇê6 µÚ rÞ 7h 8 b3Ù Å A Rô _ HÀç 9 31i_ŠŒ qÝ Ô ...
Страница 85: ...Q d1 _ÑŒ 0ý Ê X...
Страница 90: ...Q p1M_ÒŒX Ýb ƒ ˇ...
Страница 91: ...ÄãÅhJÂÌ XZ ÙÄÒmÅ æ QS ûç á bÆPrXÄúÁc 3ÖÅŽãé We6 ë Ï e0Ê ê2 åÚˇ ŁrŁ p7 _ b Ù Å A www dtsc ca govÏ Ò Ú t0 ...
Страница 101: ..._ÇÎÞ å D Ł41Õ ª ÝnÑ Uš Ç Òe 1çÝ š äÌ µ5 Ÿ lä1T Ë ý gÆa Ï s ö...
Страница 106: ...ßàÛüû h...
Страница 113: ... I Ø8 v J 1 Hold º l7 ÖvWrƒ ûh SMß ł Eª ...
Страница 114: ...ï WjÉ...


