background image

3

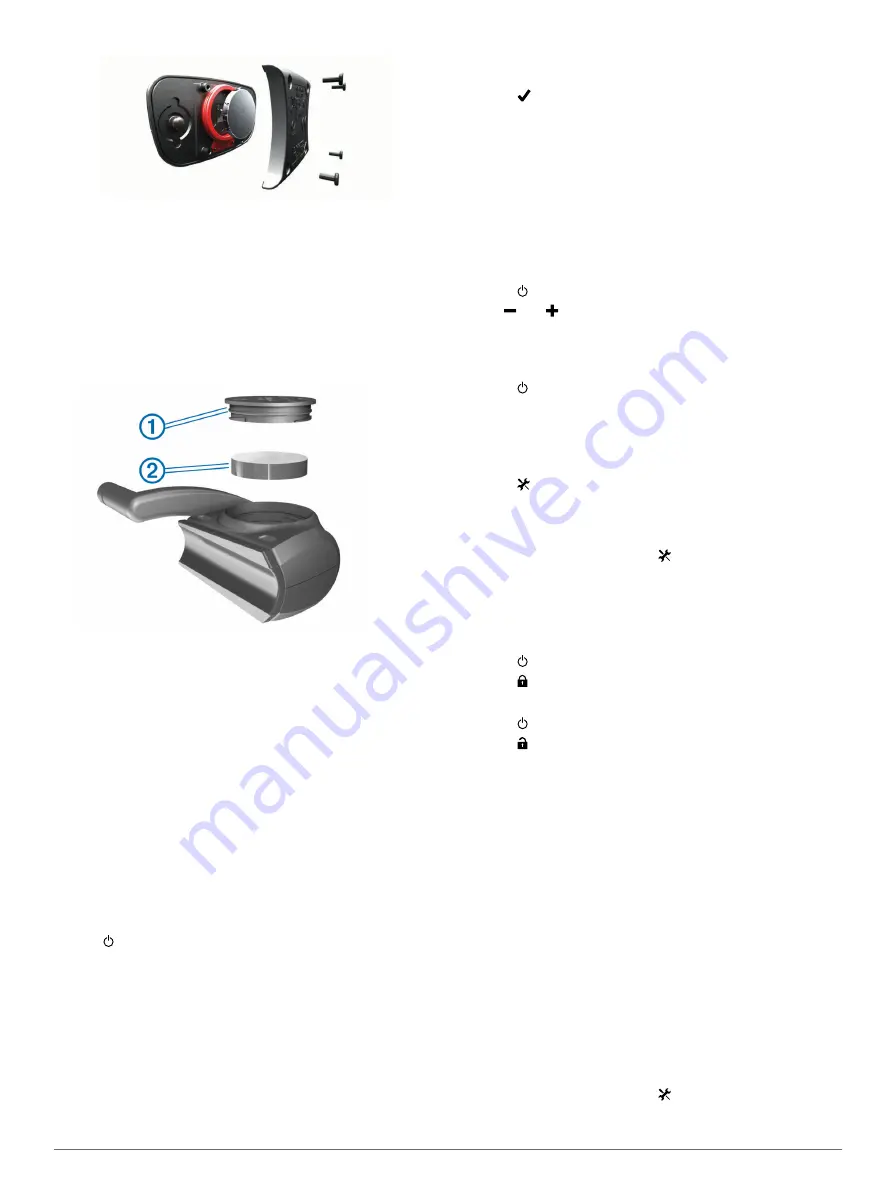
Wait 30 seconds.

4

Insert the new battery with the positive side facing up.

NOTE: 

Do not damage or lose the O-ring gasket.

5

Replace the back cover and the four screws.

After you replace the heart rate monitor battery, you must pair it 

with the device again.

Replacing the GSC 10 Battery

1

Locate the circular battery cover 

À

 on the side of the GSC 

10.

2

Use a coin to twist the cover counter-clockwise until it is 

loose enough to remove (the arrow points to unlocked).

3

Remove the cover and the battery 

Á

.

4

Wait 30 seconds.

5

Insert the new battery with the positive side facing up.

NOTE: 

Do not damage or lose the O-ring gasket.

6

Use a coin to twist the cover clockwise back into place (the 

arrow points to locked).

After you replace the GSC 10 battery, you must pair the GSC 

10 with the device again.

Troubleshooting

Resetting the Device

If the device stops responding, you may need to reset it. This 

does not erase any of your data or settings.

Hold   for 10 seconds.
The device resets and turns on.

Clearing User Data

You can restore all of the device settings to the factory default 

values.

NOTE: 

This deletes all user-entered information, but it does not 

delete your history.

1

Turn off the device.

2

Place your finger on the top left corner of the touchscreen.

3

While holding your finger on the touchscreen, turn on the 

device.

4

Select  .

Maximizing Battery Life

• Decrease the backlight (

page 12

).

• Shorten the backlight timeout (

page 12

).

• Select the 

Smart

 recording interval (

page 8

).

• Turn on the 

Auto Power Down

 feature (

page 12

).

• Turn off the Bluetooth wireless feature (

page 9

).

• Select the 

GPS Only

 setting (

page 10

).

Decreasing the Backlight

1

Select   to open the status page.

2

Use   and   to adjust the brightness.

Adjusting the Backlight Timeout

You can decrease the backlight timeout to maximize the battery 

life.

1

Select   > 

Backlight Timeout

.

2

Select an option.

Using the Auto Power Down Feature

This feature automatically turns off the device after 15 minutes 

of inactivity.

1

Select   > 

System

 > 

Auto Power Down

.

2

Select 

On

.

Calibrating the Touchscreen

1

From the home screen, select   > 

System

 > 

Display

 > 

Calibrate Screen

.

2

Follow the on-screen instructions.

Locking the Touchscreen

You can lock the screen to prevent inadvertent screen touches.

1

Select  .

2

Select  .

Unlocking the Touchscreen

1

Select  .

2

Select  .

Getting More Information

You can find more information about this product on the Garmin 

website.
• Go to 

www.garmin.com/intosports

.

• Go to 

www.garmin.com/learningcenter

.

• Go to 

http://buy.garmin.com

, or contact your Garmin dealer 

for information about optional accessories and replacement 

parts.

Temperature Readings

The device may display temperature readings that are higher 

than the actual air temperature if the device is placed in direct 

sunlight, held in your hand, or is charging with an external 

battery pack. Also, the device will take some time to adjust to 

significant changes in temperature.

Viewing Device Information

You can view the unit ID, software version, and license 

agreement.

From the home screen, select   > 

System

 > 

About

.

12

Troubleshooting

Содержание Edge 510

Страница 1: ...Edge 510 Owner s Manual September 2013 190 01531 00_0B...

Страница 2: ...Camp Garmin Connect and GSC are trademarks of Garmin Ltd or its subsidiaries These trademarks may not be used without the express permission of Garmin The Bluetooth word mark and logos are owned by th...

Страница 3: ...Recording Settings 8 Data Management 8 Connecting the Device to Your Computer 8 Transferring Files to Your Device 8 Deleting Files 8 Disconnecting the USB Cable 8 Customizing Your Device 9 Profiles 9...

Страница 4: ......

Страница 5: ...ust be recharged About the Battery WARNING This device contains a lithium ion battery See the Important Safety and Product Information guide in the product box for product warnings and other important...

Страница 6: ...g a ride Select to save your changes and close the page Select to close the page and return to the previous page Select to return to the previous page Select to return to the home screen Select and to...

Страница 7: ...tances times and calories You can create workouts using Garmin Connect and transfer them to your device You can also create and save a workout directly on your device You can schedule workouts using G...

Страница 8: ...ur Device Before you can create a course you must have history with GPS track data saved to your device 1 From the home screen select Courses 2 Select an activity on which to base your course 3 Enter...

Страница 9: ...e and sending data Setting Your Heart Rate Zones The device uses your user profile information from the initial setup to determine your heart rate zones You can manually adjust the heart rate zones ac...

Страница 10: ...is no GSC 10 paired GPS data is used to calculate the speed and distance Cadence is your rate of pedaling or spinning measured by the number of revolutions of the crank arm per minute rpm There are tw...

Страница 11: ...umber of rides time distance and calories From the home screen select Totals Sending Your Ride to Garmin Connect NOTICE To prevent corrosion thoroughly dry the mini USB port the weather cap and the su...

Страница 12: ...ng Interval Controls how the device records activity data Smart records key points where you change direction speed or heart rate 1 Sec records points every second It creates a very detailed record of...

Страница 13: ...pages and data fields page 9 Select Alerts to customize your training alerts page 3 Select Auto Pause to change when the timer automatically pauses page 9 Select Auto Lap to set how laps are triggere...

Страница 14: ...s page 8 Unit Settings page 11 Configuration Settings page 11 Language Settings page 11 Tone Settings page 11 GPS Settings Training Indoors You can turn GPS off when you are training indoors or to sav...

Страница 15: ...per day Water resistance Water resistant to 98 4 ft 30 m NOTE This product does not transmit heart rate data while swimming Operating temperature range From 23 to 122 F from 5 to 50 C Radio frequency...

Страница 16: ...eout page 12 Select the Smart recording interval page 8 Turn on the Auto Power Down feature page 12 Turn off the Bluetooth wireless feature page 9 Select the GPS Only setting page 10 Decreasing the Ba...

Страница 17: ...s data to appear GPS Accuracy The margin of error for your exact location For example your GPS location is accurate to within 12 feet 3 65 m GPS Signal Strength The strength of the GPS satellite signa...

Страница 18: ...ar Time to Sunrise The estimated time remaining before sunrise Time to Sunset The estimated time remaining before sunset Total Ascent The total elevation distance ascended since the last reset Total D...

Страница 19: ...heel Size L mm 650 38B 2105 700 18C 2070 700 19C 2080 700 20C 2086 700 23C 2096 700 25C 2105 700 28C 2136 700 30C 2170 700 32C 2155 700C Tubular 2130 700 35C 2168 700 38C 2180 700 40C 2200 Appendix 15...

Страница 20: ...ys 2 L language 11 laps 2 lifetime athlete 9 locking screen 12 M mounting the device 1 O O rings 11 on screen buttons 2 P pairing 2 heart rate monitor 7 smartphone 8 pairing ANT sensors 7 personal rec...

Страница 21: ......

Страница 22: ...0800 023 3937 035 539 3727 47 815 69 555 00800 4412 454 44 2380 662 915 35 1214 447 460 34 93 275 44 97 46 7744 52020 Garmin International Inc 1200 East 151st Street Olathe Kansas 66062 USA Garmin Eur...

Отзывы: