background image

Getting started

 WARNING

See the 

Important safety and product information

 guide in the 

product box for product warnings and other important 

information.

• Install the camera memory card (

Installing the dash camera 

memory card

, page 1

).

• Update the maps and software on your device (

Updating 

Maps and Software with Garmin Express

, page 24

).

• Mount the device in your vehicle and connect it to power 

(

Mounting and Powering the Device in Your Vehicle

page 1

).

• Align the dash camera (

Aligning the camera

, page 2

).

• Acquire GPS signals (

Acquiring GPS signals

, page 2

).

• Adjust the volume (

Adjusting the volume

, page 2

) and 

display brightness (

Adjusting the screen brightness

page 2

).

• Navigate to your destination (

Starting a route

, page 6

).

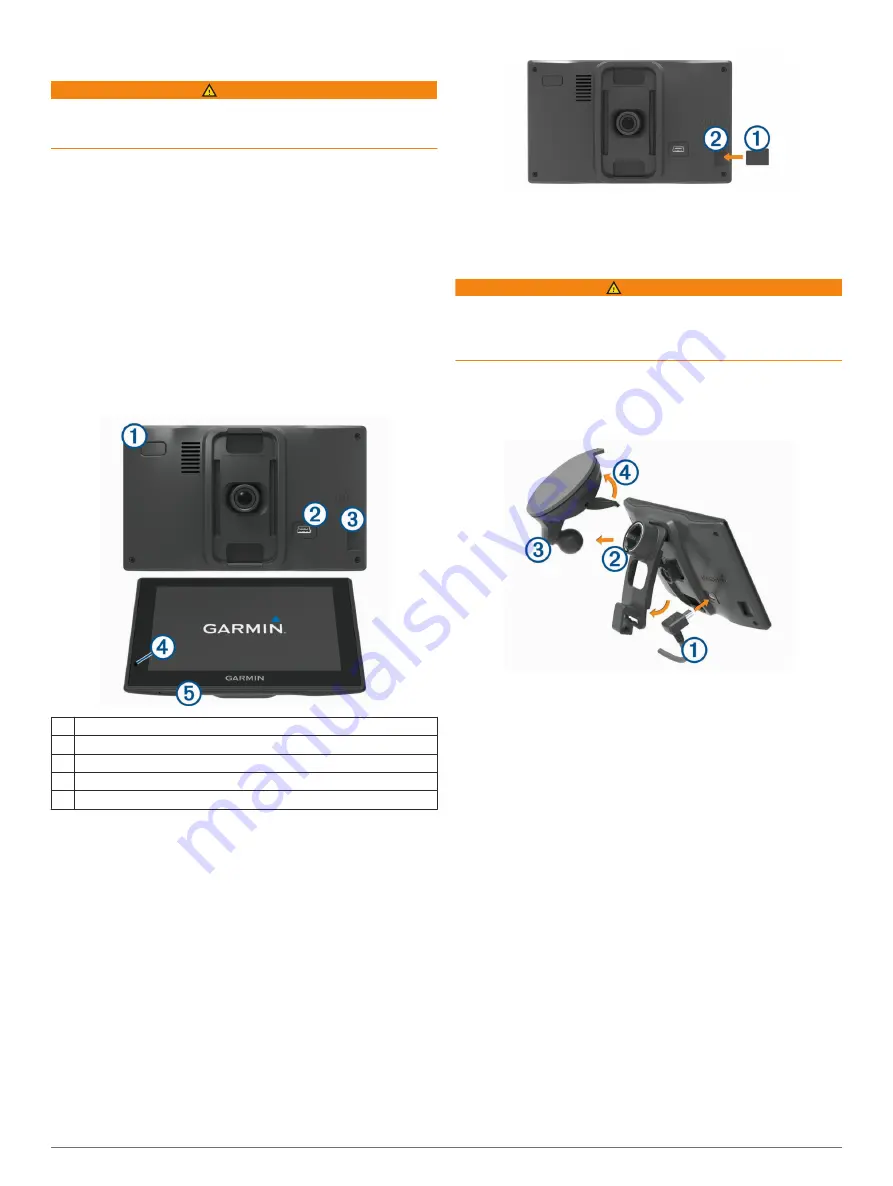
Garmin DriveAssist device overview

À

power key

Á

USB power and data port

Â

Camera memory card slot

Ã

Microphone for voice command or hands-free calling

Ä

Map and data memory card slot

Installing the dash camera memory card

Before the device can record video from the integrated dash 

camera, you must install a camera memory card. The camera 

requires a microSD

®

 memory card from 4 to 64 GB with a speed 

rating of Class 10 or higher. You can use the included memory 

card, or you can purchase a compatible memory card from an 

electronics supplier.

NOTE: 

a memory card is included so your device is ready to use 

out of the box. All memory cards have a limited life and must be 

replaced periodically. Your device alerts you when the memory 

card has exceeded its useful life and needs to be replaced. You 

can follow the troubleshooting tips to help extend the useful life 

of the memory card (

My memory card has degraded and needs 

to be replaced

, page 25

).

1

Insert a memory card 

À

 into the camera memory card slot 

Á

.

NOTE: 

if you install the memory card into the incorrect slot, 

the camera cannot record video.

2

Press it in until it clicks.

Mounting and Powering the Device in Your 

Vehicle

 WARNING

This product contains a lithium-ion battery. To prevent the 

possibility of personal injury or product damage caused by 

battery exposure to extreme heat, store the device out of direct 

sunlight.

Before you use your device on battery power, you should charge 

it.

1

Plug the vehicle power cable 

À

 into the USB port on the 

device.

2

Press the mount 

Á

 onto the suction cup 

Â

 until it snaps into 

place.
The mount is reversible. If you are using the included 

windscreen suction cup, you should install the mount with the 

socket towards the top of the device. If you are using an 

optional dash mount accessory, you should install the mount 

with the socket towards the bottom of the device. This 

ensures the dash cam is not obstructed by the mount.

3

Press the suction cup to the windscreen, and flip the lever 

à

back toward the windscreen.

4

Fit the tab on the mount into the slot on the back of the 

device.

5

Press the device onto the mount until it clicks.

6

Plug the other end of the vehicle power cable into a power 

outlet in your vehicle.

Turning the device on or off

• To turn the device on, press the power key or connect the 

device to power.

• To put the device in power saving mode, press the power key 

while the device is on.
While in power saving mode, the screen is off and the device 

uses very little power, but it can wake instantly for use.

TIP: 

you can charge your device faster by putting it in power 

saving mode while charging the battery.

• To turn off the device completely, hold the power key until a 

prompt appears on the screen, and select 

Off

.

Getting started

1

Содержание DriveAssist 51

Страница 1: ...GARMINDRIVEASSIST 51 Owner smanual...

Страница 2: ...These trademarks may not be used without the express permission of Garmin Android is a trademark of Google Inc Apple and Mac are trademarks of Apple Inc registered in the U S and other countries The...

Страница 3: ...tickers 9 Avoiding road features 9 Avoiding environmental zones 9 Custom avoidances 9 Navigating off road 9 Finding and saving locations 9 Points of Interest 9 Finding a location using the search bar...

Страница 4: ...eras 21 Viewing and Saving photoLive Traffic Cameras 21 Viewing photoLive Traffic Cameras on the Map 21 Saving a traffic camera 21 Viewing Previous Routes and Destinations 21 Garmin DriveAssist settin...

Страница 5: ...needs to be replaced page 25 1 Insert a memory card into the camera memory card slot NOTE if you install the memory card into the incorrect slot the camera cannot record video 2 Press it in until it c...

Страница 6: ...ain menu Select or to scroll through lists or menus Hold or to scroll faster Select to see a context based menu of options for the current screen Adjusting the volume 1 Select Volume 2 Select an optio...

Страница 7: ...he video or photo includes location information a map shows the location Garmin VIRB App The free Garmin VIRB app allows you to view and share recorded dash cam videos and photos on your smartphone To...

Страница 8: ...pdate the camera database stored on your device You should update your device frequently to receive the most up to date camera information Incident Detection and Notifications Your Garmin DriveAssist...

Страница 9: ...or closer than 5 m 16 ft The FCWS feature may not function properly if the camera placement settings do not correctly indicate your vehicle height or the placement of your device in the vehicle Aligni...

Страница 10: ...option Select a location marker Select a point such as a street junction or address location 5 Select Go Going home The first time you start a route home the device prompts you to enter your home loc...

Страница 11: ...s to search for nearby parking If the device does not prompt you select Where To Categories Parking and select My Destination 2 Select Filter Parking and select one or more categories to filter parkin...

Страница 12: ...When you are finished shaping the route select Go Taking a Detour You can take a detour for a specified distance along your route or detour around specific roads This is useful if you encounter constr...

Страница 13: ...orner of the area to avoid and select Next The selected area is shaded on the map 6 Select Done Disabling a custom avoidance You can disable a custom avoidance without deleting it 1 Select Settings Na...

Страница 14: ...OI and select Go The device creates a route to the parking area or venue entrance closest to the POI When you arrive at the destination a chequered flag indicates the recommended parking area A labell...

Страница 15: ...wn from the list of nearby towns To search near another location select Searching near Changing the search area page 10 To search for a town by name select Enter Search enter a town name and select Fi...

Страница 16: ...point to a location a category or a search tool The Where To menu can contain up to 36 shortcut icons 1 Select Where To Personalise 2 Select an item Removing a shortcut 1 Select Where To Remove Short...

Страница 17: ...ng your route or the road on which you are travelling You can view upcoming points of interest such as restaurants petrol stations or roadside service When travelling on a motorway you can also view i...

Страница 18: ...e weather forecast page 20 LiveTrack allows you to share your trip with selected contacts in real time LiveTrack page 19 Smart Notifications displays phone notifications and messages on your device Th...

Страница 19: ...rmin DriveAssist device such as text messages incoming calls and calendar appointments NOTE you may need to wait a few minutes to receive notifications on your navigation device after it connects to t...

Страница 20: ...list of favourite locations Editing a favourite location page 12 1 Select Apps Phone Set Home Number 2 Enter your phone number 3 Select Done Calling home Before you can call home you must enter a pho...

Страница 21: ...eless Networks 2 Select the phone and select Unpair device Traffic NOTICE Garmin is not responsible for the accuracy or timeliness of the traffic information Your device can provide information about...

Страница 22: ...p phrase The device indicates the strength of the wake up phrase as you enter the phrase 3 Select Done Activating voice command Say your wake up phrase The voice command menu appears Voice Command tip...

Страница 23: ...k 2 Select each type of alert you want to receive on your watch 3 On your watch start the Watch Link app and select Driver Warnings While you are navigating with your Garmin DriveAssist device the wat...

Страница 24: ...ng reordering locations optimising the order of stops adding suggested attractions and adding shaping points You can also use the trip planner to edit and save your active route Planning a trip A trip...

Страница 25: ...e you have stopped on the map Select Apps Where I ve Been Garmin DriveAssist settings Map and vehicle settings Select Settings Map Vehicle Vehicle sets the icon that represents your position on the ma...

Страница 26: ...cam Destination Arrival with Garmin Real Vision page 7 Go Alert alerts you when stopped traffic starts moving Go Alert page 5 Lane Departure Warning enables an alert when the device detects you may b...

Страница 27: ...restore a category of settings or all settings to the factory default values 1 Select Settings 2 If necessary select a settings category 3 Select Restore Device information Viewing Regulatory and Com...

Страница 28: ...min Express application to download and install the latest map and software updates for your device 1 If you do not have the Garmin Express application installed on your computer go to garmin com expr...

Страница 29: ...e to lock it back into the vehicle power cable Troubleshooting My video recordings are blurry Clean the camera lens Cleaning the camera lens page 24 Clean the windscreen in front of the camera Verify...

Страница 30: ...is option is disabled you must select from the Smartphone Link main menu each time you want to connect your device to Smartphone Link Clear the Live Services Check tick box On some smartphones disabli...

Страница 31: ...2 Click the Maps tab 3 Follow the on screen instructions Purchasing accessories Go to garmin com accessories Appendix 27...

Страница 32: ...forward collision warning system FCWS 3 5 Foursquare 11 fuel stations 12 fuse changing 25 G Garmin Connect 14 Garmin Express updating software 24 Garmin Live Services 15 subscribing 15 Garmin Real Vis...

Страница 33: ...s avoiding 8 tools maps 13 traffic 14 17 18 22 adding subscriptions 18 alternative route 8 cameras 21 incidents 14 18 map 14 18 receiver 17 searching for delays 14 18 traffic cameras view 21 travel hi...

Страница 34: ...support garmin com September 2018 190 02120 00_0C...

Отзывы: