background image


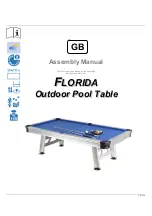
Istruzioni per il montaggio 


Leggere attentamente e conservare questo manuale 

per ogni futura consultazione


F

F

L

L

O

O

R

R

I

I

D

D

A

A


T

T

a

a

v

v

o

o

l

l

o

o


d

d

a

a


p

p

o

o

o

o

l

l


p

p

e

e

r

r


e

e

s

s

t

t

e

e

r

r

n

n

o

o


Содержание FLORIDA

Страница 1: ...A r t N r...

Страница 2: ...st nur f r die Private Nutzung geeignet Bei kommerzieller Nutzung verliert dieser Poolbillard Tisch jede G ltigkeit der Garantie Verwenden Sie dieses Ger t ausschlie lich f r den beabsichtigten Zweck...

Страница 3: ...zuerst die Tischbeine P1 mit je 4 Schrauben H1 und den Unterlegscheiben H3 an der Unterseite des Poolbillard Tisches SCHEMA MIT DER ENDANORDNUNG Roter Torz hler Seite der roten Mannschaft Seite der bl...

Страница 4: ...Befestigen Sie nun die beiden Querstreben P2 an der Innenseite der Tischbeine mit den Schrauben H2 und den Unterlegscheiben H4 Drehen Sie anschlie end die Stellf e P3 f r die H henverstellung in die...

Страница 5: ...mit einem feuchten Tuch reinigen und anschlie end ordentlich trocknen F r eine gr ndlichere Reinigung verwenden Sie einen neutralen Reiniger ohne Alkohol Wachs oder Scheuermitteln welcher Verunreinig...

Страница 6: ...nen nach Ihrer Wahl auch das Recht auf R ckg ngigmachung des Vertrages Wandlung oder auf Herabsetzung des Kaufpreises Minderung zu Melden Sie uns bitte jeden Mangel sofort Offensichtliche M ngel einsc...

Страница 7: ...Florida Assembly Manual Carefully reading and keeping the operating Instructions before use F FL LO OR RI ID DA A O Ou ut td do oo or r P Po oo ol l T Ta ab bl le e GB...

Страница 8: ...by adults Keep children away during all assembly steps to avoid that they may be fortuitously hit by the table components as well as preventing them from seizing parts that if improperly used could be...

Страница 9: ...legs P1 using bolts H1 and washer H3 to the outdoor poolbillard table STEP 2 Attach the leg end panels P2 to the INSIDE surface of legs P1 using bolts H2 and washers H4 Screw leg levellers P3 into th...

Страница 10: ...Florida STEP 2 Attach the leg end panels P2 to the INSIDE surface of legs P1 using bolts H2 and washers H4 Screw leg levellers P3 into the bottom of each legs P1...

Страница 11: ...l last many years before it becomes necessary to replace it Cabinet In general it is sufficient to rub surface with a damp cloth and dry them well A deeper cleaning you can use any neuter detergent wh...

Страница 12: ...ou also have the right at your choice to cancel the contract conversion or to receive a reduction in the purchase price redhibition Please notify us immediately of any fault Obvious faults including t...

Страница 13: ...Instructions de montage Lire attentivement la notice avant l utilisation Conservez la notice F FL LO OR RI ID DA A B BI IL LL LA AR RD D P PO OU UR R L LE ES S P PL LE EI IN N A AI IR R F...

Страница 14: ...s pour emp cher qu ils soient frapp s accidentellement par les composantes Les petites pi ces non encore assembl es vis boulons etc pourraient tre ing r es ou inhal es gardez les hors de la port e des...

Страница 15: ...STEP 1 Attachez les jambes P1 sous la table en employant les boulons H1 et les crous H3 Jambe Billard...

Страница 16: ...STEP 2 Attachez les traverses P2 l int rieur des jambes P1 en employant les boulons H2 et les crous H4 Vissez les pieds niveleurs P3 chaque jambe P1 Jambes Traverse...

Страница 17: ...qui ne laissa pas de r sidus et frottez la zone tach e b si la tache ne dispara t pas employez un produit chimique en atomiseur pour le nettoyage sec par exemple le type K2R qui ne laissera aucun halo...

Страница 18: ...posez galement au choix du droit de vous r tracter du contrat d achat conversion ou de demander la baisse du prix d achat diminution Veuillez nous faire part sans d lai des avaries Les avaries vidente...

Страница 19: ...struzioni per il montaggio Leggere attentamente e conservare questo manuale per ogni futura consultazione F FL LO OR RI ID DA A T Ta av vo ol lo o d da a p po oo ol l p pe er r e es st te er rn no o I...

Страница 20: ...cidentalmente dai componenti o che si impossessino di parti che se usate impropriamente possono essere pericolose Le parti piccole non ancora montate viti bulloni ecc potrebbero essere ingerite o inal...

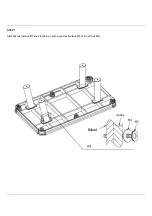
Страница 21: ...otto al tavolo usando i bulloni H1 e le rondelle H3 Step 2 Fissare le traverse P2 ai lati interni delle gambe P1 usando i bulloni H2 e le rondelle H4 Avvitare i piedini regolabili P3 in fondo a ogni g...

Страница 22: ...STEP 2 Fissare le traverse P2 all interno delle gambe P1 usando i bulloni H2 e le rondelle H4 Avvitare i piedini regolabili P3 a ogni gamba P1 Traversa Gamba...

Страница 23: ...e non lascia residui e strofinare la zona macchiata b se la macchia non scompare utilizzare un prodotto chimico in spray per la pulitura a secco per esempio il tipo K2R che non lascia aloni L usura de...

Страница 24: ...re economicamente impraticabile Si prega di segnalarci tempestivamente qualsiasi difetto La garanzia per difetti evidenti inclusi i danni di trasporto pu essere riconosciuta soltanto se tali difetti v...

Отзывы: