


42
43
DE
③
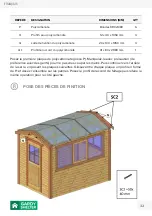
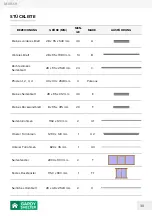
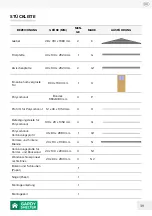
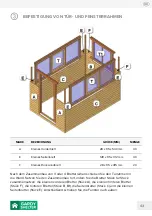
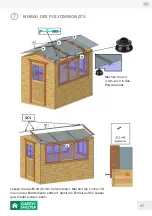
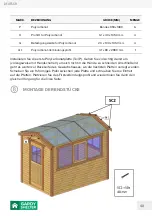
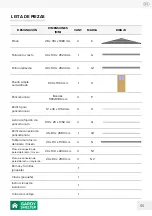
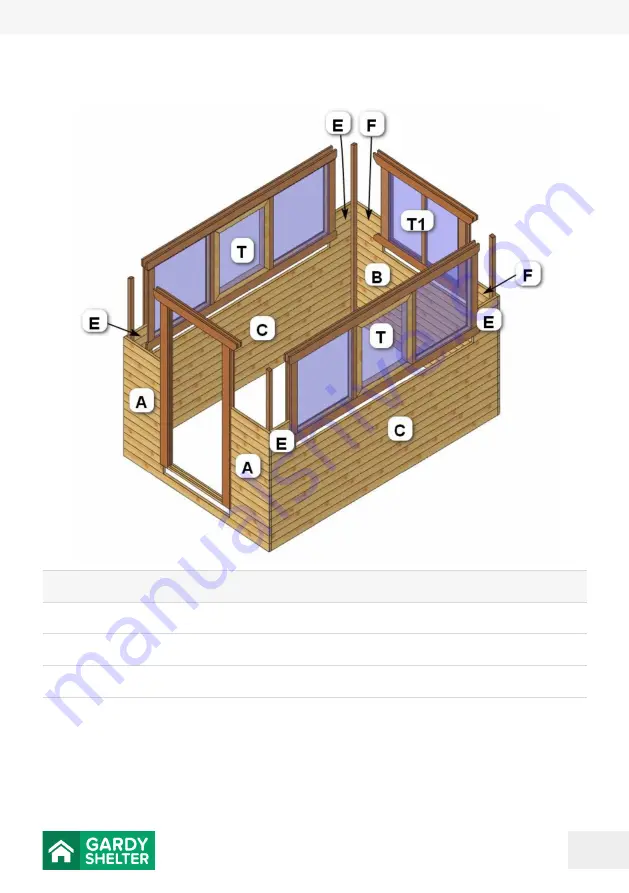
BEFESTIGUNG VON TÜR- UND FENSTERRAHMEN
MARK.
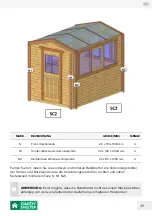
BEZEICHNUNG
GRÖßE (MM)
MENGE
A
Kleines Vorderbrett
28 x 95 x 540 mm
40
E
Kleines Seitenbrett
128 x 95 x 312 mm
40
F
Kleines Rückwandbrett
28 x 95 x 415 mm
20
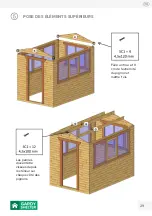
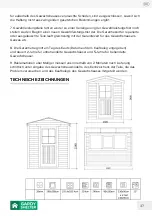
Nach dem Zusammenbau von 3 oder 4 Bretterreihen schieben Sie den Türrahmen in
die Wand. Setzen Sie den Zusammenbau fort, indem Sie die Bretter Stück für Stück
zusammensetzen: die kleinen vorderen Bretter (Stück A), die kleinen hinteren Bretter
(Stück F ), die hinteren Bretter (Stück B, B1), die Seitenbretter (Stück C) und die kleinen
Seitenbretter (Stück E). Anschließend schieben Sie die Fenster nach außen.
Содержание 7022
Страница 8: ...8 ENGLISH BASE FRAME ASSEMBLY NECESSARY TOOLS COLUMN 1 COLUMN 2 COLUMN 3 COLUMN 4...
Страница 24: ...24 FRAN AIS POSE DE LA BASE OUTILS N CESSAIRES POTEAU1 POTEAU 2 POTEAU 3 POTEAU 4...
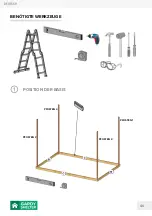
Страница 40: ...40 DEUTSCH POSITION DER BASIS BEN TIGTE WERKZEUGE PFOSTEN 1 PFOSTEN 2 PFOSTEN 3 PFOSTEN 4...
Страница 56: ...56 ESPA OL COLOCANDO LA BASE HERRAMIENTAS NECESARIAS PUESTO 1 PUESTO 2 PUESTO 3 PUESTO4...
Страница 72: ...72 ITALIANO POSA DELLA BASE STRUMENTI NECESSARI PALO 1 PALO 2 PALO 3 PALO 4...
Страница 88: ...88 POLSKI PO O ENIE BAZY POTRZEBNE NARZ DZIA S UPEK 1 S UPEK 2 S UPEK 3 S UPEK 4...
Страница 98: ......