background image

40

notice de montage - Rectoo

6

7

4

5

7
6
5
4
3
2
1

D

3

A

B

D

F

C

E

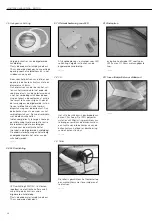
Skimmer

1

2

3

4

D

D

D

D

7x110mm

M12

9

8

7

6

5

4

3

2

1

10

9

8

7

6

5

4

3

2

1

A

A

RECTOO 390 x 920

Refoulement

COnsEiL: 

Installez de préférence le skimmer avec l’ouverture  

positionnée face aux vents dominants. Les particules en  

suspension seront alors plus facilement éliminées par le skimmer. 

Refoulement

1

2

3

4

Содержание RECTOO

Страница 1: ...RECTOO www gardipool com Montage handleiding Notice de montage Manual...

Страница 2: ......

Страница 3: ...Montage handleiding 4 Notice de montage 30 Manual 56 ENGLISH FRAN AIS NEDERLANDS 3 RECTOO 390x760 390x920...

Страница 4: ...n profielen 2 Wapeningsnet 150x150x6x6 geplaatst bovenop en dwars op de horizontale metalen breedteprofielen U brengt een beschermende laag plastiekfolie aan onder het beton voor optimale droging Bij...

Страница 5: ...BOVENGRONDSE PLAATSING 6 cm ONDERGRONDSE PLAATSING aarde aarde gestabiliseerd zand Steunprofiel Beschermend vilt 20 cm 20 cm RECTOO 390 x 760 drainage zand Beton C25 30 IPE 120 IPE 120 IPE 120 IPE 120...

Страница 6: ...lijk om de juiste planken in de juiste volgorde te gebruiken De planken van het zwembad zijn voor zien van groef en of tand Op die manier passen de verschillende lagen goed op elkaar De uiteinden van...

Страница 7: ...W2 V2 V1 Y2 Y1 X1 Z2 Z1 X2 X2 E X TE RI E U R E X TE RI E U R E X TE RI E U R I N T E R I E U R 1x 1x 1x 1x V1 V2 W1 W2 E X TE R I EU R E X TE R I EU R I N TE R I E U R 1x 1x 1x 1x 1x 1x A D B F Terug...

Страница 8: ...r Skimmer 1 2 3 4 D D Terugvoer D D 7x110mm M12 tip De opening van de skimmer wordt het best gericht naar de overheersende windrichting Hierdoor kunnen losse zwevende deeltjes gemakkelijk afgevoerd wo...

Страница 9: ...aleer de laatste laag te plaatsen moet de skimmer tussen de planken geplaatst worden Deze wordt aan de planken bevestigd met 4 stuks inox vijzen 3 5 x 20 mm in de hoeken van de skimmer geen gaten voor...

Страница 10: ...EXO 4x25mm EXO De afdekplanken worden ondersteund door L hechtingen Verdeel het aantal L hechtingen gelijkmatig rondom het zwembad Schroef op 12 mm van de bovenkant van de eindplank de L hechting vast...

Страница 11: ...PLAATSING 6 cm ONDERGRONDSE PLAATSING aarde aarde Steunprofiel Beschermend vilt 20 cm 20 cm RECTOO 390 x 920 drainage zand Beton C25 30 IPE 120 IPE 120 IPE 120 IPE 120 IPE 120 IPE 120 IPE 120 IPE 120...

Страница 12: ...unplank voorzien Het is noodzakelijk om de juiste planken in de juiste volgorde te gebruiken De planken van het zwembad zijn voor zien van groef en of tand Op die manier passen de verschillende lagen...

Страница 13: ...2 W2 W1 W1 W2 V2 V1 Y2 Y1 X1 Z2 Z1 X2 X2 E X TE RI E U R E X TE RI E U R E X TE RI E U R I N T E R I E U R 1x 1x 1x 1x V1 V2 W1 W2 E X TE R I EU R E X TE R I EU R I N TE R I E U R 1x 1x 1x 1x 1x 1x A...

Страница 14: ...D F C E Terugvoer Skimmer 1 2 3 4 D D Terugvoer D D 7x110mm M12 tip De opening van de skimmer wordt het best gericht naar de overheersende windrichting Hierdoor kunnen losse zwevende deeltjes gemakkel...

Страница 15: ...Vooraleer de laatste laag te plaatsen moet de skimmer tussen de planken geplaatst worden Deze wordt aan de planken bevestigd met 4 stuks inox vijzen 3 5 x 20 mm in de hoeken van de skimmer geen gaten...

Страница 16: ...ielen worden via de 6 voorziene gaten vastgevezen aan het zwembad 6x40mm De verticale profielen zijn te bedekken met hout De afdekplanken worden ondersteund door L hechtingen Verdeel het aantal L hech...

Страница 17: ...de folie plooivrij te houden Plooi de folie zo open dat de hoeken van de folie overeenkomen met de hoeken van het zwembad Schuif de rand van de folie in de Hung profielen let er op dat de hoeken van d...

Страница 18: ...h apparaat van 220V dient geplaatst te worden op minimum 3 50m van het zwembad Gelieve voor elke wijziging van n of meerdere elementen van de filterkit het advies van uw fabri kant te vragen Volg ook...

Страница 19: ...et grind 3 5mm en daarna met zand 0 4 0 8mm Het zand heeft een onbeperkte levens duur en dient alleen aangevuld te worden als er zand verloren gaat Markeer het peil van het zand grind om dit later tot...

Страница 20: ...en van de slang Breng de inleg stukken terug in het verbindingsstuk en draai uiteindelijk de fittingen vast zie technisch gedeelte 2 4 3 Aansluitin gen _____ Belangrijk Om de aansluitingen met de bijg...

Страница 21: ...fdraad van de koppeling of nippel om de waterdichtheid te behouden Kranen Bereid de verbindingen met kraan op dezelfde wijze als de koppelingen voor maar in de beide richtingen van de kraan Aansluitin...

Страница 22: ...r uren wordt bepaald door het totaal water volume van het zwembad watervolume m gedeeld door het filterdebiet m u _____ Functie 2 REINIGEN De wisselklep in de functie reinigen backwash plaatsen Bij he...

Страница 23: ...meld die zich kunnen voordoen met daarnaast ook hun oplossing Indien u het pro bleem zelf niet kunt oplossen neem dan telefonisch contact op met de verkoper van uw zwembad _____ 2 5 Eindafwerking Buit...

Страница 24: ...de binnenkant van de afdekplank 2 U boort twee gaten voor de houders met klokboor diameter 50 mm 80 mm 50 mm 3 Plaats de twee houders en schroef ze vast met de bijgeleverde bouten en moeren 4 Plaats d...

Страница 25: ...waar de skimmer en de terugvoer zich bevinden Hierin wordt nu ook de filtereenheid geplaatst zie 4 Veiligheidsvoorschriften Volg de instructies op de bijgeleverde tekening Schroef 1 zijkant aan het zw...

Страница 26: ...ereenkomstig de te overbruggen afstand naar de electrische koffer zie tabel in de bijgeleverde handleiding De onderwaterlamp mag enkel volledig ondergedompeld in het water aange schakeld worden _____...

Страница 27: ...personeel Vooraleer het technisch lokaal te openen moet u de stroomvoorzie ning onderbreken Pas daarna mag u het lokaal betreden Stopcontacten zijn in dit geval niet toegelaten uit elektrocutie gevaar...

Страница 28: ...m om de bodem te reinigen de stofzuigerslang wordt geplaatst op de borstel de uitschuifbare stok en is verbonden aan de skimmer _____ 5 3 Technische installatie Inspecteer jaarlijks de pomp om een goe...

Страница 29: ...eschadiging als gevolg van schuren of corrosie Beschadiging als gevolg van een defecte aansluiting Beschadiging als gevolg van het gebruik van de pomp zonder voor filter Door een derde gedemonteerd of...

Страница 30: ...l Placez un plastique sous le b ton pour un s chage optimal Lorsque la piscine est semi enterr e couvrez la partie inf rieure de l ossature en bois avec un feutre de protection afin de pr venir tout c...

Страница 31: ...PE 120 IPE 120 Profil s supports B ton C25 30 Treillage m tal 150x150x6x6 B ton C25 30 18 cm Profil s supports feutre anti bact rie Plastique position hors sol 6 cm position enterr terre terre stabili...

Страница 32: ...e planche support est pr vue pour les margelles sur tout le pourtour de l ossature Veillez utiliser les planches appropri es dans le bon ordre Les planches sont pourvues d une encoche et ou d une lang...

Страница 33: ...1x 1x V1 V2 W1 W2 E X TE R I EU R E X TE R I EU R I N TE R I E U R 1x 1x 1x 1x 1x 1x A D B F Refoulement Skimmer C E A Longueur 3602 mm B Longueur 3187 mm F Longueur 3187 mm C Longueur 3181 mm E Longu...

Страница 34: ...D D D D 7x110mm M12 8 7 6 5 4 3 2 1 9 8 7 6 5 4 3 2 1 A A Refoulement Refoulement Conseil Installez de pr f rence le skimmer avec l ouverture positionn e face aux vents dominants Les particules en su...

Страница 35: ...1 A 8 10 Avant de monter la derni re rang e ins rez le skimmer Le skimmer se fixe aux quatre coins l aide de 4 vis inox 3 5 x 20 mm pas de trous pr usin s 10 3x 3x 11 12 12 mm 8x35mm 8x35mm 12 mm 9 7...

Страница 36: ...50mm 4 5x50mm EXO 4x25mm EXO 4x25mm EXO Utiliser les 6 trous pr for s pour fixer le profil la piscine 6x40mm Dans une phase ult rieure vous habillerez les profil s verticaux de bois Les margelles sont...

Страница 37: ...120 IPE 120 IPE 120 IPE 120 M12 x 40 M12 x 40 Treillage m tal 150x150x6x6 B ton C25 30 18 cm Profil s supports feutre anti bact rie Plastique position hors sol 6 cm position enterr terre terre stabil...

Страница 38: ...ort est pr vue pour les margelles sur tout le pourtour de l ossature Veillez utiliser les planches appropri es dans le bon ordre Les planches sont pourvues d une encoche et ou d une languette Ce qui p...

Страница 39: ...W1 W2 V2 V1 Y2 Y1 X1 Z2 Z1 X2 X2 E X TE RI E U R E X TE RI E U R E X TE RI E U R I N T E R I E U R 1x 1x 1x 1x V1 V2 W1 W2 E X TE R I EU R E X TE R I EU R I N TE R I E U R 1x 1x 1x 1x 1x 1x A D B F R...

Страница 40: ...D D D D 7x110mm M12 9 8 7 6 5 4 3 2 1 10 9 8 7 6 5 4 3 2 1 A A RECTOO 390 x 920 Refoulement Conseil Installez de pr f rence le skimmer avec l ouverture positionn e face aux vents dominants Les particu...

Страница 41: ...6 5 4 3 2 1 A Avant de monter la derni re rang e ins rez le skimmer Le skimmer se fixe aux quatre coins l aide de 4 vis inox 3 5 x 20 mm pas de trous pr usin s 10 4x 4x 9 12 7x110mm 12 mm 8x35mm 8x35...

Страница 42: ...rres gale distance sur le pourtour de la piscine Forez les querres 12 mm du bord sup rieur de la planche sup rieure vis inox 4x30 mm 17 12 mm 4x30mm Utiliser les 6 trous pr for s pour fixer le profil...

Страница 43: ...uparavant Vous pouvez scotcher le liner dans les coins de la piscine afin d viter qu il ne fasse des plis D ployez le liner de sorte que les joints pousent parfaitement les angles de la piscine Ins re...

Страница 44: ...e situ au moins 3 50m du bord du bassin Demandez l avis du fabricant pour toute modification d un ou plusieurs l ments du syst me de filtration Suivez les instructions du mode d emploi de l unit de fi...

Страница 45: ...er dans le filtre 3 5mm et ensuite le sable 0 4 0 8mm Le sable a une dur e de vie illimit e N ajoutez du sable qu en cas de perte Marquez le niveau du sable gravier afin de pouvoir par la suite compl...

Страница 46: ...allonges sur les deux extr mit s du flexible Repoussez les rallonges dans le raccord et vissez les manchons voir partie technique 2 4 3 Raccorde ments _____ important Pour raccorder le skimmer la pomp...

Страница 47: ...chon Vous obtiendrez ainsi une tanch it parfaite Si la garniture caoutchouc est absente sur l un des raccords appliquez du t flon sur le filetage du raccord afin de garantir l tanch it Robinets Pr par...

Страница 48: ...positionnez le clapet dans le mode voulu Fonction 1 FILTRATION Placez le clapet en position filtration L eau sort de la pompe et est filtr e en traversant le sable avant d tre renvoy e dans la piscine...

Страница 49: ...d faillances La notice du filtre sable liste quelques probl mes et leurs solutions Si vous n arrivez pas r soudre le probl me vous m me prenez contact par t l phone avec le vendeur de la piscine _____...

Страница 50: ...du bord de l embout jusque celui de la margelle 2 forez 2 trous pour les tuis gr ce la foreuse de 50 mm de diam tre 80 mm 50 mm 3 placez les 2 tuis et vissez les avec les boulons et crou fournis 4 pl...

Страница 51: ...le d tacher Vous accolez le local technique la piscine en le vissant du c t du skimmer et du refoulement Vous y placez ensuite l unit de filtration voir 4 S curit Suivez les instructions du plan qui v...

Страница 52: ...e voir tableau dans la notice fournie Le projecteur immerg ne peut tre branch que lorsqu il se trouve compl te ment sous eau _____ 3 6 Projecteur sous marin LED Projecteur sous marin LED 35W 12V 16 co...

Страница 53: ...la piscine condi tion qu il soit cadenass et accessible uniquement par du personnel qualifi Coupez le courant avant d acc der au local technique Et acc dez y seulement alors En raison du risque d lect...

Страница 54: ...nettoyer le fond un aspi rateur placer sur le balai le manche t lescopique et connecter au skimmer _____ 5 3 Installation technique Chaque ann e v rifiez la pompe afin de garantir son bon fonctionneme...

Страница 55: ...ompe sec La d t rioration par abrasion ou corrosion La d t rioration due un branchement d fectueux Le mat riel d mont ou r par par un tiers La casse des pi ces socle de pompe couvercle de pr filtre em...

Страница 56: ...lastic foil underneath the concrete slab to obtain an optimal drying In half sunken pools you must cover the underground wooden structure with a protective felt layer to ensure that the structure neve...

Страница 57: ...stic foil Above ground 6 cm inground ground ground stabilized sand Metal supports Protective felt 20 cm 20 cm drainage sand Concrete C25 30 IPE 120 IPE 120 IPE 120 IPE 120 IPE 120 IPE 120 IPE 120 IPE...

Страница 58: ...ort these wooden borders It is necessary to use the correct planks in the correct order The swimming pool planks are provided with tongue and or grooves This ensures a perfect fit between the differen...

Страница 59: ...E U R I N T E R I E U R 1x 1x 1x 1x V1 V2 W1 W2 E X TE R I EU R E X TE R I EU R I N TE R I E U R 1x 1x 1x 1x 1x 1x A D B F Inlet Skimmer C E A Length 3602 mm B Length 3187 mm F Length 3187 mm C Lengt...

Страница 60: ...D D 7x110mm M12 8 7 6 5 4 3 2 1 9 8 7 6 5 4 3 2 1 A A RECTOO 390 x 760 INLET INLET tip It is advisable to place the opening of the skimmer towards the prevailing wind direction This way floating parti...

Страница 61: ...he skimmer must be fitted between the planks The skimmer is fixed to the planks in the corners of the skimmer no pre made drill holes with four 3 5 x 20 mm stainless steel screws 10 3x 3x 11 12 12 mm...

Страница 62: ...heses equally around the circumference of the pool Screw the L brackets into place 12mm from the top of the wooden structure stainless steel screws 4x30mm 17 12 mm 4x30mm CONTINUE page 69 The profile...

Страница 63: ...20 IPE 120 IPE 120 IPE 120 IPE 120 M12 x 40 M12 x 40 CONCRETE FLOOR Metal mesh 150x150x6x6 Concrete C25 30 18 cm Metal supports anti bacterial felt Plastic foil Above ground 6 cm inground ground groun...

Страница 64: ...oden structure in order to support these wooden borders It is necessary to use the correct planks in the correct order The swimming pool planks are provided with tongue and or grooves This ensures a p...

Страница 65: ...V2 W2 W1 W1 W2 V2 V1 Y2 Y1 X1 Z2 Z1 X2 X2 E X TE RI E U R E X TE RI E U R E X TE RI E U R I N T E R I E U R 1x 1x 1x 1x V1 V2 W1 W2 E X TE R I EU R E X TE R I EU R I N TE R I E U R 1x 1x 1x 1x 1x 1x...

Страница 66: ...C E Skimmer 1 2 3 4 D D D D 7x110mm M12 9 8 7 6 5 4 3 2 1 10 9 8 7 6 5 4 3 2 1 A A INLET INLET tip It is advisable to place the opening of the skimmer towards the prevailing wind direction This way fl...

Страница 67: ...0 4x 4x 9 12 7x110mm 12 mm 8x35mm 8x35mm 12 mm 90 Before placing the last layer the skimmer must be fitted between the planks The skimmer is fixed to the planks in the corners of the skimmer no pre ma...

Страница 68: ...coverplanks Remark clean the hardwood coverplanks before installation The borders are supported by L brackets Distribute theses equally around the circumference of the pool Screw the L brackets into p...

Страница 69: ...prevent folds in the liner Unfold the liner in such a way that the corners of the liner correspond with the corners of the pool Slide the edge of the liner into the Hung profiles ensuring that the co...

Страница 70: ...closed filter installation manual The monobloc filter is the appliance that takes care of the water treatment Filter pump and 6 way valve are all grouped in one appliance The most important parts of t...

Страница 71: ...ter first with gravel 3 5mm and then with sand 0 4 0 8mm The sand has an unlimited lifetime and only need to be topped up in case sand is lost Mark the level of sand gravel to be able to refill the fi...

Страница 72: ...of the hose Connect the fittings to the connector pieces and then tighten the fittings see the technical section 2 4 3 Connections _____ important To connect the water return device to the pump you ne...

Страница 73: ...king you are advised to apply Teflon to the thread or nipple in order to main tain it s waterproof capacity Taps Prepare the connectors to the tap in the same way as the couplings but in both directio...

Страница 74: ...position Function 1 FILTER Place the valve in the filter position The water comes out of the pump and is filtered by streaming downwards through the sand and then returning the pool Do not filter for...

Страница 75: ...of problems are mentioned that can occur along with the suggested remedies In case you can t solve the problem yourself please contact the sales representative for your pool _____ 2 5 Finishing touche...

Страница 76: ...inside of the coping 2 Bore out two holes for the holders with a brace diameter 50 mm 80 mm 50 mm 3 Place the two holders and screw them with the screws which were also supplied 4 Place the rubber pi...

Страница 77: ...de of the pool where the skimmer and water return device are situated The filter unit is also placed inside this See 4 Safety Follow the instructions in the enclosed drawing Screw one side to the pool...

Страница 78: ...table in the manual provided The underwater lamp must not be switched on unless it is completely submersed under water _____ 3 6 Underwater light LED Underwater light LED 35W 12V 16 colours adjustabl...

Страница 79: ...before opening the tech nical room Only then can you access the area Plugs are not accessible in this case due to the danger of electrocution _____ 4 1 General The borders are not intended to run on n...

Страница 80: ...n the bottom of the pool the vacuum cleaner is attached to the brush telescopic stick and is connected to the skimmer _____ 5 3 Technical installation Check the pump once a year to ensure good perform...

Страница 81: ...erioration due to dry use of the pump Deterioration due to abrasion or corrosion Deterioration due to a wrong connection Materials dismantled or repaired by a third party Breakage of pieces base of th...

Страница 82: ...82...

Страница 83: ...83...

Страница 84: ...Covimex nv Koolskampstraat 21 B 8830 Gits T 32 0 51 21 13 48 F 32 0 51 21 07 64 info gardipool be www gardipool com V1407201420...

Отзывы: