2
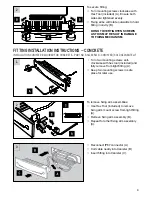
To secure fitting:
Turn mounting screws clockwise with
Hex Tool (included) (A). Ensure both
sides are tightened evenly.
Fixing arms will rotate outwards to hold
fitting in cavity (B).
DO NOT OVERTIGHTEN SCREWS
AS THIS MAY RESULT IN DAMAGE
TO FIXING MECHANISM.
4
1
2
3
FITTING INSTALLATION INSTRUCTIONS — CONCRETE
INSTALLATION CANISTER REQUIRED FOR CONCRETE— PART NO. GSLLRC5210 - CANISTER (SOLD SEPARATELY)
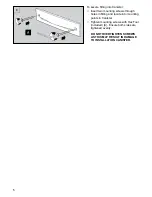
Turn two mounting screws anti-
clockwise with hex tool (included) and
fully remove from light fitting (A).
Keep two mounting screws in safe
place for later use.
To remove fixing arm assemblies:
Use Hex Tool (included) to remove
fixing arm mount screw from light fitting
(A).
Remove fixing arm assembly (B).
Repeat for other fixing arm assembly
(C).
Reconnect IP67 connector (A).
Coil cable neatly into Canister (B).
Insert fitting into Canister (C).


